
:max_bytes(150000):strip_icc():format(webp)/GettyImages-545995058-58ed21243df78cadab023f3c.jpg)
Updated What Role Does Layering Play in Coherent Sound Production for 2024
What Role Does Layering Play in Coherent Sound Production?
Edit & Create Your VIdeo with Filmora
An easy yet powerful editor
Numerous effects to choose from
Detailed tutorials provided by the official channel
To enhance the audio quality in any media file, you require a unique feature. In movies and concerts, the background music is heavier at times, the speaker volume suppresses automatically because of these interrupted soundtracks. Audio ducking plays a vital role in extracting the speaker’s voice from the combinations of audio tracks. The audio ducking satisfies the needs when playing the audio tracks.
In this article, you will learn about the functionalities of audio ducking and its importance in playing the audio tracks better. Here, you will identify the areas that require this audio ducking process. The newbie and the professionals can use the appropriate tools to insert the audio ducking features in the desired audio files.

In this article
01 [Audio ducking: Introduction ](#Part 1)
02 [Does audio ducking help sound better?](#Part 2)
03 [Where can I use audio ducking?](#Part 3)
04 [How about disabling Audio ducking?](#Part 4)
Part 1 Audio ducking: Introduction
Many sound professionals had encountered this term audio ducking. It decreases a specific volume signal for a duration and boosts up the other sound waves to enhance clarity while playing the media files. The speaker’s volume mostly hides when there is a background music track that accompanies it.
Audio ducking plays a vital role in extracting the desired sound waves from a mixture of audio signals to avoid these overlay issues. The process of temporarily lowering the volume levels for audio waves to obtain overall sound quality. This option makes your media files sound better when playing them. Here, you will be learning the effective usage of audio ducking by the video editors to implement it rightly on the soundtracks to obtain great results. Find out when you can use this option on your music tracks and choose relevant tools to establish it.

Part 2 Does audio ducking help sound better?
Yes, the audio ducking helps the audio files sound better by playing the essential soundtracks at maximum volume and suppressing the background sounds precisely. There are options to enable the auto-ducking feature in a few applications that trigger the ducking process automatically when required. A built-in program helps to complete this process efficiently. The term duck refers to leave suddenly, the audio ducking means compelling the audio tracks to sound with different volume levels to enhance the clarity.
Using this feature, you can help the audience to listen to specific soundtracks clearly for better understanding. You can focus on a particular sound signal and increase its volume for assigned durations enables the listeners to follow up the audio precisely—the audio ducking aids in playing the audio files with better sound effects and emphasizes the clarity factors.
Part 3 Where can I use audio ducking?
There are surplus collections of applications available to implement audio ducking in your sound files in the digital space. In the below discussion, get some valuable facts about the reliable audio ducking software.
● Studio
Here comes another video editor software that embeds the audio ducking functionality precisely on the videos files for effective results. Install the tool and upload the audio file to enable the audio ducking using this studio software. An audio ducking icon is displayed at its interface to adjust the sound controls as per your needs. You must assign values for four attributes related to the ducking process.
Set the ducking level that determines how low the sound signal must be reduced. In the threshold parameter, you can assign the maximum and minimum volumes that can be adjusted while embedding this ducking effect. Next, the Attack module determines the duration essential to reduce the volume while implementing the ducking level settings. Finally, in the Decay option, choose the time value that takes the volume controls to restore its original values. Use the Studio to precisely working with the sound values to embed the ducking features on the soundtracks.

3.1 For professional people: Adobe premiere pro
The professional video editors choose Adobe Premiere Pro to satisfy their needs efficiently. It is an advanced platform that refines every element to obtain the desired effects on the media files. This software aids to make miracles on the audio and video files. The user interface is simple yet carries intellectual modules to work with limitless imaginations. This editor strives to bring aesthetic looks to the videos and reshapes the audio signals as per the requirements. This program is exclusively for professional editors whose conditions are beyond the ocean. Adobe Premiere Pro meets all the editors’ needs and fulfills them with stunning effects undoubtedly.

It is enough to enable the audio ducking option in the Adobe Premiere Pro if you set the perfect ducking parameters for the uploaded audio files. To start with, install the app and insert the audio files into the timeline of Adobe Premiere Pro. Choose the clips and assign the audio type in the Essential Sound Panel. Next, adjust the loudness level according to the assigned audio type. The Adobe Premiere Pro interface discloses the Ducking settings and chooses the signal duration that requires the ducking effects. Adjust the Sensitivity, the volume level details, and time of fades between audio levels. Finally, generate keyframes to save this setting for the audio files. To modify this setting, you must create a new keyframe. When you generate a new keyframe, the older ducking parameters deletes automatically and aids in building new values to it.
3.2 For beginners and most of us: Filmora
The newbie users can opt for Filmora to set the ducking parameters for desired audio files. It has powerful controls to redefine the audio signals in the media files. Even a beginner can master this platform in a short span. The Filmora is an exclusive video editor that aids the editors to work beyond imagination. The limitless features assist in adding quality to the audio files that makes it sound better while playing them on any media player.
Wondershare Filmora
Get started easily with Filmora’s powerful performance, intuitive interface, and countless effects!
Try It Free Try It Free Try It Free Learn More about Filmora >>

The features of the Filmora application
- It has a simple interface and assists in flawless imports and exports of the media files to any desired storage space.
- The Audio Adjust option brings an effective ducking effect on the audio files efficiently.
- This app works on every detail of the sound parameters to enhance its overall output.
- There are two separate versions of this tool to support Windows and Mac systems.
- The in-built tutorials help the newbie users to handle this program like a pro.
Apart from ducking options, you can discover a wide range of video edit features that impresses the users in no time.
To include the audio ducking feature, upload the media file and click the adjust audio option to efficiently work on the ducking parameters. Set the value according to your requirement and export it to the system drive for quick play.

3.3 For people who use the phone to edit video: Filmora
The Filmora is the phone version of Filmora. It is compatible with gadgets and helps you precisely work with video files. This tool is handy, and you can edit the media files whenever required. Using this app, you can trim, split, add transitions, and enable reverse footages on your media files in no time. The adjusted audio settings enable the users to assign values for ducking attributes to obtain efficient outcomes. Easy to use the program and positively impact the media files using this creative software Filmora.

Part 4 How about disabling Audio ducking?
Based on your needs, you can disable the audio ducking feature. It is enough to disable the toggle switch in the auto audio ducking option on your device. This makes the ducking process inactive with the media files. The audio ducking is necessary only for a few audio files like concerts, speech, movies where you will be having a mixture of many audio signals.
The ducking process alters the volume of the sound signals and increases the desired ones to enhance the clarity. This feature is not required in a few scenarios, and you can disable it from the settings option. According to the audio file type, decide whether you need a ducking process or not.
Wondershare Filmora
Get started easily with Filmora’s powerful performance, intuitive interface, and countless effects!
Try It Free Try It Free Try It Free Learn More >
AI Portrait – The best feature of Wondershare Filmora for gameplay editing
The AI Portrait is a new add-on in Wondershare Filmora. It can easily remove video backgrounds without using a green screen or chroma key, allowing you to add borders, glitch effects, pixelated, noise, or segmentation video effects.

Conclusion
Thus, you had a detailed discussion about Audio ducking. Choose the applications as per your needs and enable the ducking process efficiently. Select Adobe Premiere Pro or Filmora according to the requirements and follow the above procedure to enable this option. Connect with this article to explore the efficient ways to turn the ducking feature on your audio signal. Stay tuned for exciting facts about audio ducking features of video editors in detail.
To enhance the audio quality in any media file, you require a unique feature. In movies and concerts, the background music is heavier at times, the speaker volume suppresses automatically because of these interrupted soundtracks. Audio ducking plays a vital role in extracting the speaker’s voice from the combinations of audio tracks. The audio ducking satisfies the needs when playing the audio tracks.
In this article, you will learn about the functionalities of audio ducking and its importance in playing the audio tracks better. Here, you will identify the areas that require this audio ducking process. The newbie and the professionals can use the appropriate tools to insert the audio ducking features in the desired audio files.
In this article
01 [Audio ducking: Introduction ](#Part 1)
02 [Does audio ducking help sound better?](#Part 2)
03 [Where can I use audio ducking?](#Part 3)
04 [How about disabling Audio ducking?](#Part 4)
Part 1 Audio ducking: Introduction
Many sound professionals had encountered this term audio ducking. It decreases a specific volume signal for a duration and boosts up the other sound waves to enhance clarity while playing the media files. The speaker’s volume mostly hides when there is a background music track that accompanies it.
Audio ducking plays a vital role in extracting the desired sound waves from a mixture of audio signals to avoid these overlay issues. The process of temporarily lowering the volume levels for audio waves to obtain overall sound quality. This option makes your media files sound better when playing them. Here, you will be learning the effective usage of audio ducking by the video editors to implement it rightly on the soundtracks to obtain great results. Find out when you can use this option on your music tracks and choose relevant tools to establish it.
Part 2 Does audio ducking help sound better?
Yes, the audio ducking helps the audio files sound better by playing the essential soundtracks at maximum volume and suppressing the background sounds precisely. There are options to enable the auto-ducking feature in a few applications that trigger the ducking process automatically when required. A built-in program helps to complete this process efficiently. The term duck refers to leave suddenly, the audio ducking means compelling the audio tracks to sound with different volume levels to enhance the clarity.
Using this feature, you can help the audience to listen to specific soundtracks clearly for better understanding. You can focus on a particular sound signal and increase its volume for assigned durations enables the listeners to follow up the audio precisely—the audio ducking aids in playing the audio files with better sound effects and emphasizes the clarity factors.
Part 3 Where can I use audio ducking?
There are surplus collections of applications available to implement audio ducking in your sound files in the digital space. In the below discussion, get some valuable facts about the reliable audio ducking software.
● Studio
Here comes another video editor software that embeds the audio ducking functionality precisely on the videos files for effective results. Install the tool and upload the audio file to enable the audio ducking using this studio software. An audio ducking icon is displayed at its interface to adjust the sound controls as per your needs. You must assign values for four attributes related to the ducking process.
Set the ducking level that determines how low the sound signal must be reduced. In the threshold parameter, you can assign the maximum and minimum volumes that can be adjusted while embedding this ducking effect. Next, the Attack module determines the duration essential to reduce the volume while implementing the ducking level settings. Finally, in the Decay option, choose the time value that takes the volume controls to restore its original values. Use the Studio to precisely working with the sound values to embed the ducking features on the soundtracks.
3.1 For professional people: Adobe premiere pro
The professional video editors choose Adobe Premiere Pro to satisfy their needs efficiently. It is an advanced platform that refines every element to obtain the desired effects on the media files. This software aids to make miracles on the audio and video files. The user interface is simple yet carries intellectual modules to work with limitless imaginations. This editor strives to bring aesthetic looks to the videos and reshapes the audio signals as per the requirements. This program is exclusively for professional editors whose conditions are beyond the ocean. Adobe Premiere Pro meets all the editors’ needs and fulfills them with stunning effects undoubtedly.
It is enough to enable the audio ducking option in the Adobe Premiere Pro if you set the perfect ducking parameters for the uploaded audio files. To start with, install the app and insert the audio files into the timeline of Adobe Premiere Pro. Choose the clips and assign the audio type in the Essential Sound Panel. Next, adjust the loudness level according to the assigned audio type. The Adobe Premiere Pro interface discloses the Ducking settings and chooses the signal duration that requires the ducking effects. Adjust the Sensitivity, the volume level details, and time of fades between audio levels. Finally, generate keyframes to save this setting for the audio files. To modify this setting, you must create a new keyframe. When you generate a new keyframe, the older ducking parameters deletes automatically and aids in building new values to it.
3.2 For beginners and most of us: Filmora
The newbie users can opt for Filmora to set the ducking parameters for desired audio files. It has powerful controls to redefine the audio signals in the media files. Even a beginner can master this platform in a short span. The Filmora is an exclusive video editor that aids the editors to work beyond imagination. The limitless features assist in adding quality to the audio files that makes it sound better while playing them on any media player.
Wondershare Filmora
Get started easily with Filmora’s powerful performance, intuitive interface, and countless effects!
Try It Free Try It Free Try It Free Learn More about Filmora >>
The features of the Filmora application
- It has a simple interface and assists in flawless imports and exports of the media files to any desired storage space.
- The Audio Adjust option brings an effective ducking effect on the audio files efficiently.
- This app works on every detail of the sound parameters to enhance its overall output.
- There are two separate versions of this tool to support Windows and Mac systems.
- The in-built tutorials help the newbie users to handle this program like a pro.
Apart from ducking options, you can discover a wide range of video edit features that impresses the users in no time.
To include the audio ducking feature, upload the media file and click the adjust audio option to efficiently work on the ducking parameters. Set the value according to your requirement and export it to the system drive for quick play.
3.3 For people who use the phone to edit video: Filmora
The Filmora is the phone version of Filmora. It is compatible with gadgets and helps you precisely work with video files. This tool is handy, and you can edit the media files whenever required. Using this app, you can trim, split, add transitions, and enable reverse footages on your media files in no time. The adjusted audio settings enable the users to assign values for ducking attributes to obtain efficient outcomes. Easy to use the program and positively impact the media files using this creative software Filmora.
Part 4 How about disabling Audio ducking?
Based on your needs, you can disable the audio ducking feature. It is enough to disable the toggle switch in the auto audio ducking option on your device. This makes the ducking process inactive with the media files. The audio ducking is necessary only for a few audio files like concerts, speech, movies where you will be having a mixture of many audio signals.
The ducking process alters the volume of the sound signals and increases the desired ones to enhance the clarity. This feature is not required in a few scenarios, and you can disable it from the settings option. According to the audio file type, decide whether you need a ducking process or not.
Wondershare Filmora
Get started easily with Filmora’s powerful performance, intuitive interface, and countless effects!
Try It Free Try It Free Try It Free Learn More >
AI Portrait – The best feature of Wondershare Filmora for gameplay editing
The AI Portrait is a new add-on in Wondershare Filmora. It can easily remove video backgrounds without using a green screen or chroma key, allowing you to add borders, glitch effects, pixelated, noise, or segmentation video effects.
Conclusion
Thus, you had a detailed discussion about Audio ducking. Choose the applications as per your needs and enable the ducking process efficiently. Select Adobe Premiere Pro or Filmora according to the requirements and follow the above procedure to enable this option. Connect with this article to explore the efficient ways to turn the ducking feature on your audio signal. Stay tuned for exciting facts about audio ducking features of video editors in detail.
“Free Music Production Software: Top Picks for Windows/Mac Users “
13 Free Music Production Software for Windows/Mac/Online

Benjamin Arango
Mar 27, 2024• Proven solutions
13 Free Music Production Software for Windows/Mac/Online
Technology advances have spread through all fields of human activity, including music recording and development. The invention of music development tools has made it simpler for people engaged in the creation of music in one form or another.
Numerous applications for music development are on the market, and some are meant for musicians, and others are for educators and teachers. There is also a need to direct prospective customers to the right free music production software.
A comprehensive analysis of some of the best music development tools has been conducted to help you make the correct decision while you’re ready to purchase the app. This comprehensive Music Production Software Guide will provide solutions to many of your unanswered questions relating to the purchase of music production software.
- Part 1: Free Music Production Software for Windows
- Part 2: Free Music Production Software for Mac
- Part 3: Free Music Production Software Online
Part 1: Free Music Production Software for Windows
1. Audacity
The system for music development is not complete without an audio editor. Audacity is the best free music creation software available on the market. Audacity is open-source and extensive and provides a wide range of tools and effects for performing all audio editing and recording activities. It is created by a community of volunteers and provides regular notifications almost every month. It’s lightweight, safe, and intuitive enough to be used by novice music makers.
Pros
- It is open-source
- It can load VST plugins
Cons
- Only 32-bit plugins are allowed
- Limited features
2. Ardour
Ardour is a highly integrated program of music production that allows users to record and edit on Mac, Linux, and Windows operating systems. Ardour Music Production Software was created by integrating the efforts of the world’s skilled team, such as recording technicians, programmers, and musicians. Such experienced technicians make their concerted and thorough efforts to build the program. Ardour is one of the few applications in music production that respects honesty. The accessibility of this program allows app developers to concentrate on functionality that matters to consumers rather than to construct compelling apps for advertising purposes. This is a system that should be celebrated for its user-focused functionality.
Pros
- It has excellent user-friendliness
- It is available on Mac, Linux, and Windows
Cons
- It lacks a few integral features
- It is difficult to operate for people new to audio editing

3. Tracktion T7
The people at Tracktion seem to have reached a reasonably canny business model by launching older DAW versions for free and without anything removed.
The convention appears to make it possible to access the edition without charge of two iterations before the new one. You will not be provided with all new functionality, but you will receive an update every time the company updates its flagship DAW, which it does nearly every year.
The growing section is adjustable to match the workflow, and the bottom panel adjusts so that any parameters anywhere on the screen can be seen.
Pros
- It features an unlimited number of audio and MIDI tracks
- It is able to host multiple plugin formats
Cons
- It doesn’t provide all the features at once
- It does not support many plugins
4. LMMS
LMMS is a fully free music production software for windows for music development. It is an open-source and also a project platform for the community. LMMS is a cross-platform device app. It makes it easier to manufacture beats, particularly when many music production professionals have to manufacture quality music with their computers.
Thanks to the powerful sample, beat and melody design, mixing and synthetic sound processes, and many other features, the LMMS music production software provides high-quality audio output. The product also features playback tools, plugins, and samples to produce powerful, high-quality sound.
Pros
- It is compatible with Linux, Windows, and Mac
- Hydrogen project files and MIDI can be imported easily for editing
Cons
- It eats a lot of memory and requires a high-end device to support it
- Some users complained that understanding its working is difficult

5. Cakewalk
This is an exciting app for music production to purchase. It is a fantastic tech to invest in music production. Cakewalk Sonar Artist Software is one of Cakewalk Sonar Artist ‘s great productions. Cakewalk is known for an excellent GUI, an excellent mixing console, an excellent commercial radio system, and limitless MIDI tracks.
A good device to use as part of your instruments for the development of music is the Cakewalk Sonar Artist Music Production program. It stands out as a program packed with excellent features amongst its counterparts. And the app is unmatched in the area of apps.
Pros
- You can share music compilation directly to social media
- You can easily add effects to your tracks
Cons
- It is priced, very high
- One window interface makes it hectic

6. Music Maker by Magix
This app is a special program for sound engineers, skilled musicians, and accomplished music producers, developed by US Magix Entertainment. It offers an excellent forum for creative music development in music production professionals.
In reality, the software for music production is excellent software for the Music Maker by Magix. In the field of music post-production and music mastering, mixing and arrangement, recording, and more, the software achieved remarkable breakthroughs. Thanks to the successful combination of a technical device and highly flexible workflow, the Music Maker by Magix has achieved this groundbreaking success.
With creative algorithm and superb plugin effects, the Music Maker by Magix program enables music manufacturers to develop their ideas in line with the highest quality in this industry.
Pros
- It is great for EDM producers
Cons
- It is not suitable for newbies
- The GUI feels a bit cluttered
Part 2: Free Music Production Software for Mac
7. Garageband
This is a music development studio app that is designed to function on Mac. It is a great free music production software for Mac. This software has a full sound collection, which includes virtual instruments, voice, and guitar preset.
GarageBand is a well-known app for music development and is an excellent tool for music beginners. Many people have chosen GarageBand because it does not match the ease and ease of use for recording purposes in particular.
The user-friendly interface makes you easy to create music with a more unobstructed view of what you’re recording. Apps from GarageBand captured the attention of others because of their ease-to-use and user-friendliness.
Pros
- The software offers some nicely packaged preset for vocal and guitar recording
- Productive workflow
Cons
- It has limited plugins
- It is only supported for Mac platforms

8. Ableton Live
The Ableton Live 10 Suite is a dynamic and comprehensive program for the creation and performance of musical recordings.
An essential feature of this software is that it allows you to work on your time-based workflow without affecting the live session. This means that the software gives you a rare chance to get involved with the workflow without stopping live performance.
The Multitrack Recording Technology of Ableton Live10 Suite allows music producers to adjust the speed and pacing of any audio during the recording. To make these adjustments, you don’t have to pause the recording. This is one of the striking characteristics which makes this product a good option for all.
Pros
- Adjusting the speed and pace of audio is a delight
- Sophisticated MIDI/audio routing capabilities
Cons
- It has a traditional design
- Not enough updates to fix the buggy features

9. Boom 3D
Boom 3D for Mac & Windows is an award-winning pro sound improvement software designed to play your media content on any and all of your devices, phones, or streaming services with amazing 3D effects. No costly headphones or sound boosters will be needed to make your music feel like it! Designed in a new immersive 3D surround sound technology, Boom 3D redefines how people listen to music, watch films, or play games with some headphones on their devices. 3D sound provides the option to check the LFE (subwoofer), and the audio intensity of each Virtual 3D Surround audio system speaker.
Pros
- It comes with loads of content
- Audio quality can be enhanced
Cons
- The design is not suitable for everybody
- It does not have a Linux version
10. Mixxx
For beginners, Mixxx is just another great device. This is also one of the best free music production software downloads for your music. This software supports all Mac, Windows, and Linux platforms.
The application provides you with a DJ-mixing environment and supports all standard formats such as Mp3 and many other formats.
Pros
- It is a great app for beginners
- Supported by Mac, Windows, and Linux
Cons
- It doesn’t support many plugins
- GUI isn’t that great

Part 3: Free Music Production Software Online
11. Soundation
Soundation is a platform that provides free music production software online only capabilities. The free version and three paid versions are offered. You can use this to build your tracks unless you have the resources to do so if you need a web-based music maker and editor.
If you pay, even after you have made your music, you can always cancel. Remember first to save them to your hard drive. If you need paid characteristics, pay for the monthly plan again through PayPal, and you have to use it for a month.
Pros
- Great SSL-modelled mixer
- You can use its devices as a plugin
Cons
- It works only online

12. Audiotool
Audiotool is a popular app for music production hosted online and can be used without installation from inside your browser. It uses a cloud-based network to store all your music and files wherever you are. It is also confirmed that you will share music and tracks directly with YouTube, SoundCloud, and Facebook on its own publishing site. They have premium releases from Loopmasters and some fantastic online VSTs, for example, Heisenberg, Machiniste, Bassline, and Beatbox 8 & 9.
Pros
- No installation needed
- You can directly share it to your social media
Cons
- It works only online
- No upgrades

13. Soundtrap
Soundtrap is not only an online music studio but a training site for students and instructors. The STEAM Curriculum is an online learning resource that helps students to follow music and podcasts, incorporated into the Web app. As we mentioned earlier, in addition to the online Web App, you can also use it on different devices, share it with other users, and work in innovative projects for your music.
The interface is simple, easy to use, and easy to understand. It is simply an instrument for innovation; you don’t have to learn how to apply VST or any other technical elements to music creation. You can also record your MIDI instruments directly from your machine or device’s mic.
Pros
- It provides a great platform for teachers to teach their students
- It is very easy to use
Cons
- It only has a limited number of plugins
- It cannot be used professionally

Conclusion
If you make music on a computer, the most important resource in your artistic arsenal is your DAW; in your home recording system, you ‘re probably going to have the MIDI keyboard, audio interface, studio monitor speakers, and maybe a microphone or two. But your program is at the core of it all. Not everyone can afford expensive DAWs, but one must not worry as free music production software are present to aid us.
It is important to have a DAW with which you are pleased and, perhaps more importantly, a DAW, which allows you to turn your ideas into music as quickly and painlessly as possible. So make sure you choose the best one for you according to your needs. Hopefully, this guide will aid you!


Benjamin Arango
Benjamin Arango is a writer and a lover of all things video.
Follow @Benjamin Arango
Benjamin Arango
Mar 27, 2024• Proven solutions
13 Free Music Production Software for Windows/Mac/Online
Technology advances have spread through all fields of human activity, including music recording and development. The invention of music development tools has made it simpler for people engaged in the creation of music in one form or another.
Numerous applications for music development are on the market, and some are meant for musicians, and others are for educators and teachers. There is also a need to direct prospective customers to the right free music production software.
A comprehensive analysis of some of the best music development tools has been conducted to help you make the correct decision while you’re ready to purchase the app. This comprehensive Music Production Software Guide will provide solutions to many of your unanswered questions relating to the purchase of music production software.
- Part 1: Free Music Production Software for Windows
- Part 2: Free Music Production Software for Mac
- Part 3: Free Music Production Software Online
Part 1: Free Music Production Software for Windows
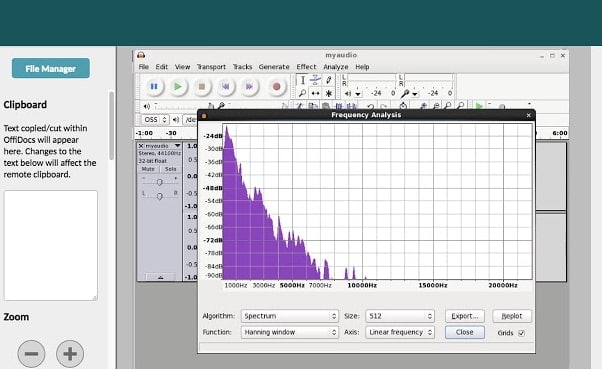
1. Audacity
The system for music development is not complete without an audio editor. Audacity is the best free music creation software available on the market. Audacity is open-source and extensive and provides a wide range of tools and effects for performing all audio editing and recording activities. It is created by a community of volunteers and provides regular notifications almost every month. It’s lightweight, safe, and intuitive enough to be used by novice music makers.
Pros
- It is open-source
- It can load VST plugins
Cons
- Only 32-bit plugins are allowed
- Limited features
2. Ardour
Ardour is a highly integrated program of music production that allows users to record and edit on Mac, Linux, and Windows operating systems. Ardour Music Production Software was created by integrating the efforts of the world’s skilled team, such as recording technicians, programmers, and musicians. Such experienced technicians make their concerted and thorough efforts to build the program. Ardour is one of the few applications in music production that respects honesty. The accessibility of this program allows app developers to concentrate on functionality that matters to consumers rather than to construct compelling apps for advertising purposes. This is a system that should be celebrated for its user-focused functionality.
Pros
- It has excellent user-friendliness
- It is available on Mac, Linux, and Windows
Cons
- It lacks a few integral features
- It is difficult to operate for people new to audio editing
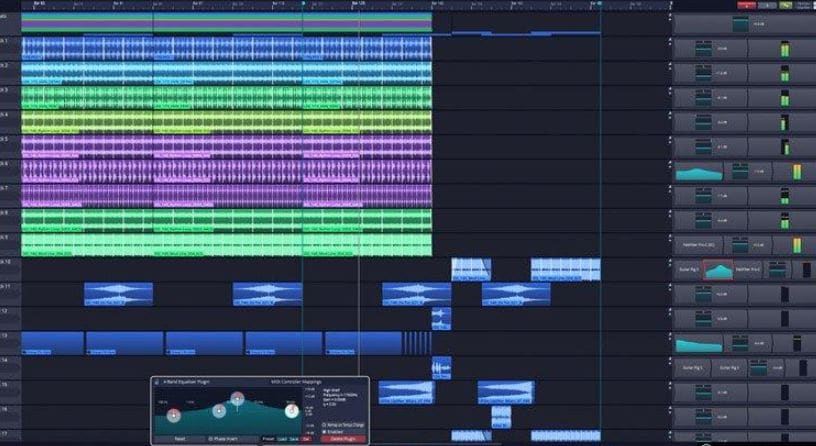
3. Tracktion T7
The people at Tracktion seem to have reached a reasonably canny business model by launching older DAW versions for free and without anything removed.
The convention appears to make it possible to access the edition without charge of two iterations before the new one. You will not be provided with all new functionality, but you will receive an update every time the company updates its flagship DAW, which it does nearly every year.
The growing section is adjustable to match the workflow, and the bottom panel adjusts so that any parameters anywhere on the screen can be seen.
Pros
- It features an unlimited number of audio and MIDI tracks
- It is able to host multiple plugin formats
Cons
- It doesn’t provide all the features at once
- It does not support many plugins
4. LMMS
LMMS is a fully free music production software for windows for music development. It is an open-source and also a project platform for the community. LMMS is a cross-platform device app. It makes it easier to manufacture beats, particularly when many music production professionals have to manufacture quality music with their computers.
Thanks to the powerful sample, beat and melody design, mixing and synthetic sound processes, and many other features, the LMMS music production software provides high-quality audio output. The product also features playback tools, plugins, and samples to produce powerful, high-quality sound.
Pros
- It is compatible with Linux, Windows, and Mac
- Hydrogen project files and MIDI can be imported easily for editing
Cons
- It eats a lot of memory and requires a high-end device to support it
- Some users complained that understanding its working is difficult
5. Cakewalk
This is an exciting app for music production to purchase. It is a fantastic tech to invest in music production. Cakewalk Sonar Artist Software is one of Cakewalk Sonar Artist ‘s great productions. Cakewalk is known for an excellent GUI, an excellent mixing console, an excellent commercial radio system, and limitless MIDI tracks.
A good device to use as part of your instruments for the development of music is the Cakewalk Sonar Artist Music Production program. It stands out as a program packed with excellent features amongst its counterparts. And the app is unmatched in the area of apps.
Pros
- You can share music compilation directly to social media
- You can easily add effects to your tracks
Cons
- It is priced, very high
- One window interface makes it hectic
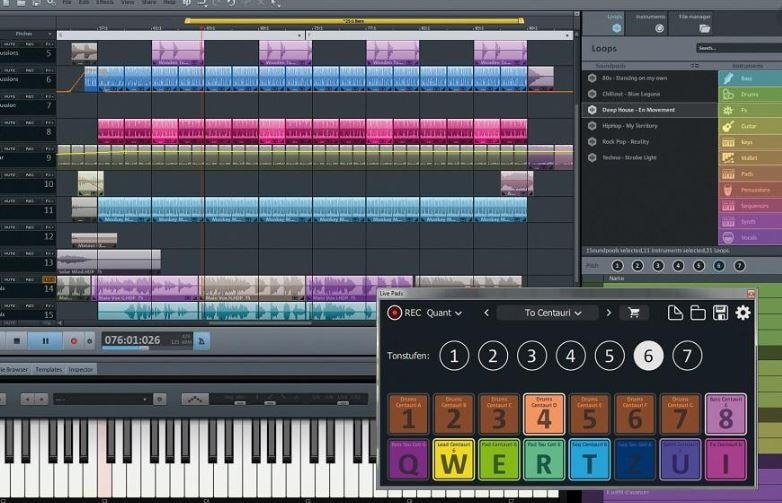
6. Music Maker by Magix
This app is a special program for sound engineers, skilled musicians, and accomplished music producers, developed by US Magix Entertainment. It offers an excellent forum for creative music development in music production professionals.
In reality, the software for music production is excellent software for the Music Maker by Magix. In the field of music post-production and music mastering, mixing and arrangement, recording, and more, the software achieved remarkable breakthroughs. Thanks to the successful combination of a technical device and highly flexible workflow, the Music Maker by Magix has achieved this groundbreaking success.
With creative algorithm and superb plugin effects, the Music Maker by Magix program enables music manufacturers to develop their ideas in line with the highest quality in this industry.
Pros
- It is great for EDM producers
Cons
- It is not suitable for newbies
- The GUI feels a bit cluttered
Part 2: Free Music Production Software for Mac
7. Garageband
This is a music development studio app that is designed to function on Mac. It is a great free music production software for Mac. This software has a full sound collection, which includes virtual instruments, voice, and guitar preset.
GarageBand is a well-known app for music development and is an excellent tool for music beginners. Many people have chosen GarageBand because it does not match the ease and ease of use for recording purposes in particular.
The user-friendly interface makes you easy to create music with a more unobstructed view of what you’re recording. Apps from GarageBand captured the attention of others because of their ease-to-use and user-friendliness.
Pros
- The software offers some nicely packaged preset for vocal and guitar recording
- Productive workflow
Cons
- It has limited plugins
- It is only supported for Mac platforms
8. Ableton Live
The Ableton Live 10 Suite is a dynamic and comprehensive program for the creation and performance of musical recordings.
An essential feature of this software is that it allows you to work on your time-based workflow without affecting the live session. This means that the software gives you a rare chance to get involved with the workflow without stopping live performance.
The Multitrack Recording Technology of Ableton Live10 Suite allows music producers to adjust the speed and pacing of any audio during the recording. To make these adjustments, you don’t have to pause the recording. This is one of the striking characteristics which makes this product a good option for all.
Pros
- Adjusting the speed and pace of audio is a delight
- Sophisticated MIDI/audio routing capabilities
Cons
- It has a traditional design
- Not enough updates to fix the buggy features
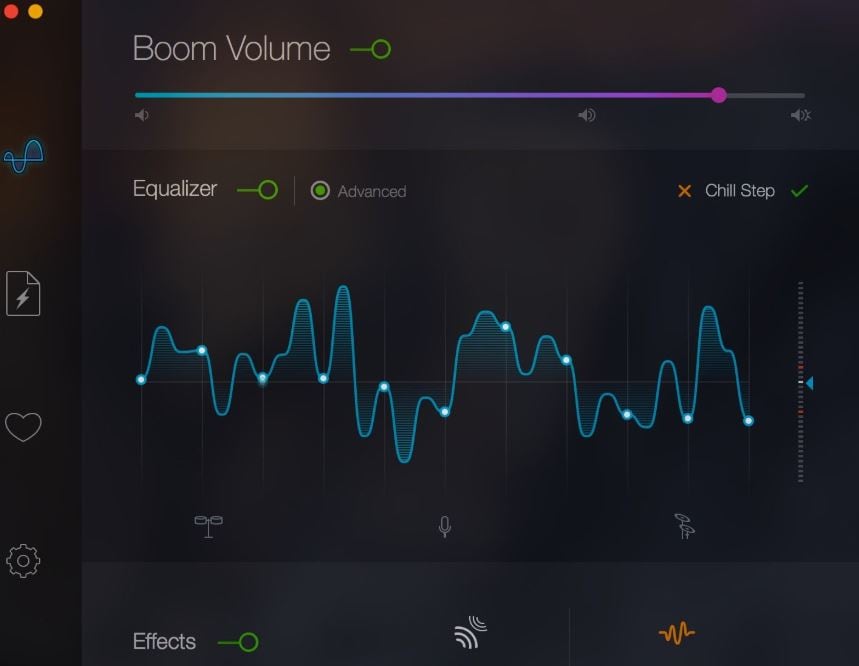
9. Boom 3D
Boom 3D for Mac & Windows is an award-winning pro sound improvement software designed to play your media content on any and all of your devices, phones, or streaming services with amazing 3D effects. No costly headphones or sound boosters will be needed to make your music feel like it! Designed in a new immersive 3D surround sound technology, Boom 3D redefines how people listen to music, watch films, or play games with some headphones on their devices. 3D sound provides the option to check the LFE (subwoofer), and the audio intensity of each Virtual 3D Surround audio system speaker.
Pros
- It comes with loads of content
- Audio quality can be enhanced
Cons
- The design is not suitable for everybody
- It does not have a Linux version
10. Mixxx
For beginners, Mixxx is just another great device. This is also one of the best free music production software downloads for your music. This software supports all Mac, Windows, and Linux platforms.
The application provides you with a DJ-mixing environment and supports all standard formats such as Mp3 and many other formats.
Pros
- It is a great app for beginners
- Supported by Mac, Windows, and Linux
Cons
- It doesn’t support many plugins
- GUI isn’t that great
Part 3: Free Music Production Software Online
11. Soundation
Soundation is a platform that provides free music production software online only capabilities. The free version and three paid versions are offered. You can use this to build your tracks unless you have the resources to do so if you need a web-based music maker and editor.
If you pay, even after you have made your music, you can always cancel. Remember first to save them to your hard drive. If you need paid characteristics, pay for the monthly plan again through PayPal, and you have to use it for a month.
Pros
- Great SSL-modelled mixer
- You can use its devices as a plugin
Cons
- It works only online
12. Audiotool
Audiotool is a popular app for music production hosted online and can be used without installation from inside your browser. It uses a cloud-based network to store all your music and files wherever you are. It is also confirmed that you will share music and tracks directly with YouTube, SoundCloud, and Facebook on its own publishing site. They have premium releases from Loopmasters and some fantastic online VSTs, for example, Heisenberg, Machiniste, Bassline, and Beatbox 8 & 9.
Pros
- No installation needed
- You can directly share it to your social media
Cons
- It works only online
- No upgrades
13. Soundtrap
Soundtrap is not only an online music studio but a training site for students and instructors. The STEAM Curriculum is an online learning resource that helps students to follow music and podcasts, incorporated into the Web app. As we mentioned earlier, in addition to the online Web App, you can also use it on different devices, share it with other users, and work in innovative projects for your music.
The interface is simple, easy to use, and easy to understand. It is simply an instrument for innovation; you don’t have to learn how to apply VST or any other technical elements to music creation. You can also record your MIDI instruments directly from your machine or device’s mic.
Pros
- It provides a great platform for teachers to teach their students
- It is very easy to use
Cons
- It only has a limited number of plugins
- It cannot be used professionally
Conclusion
If you make music on a computer, the most important resource in your artistic arsenal is your DAW; in your home recording system, you ‘re probably going to have the MIDI keyboard, audio interface, studio monitor speakers, and maybe a microphone or two. But your program is at the core of it all. Not everyone can afford expensive DAWs, but one must not worry as free music production software are present to aid us.
It is important to have a DAW with which you are pleased and, perhaps more importantly, a DAW, which allows you to turn your ideas into music as quickly and painlessly as possible. So make sure you choose the best one for you according to your needs. Hopefully, this guide will aid you!
Benjamin Arango
Benjamin Arango is a writer and a lover of all things video.
Follow @Benjamin Arango
Benjamin Arango
Mar 27, 2024• Proven solutions
13 Free Music Production Software for Windows/Mac/Online
Technology advances have spread through all fields of human activity, including music recording and development. The invention of music development tools has made it simpler for people engaged in the creation of music in one form or another.
Numerous applications for music development are on the market, and some are meant for musicians, and others are for educators and teachers. There is also a need to direct prospective customers to the right free music production software.
A comprehensive analysis of some of the best music development tools has been conducted to help you make the correct decision while you’re ready to purchase the app. This comprehensive Music Production Software Guide will provide solutions to many of your unanswered questions relating to the purchase of music production software.
- Part 1: Free Music Production Software for Windows
- Part 2: Free Music Production Software for Mac
- Part 3: Free Music Production Software Online
Part 1: Free Music Production Software for Windows
1. Audacity
The system for music development is not complete without an audio editor. Audacity is the best free music creation software available on the market. Audacity is open-source and extensive and provides a wide range of tools and effects for performing all audio editing and recording activities. It is created by a community of volunteers and provides regular notifications almost every month. It’s lightweight, safe, and intuitive enough to be used by novice music makers.
Pros
- It is open-source
- It can load VST plugins
Cons
- Only 32-bit plugins are allowed
- Limited features
2. Ardour
Ardour is a highly integrated program of music production that allows users to record and edit on Mac, Linux, and Windows operating systems. Ardour Music Production Software was created by integrating the efforts of the world’s skilled team, such as recording technicians, programmers, and musicians. Such experienced technicians make their concerted and thorough efforts to build the program. Ardour is one of the few applications in music production that respects honesty. The accessibility of this program allows app developers to concentrate on functionality that matters to consumers rather than to construct compelling apps for advertising purposes. This is a system that should be celebrated for its user-focused functionality.
Pros
- It has excellent user-friendliness
- It is available on Mac, Linux, and Windows
Cons
- It lacks a few integral features
- It is difficult to operate for people new to audio editing
3. Tracktion T7
The people at Tracktion seem to have reached a reasonably canny business model by launching older DAW versions for free and without anything removed.
The convention appears to make it possible to access the edition without charge of two iterations before the new one. You will not be provided with all new functionality, but you will receive an update every time the company updates its flagship DAW, which it does nearly every year.
The growing section is adjustable to match the workflow, and the bottom panel adjusts so that any parameters anywhere on the screen can be seen.
Pros
- It features an unlimited number of audio and MIDI tracks
- It is able to host multiple plugin formats
Cons
- It doesn’t provide all the features at once
- It does not support many plugins
4. LMMS
LMMS is a fully free music production software for windows for music development. It is an open-source and also a project platform for the community. LMMS is a cross-platform device app. It makes it easier to manufacture beats, particularly when many music production professionals have to manufacture quality music with their computers.
Thanks to the powerful sample, beat and melody design, mixing and synthetic sound processes, and many other features, the LMMS music production software provides high-quality audio output. The product also features playback tools, plugins, and samples to produce powerful, high-quality sound.
Pros
- It is compatible with Linux, Windows, and Mac
- Hydrogen project files and MIDI can be imported easily for editing
Cons
- It eats a lot of memory and requires a high-end device to support it
- Some users complained that understanding its working is difficult
5. Cakewalk
This is an exciting app for music production to purchase. It is a fantastic tech to invest in music production. Cakewalk Sonar Artist Software is one of Cakewalk Sonar Artist ‘s great productions. Cakewalk is known for an excellent GUI, an excellent mixing console, an excellent commercial radio system, and limitless MIDI tracks.
A good device to use as part of your instruments for the development of music is the Cakewalk Sonar Artist Music Production program. It stands out as a program packed with excellent features amongst its counterparts. And the app is unmatched in the area of apps.
Pros
- You can share music compilation directly to social media
- You can easily add effects to your tracks
Cons
- It is priced, very high
- One window interface makes it hectic
6. Music Maker by Magix
This app is a special program for sound engineers, skilled musicians, and accomplished music producers, developed by US Magix Entertainment. It offers an excellent forum for creative music development in music production professionals.
In reality, the software for music production is excellent software for the Music Maker by Magix. In the field of music post-production and music mastering, mixing and arrangement, recording, and more, the software achieved remarkable breakthroughs. Thanks to the successful combination of a technical device and highly flexible workflow, the Music Maker by Magix has achieved this groundbreaking success.
With creative algorithm and superb plugin effects, the Music Maker by Magix program enables music manufacturers to develop their ideas in line with the highest quality in this industry.
Pros
- It is great for EDM producers
Cons
- It is not suitable for newbies
- The GUI feels a bit cluttered
Part 2: Free Music Production Software for Mac
7. Garageband
This is a music development studio app that is designed to function on Mac. It is a great free music production software for Mac. This software has a full sound collection, which includes virtual instruments, voice, and guitar preset.
GarageBand is a well-known app for music development and is an excellent tool for music beginners. Many people have chosen GarageBand because it does not match the ease and ease of use for recording purposes in particular.
The user-friendly interface makes you easy to create music with a more unobstructed view of what you’re recording. Apps from GarageBand captured the attention of others because of their ease-to-use and user-friendliness.
Pros
- The software offers some nicely packaged preset for vocal and guitar recording
- Productive workflow
Cons
- It has limited plugins
- It is only supported for Mac platforms
8. Ableton Live
The Ableton Live 10 Suite is a dynamic and comprehensive program for the creation and performance of musical recordings.
An essential feature of this software is that it allows you to work on your time-based workflow without affecting the live session. This means that the software gives you a rare chance to get involved with the workflow without stopping live performance.
The Multitrack Recording Technology of Ableton Live10 Suite allows music producers to adjust the speed and pacing of any audio during the recording. To make these adjustments, you don’t have to pause the recording. This is one of the striking characteristics which makes this product a good option for all.
Pros
- Adjusting the speed and pace of audio is a delight
- Sophisticated MIDI/audio routing capabilities
Cons
- It has a traditional design
- Not enough updates to fix the buggy features
9. Boom 3D
Boom 3D for Mac & Windows is an award-winning pro sound improvement software designed to play your media content on any and all of your devices, phones, or streaming services with amazing 3D effects. No costly headphones or sound boosters will be needed to make your music feel like it! Designed in a new immersive 3D surround sound technology, Boom 3D redefines how people listen to music, watch films, or play games with some headphones on their devices. 3D sound provides the option to check the LFE (subwoofer), and the audio intensity of each Virtual 3D Surround audio system speaker.
Pros
- It comes with loads of content
- Audio quality can be enhanced
Cons
- The design is not suitable for everybody
- It does not have a Linux version
10. Mixxx
For beginners, Mixxx is just another great device. This is also one of the best free music production software downloads for your music. This software supports all Mac, Windows, and Linux platforms.
The application provides you with a DJ-mixing environment and supports all standard formats such as Mp3 and many other formats.
Pros
- It is a great app for beginners
- Supported by Mac, Windows, and Linux
Cons
- It doesn’t support many plugins
- GUI isn’t that great
Part 3: Free Music Production Software Online
11. Soundation
Soundation is a platform that provides free music production software online only capabilities. The free version and three paid versions are offered. You can use this to build your tracks unless you have the resources to do so if you need a web-based music maker and editor.
If you pay, even after you have made your music, you can always cancel. Remember first to save them to your hard drive. If you need paid characteristics, pay for the monthly plan again through PayPal, and you have to use it for a month.
Pros
- Great SSL-modelled mixer
- You can use its devices as a plugin
Cons
- It works only online
12. Audiotool
Audiotool is a popular app for music production hosted online and can be used without installation from inside your browser. It uses a cloud-based network to store all your music and files wherever you are. It is also confirmed that you will share music and tracks directly with YouTube, SoundCloud, and Facebook on its own publishing site. They have premium releases from Loopmasters and some fantastic online VSTs, for example, Heisenberg, Machiniste, Bassline, and Beatbox 8 & 9.
Pros
- No installation needed
- You can directly share it to your social media
Cons
- It works only online
- No upgrades
13. Soundtrap
Soundtrap is not only an online music studio but a training site for students and instructors. The STEAM Curriculum is an online learning resource that helps students to follow music and podcasts, incorporated into the Web app. As we mentioned earlier, in addition to the online Web App, you can also use it on different devices, share it with other users, and work in innovative projects for your music.
The interface is simple, easy to use, and easy to understand. It is simply an instrument for innovation; you don’t have to learn how to apply VST or any other technical elements to music creation. You can also record your MIDI instruments directly from your machine or device’s mic.
Pros
- It provides a great platform for teachers to teach their students
- It is very easy to use
Cons
- It only has a limited number of plugins
- It cannot be used professionally
Conclusion
If you make music on a computer, the most important resource in your artistic arsenal is your DAW; in your home recording system, you ‘re probably going to have the MIDI keyboard, audio interface, studio monitor speakers, and maybe a microphone or two. But your program is at the core of it all. Not everyone can afford expensive DAWs, but one must not worry as free music production software are present to aid us.
It is important to have a DAW with which you are pleased and, perhaps more importantly, a DAW, which allows you to turn your ideas into music as quickly and painlessly as possible. So make sure you choose the best one for you according to your needs. Hopefully, this guide will aid you!
Benjamin Arango
Benjamin Arango is a writer and a lover of all things video.
Follow @Benjamin Arango
Removing Noise From Music Using Adobe Audition: Reviewing All Possibilities
With the invention of advanced editing software, the demands of content creation increased. Content creators outrun many challenges to create captivating content. One of these challenges is the maintenance of audio quality. Sometimes, singing a microphone is not enough, so post-creation methods do the trick. One of the ways of doing this is through Adobe Audition noise reduction.
There are multiple things to consider during audio editing at a professional level. For instance, microphone noise, humming, wind, hiss removal, and others. Adobe Audition removes background noises and nuisances that decline audio quality. In this article, you can read about Adobe Audition remove noise methods. In addition, some other tools are discussed for users’ ease and accessibility.
AI Noise Reduction A cross-platform for facilitating your video editing process by offering valuable benefits!
Free Download Free Download Learn More

Part 1: What Do You Know About Background Noise?
Background noise is anything that disturbs the pace of the video and diverts the viewer’s attention. It is the unwanted and unintended sound that takes up your audio. This may include someone chatting in the background, wind noise, and other noises. These factors decline and disrupt the clarity of audio. However, these elements can be managed through various tools and techniques to help creators.
Part 2: How to Remove Noise from Adobe Audition: A Comprehensive Review
Adobe Audition is a tool tailored to assist in audio editing tasks with precision. Users can create, merge, and mix different sound effects and be creative with them. It also has seamless support of Adobe After Effects and Adobe Stock for this purpose. Noise reduction Audition is one of its features that helps in cleaning and enhancing audio. It clears out any unnecessary background noises from any project.
In addition, the tool allows you to manage the audio levels for denoising. Along with manual settings, you can also add denoise effects to reduce background effects. You can manage high and low frequencies in Adobe Audition to remove noise. Upon editing this software, you can review the results afterward.
Different Methods of Audio Reduction in Adobe Audition
As a content creator, you must often manage dialogues and music within a video. Combining both can sometimes get the focus off actual dialogues. This can be due to many reasons; however, the solution is noise reduction in Audition. In this section, you can explore different methods to reduce noise:
1. Noise Reduction Effect
In this section, we are doing a noise reduction Audition manually. The process is straightforward, and here is a step-by-step guide to it:
Step 1: Upon importing your audio in Adobe Audition, navigate towards the top toolbar. Select the “Effects” tab and choose “Noise Reduction/Restoration” from the dropdown menu. As the menu expands further, select “Noise Reduction.”

Step 2: This will feature a Noise Reduction window on your screen. In this window, select the “Capture Noise Print” tab and adjust the Noise Reduction slider. Afterwards, press the play button on this window to listen to the audio and select “Apply.”

2. DeNoise Effect
This is the second method of Adobe Audition to remove noise. Accessing this option is almost the same, but settings may vary. Here is an instruction manual on how you can denoise in Audition:
Step 1: Once you have imported media into the timeline, reach the upper toolbar. Look for the “Effects” tab and proceed to the “Noise Reduction/Restoration” settings. From the expansion panel, choose the “DeNoise” option.

Step 2: After accessing the DeNoise window appearing on the screen, direct towards it. Then, change the position of the “Amount” slider and play your audio. Further, select the “Apply” button to add this effect to your audio.

3. Dynamic Effect
Another audio effect that you can apply and adjust in the same manner is the dynamic effect. Follow the steps given below to achieve this effect:
Step 1: After selecting the “Audio” tab, choose “Amplitude and Compression” from the dropdown menu. Expand this option and select “Dynamics” from the expansion menu.

Step 2: From the Dynamics window, expand the “Preset” option and set it to “Default.” Further, activate the “AutoGate” option and change the “Threshold” value. Then, click “Apply” to save and apply these settings.

Part 3: Other Solutions That Can Be Tried to Remove Noise from Videos
Since Adobe Audition remove noise has a professional interface, it might trouble some of you. The settings can be challenging to apply, so this section is all about alternatives. In this section, you can find the online solutions for noise reduction below:
1. Flixier
With this online Adobe Audition remove noise alternative, you can remove background noise. Users simply need to upload a video and activate the enhanced audio option. The audio enhancer eliminates unnecessary sound, giving it a name and description. It is compatible with popular and worldwide media formats like WAV, MP3, etc. Moreover, you can share the video straight to social platforms.

Key Features
- Offers an Improve Quality feature to clear up and enhance speech.
- Users can edit audio after denoising, and you can access its audio library to apply effects.
- Users can detach audio from the clip or fade in and out the audio effects to align with the video.
2. MyEdit
Are you looking for an online AI alternative to Adobe Audition noise reduction? This is a versatile platform for removing unwanted audio from up to 100 MB file size. It can denoise a 10 minutes file of formats like MP3, MP4, WAV, and FLAC. It enhances quality through audio denoise, wind remover, and speech enhancement. It uses AI technology to auto-remove background noise and enables a preview.

Key Features
- Users can employ its Vocal Remover to create clear and high-quality voiceovers.
- The user interface is a simple upload-to-convert process and doesn’t take up any storage.
- The AI helps accelerate the denoise process and retains audio quality.
3. KwiCut
Utilize this web-based Adobe Audition remove noise alternative to eliminate background noises. It can remove anything that declines an audio quality, like hums, hisses, and more. It removes any distractions in the background that decline communication. The AI assists in enhancing speech to maintain the professional element in the continent.

Key Features
- The tool supports a range of audio and video formats like MP3, MOV, WAV, and more.
- It supports text-based audio editing to edit audio or remove secondary noises.
- To create effective voiceovers for videos, use KwiCut’s voice cloning feature.
Part 4: Wondershare Filmora: A Unique Solution to Reducing Noise in Video and Audio Content
In contrast to all these Adobe Audition noise reduction alternatives, here is another. Wondershare Filmora is a wide platform for video, audio, and visual editing. The tool allows users to use manual and AI features to enhance content. In addition, Filmora introduced its V13 upgrade with new AI features. Amongst them is the AI Vocal Remover tool that separates vocals from background noise.
Using this tool can help you embed vocals in video tutorials or vlogs. In addition, Filmora also offers an Audio Denoise feature to remove distracting noises and voices. Users can enhance speech by removing wind noise, humming, and hissing. In addition, you can take Filmora’s Denoise AI’s assistance to do this.
Steps for Filmora AI Audio Denoise
If you wish to employ Filmora’s denoise feature, you are at the right place. This tool enables AI Speech Enhancement and Wind Removal with a denoise option. In addition, it has DeReverb, Hum Removal, and Hiss Removal. Users can manually adjust the value of this slider to set audio preferences. By following this step-by-step guide, users can remove background noises from video:
Free Download For Win 7 or later(64-bit)
Free Download For macOS 10.14 or later
Step 1: Initiate Filmora and Import Media to Timeline
First, download this AI software on your device and launch it. After logging in, locate and hit the “New Project” option and enter its editing interface. Afterward, click the “Ctrl + I” keys and choose files from your device. Once the files are imported, drag and place them in the timeline.

Step 2: Activate Audio Denoise
Once the media is in the timeline, select it and navigate towards the right-side panel. Under the “Audio” tab, locate and expand the “Denoise” option. In this section, enable the “Normal Denoise” button, which will auto-denoise audio. You can also use the “Denoise Level” slider to adjust the intensity of denoise.

Step 3: Export the Edited File
Once you have made all the changes, click the “Export” button at the top right corner. Further, adjust export settings in the appeared window and click the “Export” button.

Bonus Tip: Remove Vocals from Audio with Dedicated AI Vocal Remover in Filmora
Other than denoising, you can use Vocal Remover to extract speech from the background. It separates both vocals and background noise. We have crafted the step-by-step procedure to use vocal remover:
Step 1: Start Filmora and Import Video
Begin by installing and launching Wondershare Filmora on your device. Log in and select the “New Project” tab to access Filmora’s editing interface. Next, use the “Import” option to import files from your device. Once imported, simply drag and drop them onto the timeline.

Step 2: Access the AI Vocal Remover
Next, direct towards the timeline panel and right-click on the video in the timeline. From the options menu, select the “AI Vocal Remover” option. The AI will start separating vocals from background audio.

Step 3: Download the AI Processed Video
Once both vocals and background noise are separate, delete the background audio. Then, click the “Export” button to download this file on your device.

Free Download For Win 7 or later(64-bit)
Free Download For macOS 10.14 or later
Conclusion
After reading this article, users have knowledge of noise reduction in Audition. The article discussed different methods of removing noises in this professional software. Users can employ the web-based Adobe Audition noise reduction alternatives.
If you want a next-level tool for creative editing, then download Wondershare Filmora. The article discussed two methods for enhancing audio content. The software is compatible across multiple platforms to assist all types of users.
Free Download Free Download Learn More
Part 1: What Do You Know About Background Noise?
Background noise is anything that disturbs the pace of the video and diverts the viewer’s attention. It is the unwanted and unintended sound that takes up your audio. This may include someone chatting in the background, wind noise, and other noises. These factors decline and disrupt the clarity of audio. However, these elements can be managed through various tools and techniques to help creators.
Part 2: How to Remove Noise from Adobe Audition: A Comprehensive Review
Adobe Audition is a tool tailored to assist in audio editing tasks with precision. Users can create, merge, and mix different sound effects and be creative with them. It also has seamless support of Adobe After Effects and Adobe Stock for this purpose. Noise reduction Audition is one of its features that helps in cleaning and enhancing audio. It clears out any unnecessary background noises from any project.
In addition, the tool allows you to manage the audio levels for denoising. Along with manual settings, you can also add denoise effects to reduce background effects. You can manage high and low frequencies in Adobe Audition to remove noise. Upon editing this software, you can review the results afterward.
Different Methods of Audio Reduction in Adobe Audition
As a content creator, you must often manage dialogues and music within a video. Combining both can sometimes get the focus off actual dialogues. This can be due to many reasons; however, the solution is noise reduction in Audition. In this section, you can explore different methods to reduce noise:
1. Noise Reduction Effect
In this section, we are doing a noise reduction Audition manually. The process is straightforward, and here is a step-by-step guide to it:
Step 1: Upon importing your audio in Adobe Audition, navigate towards the top toolbar. Select the “Effects” tab and choose “Noise Reduction/Restoration” from the dropdown menu. As the menu expands further, select “Noise Reduction.”
Step 2: This will feature a Noise Reduction window on your screen. In this window, select the “Capture Noise Print” tab and adjust the Noise Reduction slider. Afterwards, press the play button on this window to listen to the audio and select “Apply.”
2. DeNoise Effect
This is the second method of Adobe Audition to remove noise. Accessing this option is almost the same, but settings may vary. Here is an instruction manual on how you can denoise in Audition:
Step 1: Once you have imported media into the timeline, reach the upper toolbar. Look for the “Effects” tab and proceed to the “Noise Reduction/Restoration” settings. From the expansion panel, choose the “DeNoise” option.
Step 2: After accessing the DeNoise window appearing on the screen, direct towards it. Then, change the position of the “Amount” slider and play your audio. Further, select the “Apply” button to add this effect to your audio.
3. Dynamic Effect
Another audio effect that you can apply and adjust in the same manner is the dynamic effect. Follow the steps given below to achieve this effect:
Step 1: After selecting the “Audio” tab, choose “Amplitude and Compression” from the dropdown menu. Expand this option and select “Dynamics” from the expansion menu.
Step 2: From the Dynamics window, expand the “Preset” option and set it to “Default.” Further, activate the “AutoGate” option and change the “Threshold” value. Then, click “Apply” to save and apply these settings.
Part 3: Other Solutions That Can Be Tried to Remove Noise from Videos
Since Adobe Audition remove noise has a professional interface, it might trouble some of you. The settings can be challenging to apply, so this section is all about alternatives. In this section, you can find the online solutions for noise reduction below:
1. Flixier
With this online Adobe Audition remove noise alternative, you can remove background noise. Users simply need to upload a video and activate the enhanced audio option. The audio enhancer eliminates unnecessary sound, giving it a name and description. It is compatible with popular and worldwide media formats like WAV, MP3, etc. Moreover, you can share the video straight to social platforms.
Key Features
- Offers an Improve Quality feature to clear up and enhance speech.
- Users can edit audio after denoising, and you can access its audio library to apply effects.
- Users can detach audio from the clip or fade in and out the audio effects to align with the video.
2. MyEdit
Are you looking for an online AI alternative to Adobe Audition noise reduction? This is a versatile platform for removing unwanted audio from up to 100 MB file size. It can denoise a 10 minutes file of formats like MP3, MP4, WAV, and FLAC. It enhances quality through audio denoise, wind remover, and speech enhancement. It uses AI technology to auto-remove background noise and enables a preview.
Key Features
- Users can employ its Vocal Remover to create clear and high-quality voiceovers.
- The user interface is a simple upload-to-convert process and doesn’t take up any storage.
- The AI helps accelerate the denoise process and retains audio quality.
3. KwiCut
Utilize this web-based Adobe Audition remove noise alternative to eliminate background noises. It can remove anything that declines an audio quality, like hums, hisses, and more. It removes any distractions in the background that decline communication. The AI assists in enhancing speech to maintain the professional element in the continent.
Key Features
- The tool supports a range of audio and video formats like MP3, MOV, WAV, and more.
- It supports text-based audio editing to edit audio or remove secondary noises.
- To create effective voiceovers for videos, use KwiCut’s voice cloning feature.
Part 4: Wondershare Filmora: A Unique Solution to Reducing Noise in Video and Audio Content
In contrast to all these Adobe Audition noise reduction alternatives, here is another. Wondershare Filmora is a wide platform for video, audio, and visual editing. The tool allows users to use manual and AI features to enhance content. In addition, Filmora introduced its V13 upgrade with new AI features. Amongst them is the AI Vocal Remover tool that separates vocals from background noise.
Using this tool can help you embed vocals in video tutorials or vlogs. In addition, Filmora also offers an Audio Denoise feature to remove distracting noises and voices. Users can enhance speech by removing wind noise, humming, and hissing. In addition, you can take Filmora’s Denoise AI’s assistance to do this.
Steps for Filmora AI Audio Denoise
If you wish to employ Filmora’s denoise feature, you are at the right place. This tool enables AI Speech Enhancement and Wind Removal with a denoise option. In addition, it has DeReverb, Hum Removal, and Hiss Removal. Users can manually adjust the value of this slider to set audio preferences. By following this step-by-step guide, users can remove background noises from video:
Free Download For Win 7 or later(64-bit)
Free Download For macOS 10.14 or later
Step 1: Initiate Filmora and Import Media to Timeline
First, download this AI software on your device and launch it. After logging in, locate and hit the “New Project” option and enter its editing interface. Afterward, click the “Ctrl + I” keys and choose files from your device. Once the files are imported, drag and place them in the timeline.
Step 2: Activate Audio Denoise
Once the media is in the timeline, select it and navigate towards the right-side panel. Under the “Audio” tab, locate and expand the “Denoise” option. In this section, enable the “Normal Denoise” button, which will auto-denoise audio. You can also use the “Denoise Level” slider to adjust the intensity of denoise.
Step 3: Export the Edited File
Once you have made all the changes, click the “Export” button at the top right corner. Further, adjust export settings in the appeared window and click the “Export” button.
Bonus Tip: Remove Vocals from Audio with Dedicated AI Vocal Remover in Filmora
Other than denoising, you can use Vocal Remover to extract speech from the background. It separates both vocals and background noise. We have crafted the step-by-step procedure to use vocal remover:
Step 1: Start Filmora and Import Video
Begin by installing and launching Wondershare Filmora on your device. Log in and select the “New Project” tab to access Filmora’s editing interface. Next, use the “Import” option to import files from your device. Once imported, simply drag and drop them onto the timeline.
Step 2: Access the AI Vocal Remover
Next, direct towards the timeline panel and right-click on the video in the timeline. From the options menu, select the “AI Vocal Remover” option. The AI will start separating vocals from background audio.
Step 3: Download the AI Processed Video
Once both vocals and background noise are separate, delete the background audio. Then, click the “Export” button to download this file on your device.
Free Download For Win 7 or later(64-bit)
Free Download For macOS 10.14 or later
Conclusion
After reading this article, users have knowledge of noise reduction in Audition. The article discussed different methods of removing noises in this professional software. Users can employ the web-based Adobe Audition noise reduction alternatives.
If you want a next-level tool for creative editing, then download Wondershare Filmora. The article discussed two methods for enhancing audio content. The software is compatible across multiple platforms to assist all types of users.
Also read:
- In 2024, Compile of High-Quality Sound Spectrum Templates to Elevate Video Production - 2023 Update
- Updated In 2024, Essential Online Hubs for Natural Environment Recordings
- Updated The Art of Merging Sound and Visuals Audio Addition in GIFs on a Mac System
- New 2024 Approved Serene Sound Sanctuary High-Fidelity Audio Management Application to Banish Background Noise From Your Phones
- Updated Ultimate List of Budget-Friendly, Web-Based DAW Tools
- New Soundless Videos The Quintessential Methods to Ditch Noise Online for 2024
- The Perfect Blueprint for iPhones as Portable Recorders
- New Uncovering Essential Programs to Combat Unwanted Ambient Noises in Your Recordings for 2024
- Discovering the Premium Free Plugins The Top 10 List Sound Engineers
- Updated Tremors and Rumbles A Compendium of Colossal Sound Effects
- Updated Mastering Sound Capture with Apowersoft Step-by-Step Tutorial and Top 4 Alternatives
- Updated In 2024, Innovating Your Impact Strategies for Changing Your Vocal Characteristics
- New 2024 Approved Auditory Delights in Cinema - Celebrating the Best 8 Film Soundscapes
- In 2024, Premier Applications for Audio File Isolation From Visual Content
- New In 2024, A Comprehensive Walkthrough to Modify Videos Speaker Output
- In 2024, The Windows 10 Wizards Handbook Achieving Clear Audio Recordings
- Perfecting Digital Voices An In-Depth Guide to Cloning with AI Technology
- 8 Best Online Free Voice Recorder for 2024
- Updated Unconventional Chat Services Excellence List Security, Functionality, and Pleasure
- Updated Navigating TikToks Volume Settings Essential Methods for Quiet Videos
- Updated Pinpoint Intestinal Expulsion Noise Collection
- Updated 2024 Approved The Ultimate Tutorial on Muting Off-Screen Speeches and Enhancing Film Quality
- In 2024, A Perfect Guide To Remove or Disable Google Smart Lock On Honor Magic 6 Pro
- Network Locked SIM Card Inserted On Your Motorola Defy 2 Phone? Unlock It Now
- In 2024, Easy Guide How To Bypass OnePlus 11R FRP Android 10/11/12/13
- How to Change/Add Location Filters on Snapchat For your OnePlus Open | Dr.fone
- Detect and Fix Image Aspect Imbalance
- In 2024, Top 4 Ways to Trace Vivo Y100A Location | Dr.fone
- How to Fix Plugins Not Working in Final Cut Pro X for 2024
- 7 Ways to Unlock a Locked Google Pixel Fold Phone
- Updated In 2024, How to Anonymize Faces in Media A Beginners Guide to Free Apps
- Latest way to get Shiny Meltan Box in Pokémon Go Mystery Box On Vivo V29e | Dr.fone
- Updated Maximize Your Reach A Guide to Optimizing Social Media Aspect Ratios for 2024
- Updated Take Your Videos to the Next Level 10 Best Premiere Pro Transitions
- How to Reset Poco F5 Pro 5G Without the Home Button | Dr.fone
- New Transform Your Canon Footage A Comprehensive Guide to Video Editing
- 10 Best Fake GPS Location Spoofers for Samsung Galaxy M54 5G | Dr.fone
- A Quick Guide to Vivo S18e FRP Bypass Instantly
- In 2024, How to Transfer Contacts from Honor Magic5 Ultimate To Phone | Dr.fone
- Free Video Editing for Dummies Top Picks for Desktop, Online, and Mobile
- How To Simulate GPS Movement With Location Spoofer On OnePlus Ace 2? | Dr.fone
- Title: Updated What Role Does Layering Play in Coherent Sound Production for 2024
- Author: David
- Created at : 2024-05-05 10:23:10
- Updated at : 2024-05-06 10:23:10
- Link: https://sound-tweaking.techidaily.com/updated-what-role-does-layering-play-in-coherent-sound-production-for-2024/
- License: This work is licensed under CC BY-NC-SA 4.0.
