
:max_bytes(150000):strip_icc():format(webp)/kentuckyderby-5c7ed5d646e0fb00011bf3da.jpg)
Updated The Art of Crystal Clear Audio Removing Unwanted Frequency Alterations in Film and Videos
The Art of Crystal Clear Audio: Removing Unwanted Frequency Alterations in Film and Videos
Create High-Quality Video - Wondershare Filmora
An easy and powerful YouTube video editor
Numerous video and audio effects to choose from
Detailed tutorials are provided by the official channel
Whether you are in the business of shooting or editing, noisy or distorted footage is among the most frustrating roadblocks you’ll ever encounter in your workflow. The magic of filmmaking lies after the scenes in post-production. You can remove distortion from audio using various methods.
In this article
01 What Is Distortion in Audio?
02 The Difference Between Noise and Distortion
03 How to Remove Distortion From Audio for Your Video
What Is Distortion in Audio?
You have probably heard the term distortion and would like to know what it is. Distortion is a common term in music production.
Although the term is simple, there is more than meets the eye. Distortion is defined as the change or deformation of an audio waveform that results in the production of an audio output that is different from the input. Distortion can occur at a single point or multiple points in a specific signal chain.
While there are many types of audio distortion, the most common one is clipping. It occurs when an audio signal is amplified beyond the maximum allowed unit in both analog and digital systems.
A signal is distorted when an output does not record the same signal as the input. The issue can occur due to amplifier clipping, faulty equipment, overloading of a sound source, production of hot signals, and pushing speakers beyond their limit.
In the past, people perceived distortion as a bad thing. Today, however, some kinds of distortions are considered beneficial because of their positive effect on the sound. Sound engineers apply plugins, outboard gear, and other techniques to add pleasing distortions to audios. The distortions work by adding unique elements to audios, thus improving sounds in many instances.
The Difference Between Noise and Distortion
Noise and distortion can sound very similar and hard to tell apart. However, the two are different phenomena with unique characteristics. Noise is an undesired disturbance that sounds white or pink and creates an even-tempered sound wave. On the other hand, distortion is the alteration of a waveform, where some parts are amplified while others are attenuated, leading to an uneven distribution of energy among frequencies. Let’s look at the differences between noise and distortion.
1. Where It Appears in a Signal
Noise appears randomly throughout the signal, while distortion seems at the same frequency. One example of noise is an audio hiss that can be heard when no other sounds are present. An example of distortion is a sine wave with a flat top and bottom combined with different amplitudes.
2. How It Affects Signals
Noise is random and can appear when signals are quiet. Distortion is affected by the input signal and can be altered by adding or removing signal frequencies.
How It’s Measured
You can measure distortion by using an oscilloscope to display the input signal’s waveform over time. The oscilloscope measures energy distribution among different frequencies, while you can measure noise with a spectrum analyzer by displaying an audio signal’s magnitude and frequency content over time.
Despite their differences, noise and distortion are both unwanted sounds. When they are present in a signal, they can degrade its quality. For this reason, it is essential to understand the differences between them to assess signs and produce better results accurately.
How to Remove Distortion From Audio for Your Video
You can use several different methods to remove audio distortion in your video. They include:
Method 1: Use an Online Audio Distortion Tool
You can use an online distortion tool to fix this problem. One of the popular tools for removing distortion from audio is Audacity. Available for Linux, macOS, Windows, and other Unix-like operating systems, Audacity is a FOSS (free and open-source digital audio editor software). It is also a recording application software, and you can use the program for varying tasks, including conversing audio files, removing audio distortion, adding effects, and mixing audio clips.
Keeping this in mind, let’s look at how to remove distortion from audio using Audacity.
- The first step is opening the file. To do this, drag and drop the audio file into Audacity.
- Next, you need to select the distorted area before clicking on Effect. Once you have done this, click on the Noise Reduction option.

- Doing this will open the Noise reduction window.
- Go to the Noise Profile and click on it; this will allow Audacity to know what it should filter out.

- Now, select the whole audio before reopening the Noise Reduction Window. Set the values as you see necessary.
- Check the audio by clicking Preview. If you are satisfied with the results, click OK.
- Be sure to apply the filter again if your audio is still distorted. Avoid doing it excessively, as the audio could be degraded. In turn, this can lead to the voice sounding robotic and tinny.
Method 2: Software Solutions - Adobe Audition
You can remove distortion from audio using specialized audio editing software. One of the professional audio tools that you can use to fix audio distortion is Adobe Audition; this software allows you to carve out any unwanted sound for impressive results.
These steps below will allow you to remove distortion from audio with Adobe Audition.
- Double click on the track to access the Waveform.
- Go to Window, and then select the Amplitude Statistics option.
- A new window will open. Now, hit the Scan button in the left corner. The software will then scan the audio.

- Check the section written Possibly Clipped Samples.

- Head over to Effects>Diagnostics> DeClipper.

- In the Preset section, select the Restore Heavily Clipped option.

- Next, hit the Settings button, and adjust the Tolerance.

- Hit the Scan button again, and you’ll see all the problems in your audio.
- Click Repair all to fix your distorted audio.

- Alternatively, you could head to Effects Rack and click on Filter and EQ, then FFT Filter.

- Put the Preset option to Default settings. Take out a few of the frequencies where your audio is distorted.

Method 3: Video Editing Tools like VSDC
When it comes to removing distortion from audio, you can use video editing tools to fix this problem. VSDC is one of the non-linear editing applications that people use to remove audio distortion.
Follow the steps below to learn how to remove distortion from audio using VSDC.
- Upload your footage to VSDC and right-click on it.
- Select the Audio effects option, then choose Filters. Click on Gate.

- You will see the Properties window. Here, you will find all the parameters that you need to fix your audio problems, including distortion.

The Gate filter allows users to control how fast and when the gate opens and what sort of sounds can get in.
- Threshold: This is the level of the decibel at which the gate opens. Set it based on the loudness of the audio distortion.
- Attack: This parameter defines how fast the gate will open. Essentially, the higher the attack value, the slower the gate opens. /li>
- Knee: With this parameter, you can control the response of the compressor to the signal that’s crossing the threshold. That means you can apply compression with a delay or instantly.
- Make-up gain: This increases the signal level after it has been processed.
- Ratio: This value controls compression applied to the distortion. It defines how quieter the distortion will be after gating.
- Reduction: This parameter defines the level of signal reduction will be.
- Release: This value defines how fast the gate will close after opening. You can change the Release parameter to suit your preferences.
Method 4:Normalize Your Audio with Filmora Audio Equalizer
Filmora is a video editing software that you can use to shoot, edit, and share clips with other people. It provides an easy-to-use interface that has made it one of the most popular choices for independent filmmakers. Filmora also offers audio equalizer effects designed for professional sound designers who want to work on projects with their voice-over recordings.
You can normalize your audio with Filmora by following the three simple steps below:
Step 1. Open Filmora and Import your file
First, open up Filmora and open your audio file. It can be any format you have except MOV from Apple devices like iPhone or iPad. Then, select the Media tab on the top of Filmora’s main window to import your media file.
Step 2. Adjust the Levels
Next, click the Levels option on Filmora’s left panel, where you will find three options: Gain, Equalize, and Normalizer. You can use this to adjust your audio level to be loud enough without being too loud. The normalizer helps you ensure that your audio is at a consistent level throughout the recording. You can use it both for music or voice-over recordings.

Step 3. Export Your File
Finally, you may export it when you have made the necessary adjustments to your audio file. Just click the File tab in Filmora’s main window and select Export. Many options are available for exporting your media file, including an output profile setting where you may choose MP4, AVI, or WMV and upload to Facebook, Youtube, and Vimeo.
For Win 7 or later (64-bit)
For macOS 10.12 or later
Conclusion
● Normalizing your audio file is not a complicated process, but it does require some technical knowledge. However, your audio will sound excellent and professional if you follow the steps above. You can use Filmora’s audio equalizer effects to normalize your video.
Whether you are in the business of shooting or editing, noisy or distorted footage is among the most frustrating roadblocks you’ll ever encounter in your workflow. The magic of filmmaking lies after the scenes in post-production. You can remove distortion from audio using various methods.
In this article
01 What Is Distortion in Audio?
02 The Difference Between Noise and Distortion
03 How to Remove Distortion From Audio for Your Video
What Is Distortion in Audio?
You have probably heard the term distortion and would like to know what it is. Distortion is a common term in music production.
Although the term is simple, there is more than meets the eye. Distortion is defined as the change or deformation of an audio waveform that results in the production of an audio output that is different from the input. Distortion can occur at a single point or multiple points in a specific signal chain.
While there are many types of audio distortion, the most common one is clipping. It occurs when an audio signal is amplified beyond the maximum allowed unit in both analog and digital systems.
A signal is distorted when an output does not record the same signal as the input. The issue can occur due to amplifier clipping, faulty equipment, overloading of a sound source, production of hot signals, and pushing speakers beyond their limit.
In the past, people perceived distortion as a bad thing. Today, however, some kinds of distortions are considered beneficial because of their positive effect on the sound. Sound engineers apply plugins, outboard gear, and other techniques to add pleasing distortions to audios. The distortions work by adding unique elements to audios, thus improving sounds in many instances.
The Difference Between Noise and Distortion
Noise and distortion can sound very similar and hard to tell apart. However, the two are different phenomena with unique characteristics. Noise is an undesired disturbance that sounds white or pink and creates an even-tempered sound wave. On the other hand, distortion is the alteration of a waveform, where some parts are amplified while others are attenuated, leading to an uneven distribution of energy among frequencies. Let’s look at the differences between noise and distortion.
1. Where It Appears in a Signal
Noise appears randomly throughout the signal, while distortion seems at the same frequency. One example of noise is an audio hiss that can be heard when no other sounds are present. An example of distortion is a sine wave with a flat top and bottom combined with different amplitudes.
2. How It Affects Signals
Noise is random and can appear when signals are quiet. Distortion is affected by the input signal and can be altered by adding or removing signal frequencies.
How It’s Measured
You can measure distortion by using an oscilloscope to display the input signal’s waveform over time. The oscilloscope measures energy distribution among different frequencies, while you can measure noise with a spectrum analyzer by displaying an audio signal’s magnitude and frequency content over time.
Despite their differences, noise and distortion are both unwanted sounds. When they are present in a signal, they can degrade its quality. For this reason, it is essential to understand the differences between them to assess signs and produce better results accurately.
How to Remove Distortion From Audio for Your Video
You can use several different methods to remove audio distortion in your video. They include:
Method 1: Use an Online Audio Distortion Tool
You can use an online distortion tool to fix this problem. One of the popular tools for removing distortion from audio is Audacity. Available for Linux, macOS, Windows, and other Unix-like operating systems, Audacity is a FOSS (free and open-source digital audio editor software). It is also a recording application software, and you can use the program for varying tasks, including conversing audio files, removing audio distortion, adding effects, and mixing audio clips.
Keeping this in mind, let’s look at how to remove distortion from audio using Audacity.
- The first step is opening the file. To do this, drag and drop the audio file into Audacity.
- Next, you need to select the distorted area before clicking on Effect. Once you have done this, click on the Noise Reduction option.
- Doing this will open the Noise reduction window.
- Go to the Noise Profile and click on it; this will allow Audacity to know what it should filter out.
- Now, select the whole audio before reopening the Noise Reduction Window. Set the values as you see necessary.
- Check the audio by clicking Preview. If you are satisfied with the results, click OK.
- Be sure to apply the filter again if your audio is still distorted. Avoid doing it excessively, as the audio could be degraded. In turn, this can lead to the voice sounding robotic and tinny.
Method 2: Software Solutions - Adobe Audition
You can remove distortion from audio using specialized audio editing software. One of the professional audio tools that you can use to fix audio distortion is Adobe Audition; this software allows you to carve out any unwanted sound for impressive results.
These steps below will allow you to remove distortion from audio with Adobe Audition.
- Double click on the track to access the Waveform.
- Go to Window, and then select the Amplitude Statistics option.
- A new window will open. Now, hit the Scan button in the left corner. The software will then scan the audio.
- Check the section written Possibly Clipped Samples.
- Head over to Effects>Diagnostics> DeClipper.
- In the Preset section, select the Restore Heavily Clipped option.
- Next, hit the Settings button, and adjust the Tolerance.
- Hit the Scan button again, and you’ll see all the problems in your audio.
- Click Repair all to fix your distorted audio.
- Alternatively, you could head to Effects Rack and click on Filter and EQ, then FFT Filter.
- Put the Preset option to Default settings. Take out a few of the frequencies where your audio is distorted.
Method 3: Video Editing Tools like VSDC
When it comes to removing distortion from audio, you can use video editing tools to fix this problem. VSDC is one of the non-linear editing applications that people use to remove audio distortion.
Follow the steps below to learn how to remove distortion from audio using VSDC.
- Upload your footage to VSDC and right-click on it.
- Select the Audio effects option, then choose Filters. Click on Gate.
- You will see the Properties window. Here, you will find all the parameters that you need to fix your audio problems, including distortion.
The Gate filter allows users to control how fast and when the gate opens and what sort of sounds can get in.
- Threshold: This is the level of the decibel at which the gate opens. Set it based on the loudness of the audio distortion.
- Attack: This parameter defines how fast the gate will open. Essentially, the higher the attack value, the slower the gate opens. /li>
- Knee: With this parameter, you can control the response of the compressor to the signal that’s crossing the threshold. That means you can apply compression with a delay or instantly.
- Make-up gain: This increases the signal level after it has been processed.
- Ratio: This value controls compression applied to the distortion. It defines how quieter the distortion will be after gating.
- Reduction: This parameter defines the level of signal reduction will be.
- Release: This value defines how fast the gate will close after opening. You can change the Release parameter to suit your preferences.
Method 4:Normalize Your Audio with Filmora Audio Equalizer
Filmora is a video editing software that you can use to shoot, edit, and share clips with other people. It provides an easy-to-use interface that has made it one of the most popular choices for independent filmmakers. Filmora also offers audio equalizer effects designed for professional sound designers who want to work on projects with their voice-over recordings.
You can normalize your audio with Filmora by following the three simple steps below:
Step 1. Open Filmora and Import your file
First, open up Filmora and open your audio file. It can be any format you have except MOV from Apple devices like iPhone or iPad. Then, select the Media tab on the top of Filmora’s main window to import your media file.
Step 2. Adjust the Levels
Next, click the Levels option on Filmora’s left panel, where you will find three options: Gain, Equalize, and Normalizer. You can use this to adjust your audio level to be loud enough without being too loud. The normalizer helps you ensure that your audio is at a consistent level throughout the recording. You can use it both for music or voice-over recordings.
Step 3. Export Your File
Finally, you may export it when you have made the necessary adjustments to your audio file. Just click the File tab in Filmora’s main window and select Export. Many options are available for exporting your media file, including an output profile setting where you may choose MP4, AVI, or WMV and upload to Facebook, Youtube, and Vimeo.
For Win 7 or later (64-bit)
For macOS 10.12 or later
Conclusion
● Normalizing your audio file is not a complicated process, but it does require some technical knowledge. However, your audio will sound excellent and professional if you follow the steps above. You can use Filmora’s audio equalizer effects to normalize your video.
Discovering Elegant Sound Design Software: Highlights, Strengths, Weaknesses, and Competitive Overviews (2024 Release)
Audio editors are generally referred to as Digital Audio Workstation, DAW. They provide you with digital tools to edit, record, and also produce audio files. Most audio editors are used to create podcasts and mix different audio files.
Internet is full of different audio editors, but the case in the study is about Beautiful Audio Editor. To know more about this editor and to learn about its steps, read the article below.
In this article
01 What Is Beautiful Audio Editor?
02 Beautiful Audio Editor: Key Features, Pros & Cons
03 How to Use Beautiful Audio Editor?
04 Best Alternatives for Beautiful Audio Editor
Part 1. What Is Beautiful Audio Editor?
For an online editor, Beautiful Audio Editor is the best choice, and this is because the editor is feature-rich. This editor works well on both Chrome and Firefox browsers. Beautiful Audio Editor is great for the fact that it offers excellent options of frequency effects. Importantly, the audio editor allows you to save the files on Google Drive.

Do you know the best part of Beautiful Audio Editor? The editor supports multi-track editing and allows you to adjust and manage every track level. With this editor, try and move from complete silence to 6 decibels higher than the actual level. Do you know what wonders this can do? For smooth fade-ins and fade-outs, this is very helpful.
Part 2. Beautiful Audio Editor: Key Features, Pros & Cons
With Beautiful Audio Editor, you can edit amazing audio files, make stunning mixes and crazy podcasts. This online, easy-to-use editor has a lot of features to offer. Do you know what they are? Let’s increase your knowledge and share some key features of Beautiful Audio Editor:
· Editing Features
This is a multi-track audio editor that supports adjusting every level of each track. With Beautiful Audio Editor, try to alter volume and pan. Along with this, options like Move, Split, Duplicate and Delete sections of the audio file are also offered.
· Recording
Do you think Beautiful Audio Editor is just an editor? You are wrong if you think so. This is because the editor is not only great for editing but try and record with this fantastic tool. You can record through your microphone and get high-quality recordings.
· Effects
Beautiful Audio Editor provides a wide range of effects that can modify and transform your audio file. For instance, you get effects like Gain, Dynamic Compression, Reverb, Low/High pass filters. Along with all this, you can also speed up or slow down the audio.
· Customized Effects
Which audio editor offers customized effects? Beautiful Audio Editor does! With Volume Envelopes, you can create custom Fade Ins and Fade Outs. Moreover, the editor also provides features like dragging the effects, zooming, etc.
2.1. Pros & Cons of Beautiful Audio Editor
Do you have any idea about the benefits that you get from Beautiful Audio Editor? If you don’t, let’s enlighten you with this editor’s pros and cons.
Benefits
- You can export files both in 16-bit WAV and also in 128-bit MP3 format from Beautiful AudioEditor.
- This audio editor is free to use. You don’t even have to register for editing audio, just open Chrome or Firefox and start the work.
- Your edited audio files are saved both online and offline. You can either save files on Google Drive or else save local files.
- Beautiful Audio Editorenables you to create audio envelopes. Moreover, you can apply dozens of audio effects while editing.
Drawback
- A significant drawback of this editor is that it crashes if the project is over 300MB or 45mins. This is not reliable for high stake projects.
Part 3. How to Use Beautiful Audio Editor?
Have you ever used this editor before? As we mentioned in the introduction, we would introduce the steps to use Beautiful Audio Editor, so here we are. Are you ready to learn about its step-by-step guidelines? Let’s get started!
Step 1: To start the editing, open the online editor. A timeline screen will appear in front of you; head to the ‘File’ tab and click on it from the top menu bar. From the sub-menu, select the ‘Import local sound file’ option to import the file from your device.

Step 2: For splitting the audio, drag the play head to the point from where you want to split. Next to the toolbar, click on the ‘Split’ icon. This will split the audio into 2 parts, and you can split as much as you want to. By using the ‘Remove’ icon from the toolbar, you can also remove the extra audio part.

Step 3: For adding Fade to your audio, move to the line under the timeline. Now, select a start and an endpoint on the line and drag it downwards for Fade Out. In comparison, push it upwards for Fade In.

Step 4: For adjusting the Volume or the Gain, move to the bottom left corner. You will see a ‘Gain’ option, hit on it to open its tab on the right side of the screen, and then adjust the ‘Gain’ by moving the slider.

Step 5: You can also rename your file by double-clicking on it. Lastly, to save the file, tap on the ‘File’ tab and select the ‘Save project to a local file for later load’ option. After this, download the file to your preferred location.

Part 4. Best Alternatives for Beautiful Audio Editor
We have something for you if Beautiful Audio Editor has failed to impress you. The following section of this article will share the best alternatives with its readers. Let’s begin!
1. TwistedWave
Do you know how amazing this alternative is? TwistedWave is an online, easy-to-use audio editor. The interface of this editor is very clean and simple to understand. Moreover, you get a long list of effects from TwistedWave, for instance, Reverse, Graphic EQ, Fade in and Fade out, Amplify, Normalize, and others.
The best part about this audio editor is that you can easily send files to SoundCloud and also Google Drive. Likewise, you can upload files from both Google Drive and SoundCloud.

2. Bear Audio Editor
Moving on to discuss Bear Audio Editor, which can trim, cut, and also convert music files. Interestingly, you can avail all these amazing features online and free, without even downloading any software. This editor offers you options like Fade In and Out, Mute, Pitch and Volume Adjustment, etc.
You can also combine different music files, ringtones, etc., to make your perfect mix. Bear Audio Editor supports MP3, OGG, and WAV input formats. Whereas OGG, WMA, WAV, MP3, and M4R are output-supported formats.

3. Sodaphonic
Do you want to edit a file from Dropbox? Try Sodaphonic audio editor. You can not only open files from Dropbox but also import them from Google Drive. This online editor offers diverse options that include Louder, Quieter, Silence, Normalize, Bleep it, Reverse, and much more than this.
Other than this, you get different editing options, including Delete, Trim, Cut, Copy, etc. This editor also allows access to a microphone for recording.

Last Words
Beautiful Audio Editor, like its name, is beautiful and equally amazing to use. The online editor offers a lot of features, and interestingly, it’s free. The article discussed great details about Beautiful Audio Editor along with its guideline. What if we share another audio editor? Try Wondershare Filmora Audio Editor, the easy-to-use, drag-and-drop software.
You can modify your audio files to the next level with Filmora . Its advanced audio editing features are unmatched, like Audio Equalizer, Audio Denoise, Detach Audio from Video, and so much more. You can also add Voiceovers, replace original audio from video, add background music, etc.
Wondershare Filmora
Get started easily with Filmora’s powerful performance, intuitive interface, and countless effects!
Try It Free Try It Free Try It Free Learn More >

02 Beautiful Audio Editor: Key Features, Pros & Cons
03 How to Use Beautiful Audio Editor?
04 Best Alternatives for Beautiful Audio Editor
Part 1. What Is Beautiful Audio Editor?
For an online editor, Beautiful Audio Editor is the best choice, and this is because the editor is feature-rich. This editor works well on both Chrome and Firefox browsers. Beautiful Audio Editor is great for the fact that it offers excellent options of frequency effects. Importantly, the audio editor allows you to save the files on Google Drive.
Do you know the best part of Beautiful Audio Editor? The editor supports multi-track editing and allows you to adjust and manage every track level. With this editor, try and move from complete silence to 6 decibels higher than the actual level. Do you know what wonders this can do? For smooth fade-ins and fade-outs, this is very helpful.
Part 2. Beautiful Audio Editor: Key Features, Pros & Cons
With Beautiful Audio Editor, you can edit amazing audio files, make stunning mixes and crazy podcasts. This online, easy-to-use editor has a lot of features to offer. Do you know what they are? Let’s increase your knowledge and share some key features of Beautiful Audio Editor:
· Editing Features
This is a multi-track audio editor that supports adjusting every level of each track. With Beautiful Audio Editor, try to alter volume and pan. Along with this, options like Move, Split, Duplicate and Delete sections of the audio file are also offered.
· Recording
Do you think Beautiful Audio Editor is just an editor? You are wrong if you think so. This is because the editor is not only great for editing but try and record with this fantastic tool. You can record through your microphone and get high-quality recordings.
· Effects
Beautiful Audio Editor provides a wide range of effects that can modify and transform your audio file. For instance, you get effects like Gain, Dynamic Compression, Reverb, Low/High pass filters. Along with all this, you can also speed up or slow down the audio.
· Customized Effects
Which audio editor offers customized effects? Beautiful Audio Editor does! With Volume Envelopes, you can create custom Fade Ins and Fade Outs. Moreover, the editor also provides features like dragging the effects, zooming, etc.
2.1. Pros & Cons of Beautiful Audio Editor
Do you have any idea about the benefits that you get from Beautiful Audio Editor? If you don’t, let’s enlighten you with this editor’s pros and cons.
Benefits
- You can export files both in 16-bit WAV and also in 128-bit MP3 format from Beautiful AudioEditor.
- This audio editor is free to use. You don’t even have to register for editing audio, just open Chrome or Firefox and start the work.
- Your edited audio files are saved both online and offline. You can either save files on Google Drive or else save local files.
- Beautiful Audio Editorenables you to create audio envelopes. Moreover, you can apply dozens of audio effects while editing.
Drawback
- A significant drawback of this editor is that it crashes if the project is over 300MB or 45mins. This is not reliable for high stake projects.
Part 3. How to Use Beautiful Audio Editor?
Have you ever used this editor before? As we mentioned in the introduction, we would introduce the steps to use Beautiful Audio Editor, so here we are. Are you ready to learn about its step-by-step guidelines? Let’s get started!
Step 1: To start the editing, open the online editor. A timeline screen will appear in front of you; head to the ‘File’ tab and click on it from the top menu bar. From the sub-menu, select the ‘Import local sound file’ option to import the file from your device.
Step 2: For splitting the audio, drag the play head to the point from where you want to split. Next to the toolbar, click on the ‘Split’ icon. This will split the audio into 2 parts, and you can split as much as you want to. By using the ‘Remove’ icon from the toolbar, you can also remove the extra audio part.
Step 3: For adding Fade to your audio, move to the line under the timeline. Now, select a start and an endpoint on the line and drag it downwards for Fade Out. In comparison, push it upwards for Fade In.
Step 4: For adjusting the Volume or the Gain, move to the bottom left corner. You will see a ‘Gain’ option, hit on it to open its tab on the right side of the screen, and then adjust the ‘Gain’ by moving the slider.
Step 5: You can also rename your file by double-clicking on it. Lastly, to save the file, tap on the ‘File’ tab and select the ‘Save project to a local file for later load’ option. After this, download the file to your preferred location.
Part 4. Best Alternatives for Beautiful Audio Editor
We have something for you if Beautiful Audio Editor has failed to impress you. The following section of this article will share the best alternatives with its readers. Let’s begin!
1. TwistedWave
Do you know how amazing this alternative is? TwistedWave is an online, easy-to-use audio editor. The interface of this editor is very clean and simple to understand. Moreover, you get a long list of effects from TwistedWave, for instance, Reverse, Graphic EQ, Fade in and Fade out, Amplify, Normalize, and others.
The best part about this audio editor is that you can easily send files to SoundCloud and also Google Drive. Likewise, you can upload files from both Google Drive and SoundCloud.
2. Bear Audio Editor
Moving on to discuss Bear Audio Editor, which can trim, cut, and also convert music files. Interestingly, you can avail all these amazing features online and free, without even downloading any software. This editor offers you options like Fade In and Out, Mute, Pitch and Volume Adjustment, etc.
You can also combine different music files, ringtones, etc., to make your perfect mix. Bear Audio Editor supports MP3, OGG, and WAV input formats. Whereas OGG, WMA, WAV, MP3, and M4R are output-supported formats.
3. Sodaphonic
Do you want to edit a file from Dropbox? Try Sodaphonic audio editor. You can not only open files from Dropbox but also import them from Google Drive. This online editor offers diverse options that include Louder, Quieter, Silence, Normalize, Bleep it, Reverse, and much more than this.
Other than this, you get different editing options, including Delete, Trim, Cut, Copy, etc. This editor also allows access to a microphone for recording.
Last Words
Beautiful Audio Editor, like its name, is beautiful and equally amazing to use. The online editor offers a lot of features, and interestingly, it’s free. The article discussed great details about Beautiful Audio Editor along with its guideline. What if we share another audio editor? Try Wondershare Filmora Audio Editor, the easy-to-use, drag-and-drop software.
You can modify your audio files to the next level with Filmora . Its advanced audio editing features are unmatched, like Audio Equalizer, Audio Denoise, Detach Audio from Video, and so much more. You can also add Voiceovers, replace original audio from video, add background music, etc.
Wondershare Filmora
Get started easily with Filmora’s powerful performance, intuitive interface, and countless effects!
Try It Free Try It Free Try It Free Learn More >
Top 10 Male to Female Voice Changer Apps
If you’ve been searching for the best android and iOS voice-changing apps around the internet, you’re on the right spot. Voice-changing applications are always fun. They’re handy when you’re pulling a prank on a friend, or you want some amazing effects to test your voice. Thus, we provide you with all the best male to female voice changer apps in the list below.
Record & Edit Voice Fast before Changing Voice
Before changing your voice from male to female, I suggest you edit your voice first. Filmora is an easy-to-use yet powerful video editor helping you quickly edit voice no matter your voice or the audio extracted from videos. Explore Filmora’s audio editing features and get ready for changing voice!
For Win 7 or later (64-bit)
For macOS 10.12 or later


Part 1: Changing Voice Online for Free with Media.io
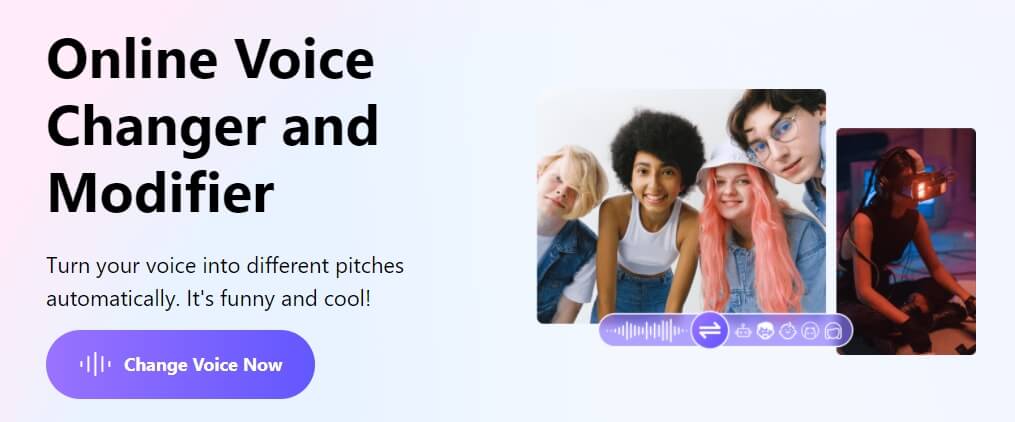
If you want to change voice without downloading and installing any app on your mobile phone, you can try some online solutions. Media.io is an all-in-one online video toolkit that allows you to edit, convert and compress video, audio and image files easily. The online voice changer from Media.io can transform your voice to a male voice, female voice, child voice, robot voice, and Donald Duck voice. If you wish to have voice filters, you won’t have any problems in the future with the Media.io voice changer.

This online voice changer works best on the Chrome browser, so you can utilize it whether using a Windows, Mac, Linux, or Chromebook device. As a result, you can deceive your family or friends by speaking in another people’s voice rather than your own. Doesn’t that sound like fun?
![]()
A cross-platform for making videos anywhere for all creators

Why your video editing isn’t good enough? How about some creative inspo?
- 100 Million+ Users
- 150+ Countries and Regions
- 4 Million+ Social Media Followers
- 5 Million+ Stock Media for Use
* Secure Download

Part 2: Best Male to Female Voice Changer Apps for iPhone and Android
- Girls Voice Changer
- Voice Changer Voice Recorder Editor & Effect
- VoiceFX
- Voice Changer
- Voice Changer - Audio effects
- Magic Call App
- Voice Changer and Sound Recorder
- Super Voice Editor
- Voice Changer with Effects
- Voice Changer - Girls Voice changer Male to Female
1. Girls Voice Changer
Available for: Android, iOS
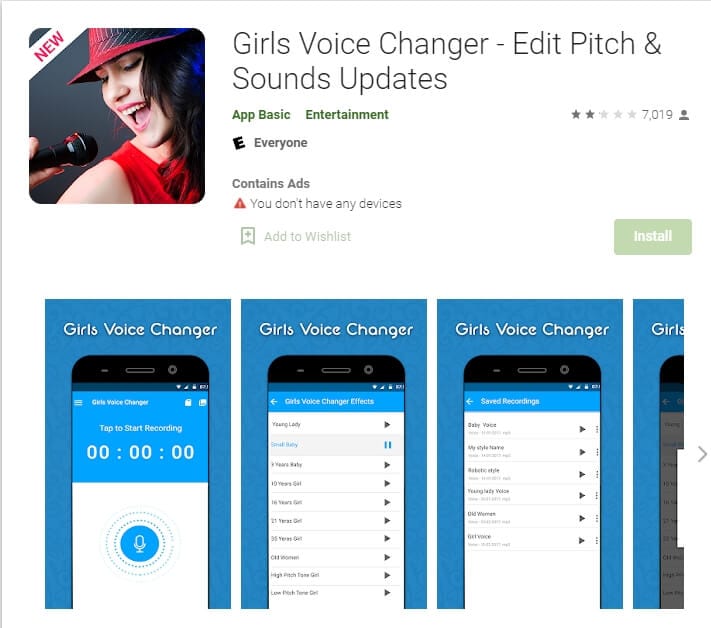
This girl voice changer app is highly portable and easy for any user to use comfortably. It is specifically more popular for changing male voice to female and for pitch adjustments. It’s completely free, so download on your android if you have a storage of about 8MB ready, and start using it!
This male-to-female voice changer app has several options in the library. Though the pitch adjustments are easy to make, some users have informed a lack of performance on very high-pitched settings. However, the smoothness of an android application also depends on how much space is readily available in the device. So next time you’re bored at a part, you have the perfect partner!
2. Voice Changer Voice Recorder Editor & Effect
Available for: Android
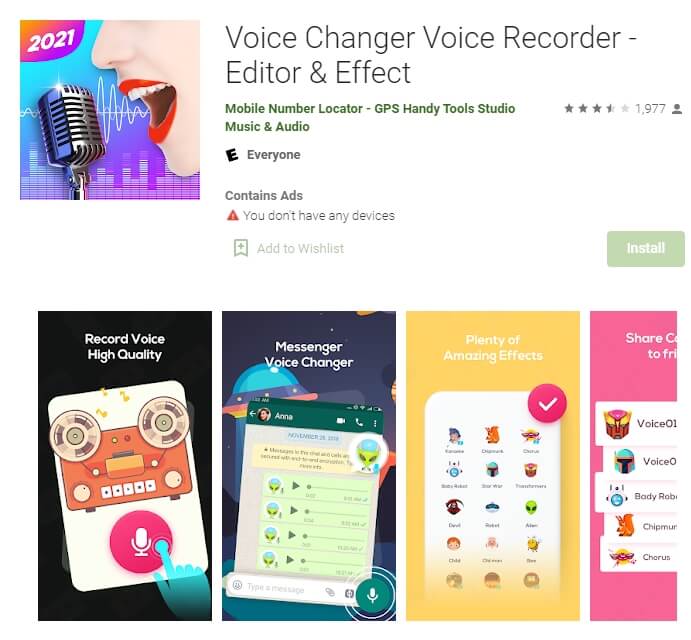
This voice changer application is for multi-purpose. Yes, you can use it as a girl voice changer smoothly and with ease. But apart from male to female voice changing, The “voice changer - voice editor application” can also be used to autotune your voice.
Now autotune is a big feature that every singer uses to make their voices tuned perfectly. With this app, you can also do the same to record your music or have fun while you are bored. The application is pretty to use and can be used as a girl voice changer not only for entertainment but also if you’re practicing. Many people who wish to seek a career in background voices might find this useful.
3. VoiceFX
Available for: Android

The VoiceFX application is filled with a lot of exciting options and features. If you are looking for an app that is more than just a male-to-female voice changer app, the voice fx is highly recommended.
You can also convert your voice into a robot or even an animal from male to female voice. Yes, you read it right. You can turn your manly voice into any of the fictional cartoons you want. This one’s a very easy and efficient way of filming a video with added effects or developing a mini-game with different voice characters. If you haven’t forgotten, there was a very big trend of converting famous music into chipmunk voices. With this app, you can convert your favorite songs into a chipmunk addition song without any problem.
4. Voice Changer
Available for: Android

The voice changer is a very famous male-to-female voice changer app. With over 10 million downloads on the google play store, the voice changer is highly recommended for users who have fun changing their voices from male to female. Compared to other voice changer applications, The Voice changer app has a very elegant and sleek design that makes it very easy to use.
Apart from the male to female voice change option, There are more than 50 other options that you can enjoy. Furthermore, you can share your creations with your friends through Bluetooth or other social media.
5. Voice Changer - Audio effects
Available for: Android

There are a lot of girl voice changer applications on the google play store. But not all of them are up to the mark. The Voice changer - audio effects is another highly recommended voice changer application.
The Voice Changer - Audio effects have a lot of other things to offer as well. Converting your voice from a male to a female has never been easier. Not only can you convert your voice into a girl, but you can also modify it. Furthermore, you can talk to your friends on the phone while you use the voice changer application. Moreover, the voices of animals and robots can also be an alternative to the female voice if you ever get bored of it.
6. Magic Call App
Available for: Android

The magic call is a real-time voice changer app that you can use for changing your voice during a call specifically. It is a really fun app which you can use with your friends to prank even your family!
This is a perfect option for people looking for a real-time girl voice changer app. The main purpose of this application is real-time calls. The magic call is ideal specifically for a male-to-female voice modification. And you can operate this application easily in call durations.
All you have to do is open the voice changer app and dial your call. Apart from Female voice, you can also convert your voice into a cartoon or an animal.
7. Voice Changer and Sound Recorder
Available for: iOS

If you are an iPhone user, then you must know that finding a voice changer on the apple store is like digging a diamond from the ground.
The Voice changer and sound recorder application is found exclusively on the apple store for people who love girl voice changer apps. It is a live call voice changer app, which means converting your voice from a male to a female in between the call. Furthermore, you can even add background voices such as traffic and echo to make your call even funnier. If you are looking for an excuse to get off from your call, then this application has got your back.
8. Super Voice Editor
Available for: Android
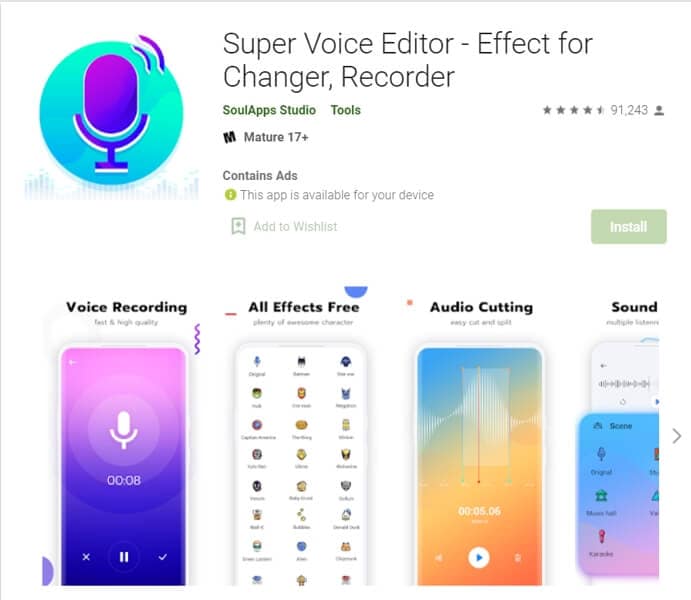
This one is a fun application for people searching for a voice changer app male to female. Not only can you record the audio that you edit, but also use it in real-time! Amazing right? Super voice editor enables you to add effects to your voice while you’re on a call as well. This feature means, next time you’re pulling a prank on the birthday boy, he won’t ever know! Sound like the wonder woman or dexter from his laboratory. The Super-Voice editor is perfect for kids playing in the house and even teenagers looking for something interesting. The SoulApps studio has made it easy for you to sound like your dream faces on the screen. With an MP3 cutter and Ringtone maker, this girl voice changer app is pure creativity.
9. Voice Changer with Effects
Available for: Android

Our list of girl voice changers, Voice changer with effects, is a very practical application that we highly recommend to our users.
With over 50 million downloads on google play, Voice changer with effects is highly suited for anyone looking for more than just a male-to-female voice changer. It has over 40 plus options such as helium, chipmunk, zombie, alien, and many more. With this application, you can even import a favorite audio clip of yours, and then you can easily convert it into a voice you like. If you want to modify your ringtone to an audio clip you just converted, then there is no better application than this one.
10. Voice Changer - Girls Voice changer Male to Female
Available for: Android

If you are looking for a girl voice changer app solely, this application perfectly fits you. The application is specifically designed only to change your voice from a male to a female. Although this application does provide options apart from female voice conversions, those features don’t function ideally. However, if you want a girl voice changer, you won’t have any trouble.
You can use this application while you are on a call. Hence, you can fool your family or friends by using a girl voice instead of your own. We recommend this as an average application that would fit your needs sufficiently.
In conclusion, you have now gone through the list of the perfect options for your android or iOS. Therefore, now you must be ready to choose the best girl voice changer app. So head on to your play store and search for your favorite app right now!
For Win 7 or later (64-bit)
For macOS 10.12 or later
Part 1: Changing Voice Online for Free with Media.io
If you want to change voice without downloading and installing any app on your mobile phone, you can try some online solutions. Media.io is an all-in-one online video toolkit that allows you to edit, convert and compress video, audio and image files easily. The online voice changer from Media.io can transform your voice to a male voice, female voice, child voice, robot voice, and Donald Duck voice. If you wish to have voice filters, you won’t have any problems in the future with the Media.io voice changer.
This online voice changer works best on the Chrome browser, so you can utilize it whether using a Windows, Mac, Linux, or Chromebook device. As a result, you can deceive your family or friends by speaking in another people’s voice rather than your own. Doesn’t that sound like fun?
![]()
A cross-platform for making videos anywhere for all creators
Why your video editing isn’t good enough? How about some creative inspo?
- 100 Million+ Users
- 150+ Countries and Regions
- 4 Million+ Social Media Followers
- 5 Million+ Stock Media for Use
* Secure Download
Part 2: Best Male to Female Voice Changer Apps for iPhone and Android
- Girls Voice Changer
- Voice Changer Voice Recorder Editor & Effect
- VoiceFX
- Voice Changer
- Voice Changer - Audio effects
- Magic Call App
- Voice Changer and Sound Recorder
- Super Voice Editor
- Voice Changer with Effects
- Voice Changer - Girls Voice changer Male to Female
1. Girls Voice Changer
Available for: Android, iOS
This girl voice changer app is highly portable and easy for any user to use comfortably. It is specifically more popular for changing male voice to female and for pitch adjustments. It’s completely free, so download on your android if you have a storage of about 8MB ready, and start using it!
This male-to-female voice changer app has several options in the library. Though the pitch adjustments are easy to make, some users have informed a lack of performance on very high-pitched settings. However, the smoothness of an android application also depends on how much space is readily available in the device. So next time you’re bored at a part, you have the perfect partner!
2. Voice Changer Voice Recorder Editor & Effect
Available for: Android
This voice changer application is for multi-purpose. Yes, you can use it as a girl voice changer smoothly and with ease. But apart from male to female voice changing, The “voice changer - voice editor application” can also be used to autotune your voice.
Now autotune is a big feature that every singer uses to make their voices tuned perfectly. With this app, you can also do the same to record your music or have fun while you are bored. The application is pretty to use and can be used as a girl voice changer not only for entertainment but also if you’re practicing. Many people who wish to seek a career in background voices might find this useful.
3. VoiceFX
Available for: Android
The VoiceFX application is filled with a lot of exciting options and features. If you are looking for an app that is more than just a male-to-female voice changer app, the voice fx is highly recommended.
You can also convert your voice into a robot or even an animal from male to female voice. Yes, you read it right. You can turn your manly voice into any of the fictional cartoons you want. This one’s a very easy and efficient way of filming a video with added effects or developing a mini-game with different voice characters. If you haven’t forgotten, there was a very big trend of converting famous music into chipmunk voices. With this app, you can convert your favorite songs into a chipmunk addition song without any problem.
4. Voice Changer
Available for: Android
The voice changer is a very famous male-to-female voice changer app. With over 10 million downloads on the google play store, the voice changer is highly recommended for users who have fun changing their voices from male to female. Compared to other voice changer applications, The Voice changer app has a very elegant and sleek design that makes it very easy to use.
Apart from the male to female voice change option, There are more than 50 other options that you can enjoy. Furthermore, you can share your creations with your friends through Bluetooth or other social media.
5. Voice Changer - Audio effects
Available for: Android
There are a lot of girl voice changer applications on the google play store. But not all of them are up to the mark. The Voice changer - audio effects is another highly recommended voice changer application.
The Voice Changer - Audio effects have a lot of other things to offer as well. Converting your voice from a male to a female has never been easier. Not only can you convert your voice into a girl, but you can also modify it. Furthermore, you can talk to your friends on the phone while you use the voice changer application. Moreover, the voices of animals and robots can also be an alternative to the female voice if you ever get bored of it.
6. Magic Call App
Available for: Android
The magic call is a real-time voice changer app that you can use for changing your voice during a call specifically. It is a really fun app which you can use with your friends to prank even your family!
This is a perfect option for people looking for a real-time girl voice changer app. The main purpose of this application is real-time calls. The magic call is ideal specifically for a male-to-female voice modification. And you can operate this application easily in call durations.
All you have to do is open the voice changer app and dial your call. Apart from Female voice, you can also convert your voice into a cartoon or an animal.
7. Voice Changer and Sound Recorder
Available for: iOS
If you are an iPhone user, then you must know that finding a voice changer on the apple store is like digging a diamond from the ground.
The Voice changer and sound recorder application is found exclusively on the apple store for people who love girl voice changer apps. It is a live call voice changer app, which means converting your voice from a male to a female in between the call. Furthermore, you can even add background voices such as traffic and echo to make your call even funnier. If you are looking for an excuse to get off from your call, then this application has got your back.
8. Super Voice Editor
Available for: Android
This one is a fun application for people searching for a voice changer app male to female. Not only can you record the audio that you edit, but also use it in real-time! Amazing right? Super voice editor enables you to add effects to your voice while you’re on a call as well. This feature means, next time you’re pulling a prank on the birthday boy, he won’t ever know! Sound like the wonder woman or dexter from his laboratory. The Super-Voice editor is perfect for kids playing in the house and even teenagers looking for something interesting. The SoulApps studio has made it easy for you to sound like your dream faces on the screen. With an MP3 cutter and Ringtone maker, this girl voice changer app is pure creativity.
9. Voice Changer with Effects
Available for: Android
Our list of girl voice changers, Voice changer with effects, is a very practical application that we highly recommend to our users.
With over 50 million downloads on google play, Voice changer with effects is highly suited for anyone looking for more than just a male-to-female voice changer. It has over 40 plus options such as helium, chipmunk, zombie, alien, and many more. With this application, you can even import a favorite audio clip of yours, and then you can easily convert it into a voice you like. If you want to modify your ringtone to an audio clip you just converted, then there is no better application than this one.
10. Voice Changer - Girls Voice changer Male to Female
Available for: Android
If you are looking for a girl voice changer app solely, this application perfectly fits you. The application is specifically designed only to change your voice from a male to a female. Although this application does provide options apart from female voice conversions, those features don’t function ideally. However, if you want a girl voice changer, you won’t have any trouble.
You can use this application while you are on a call. Hence, you can fool your family or friends by using a girl voice instead of your own. We recommend this as an average application that would fit your needs sufficiently.
In conclusion, you have now gone through the list of the perfect options for your android or iOS. Therefore, now you must be ready to choose the best girl voice changer app. So head on to your play store and search for your favorite app right now!
Also read:
- New Beyond Free Photos Understanding Pexels.coms Role in Creative Projects
- 2024 Approved Achieving Silent Movie Magic Non-Download Methods for Removing Sound From Windows 10 Footage
- Crafting Emotional Depth Utilizing Piano Melodies for Movie Soundtracks
- New Sound Effects for Podcasts Places to Find Them for 2024
- New Extensive Info on Vimeo Video - Aspect Ratio Detailled for 2024
- Updated 2024 Approved How To Choose the Best Mac MP3 Tag Editor?
- New In 2024, Harnessing Free Tools to Turn Audio Into Text The Essential Guide with Top Three Strategies (Step by Step)
- Updated Navigating Through Googles Audio Platform The Podcast Interface Explained for 2024
- Updated 2024 Approved Digital Audio Tutorial Removing Drum Beats From Your Songs with Ease
- New Mastering Audio Clarity Techniques for Eliminating Distortion in Videos
- New In 2024, The Art of Low-Pitched Audio Transforming Your Voice in Filmora 2023
- New 2024 Approved Vocaroo Voice Recorder Guideline and Alternatives
- Innovative Approaches to Minimize Audio and Video File Size
- New 2024 Approved Acoustical Alchemy Insights A Comparative Study of Premier Audio Editing Tools, Their Strengths, Weaknesses, and Alternatives
- New Effortless Audiobook Production The Ultimate Instruction Manual for Aspiring Authors
- Cutting Edge Audio Solutions Top Online Sites for Professional-Grade MP3 Modification for 2024
- New In 2024, Enrich Video Templates with Auditory Components in Pinnacle Studio
- Updated Melancholy Moments A Curated List of Heartfelt 2024 Playlists
- In 2024, Swift Guide to Extracting WhatsApp Voice Recordings as MP3 Files
- In 2024, Expeditious Methods for Swiftly Neutralizing Audio Interference and Noise
- New Upgrading Your Audacity Experience Seamless Integration of Lame Library
- In 2024, Mute Magic Top 5 Ways to Erase Sound From Web Videos
- In 2024, Top 8 Speech-to-Text Tools Compatible with Windows & macOS Systems
- Updated The Fundamentals of Podcast Production An Introduction to Basic Editing Techniques
- New 2024 Approved Calm in the Digital Realm Navigating to Your Personal Sanctuary Online
- In 2024, Cinematic Mood Setting Through Suspenseful and Dynamic Music Cues
- Updated 2024 Approved Streamlining Access The Best Approaches for Downloading Spotify Music Content
- Seamless Song Editing on Mac Unveiling the Most Acclaimed MP3 Cutter Applications
- New Uncovering Fragmentation Auditory Signal for 2024
- Updated Mastering Beats and Melodies A Compilation of Top 8 Audio Workstations on Android for 2024
- Updated In 2024, REAPER Essentials & Extras A Complete Rundown with Expert Commentary
- New 2024 Approved 5 Best Auto Music Mixer for Mac
- 2024 Approved IMovie Expert Tips How to Achieve Cleaner Soundscape in Your Videos
- New 2024 Approved Crafting an Elegant Audio Dissolve Experience
- New Essential Windows Voice-to-Text Software Top Picks and Their Rankings for 2024
- Effective Strategies for High-Quality Broadcast Audio Capture
- Tail Wags & Whispers Dognoise Auditory Experience for 2024
- New Prime Budget-Optimized Mac Audio Adjustment Software for 2024
- Elevate Your Audio Altering Speech Pitch with Audacity
- Evaluation Report on Sound Forges Audio Editing Tools for 2024
- Updated Exploring Alternatives to Vocaroo A Roadmap for Audio Documentation
- New Essential iPhone Audio Recorders Discover the Top 10
- 2024 Approved Step-by-Step Analysis of Substitutes for Apowersofts Audio Recorder
- New In 2024, Mastering the Art of Saving Your Google Voice Communication on Android & Windows PCs
- New Fusing Sight and Sound Tips for Merging Audio Elements with Visual Content for 2024
- Updated 2024 Approved Top-Ranked Internet MP3 Trimmer & Merger Tool
- Updated How to Quickly Fix Audio Importing Issues in Adobe Premiere Pro
- In 2024, How to Remove Find My iPhone without Apple ID On your iPhone 11?
- Factory Reset iPhone 13 Pro Max | Dr.fone
- Best Android Data Recovery - Undelete Lost Music from HTC
- How to Unlock Apple iPhone 14 When We Dont Have Apple ID or Password?
- Best Fixes For Honor 100 Pro Hard Reset | Dr.fone
- Updated 2024 Approved The Ultimate FCP X Green Screen Tutorial From Basics to Advanced
- How To Bypass Google FRP on X90S
- Identify malfunctioning hardware drivers with Windows Device Manager on Windows 11
- New 2024 Approved Best 10 Chinese Video to English Translators
- New 2024 Approved Best of the Best 28 Video to GIF Converter Options
- How to recover deleted photos from Android Gallery without backup on Samsung Galaxy M14 5G
- Updated Valentines Day 2023 A Step-by-Step Guide to Making a Romantic Video
- In 2024, Easy Steps on How To Create a New Apple ID Account On Apple iPhone 6s | Dr.fone
- This is how you can recover deleted pictures from Reno 10 Pro 5G.
- New In 2024, The Ultimate List of Free and Paid Android Video Editing Software
- Updated Fast Forward Top Video Speed Adjustment Software for Windows and Mac for 2024
- Video Stabilization Magic Transforming Shaky Clips in Adobe Premiere Pro for 2024
- Updated Cut Videos Without Restrictions 8 Free Trimmers
- Reset pattern lock Tutorial for OnePlus
- New Intro Maker Tools for PC Top Picks Online and Offline
- Updated Having Difficulty in Choosing the Most Affordable 3D Slideshow Software? Stay Here for the Best Application Choices of All Times to Create the Most Stunning Slideshows Ever
- In 2024, How to Transfer Contacts from Honor Play 8T To Phone | Dr.fone
- In 2024, How To Open Your Apple iPhone 12 Pro Max Without a Home Button | Dr.fone
- Updated Best Way to Freeze-Frame in Final Cut Pro
- In 2024, Pokemon Go No GPS Signal? Heres Every Possible Solution On Nokia C22 | Dr.fone
- In 2024, Top 6 Apps/Services to Trace Any Apple iPhone 14 Location By Mobile Number | Dr.fone
- How to recover deleted photos from Android Gallery after format on Camon 20
- In 2024, Tecno Phantom V Flip ADB Format Tool for PC vs. Other Unlocking Tools Which One is the Best?
- Free Video Clipper Tools Our Top 5 Picks
- Your Complete Guide To Reset ZTE Axon 40 Lite | Dr.fone
- Title: Updated The Art of Crystal Clear Audio Removing Unwanted Frequency Alterations in Film and Videos
- Author: David
- Created at : 2024-05-05 09:40:41
- Updated at : 2024-05-06 09:40:41
- Link: https://sound-tweaking.techidaily.com/updated-the-art-of-crystal-clear-audio-removing-unwanted-frequency-alterations-in-film-and-videos/
- License: This work is licensed under CC BY-NC-SA 4.0.
