
:max_bytes(150000):strip_icc():format(webp)/Rearviewofboywithlaptoponsofa-31ba45dfa7fb4553a257c133b352ef64.jpg)
Updated Syncing Audiovisual Elements Adding Soundtracks to Video in Adobe Premiere for 2024
Syncing Audiovisual Elements: Adding Soundtracks to Video in Adobe Premiere
Versatile Video Editor - Wondershare Filmora
An easy yet powerful editor
Numerous effects to choose from
Detailed tutorials provided by the official channel
Look at any of the spot commercials, wedding videos, or even some family candid videos. Adding audio makes them appealing and likable. To catch a potential customer or create an emotional connection with the viewer combination of audio and video is a must. This makes the footage attractive and exceptional.
Read on to know more about the step-by-step approach how to add audio to video in Adobe Premiere Pro.
In this article
01 [How to add audio to video in Premiere Pro](#Part 1)
02 [How to adjust audio in Premiere Pro](#Part 2)
03 [Adding Audio to Video files](#Part 3)
Part 1 How to add audio to video in Premiere Pro
Some essential pointers for all would-be videographers are:
● Before you add audio to video in Premiere Pro, be ready to see your file size increase to a large extent. If you add a background score of 15MB, your total video file size will increase by the same amount of 15MB. The best way to take care of such a problem is to use additional compression techniques to get a suitable file size.
● Most videographers use lots of software tools to add audio to video professionally. One such trending software tool is the Adobe Premiere Pro. Its simple to add audio to video in Premiere Pro, edit your audio and video, and fine-tune the audio volume of each video project.
Let’s learn how.

Step1 Find out the Audio option
Navigate to the Audio workspace, select Audio at the top on the tools bar
Step2 Choose the Workspace
Click Window select Workspace click on Audio
Step3 Check toolbar
Within Audio, click on Choose Window Media Browser to show the Media Browser toolbar.
Step4 Select audio files
Go to your audio file; for Windows OS, right-click or control-click the selected audio file for macOS.
Step5 Import and add
Please select the desired audio file, then click import to add it to your Project.
An important tip is to keep the Ingest box selected if you want to copy your audio file concurrently to your project folder.
Adding audio to your series

Step1 Go to the Project panel
Select Window, click on Project to open the Project panel.
Step2 Select audio file
Click on the audio file you imported to select it.
Step3 Check the waveform
Double click the file to open it in the Source panel to check the sound and waveform.
Step4 Check sounds
Play the audio file if you want to check the audio quality, volume, and overall sound.
Step5 Add audio to the video track
Hold the left click on your mouse to drag the audio file to the series in the Timeline panel. You can add any audio file to the video track listed in the panel window in this step.
Step6 Trim audio file
Select the Trim option to trim your audio file the same way you will edit the video file in the final step.
Part 2 How to adjust audio in Premiere Pro
Now that you have understood how to add audio to video in Adobe Premier Pro. Let’s know how to adjust audio in Premier Pro.

Step1 Activate the series
Press on the spacebar to activate your series in the Program panel (appears in the top right of the panel)
Step2 Stop playback
To stop the playback, press the space bar again.
Step3 Choose starting point of playback
Press down the left mouse button to hold and drag the Blue colored play head to wherever you desire the playback to start.
If you feel the audio track is mild or too harsh compared to the rest of the audio series, change each audio track’s volume separately.
Step1 Select Audio Track Mixer
Click Window selects Audio Track Mixer from the menu.
Step2 Click the series name to see the audio mixer
Click the series name of your audio file to show the audio mixer for your series.
Step3 Choose playback to play the audio
At the bottom of the panel is the Audio Track Mixer. Click on playback to star, pause or play your audio in-ring sequence.
Step4 Click on the slider
When your audio file plays or loops, click on the slider to move up or down. It will increase or reduce the volume of each separate audio track in your audio series.
Step5 Adjust the volume
Use the slider to adjust the overall audio volume
Tips
Always keep the audio projects within the -6 to 3 dB volume range to get the best quality of the audio effect. Any lower you won’t be able to hear the sound, or if it’s higher, the sound will hurt the listeners’ ears.
Professional advice to all beginner-level videographers is that as Premiere Pro is complex so you need more straightforward tools like Filmora for all your video editing work. Filmora is easy to use and much cheaper than Premiere Pro.
You may think now why or how Filmora can be the best as an alternative on how to add audio to video using Premiere Pro. Well! It will help you to transform your video into a piece of art incredibly by offering simple drag and drop options, including an easy-to-use interface and powerful editing tools. You can:
● Edit and create your videos with minimal effort
● Get a Music Library to add comedy, fear, tension, and love to every scene
● Get several royalty-free songs and sound effects
● Create videos with up to 800 stunning effects
● Unleash your creativity with its offered Hollywood effects
● Import and export in almost any type of video format
How to use Filmora to add audio to video
Adding sound to any video file enhances its viewability and the whole experience of watching any video. To do this, you need to add audio to video. The same can be done quickly in Filmora, a 3rd-party video editing software tool now the hot favorite of amateur and professional video editors. Below we describe how to add audio to video in Filmora.
Import Media
To start the process of adding audio to video follow these steps.
Step1 Select the audio, add using the Import option or drag and select
Import selected audio using the Filmora Media Panel and add it to your timeline. You can also choose and drag the audio file from the source folder to the Media Panel. Filmora supports multiple audio file formats to ease adding audio to video. The supported audio files are MP3, M4V, MPA, WAV, WMA.

Step2 Add and make the audio file
Adding the audio file to Filmora Media Panel makes it a media asset and can now be used multiple times in future projects. The original file remains as Filmora doesn’t change the original audio file.
Step3 Copying or deleting an audio file
In Filmora, using the feature of copying or deleting an audio file, you can work on the audio and video from any computer or remote PC.
Part 3 Adding Audio to Video files
Using Filmora, it is easy to sync or add audio to the video, which is separately recorded and stored on your device.
Using Filmora, it is easy to sync or add audio to the video, which is separately recorded and stored on your device.
Step1 Click on Import in the Media Panel
Select the audio and video files to import them into Filmora.
Step2 Click on the video file to add audio
Press the Ctrl key (Windows) or Cmd key (Mac OS) and click on the audio file.
Step3 Add audio to video
Right-click on the files selected and choose the Merge audio & video option to add audio to the video.
Filmora analyzes audio and video files and replaces the existing audio with the newly selected audio file. Once the synchronization process is over, the new merged file will be available in the Media Panel for future processing.
The synchronized file will have the same terminology as the original video file with a difference. It will get an extension Merged to its name.
The original file will not get affected in Filmora. This software tool only references the files to generate a new file. The new file created when you add audio to the video can now be added to the timeline and exported.
Wondershare Filmora
Get started easily with Filmora’s powerful performance, intuitive interface, and countless effects!
Try It Free Try It Free Try It Free Learn More about Filmora>

Conclusion
So, this article listed how to add audio to video in Premiere Pro via a step-by-step guide. The guide lets you know the easy method of adding audio to video in Adobe Premiere Pro to all potential videographers. Thus, you can now start your journey of video edition by putting your best click forward!
Look at any of the spot commercials, wedding videos, or even some family candid videos. Adding audio makes them appealing and likable. To catch a potential customer or create an emotional connection with the viewer combination of audio and video is a must. This makes the footage attractive and exceptional.
Read on to know more about the step-by-step approach how to add audio to video in Adobe Premiere Pro.
In this article
01 [How to add audio to video in Premiere Pro](#Part 1)
02 [How to adjust audio in Premiere Pro](#Part 2)
03 [Adding Audio to Video files](#Part 3)
Part 1 How to add audio to video in Premiere Pro
Some essential pointers for all would-be videographers are:
● Before you add audio to video in Premiere Pro, be ready to see your file size increase to a large extent. If you add a background score of 15MB, your total video file size will increase by the same amount of 15MB. The best way to take care of such a problem is to use additional compression techniques to get a suitable file size.
● Most videographers use lots of software tools to add audio to video professionally. One such trending software tool is the Adobe Premiere Pro. Its simple to add audio to video in Premiere Pro, edit your audio and video, and fine-tune the audio volume of each video project.
Let’s learn how.
Step1 Find out the Audio option
Navigate to the Audio workspace, select Audio at the top on the tools bar
Step2 Choose the Workspace
Click Window select Workspace click on Audio
Step3 Check toolbar
Within Audio, click on Choose Window Media Browser to show the Media Browser toolbar.
Step4 Select audio files
Go to your audio file; for Windows OS, right-click or control-click the selected audio file for macOS.
Step5 Import and add
Please select the desired audio file, then click import to add it to your Project.
An important tip is to keep the Ingest box selected if you want to copy your audio file concurrently to your project folder.
Adding audio to your series
Step1 Go to the Project panel
Select Window, click on Project to open the Project panel.
Step2 Select audio file
Click on the audio file you imported to select it.
Step3 Check the waveform
Double click the file to open it in the Source panel to check the sound and waveform.
Step4 Check sounds
Play the audio file if you want to check the audio quality, volume, and overall sound.
Step5 Add audio to the video track
Hold the left click on your mouse to drag the audio file to the series in the Timeline panel. You can add any audio file to the video track listed in the panel window in this step.
Step6 Trim audio file
Select the Trim option to trim your audio file the same way you will edit the video file in the final step.
Part 2 How to adjust audio in Premiere Pro
Now that you have understood how to add audio to video in Adobe Premier Pro. Let’s know how to adjust audio in Premier Pro.
Step1 Activate the series
Press on the spacebar to activate your series in the Program panel (appears in the top right of the panel)
Step2 Stop playback
To stop the playback, press the space bar again.
Step3 Choose starting point of playback
Press down the left mouse button to hold and drag the Blue colored play head to wherever you desire the playback to start.
If you feel the audio track is mild or too harsh compared to the rest of the audio series, change each audio track’s volume separately.
Step1 Select Audio Track Mixer
Click Window selects Audio Track Mixer from the menu.
Step2 Click the series name to see the audio mixer
Click the series name of your audio file to show the audio mixer for your series.
Step3 Choose playback to play the audio
At the bottom of the panel is the Audio Track Mixer. Click on playback to star, pause or play your audio in-ring sequence.
Step4 Click on the slider
When your audio file plays or loops, click on the slider to move up or down. It will increase or reduce the volume of each separate audio track in your audio series.
Step5 Adjust the volume
Use the slider to adjust the overall audio volume
Tips
Always keep the audio projects within the -6 to 3 dB volume range to get the best quality of the audio effect. Any lower you won’t be able to hear the sound, or if it’s higher, the sound will hurt the listeners’ ears.
Professional advice to all beginner-level videographers is that as Premiere Pro is complex so you need more straightforward tools like Filmora for all your video editing work. Filmora is easy to use and much cheaper than Premiere Pro.
You may think now why or how Filmora can be the best as an alternative on how to add audio to video using Premiere Pro. Well! It will help you to transform your video into a piece of art incredibly by offering simple drag and drop options, including an easy-to-use interface and powerful editing tools. You can:
● Edit and create your videos with minimal effort
● Get a Music Library to add comedy, fear, tension, and love to every scene
● Get several royalty-free songs and sound effects
● Create videos with up to 800 stunning effects
● Unleash your creativity with its offered Hollywood effects
● Import and export in almost any type of video format
How to use Filmora to add audio to video
Adding sound to any video file enhances its viewability and the whole experience of watching any video. To do this, you need to add audio to video. The same can be done quickly in Filmora, a 3rd-party video editing software tool now the hot favorite of amateur and professional video editors. Below we describe how to add audio to video in Filmora.
Import Media
To start the process of adding audio to video follow these steps.
Step1 Select the audio, add using the Import option or drag and select
Import selected audio using the Filmora Media Panel and add it to your timeline. You can also choose and drag the audio file from the source folder to the Media Panel. Filmora supports multiple audio file formats to ease adding audio to video. The supported audio files are MP3, M4V, MPA, WAV, WMA.
Step2 Add and make the audio file
Adding the audio file to Filmora Media Panel makes it a media asset and can now be used multiple times in future projects. The original file remains as Filmora doesn’t change the original audio file.
Step3 Copying or deleting an audio file
In Filmora, using the feature of copying or deleting an audio file, you can work on the audio and video from any computer or remote PC.
Part 3 Adding Audio to Video files
Using Filmora, it is easy to sync or add audio to the video, which is separately recorded and stored on your device.
Using Filmora, it is easy to sync or add audio to the video, which is separately recorded and stored on your device.
Step1 Click on Import in the Media Panel
Select the audio and video files to import them into Filmora.
Step2 Click on the video file to add audio
Press the Ctrl key (Windows) or Cmd key (Mac OS) and click on the audio file.
Step3 Add audio to video
Right-click on the files selected and choose the Merge audio & video option to add audio to the video.
Filmora analyzes audio and video files and replaces the existing audio with the newly selected audio file. Once the synchronization process is over, the new merged file will be available in the Media Panel for future processing.
The synchronized file will have the same terminology as the original video file with a difference. It will get an extension Merged to its name.
The original file will not get affected in Filmora. This software tool only references the files to generate a new file. The new file created when you add audio to the video can now be added to the timeline and exported.
Wondershare Filmora
Get started easily with Filmora’s powerful performance, intuitive interface, and countless effects!
Try It Free Try It Free Try It Free Learn More about Filmora>
Conclusion
So, this article listed how to add audio to video in Premiere Pro via a step-by-step guide. The guide lets you know the easy method of adding audio to video in Adobe Premiere Pro to all potential videographers. Thus, you can now start your journey of video edition by putting your best click forward!
Expert Picks: Convert MP3 Audio to Written Format
An MP3 to text converter allows you to change mp3 files to text files. This program assists in the transcription of interviews, lectures, sermons, conferences, and even music. Mp3 to text converters are everywhere on the internet today. They provide the most convenient method for converting mp3 to text. Companies, individuals, conference organizers, and agents benefit from such technologies. Modern mp3 to text online converters with superior hi-tech features and capabilities have emerged.
If you’re searching for free software to convert audio to text, think about how well it works and how accurate the converted text is. In other words, choose a tool that can quickly produce accurate and editable transcriptions. Many converters on the internet may provide these functions, but which one should you pick? Today, we’ll show you the finest MP3 to text converters that are completely free or premium.
- 14 Best MP3 to Text Converter Online
- VEED.IO
- Flixier
- Happyscribe
- Go Transcribe
- Rev
- Transcribe
- Vocalmatic
- Getwelder
- Amberscript
- 360 Converter
- Virtual Speech
- Sonix
- Audext
- Bear File Converter
Why You Should Use MP3 to Text Converter?
Any audio can be converted to text using an MP3 to text converter. It’s an excellent approach to transcribe conferences or presentations accurately. Transcribing audio takes a long time, as we all know. Depending on the size of your MP3 files, an MP3 to text converter can correctly auto-transcribe them into text in minutes. This means you can begin correcting and polishing your transcriptions immediately, thus, cutting down on time spent on the task!
7 Best MP3 To Text Converter for Windows/Mac
1. Filmora
Although Wondershare Filmora Video Editor is well recognized for its broader video editing operations, it also has a large library of other features, such as mp3 to text conversion, that you can utilize to make your projects handy. It’s a Freemium program, like most other products we’ve discussed. However, the advantage here is that you can get mp3 to text software and all of Filmora’s other tools and features, providing you more bang for your money.
Platform: Windows/Mac
Price:$4.99/Month
Features
- Mp3 to text conversion
- Support upload audio files
Pros
- Very easy to use
- Simple interface that requires few clicks
- Pre-built text templates
2.Office 365/Word
Microsoft Word provides various useful built-in features for transcribing audio files. Word can instantly transcribe straight from your audio files, eliminating the need to place a speaker up to your PC microphone and play it. Of course, you’ll need an Office 365 or Office license for this to operate (though there are various hacks for getting Office to work for free, at least temporarily). Sign in to Office 365 on your browser and create a new Word document to transcribe.

Platform: Windows
**Price:**Free
Features
- Directly record in Word.
- Voice instructions may be uploaded as an audio file.
Pros
- It allows you to capture audio from your device’s microphone, as well as recognize and transcribe noises from the speakers in real-time.
Cons
- It is compatible with Windows devices only.
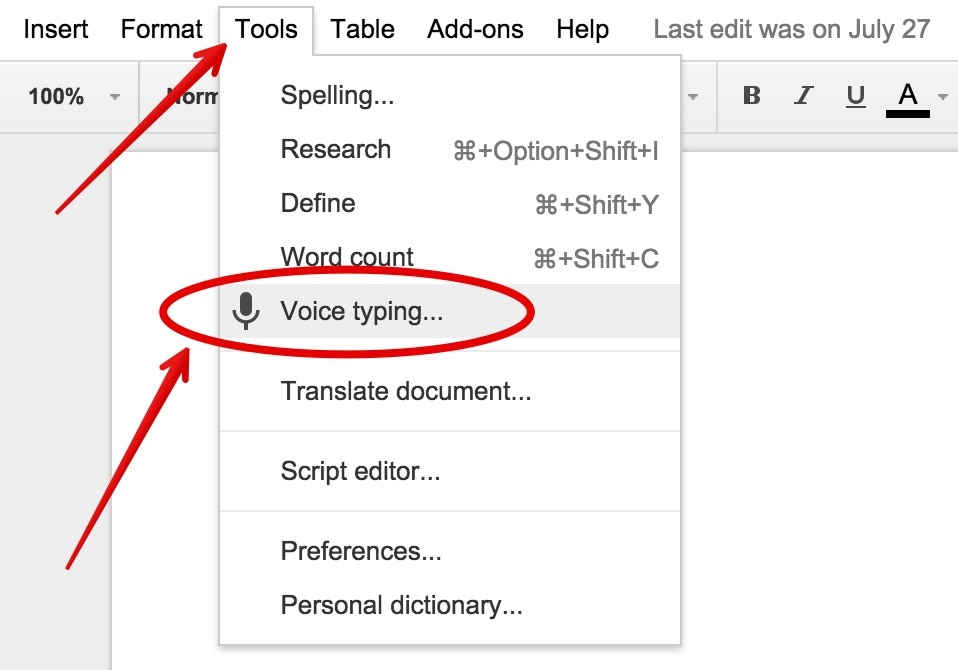
3. Google Docs
Google Docs has become an indispensable tool for most content creators., especially if you’re already using Google services. It allows you to write with your voice and access over 100 view commands for altering and formatting your documents in any manner you like. Making bullet points, altering the text style, and shifting the pointer to other document places are all examples. Consider Google Docs or Google Slides with Google’s Voice Typing tool for Google products like Gmail and Google Drive and require an in-built, powerful, but free dictation tool.
Platform: Windows/Mac
**Price:**Free
Features
- Voice typing and commands
- Transcribe in real-time
Pros
- Compatible with any device
- Very accurate
- It’s quick, particularly for real-time typing, since no prepared audio files are required
Cons
- It can only function in real-time, not with previously recorded data
4. Speech to Text converter
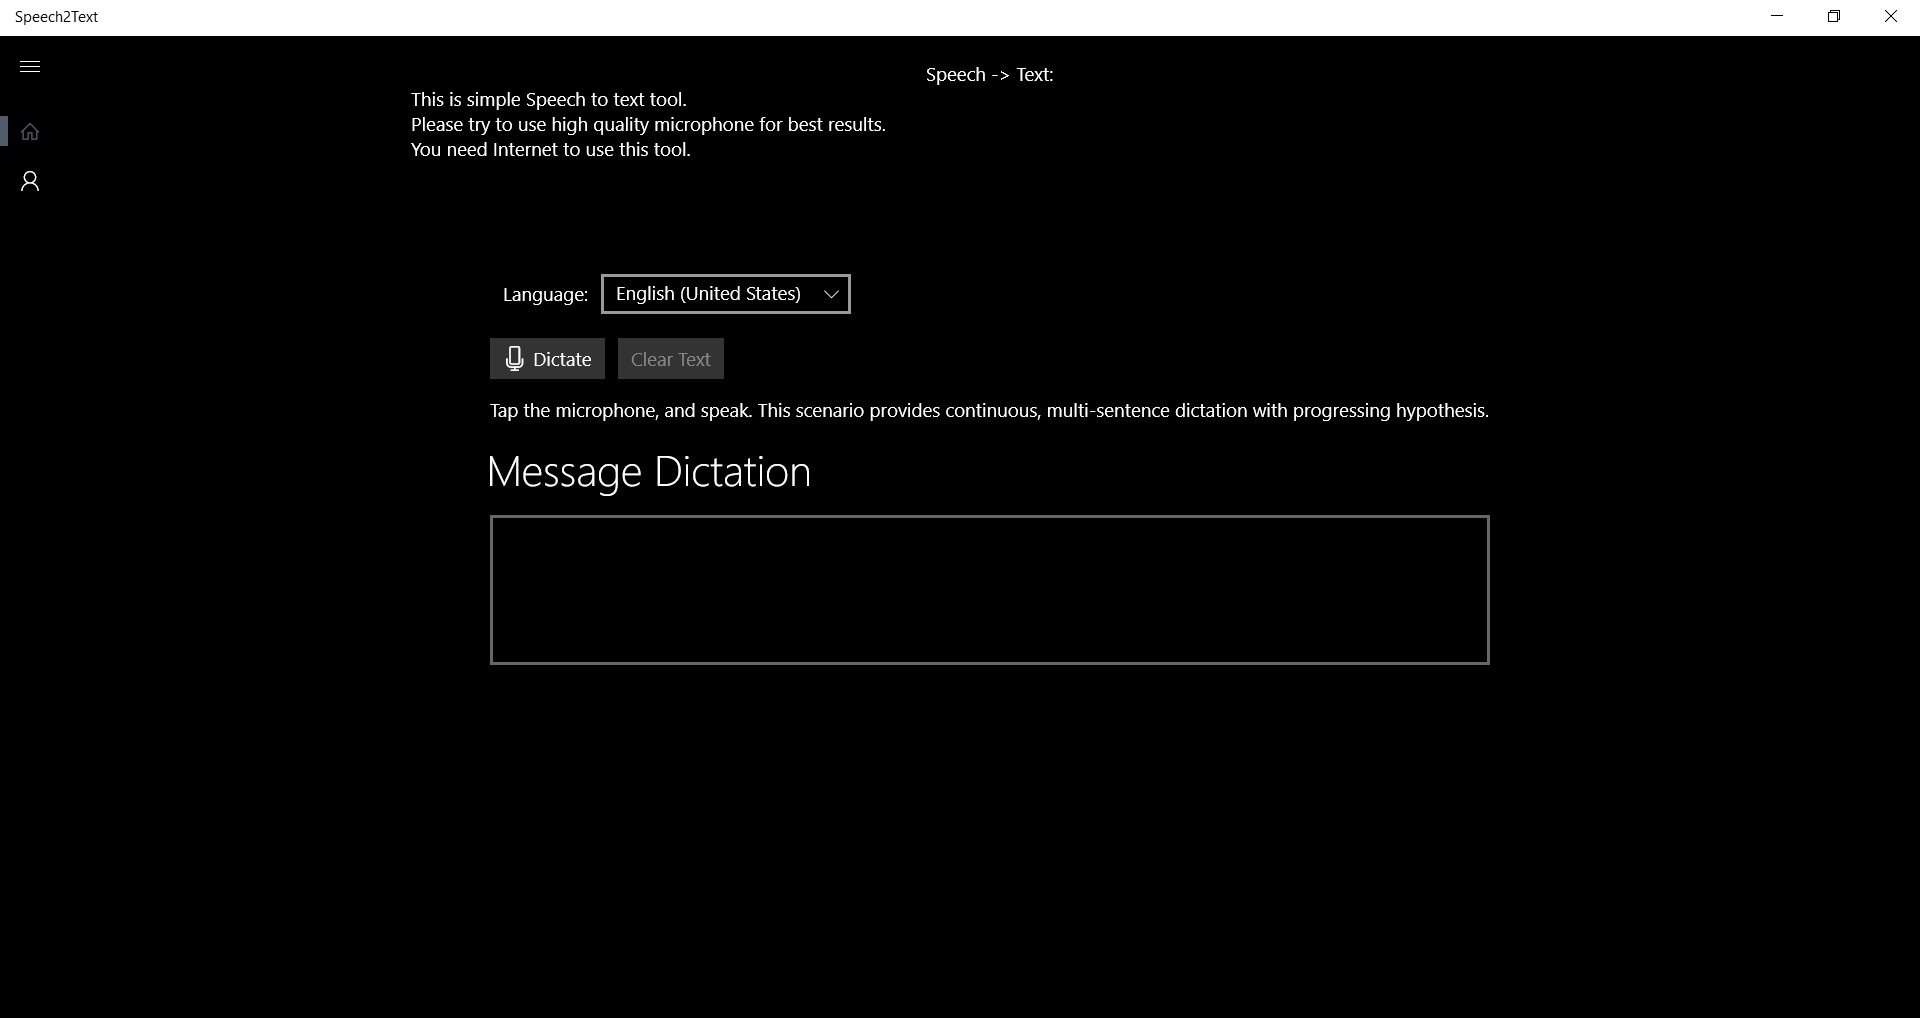
Any voice can be converted into plain text with the speech-to-text converter tool. The default language is English US. It also works with the languages that are installed on your Windows 10 computer. This tool is straightforward and uncluttered. Instead of typing your email, narrative, lesson, or chat, you can talk, and this program will convert it to text. You may copy and paste this content anywhere you like. It’s a Universal Windows Platform (UWP) software, which means it’ll run on any Windows 10 device, including phones, PCs, tablets, and Xboxes.
Platform: Windows
**Price:**Free
Features
- Voice commands
- Text editor
- Will support the language that you use in your PC
Pros
- It is highly efficient due to the usage of keyboard controls
- It gives simple keyboard shortcuts for navigation
Cons
- It needs an internet connection
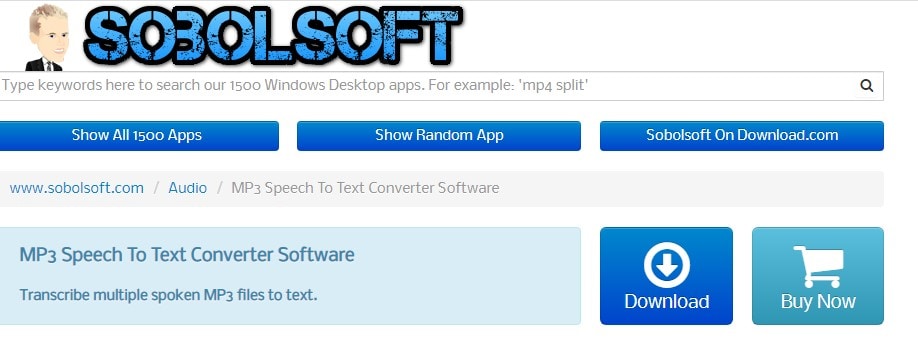
5. Sobolsoft
Sobolsoft’s MP3 Voice to Text Converter software is one of the most incredible solutions on the market if you’re seeking a trustworthy mp3 to text program that you can use on your PC. The program is simple; just choose the audio files you want to transcribe and press the Start Converting button. All of the text generated by the program will be presented in the Results box, where you may modify, copy, or save it as a text file. This program, however, does not handle video files, so you won’t be able to use it to transcribe videos stored in MP4, AVI, MOV, or any other common video file type. You may sample Sobolsoft’s MP3 Speech to Text Converter for free before deciding if you want to buy a license to use the program without limitations.
Platform: Windows
Price:$19.99 per month
Features
- Powerful speech to text conversion
- Transcribe in real time
Pros
- In terms of production and understandable alternatives, there are no time constraints.
- You can separate the timeframes and convert numerous files.
Cons
- This software doesn’t provide support for video files.
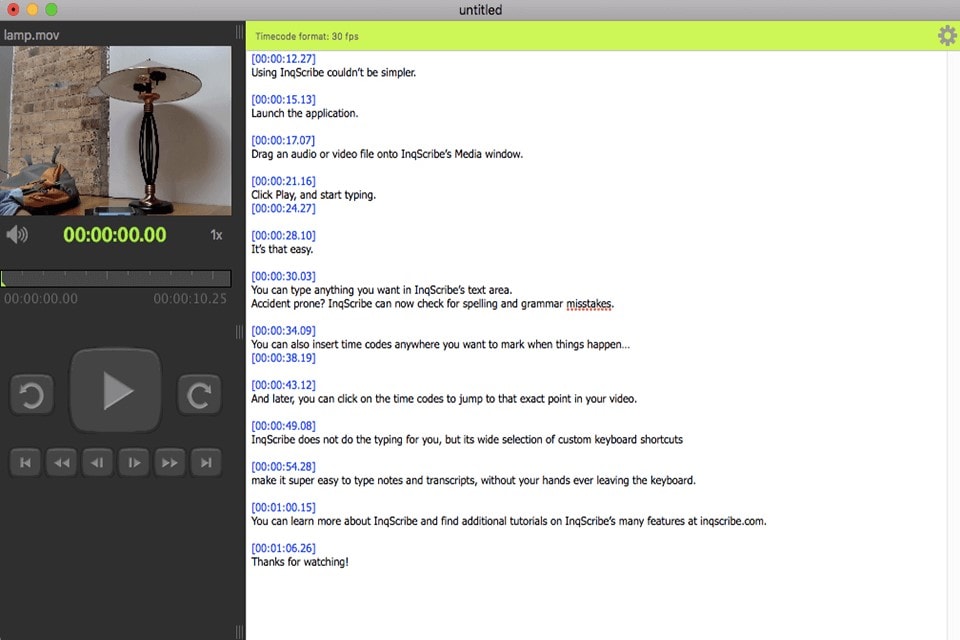
6. InqScribe
Even though InqScribe does not produce text automatically, it is still one of the best tools for creating subtitles for films and audio transcripts on Windows and Mac computers. The program supports a wide range of languages, allowing you to transcribe several languages in the same document. Simply drag and drop a video or audio file into the media window of the app and begin composing your transcript. InqScribe also allows you to include timecodes wherever in the text, making it ideal for creating subtitle files that you can simply add to videos you post online.
**Platform:**Windows/Mac
Price:$99 for an individual license
Features
- The program lets you export the process and add subtitles to your projects before exporting them as video files using Final Cut Pro or Adobe Premiere Pro.
Pros
- It can convert movie subtitles
- Feature-rich
Cons
- Installation is required
- It doesn’t allow recording directly into the software
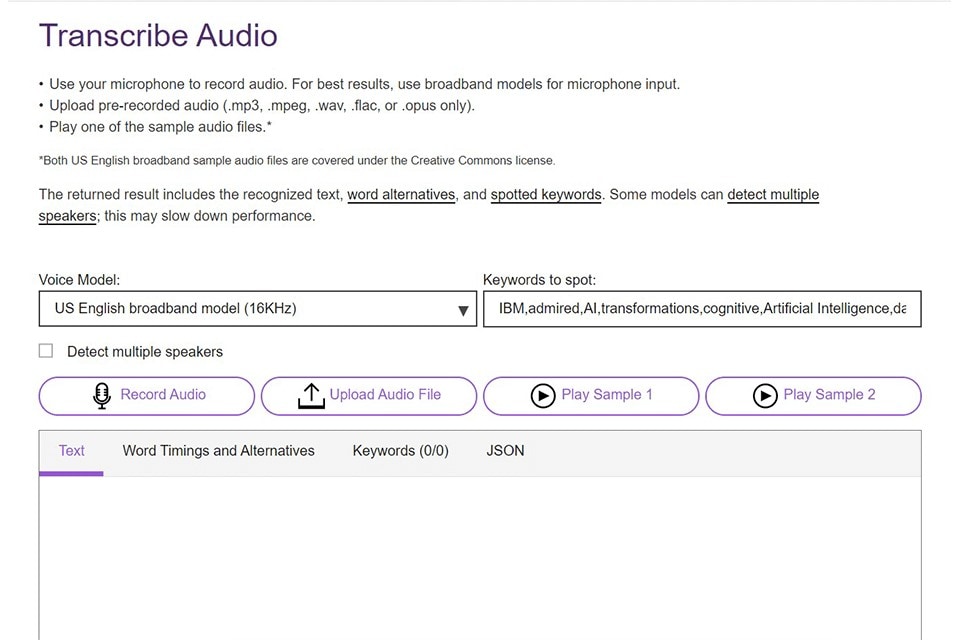
7. Watson STT
Arabic, English, Brazilian, German, Portuguese, Spanish, French, Japanese, Korean, and Mandarin are just a few of the languages available. The IBMWatson STT is ideal for anybody who works with one of these languages. This is one of the greatest free audio to text converters out there.
This transcription program enables you to convert audio to text in real time or upload previously recorded files. It boasts of advanced language models, audio frequency settings, and transcription output capabilities.
You can easily organize and prepare your transcripts with features like numeric redaction, speaker labels, smart formatting, word timestamps, confidence, keyword detection, and alternatives.
**Platform:**Windows/Mac
**Price:**Free
Features
- Smart formatting
- Speaker labels
- Keyword spotting
- Word timestamps
- Numeric redaction
Pros
- Utilizes unstructured data
- Enhances the user experience
- Allows you to upload prerecorded audio
Cons
- Limited options in a free version
15 Best mp3 to text converter Online
2. VEED.IO
Veed.io is much more than just an MP3 to text converter. With this powerful tool, you may make any kind of audio or video. It lets you add sound effects to Instagram stories and YouTube intros, among other things. To transcribe the voice from your MP3 to a text file, get Veed’s free, fast, and simple online transcription tool. It works with WAVs, M4As, OGGs, and even video files and MP3.

**Price:**free and paid ($12/mo)
Features
- Fast cloud servers
- It can read and transcribe a variety of languages, including English, French, Chinese, Spanish, and others.
Pros
- Simple interface
Cons
- The free version is not accurate
3. Flixier
Flixier is a cloud-based, collaborative video editing application that operates on any computer browser, significantly speeding up your video production process. Flixier is a robust video editor that runs entirely inside the browser. This means you can keep editing on several devices, including Chromebooks, without sacrificing performance. Flixier is also simple for collaborative video editings, such as when working with a cameraperson or an outside editor.
**Price:**free and paid ($10/user/mo)
Features
- Speech to text converter
Pros
- It is a collaborative tool that allows you to use other apps.
Cons
- It takes to transcribe a file.
- The free version has fewer features.
4. Happyscribe
Happy Scribe is a reliable voice-to-text converter that can also transcribe MPA, MPE, MPEG, M4A, WMA, MP4, and MOV files for 120 Euros per hour of conversion. It has been recommended by the BBC, Forbes, Spotify, and other reputable organizations. When your account’s credits go below a certain level, the solution automatically recharges your account.
Price:$2.11 per minute
Features
- Fast and reliable speech to text converter
- Real-time transcription
Pros
- No credit expirations.
- It can transcribe Zoom meetings.
Cons
- Since AI is used for transcription, the text might not be as accurate as expected.
5. Go Transcribe
Go transcribe is a popular service that uses artificial intelligence. The app is compatible with any device and supports 17 different languages. Within the same sector, it also offers Team Management solutions. Go Transcribe offers a pay-per-minute service at 22 cents (USD). It also offers a monthly membership plan that starts at 48 USD a month for 4 hours. They also provide free audio and video translation services for testing reasons.

Price:$48 for 4 hours a month
Features
- Mp3 to text converter
- Audio and video translation
Pros
- Has a lot of useful features
- Simple interface for novices
Cons
- Text is accurate at times
6. Rev
Rev , one of the greatest and most reputable transcription services, does not use Artificial Intelligence (AI) technology and instead relies on people to do all of the conversions. It assures that the transcribed audio is accurate up to 99 %.

Price:$1.25 per minute
Features
- AI-based mp3 and speech to text converter
Pros
- It offers a rough draft (generated by the AI) with up to 80% accuracy at a comparatively lower cost.
- It can add English and foreign captions to your videos.
Cons
- Rev is a bit more expensive than other service providers in the same industry.
7. Transcribe
Transcribe , a widely used and acknowledged program is a must-have for journalists, lawyers, students, and anybody else who could use such software. It is one of the most popular web tools since it is fast, simple, and flexible to the demands of users. It offers a one-week free trial and then charges $20 per year for a single subscription with an additional $6 per hour of automated audio to text conversion. Alternatively, you can pay 20 USD per year to use the editor without automated transcriptions.
Price:$20/year + $6/hour
Features
- Integrated editor
- Voice typing
- Automatic text expander
Pros
- Simple interface
- Great features and shortcuts
Cons
- It is slow sometimes, depending on the size of the audio file.
8.Vocalmatic
Vocalmatic is the most convenient MP3 to text internet portal, complete with a professional transcribing service for journalists, podcasts, marketing, and sales. It converts text to MP3, WMA, and WAV formats. Its voice-to-text AI turns audio and video data into text in minutes and is rapid, efficient, and simple to use. It can transcribe your material into over 110 languages, making it as global as possible while being understandable to everybody. The online editing mode with playback controls is a highly unique feature. This text editor has Word and text export options.
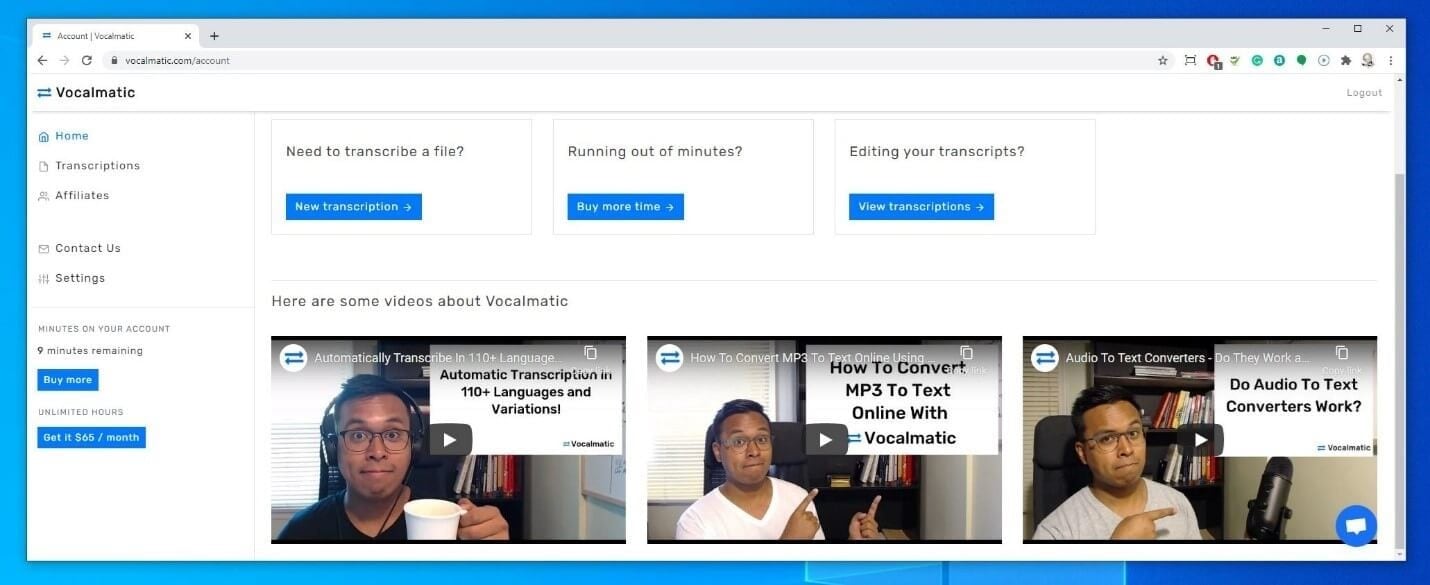
Price:$10/hour
Features
- Mp3 to text converter
- Text editor
Pros
- Supports several languages.
Cons
- The interface is not as easy to use.
9. Getwelder
Getwelder mp3 to text converter is best for those who have already begun a podcast using Zoom or Skype and want to improve the quality of their studio.
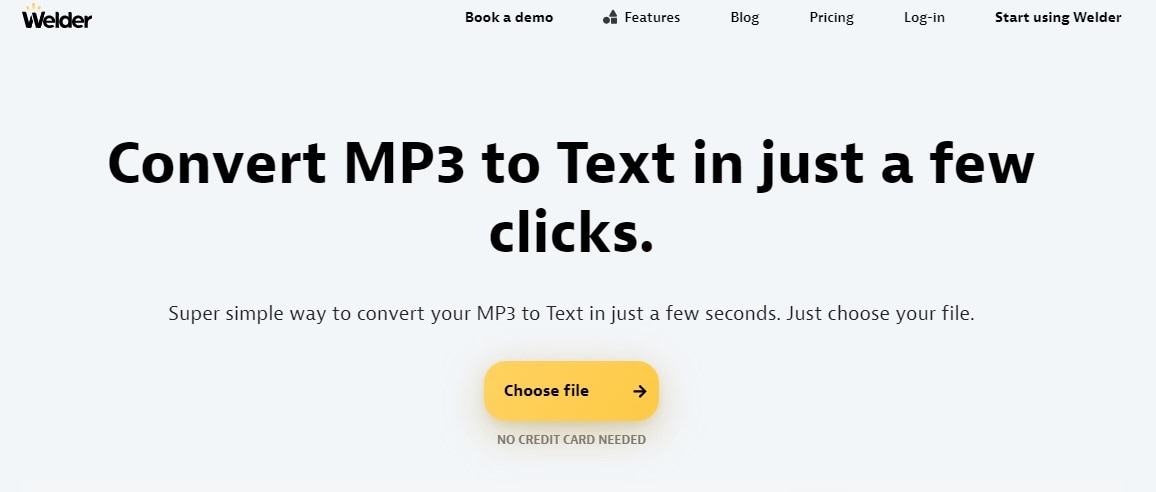
**Platform:**Android
Price:$20/month
Features
- It offers the finest user interface and user experience, making it the simplest to use.
- Amazing sound and video quality with up to 4K video and 48Khz audio.
Pros
- It provides separate audio and video tracks for appropriate editing.
- They now provide podcast transcripts that can be used right away for reusing material. Guests may quickly find out how to utilize it.
Cons
- Pricing is a little high for beginners and enthusiasts, at $20 per month.
- The video file is very big (it will quickly eat up your hard disk).
10. Amberscript
AmberScript is an online service that accepts MP3 audio recordings and converts them to text. It uses ASR (Automatic Speech Recognition) technology to significantly speed up the process. Moreover, the app gives a free trial transcription that lasts up to 30 minutes. Following that, you must acquire their premium membership to continue converting.
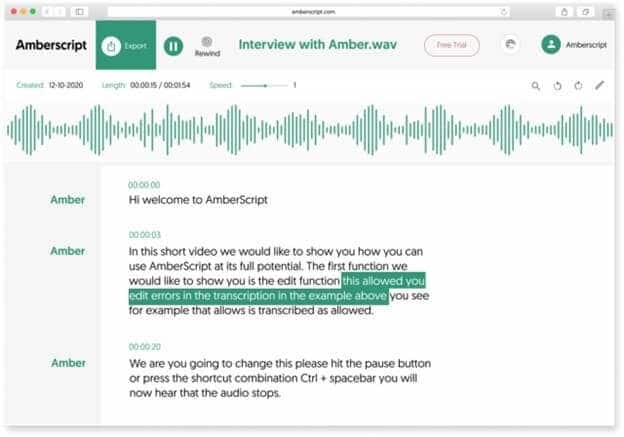
**Platform:**Android
Price:$8/hour
Features
- Text editor
- Multiple speakers distinction
- Mobile app available
Pros
- It provides a simple way to upload the source files.
- Artificial Intelligence (AI) is used for transcribing.
Cons
- Only the costliest membership gives 99 percent accuracy since people review the transcriptions.
11. 360 Converter
360 Converter is one of the most basic MP3 to text converters available. It features the most intuitive user interface with easy selection formats. It handles not only local files but also cloud and internet data. It can transcribe mp3 files in over 12 languages and save them as plain text, Microsoft Word documents, or PDF files. It has automated transcription software that accurately translates audio and video data to text, making it a must-have for transcribing tasks.
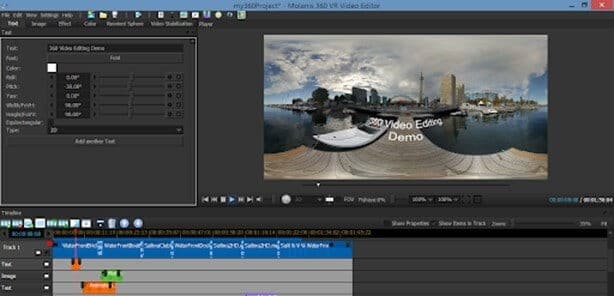
**Platform:**Android
**Price:**free
Features
- Video to text
- Speech to text
Pros
- Has a free version that fives accurate results
Cons
- File limit of 20MB foe guests and 50MB for members who have signed up
12. Virtual Speech
This internet application converts your voice into text and sends it to you through email, where you can download it. For audio files under 60 seconds, this program is free to use. We charge a nominal price for each minute of extra audio over this. When you submit an audio file, the price is plainly indicated.
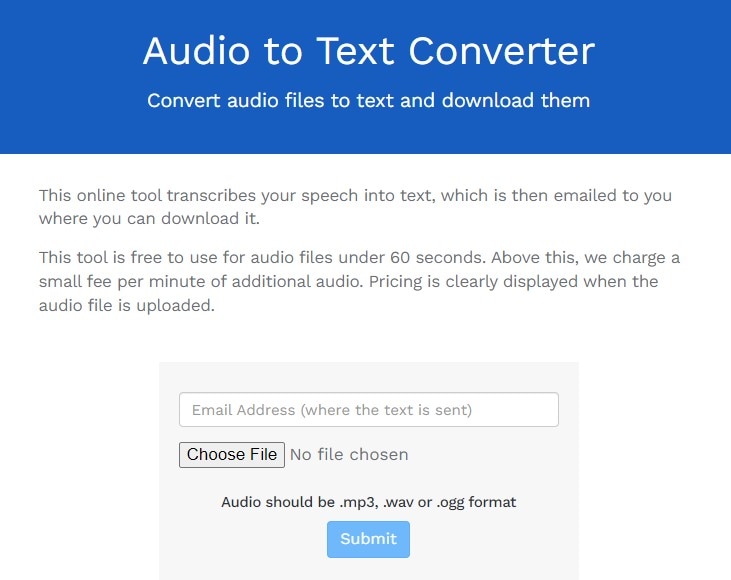
**Platform:**Android/iPhone
**Price:**free
Features
- Audio to text converter
- Download text file
Pros
- The free version gives you up to 10 files per month
Cons
- It lacks a text editor
13. Sonix
Sonix is a legitimate and no-nonsense online converter that is available in three membership tiers and offers 30 minutes of free transcribing as a trial without asking for any credit card information. The online tool ensures maximum conversion accuracy and even provides attractive savings if you purchase their Enterprise package.
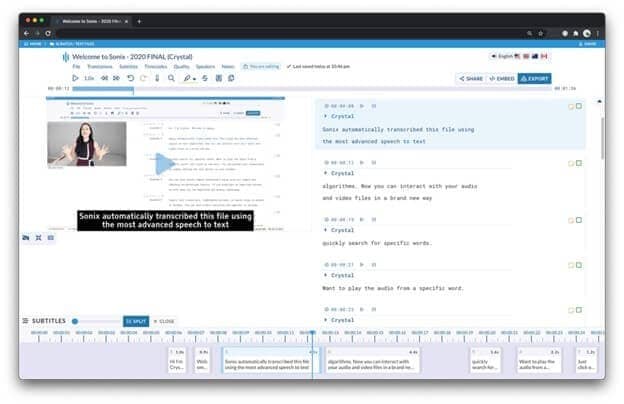
**Platform:**iPhone
Price:$10/hour
Features
- 35+ languages
- Text editor
- Word-by-word timestamps
- Speaker labelling
Pros
- Many prestigious companies, like Stanford University, CNBC, Harvard University, ESPN, and others, promote Sonix.
- The corporate membership provides users with enhanced training.
Cons
- Even using the trial transcription requires registration.
14. Audext
Audext is a fantastic online application that can automatically transcribe your audio files, which is both rapid and inexpensive. It only costs $12 per hour of transcribing, or $5 if you sign up for their subscription plan.
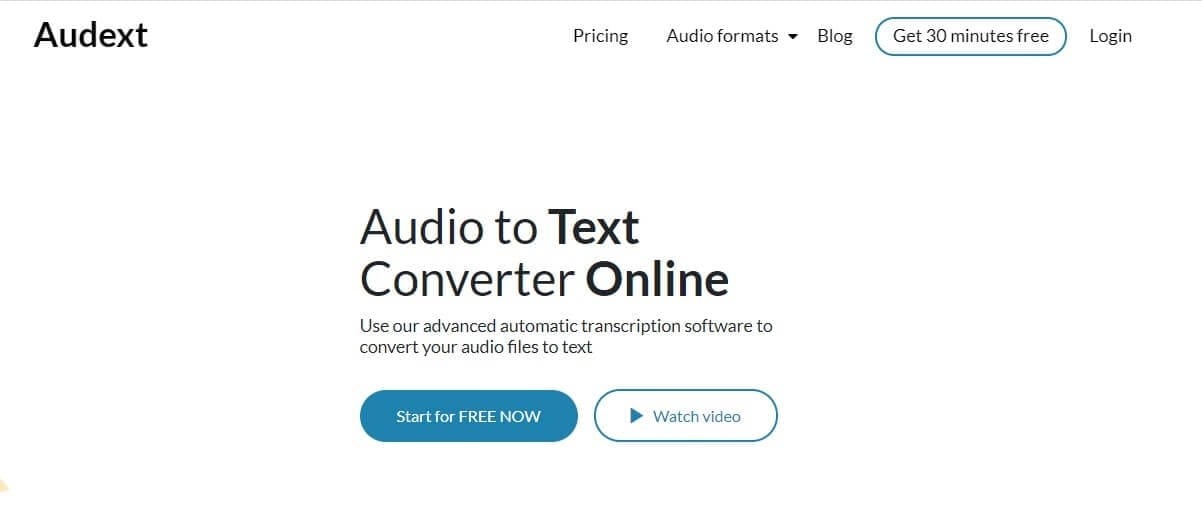
**Platform:**iPhone
Price:$12/hour
Features
- Built-in text editor
- Auto-save progress
- Recognition of voices despite background noise
- Speaker identification
- Various audio formats support
Pros
- Audext is simple to use and helps the process go smoothly from beginning to end.
Cons
- It needs a lot of computation power.
15. Bear File Converter
Bear File Converter is a good solution for quick audio-to-text conversion for short notes. Based on the Baidu recognition engine, it can convert clean audio with minimal interfering sounds properly. However, the internet program does not convert MP3 music files to text accurately. Furthermore, the internet program only records for three minutes.
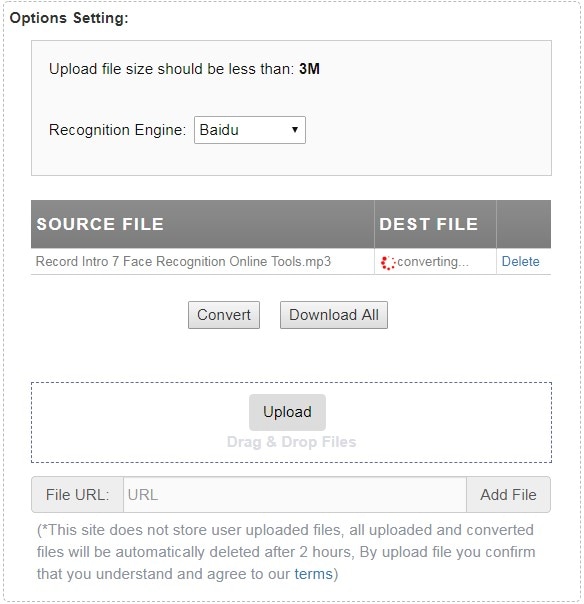
**Platform:**Windows/Mac
**Price:**Free with a premium version ($29.95 per user)
Features
- Mp3 to text conversion
- AI-based speech to text conversion
- Online text editor
Pros
- For transcribing, it uses Artificial Intelligence (AI).
- It provides a simple way to upload the source files.
Cons
- The online tool has a file size limit of 3 minutes.
- It is not very accurate on mp3 files.
How to Convert MP3 to Text with Filmora
The Speech to Text effect makes it seem like someone’s words are transformed into text on your screen! Consider making several text tracks and beginning the next one a little later than the previous if you want to create a pause in the phrase.
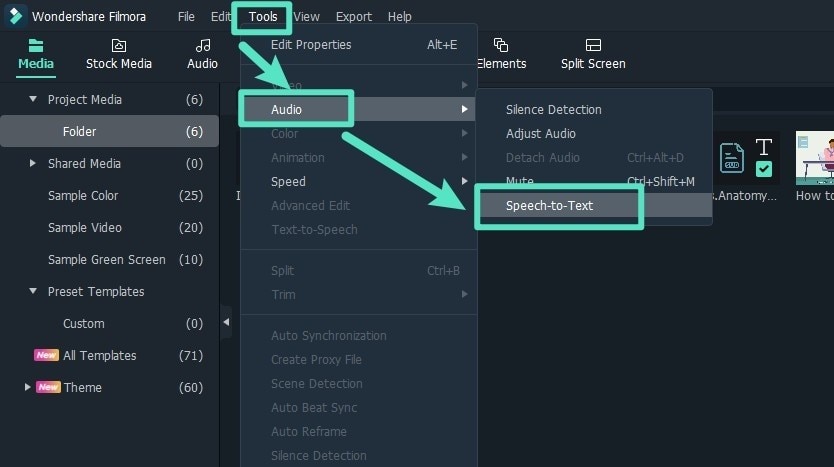
Step1 – Add file and select speech to text feature
You can do this in four ways.
A. Select the audio asset on the timeline, then go to Tools > Audio > Speech-to-Text in the top menu bar.
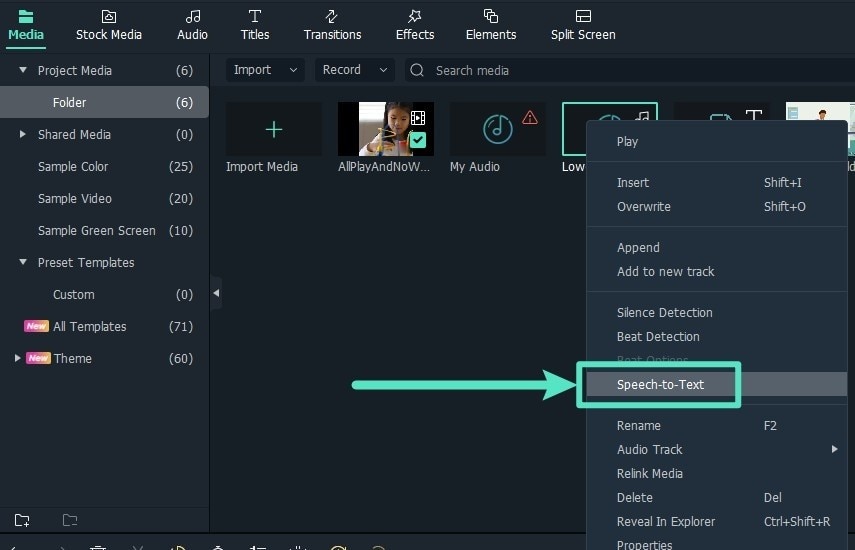
B. In the Media resource box, right-click the video/audio with the audio track and choose Speech-to-Text.
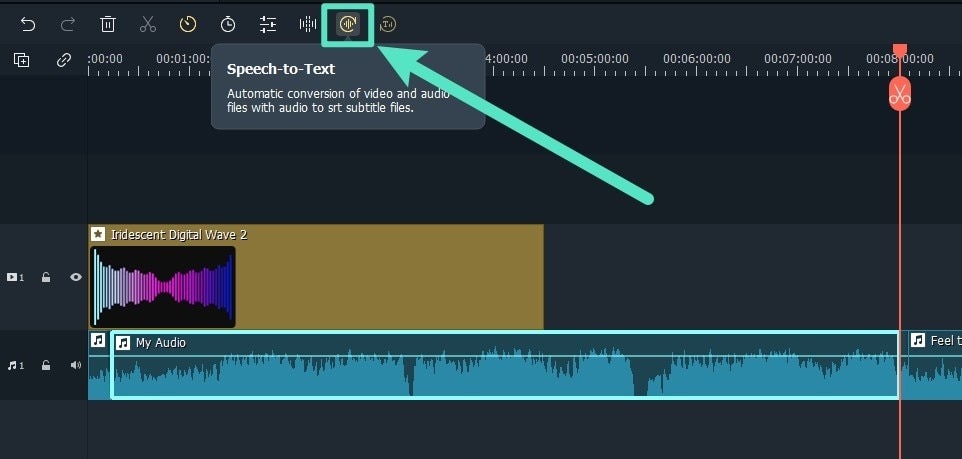
C. Once you’ve selected an audio asset, click the speech-to-text tool icon in the toolbar; if there is no compatible file type on the timeline, it will not appear.
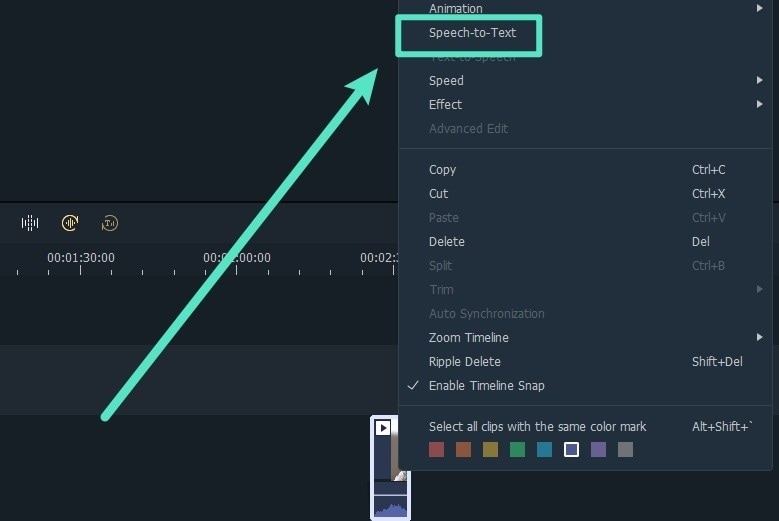
D. Right-click on the audio asset in the timeline and pick Speech-to-Text from the context menu that appears.
Step2- Parameter Settings
Select the language of the audio files to be transcribed and the files to be converted in the STT parameter setting bar and tick the automatically match to the timeline option.
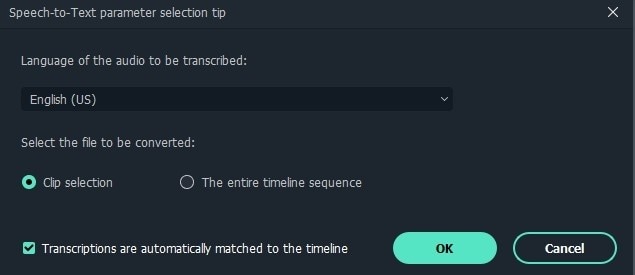
You must pick the language of the clip transcription in the language option.
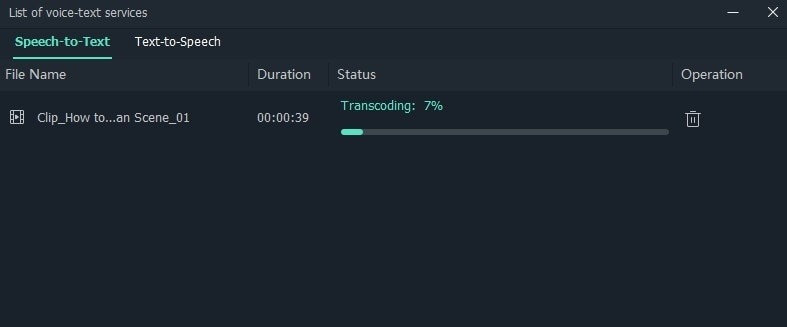
Step3– The list of tasks
- The progress of the file’s transcoding and transcription will be shown in the task list.
- The list is ordered from the first imported file to the last, with the latter at the very top of the list. It allows for up-and-down swiveling.
Step4– Generate and export files
SRT format will be used to display the created file.

Notice and Tips When Converting MP3 to Text
Keeping it Confidential
Online services present yet another potentially serious issue: privacy. Your audio file is stored on someone else’s server since you have to submit it to the service.
Your audio might be revealed to the public if that service is ever hacked or someone working there is not honest. In some circumstances, this may not be an issue, but in others, it might be a major one. In certain sectors, it might result in legal issues and large penalties. Many online voice to text services aren’t an option if you operate in a profession with tight privacy rules, such as healthcare.
Audio-to-text PC software is Better
While there are certain drawbacks to computer-assisted transcribing, it is not without merit. It’s a cheap method to convert your audio, and it can “learn” from its errors and improve over time thanks to the newest machine learning technologies. Simple audio material, taking notes, and other tasks with a low degree of complexity are best handled by software or web-based solutions. Even so, you’ll have to proofread everything and make a significant number of mistakes.
It’s also beneficial in cases when accuracy is less crucial than having the material translated to text, such as contact center monitoring. If the material is only being read internally, perfection may be less essential than speed and cost.
Bottom Line
Do you wish to convert an MP3 file to a text file and transcribe a speech? You may utilize the online auto transcribing tool provided by Filmora! It’s quick and simple to operate. Say goodbye to hours of manually transcribing audio transcriptions and welcome to automated transcriptions that just take a few clicks. There is no software to download; everything is done online.
Simply upload your audio recording, then choose the Auto Transcribe option. You may make minor changes to the transcription if necessary. WAV, M4A, and other common audio formats are all supported by Filmora’s speech-to-text service.
- VEED.IO
- Flixier
- Happyscribe
- Go Transcribe
- Rev
- Transcribe
- Vocalmatic
- Getwelder
- Amberscript
- 360 Converter
- Virtual Speech
- Sonix
- Audext
- Bear File Converter
- How to Convert MP3 to Text with Filmora
- Notice and Tips When Converting MP3 to Text
Why You Should Use MP3 to Text Converter?
Any audio can be converted to text using an MP3 to text converter. It’s an excellent approach to transcribe conferences or presentations accurately. Transcribing audio takes a long time, as we all know. Depending on the size of your MP3 files, an MP3 to text converter can correctly auto-transcribe them into text in minutes. This means you can begin correcting and polishing your transcriptions immediately, thus, cutting down on time spent on the task!
7 Best MP3 To Text Converter for Windows/Mac
1. Filmora
Although Wondershare Filmora Video Editor is well recognized for its broader video editing operations, it also has a large library of other features, such as mp3 to text conversion, that you can utilize to make your projects handy. It’s a Freemium program, like most other products we’ve discussed. However, the advantage here is that you can get mp3 to text software and all of Filmora’s other tools and features, providing you more bang for your money.
Platform: Windows/Mac
Price:$4.99/Month
Features
- Mp3 to text conversion
- Support upload audio files
Pros
- Very easy to use
- Simple interface that requires few clicks
- Pre-built text templates
2.Office 365/Word
Microsoft Word provides various useful built-in features for transcribing audio files. Word can instantly transcribe straight from your audio files, eliminating the need to place a speaker up to your PC microphone and play it. Of course, you’ll need an Office 365 or Office license for this to operate (though there are various hacks for getting Office to work for free, at least temporarily). Sign in to Office 365 on your browser and create a new Word document to transcribe.
Platform: Windows
**Price:**Free
Features
- Directly record in Word.
- Voice instructions may be uploaded as an audio file.
Pros
- It allows you to capture audio from your device’s microphone, as well as recognize and transcribe noises from the speakers in real-time.
Cons
- It is compatible with Windows devices only.
3. Google Docs
Google Docs has become an indispensable tool for most content creators., especially if you’re already using Google services. It allows you to write with your voice and access over 100 view commands for altering and formatting your documents in any manner you like. Making bullet points, altering the text style, and shifting the pointer to other document places are all examples. Consider Google Docs or Google Slides with Google’s Voice Typing tool for Google products like Gmail and Google Drive and require an in-built, powerful, but free dictation tool.
Platform: Windows/Mac
**Price:**Free
Features
- Voice typing and commands
- Transcribe in real-time
Pros
- Compatible with any device
- Very accurate
- It’s quick, particularly for real-time typing, since no prepared audio files are required
Cons
- It can only function in real-time, not with previously recorded data
4. Speech to Text converter
Any voice can be converted into plain text with the speech-to-text converter tool. The default language is English US. It also works with the languages that are installed on your Windows 10 computer. This tool is straightforward and uncluttered. Instead of typing your email, narrative, lesson, or chat, you can talk, and this program will convert it to text. You may copy and paste this content anywhere you like. It’s a Universal Windows Platform (UWP) software, which means it’ll run on any Windows 10 device, including phones, PCs, tablets, and Xboxes.
Platform: Windows
**Price:**Free
Features
- Voice commands
- Text editor
- Will support the language that you use in your PC
Pros
- It is highly efficient due to the usage of keyboard controls
- It gives simple keyboard shortcuts for navigation
Cons
- It needs an internet connection
5. Sobolsoft
Sobolsoft’s MP3 Voice to Text Converter software is one of the most incredible solutions on the market if you’re seeking a trustworthy mp3 to text program that you can use on your PC. The program is simple; just choose the audio files you want to transcribe and press the Start Converting button. All of the text generated by the program will be presented in the Results box, where you may modify, copy, or save it as a text file. This program, however, does not handle video files, so you won’t be able to use it to transcribe videos stored in MP4, AVI, MOV, or any other common video file type. You may sample Sobolsoft’s MP3 Speech to Text Converter for free before deciding if you want to buy a license to use the program without limitations.
Platform: Windows
Price:$19.99 per month
Features
- Powerful speech to text conversion
- Transcribe in real time
Pros
- In terms of production and understandable alternatives, there are no time constraints.
- You can separate the timeframes and convert numerous files.
Cons
- This software doesn’t provide support for video files.
6. InqScribe
Even though InqScribe does not produce text automatically, it is still one of the best tools for creating subtitles for films and audio transcripts on Windows and Mac computers. The program supports a wide range of languages, allowing you to transcribe several languages in the same document. Simply drag and drop a video or audio file into the media window of the app and begin composing your transcript. InqScribe also allows you to include timecodes wherever in the text, making it ideal for creating subtitle files that you can simply add to videos you post online.
**Platform:**Windows/Mac
Price:$99 for an individual license
Features
- The program lets you export the process and add subtitles to your projects before exporting them as video files using Final Cut Pro or Adobe Premiere Pro.
Pros
- It can convert movie subtitles
- Feature-rich
Cons
- Installation is required
- It doesn’t allow recording directly into the software
7. Watson STT
Arabic, English, Brazilian, German, Portuguese, Spanish, French, Japanese, Korean, and Mandarin are just a few of the languages available. The IBMWatson STT is ideal for anybody who works with one of these languages. This is one of the greatest free audio to text converters out there.
This transcription program enables you to convert audio to text in real time or upload previously recorded files. It boasts of advanced language models, audio frequency settings, and transcription output capabilities.
You can easily organize and prepare your transcripts with features like numeric redaction, speaker labels, smart formatting, word timestamps, confidence, keyword detection, and alternatives.
**Platform:**Windows/Mac
**Price:**Free
Features
- Smart formatting
- Speaker labels
- Keyword spotting
- Word timestamps
- Numeric redaction
Pros
- Utilizes unstructured data
- Enhances the user experience
- Allows you to upload prerecorded audio
Cons
- Limited options in a free version
15 Best mp3 to text converter Online
2. VEED.IO
Veed.io is much more than just an MP3 to text converter. With this powerful tool, you may make any kind of audio or video. It lets you add sound effects to Instagram stories and YouTube intros, among other things. To transcribe the voice from your MP3 to a text file, get Veed’s free, fast, and simple online transcription tool. It works with WAVs, M4As, OGGs, and even video files and MP3.
**Price:**free and paid ($12/mo)
Features
- Fast cloud servers
- It can read and transcribe a variety of languages, including English, French, Chinese, Spanish, and others.
Pros
- Simple interface
Cons
- The free version is not accurate
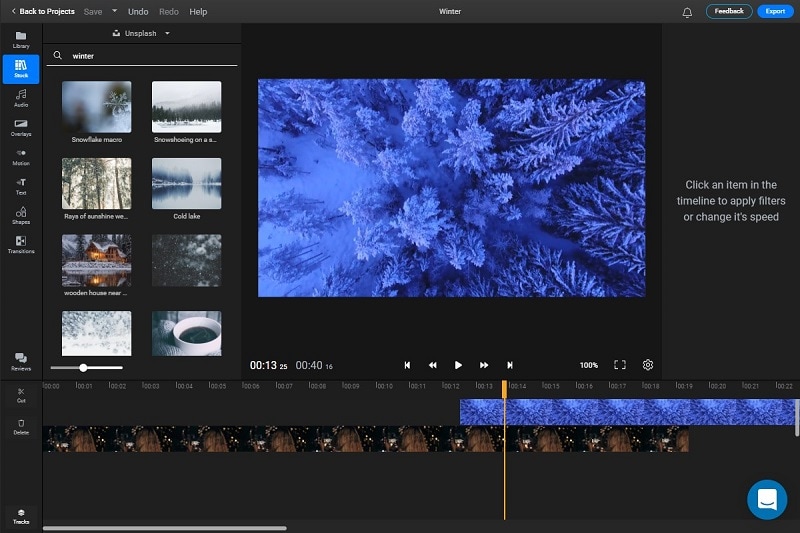
3. Flixier
Flixier is a cloud-based, collaborative video editing application that operates on any computer browser, significantly speeding up your video production process. Flixier is a robust video editor that runs entirely inside the browser. This means you can keep editing on several devices, including Chromebooks, without sacrificing performance. Flixier is also simple for collaborative video editings, such as when working with a cameraperson or an outside editor.
**Price:**free and paid ($10/user/mo)
Features
- Speech to text converter
Pros
- It is a collaborative tool that allows you to use other apps.
Cons
- It takes to transcribe a file.
- The free version has fewer features.
4. Happyscribe
Happy Scribe is a reliable voice-to-text converter that can also transcribe MPA, MPE, MPEG, M4A, WMA, MP4, and MOV files for 120 Euros per hour of conversion. It has been recommended by the BBC, Forbes, Spotify, and other reputable organizations. When your account’s credits go below a certain level, the solution automatically recharges your account.
Price:$2.11 per minute
Features
- Fast and reliable speech to text converter
- Real-time transcription
Pros
- No credit expirations.
- It can transcribe Zoom meetings.
Cons
- Since AI is used for transcription, the text might not be as accurate as expected.
5. Go Transcribe
Go transcribe is a popular service that uses artificial intelligence. The app is compatible with any device and supports 17 different languages. Within the same sector, it also offers Team Management solutions. Go Transcribe offers a pay-per-minute service at 22 cents (USD). It also offers a monthly membership plan that starts at 48 USD a month for 4 hours. They also provide free audio and video translation services for testing reasons.
Price:$48 for 4 hours a month
Features
- Mp3 to text converter
- Audio and video translation
Pros
- Has a lot of useful features
- Simple interface for novices
Cons
- Text is accurate at times
6. Rev
Rev , one of the greatest and most reputable transcription services, does not use Artificial Intelligence (AI) technology and instead relies on people to do all of the conversions. It assures that the transcribed audio is accurate up to 99 %.
Price:$1.25 per minute
Features
- AI-based mp3 and speech to text converter
Pros
- It offers a rough draft (generated by the AI) with up to 80% accuracy at a comparatively lower cost.
- It can add English and foreign captions to your videos.
Cons
- Rev is a bit more expensive than other service providers in the same industry.
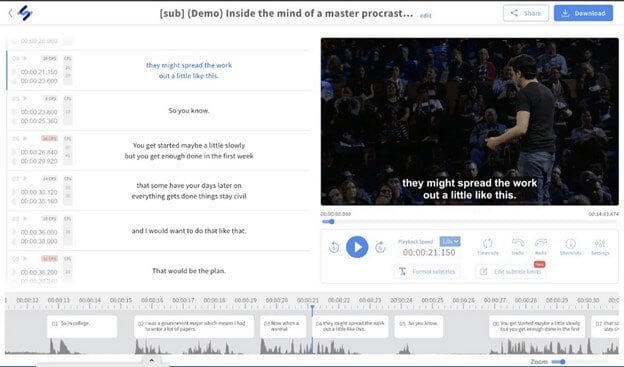
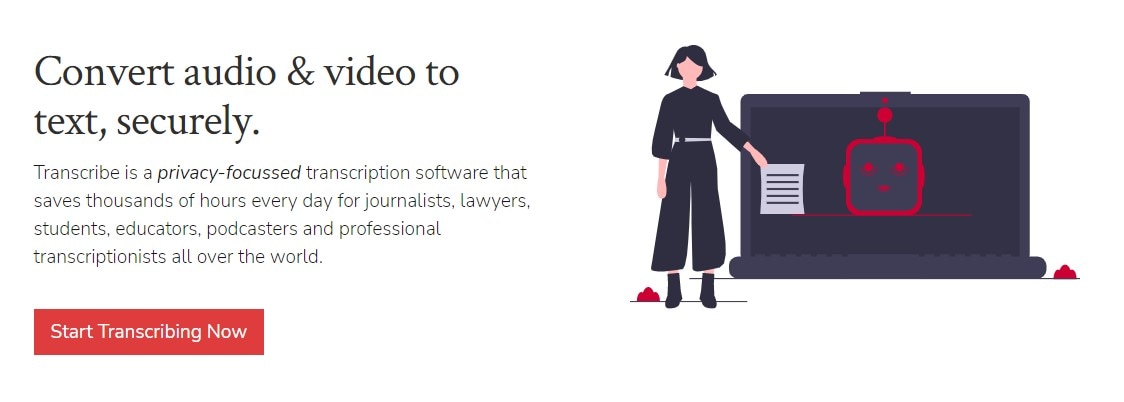
7. Transcribe
Transcribe , a widely used and acknowledged program is a must-have for journalists, lawyers, students, and anybody else who could use such software. It is one of the most popular web tools since it is fast, simple, and flexible to the demands of users. It offers a one-week free trial and then charges $20 per year for a single subscription with an additional $6 per hour of automated audio to text conversion. Alternatively, you can pay 20 USD per year to use the editor without automated transcriptions.
Price:$20/year + $6/hour
Features
- Integrated editor
- Voice typing
- Automatic text expander
Pros
- Simple interface
- Great features and shortcuts
Cons
- It is slow sometimes, depending on the size of the audio file.
8.Vocalmatic
Vocalmatic is the most convenient MP3 to text internet portal, complete with a professional transcribing service for journalists, podcasts, marketing, and sales. It converts text to MP3, WMA, and WAV formats. Its voice-to-text AI turns audio and video data into text in minutes and is rapid, efficient, and simple to use. It can transcribe your material into over 110 languages, making it as global as possible while being understandable to everybody. The online editing mode with playback controls is a highly unique feature. This text editor has Word and text export options.
Price:$10/hour
Features
- Mp3 to text converter
- Text editor
Pros
- Supports several languages.
Cons
- The interface is not as easy to use.
9. Getwelder
Getwelder mp3 to text converter is best for those who have already begun a podcast using Zoom or Skype and want to improve the quality of their studio.
**Platform:**Android
Price:$20/month
Features
- It offers the finest user interface and user experience, making it the simplest to use.
- Amazing sound and video quality with up to 4K video and 48Khz audio.
Pros
- It provides separate audio and video tracks for appropriate editing.
- They now provide podcast transcripts that can be used right away for reusing material. Guests may quickly find out how to utilize it.
Cons
- Pricing is a little high for beginners and enthusiasts, at $20 per month.
- The video file is very big (it will quickly eat up your hard disk).
10. Amberscript
AmberScript is an online service that accepts MP3 audio recordings and converts them to text. It uses ASR (Automatic Speech Recognition) technology to significantly speed up the process. Moreover, the app gives a free trial transcription that lasts up to 30 minutes. Following that, you must acquire their premium membership to continue converting.
**Platform:**Android
Price:$8/hour
Features
- Text editor
- Multiple speakers distinction
- Mobile app available
Pros
- It provides a simple way to upload the source files.
- Artificial Intelligence (AI) is used for transcribing.
Cons
- Only the costliest membership gives 99 percent accuracy since people review the transcriptions.
11. 360 Converter
360 Converter is one of the most basic MP3 to text converters available. It features the most intuitive user interface with easy selection formats. It handles not only local files but also cloud and internet data. It can transcribe mp3 files in over 12 languages and save them as plain text, Microsoft Word documents, or PDF files. It has automated transcription software that accurately translates audio and video data to text, making it a must-have for transcribing tasks.
**Platform:**Android
**Price:**free
Features
- Video to text
- Speech to text
Pros
- Has a free version that fives accurate results
Cons
- File limit of 20MB foe guests and 50MB for members who have signed up
12. Virtual Speech
This internet application converts your voice into text and sends it to you through email, where you can download it. For audio files under 60 seconds, this program is free to use. We charge a nominal price for each minute of extra audio over this. When you submit an audio file, the price is plainly indicated.
**Platform:**Android/iPhone
**Price:**free
Features
- Audio to text converter
- Download text file
Pros
- The free version gives you up to 10 files per month
Cons
- It lacks a text editor
13. Sonix
Sonix is a legitimate and no-nonsense online converter that is available in three membership tiers and offers 30 minutes of free transcribing as a trial without asking for any credit card information. The online tool ensures maximum conversion accuracy and even provides attractive savings if you purchase their Enterprise package.
**Platform:**iPhone
Price:$10/hour
Features
- 35+ languages
- Text editor
- Word-by-word timestamps
- Speaker labelling
Pros
- Many prestigious companies, like Stanford University, CNBC, Harvard University, ESPN, and others, promote Sonix.
- The corporate membership provides users with enhanced training.
Cons
- Even using the trial transcription requires registration.
14. Audext
Audext is a fantastic online application that can automatically transcribe your audio files, which is both rapid and inexpensive. It only costs $12 per hour of transcribing, or $5 if you sign up for their subscription plan.
**Platform:**iPhone
Price:$12/hour
Features
- Built-in text editor
- Auto-save progress
- Recognition of voices despite background noise
- Speaker identification
- Various audio formats support
Pros
- Audext is simple to use and helps the process go smoothly from beginning to end.
Cons
- It needs a lot of computation power.
15. Bear File Converter
Bear File Converter is a good solution for quick audio-to-text conversion for short notes. Based on the Baidu recognition engine, it can convert clean audio with minimal interfering sounds properly. However, the internet program does not convert MP3 music files to text accurately. Furthermore, the internet program only records for three minutes.
**Platform:**Windows/Mac
**Price:**Free with a premium version ($29.95 per user)
Features
- Mp3 to text conversion
- AI-based speech to text conversion
- Online text editor
Pros
- For transcribing, it uses Artificial Intelligence (AI).
- It provides a simple way to upload the source files.
Cons
- The online tool has a file size limit of 3 minutes.
- It is not very accurate on mp3 files.
How to Convert MP3 to Text with Filmora
The Speech to Text effect makes it seem like someone’s words are transformed into text on your screen! Consider making several text tracks and beginning the next one a little later than the previous if you want to create a pause in the phrase.
Step1 – Add file and select speech to text feature
You can do this in four ways.
A. Select the audio asset on the timeline, then go to Tools > Audio > Speech-to-Text in the top menu bar.
B. In the Media resource box, right-click the video/audio with the audio track and choose Speech-to-Text.
C. Once you’ve selected an audio asset, click the speech-to-text tool icon in the toolbar; if there is no compatible file type on the timeline, it will not appear.
D. Right-click on the audio asset in the timeline and pick Speech-to-Text from the context menu that appears.
Step2- Parameter Settings
Select the language of the audio files to be transcribed and the files to be converted in the STT parameter setting bar and tick the automatically match to the timeline option.
You must pick the language of the clip transcription in the language option.
Step3– The list of tasks
- The progress of the file’s transcoding and transcription will be shown in the task list.
- The list is ordered from the first imported file to the last, with the latter at the very top of the list. It allows for up-and-down swiveling.
Step4– Generate and export files
SRT format will be used to display the created file.
Notice and Tips When Converting MP3 to Text
Keeping it Confidential
Online services present yet another potentially serious issue: privacy. Your audio file is stored on someone else’s server since you have to submit it to the service.
Your audio might be revealed to the public if that service is ever hacked or someone working there is not honest. In some circumstances, this may not be an issue, but in others, it might be a major one. In certain sectors, it might result in legal issues and large penalties. Many online voice to text services aren’t an option if you operate in a profession with tight privacy rules, such as healthcare.
Audio-to-text PC software is Better
While there are certain drawbacks to computer-assisted transcribing, it is not without merit. It’s a cheap method to convert your audio, and it can “learn” from its errors and improve over time thanks to the newest machine learning technologies. Simple audio material, taking notes, and other tasks with a low degree of complexity are best handled by software or web-based solutions. Even so, you’ll have to proofread everything and make a significant number of mistakes.
It’s also beneficial in cases when accuracy is less crucial than having the material translated to text, such as contact center monitoring. If the material is only being read internally, perfection may be less essential than speed and cost.
Bottom Line
Do you wish to convert an MP3 file to a text file and transcribe a speech? You may utilize the online auto transcribing tool provided by Filmora! It’s quick and simple to operate. Say goodbye to hours of manually transcribing audio transcriptions and welcome to automated transcriptions that just take a few clicks. There is no software to download; everything is done online.
Simply upload your audio recording, then choose the Auto Transcribe option. You may make minor changes to the transcription if necessary. WAV, M4A, and other common audio formats are all supported by Filmora’s speech-to-text service.
“Harmonizing Screens: A List of the Top 15 Scores for Various Genre Videos”
Montage is a film editing technique that combines a series of clips or shots into a single sequence. Background music is often applied to the final montage during compilation. We’ll look at some of the best montage music for different video types and the benefits of adding them to your montage video.
Why Music Is Important for Montage Video
Music plays an essential role in montage videos. Here are five reasons why you should add music to your montage video.
1. Music Captures Attention
One of the reasons people include music in montage videos is that it holds the audience’s attention; it shapes emotion while motivating viewers. In addition to touching viewers, music makes the moving images in your montage video seem more beautiful and engaging. It also brings mood and dynamism to the video.
Musicologists have discovered that the choice of musical instruments, volume, harmony, and tempo play a vital role in montage video.
2. Music Takes Your Montage Video to the Next Level
By using music, you’ll boost the cohesiveness and production value of your montage video. Your audience wants a professional montage video that is well-constructed and flows nicely. Music is the bridge that lets your montage video transition seamlessly between different scenes or ideas, particularly when you need to have a jump cut.
Additionally, montage music is a great way to fill in moments in your montage video that would have been silent. You can also use it to fill dead air in your video where there is a visual without sound.
3. Music Helps You to Communicate Your Message
Music is a vital component in conveying your message in your montage video. The music in your video should be in tune with the message you are trying to send.
4. Helps to Underscore the Unfolding Action
Montage music helps you to emphasize the action taking place in your video. As a result, this will make your audience focus on the action and get your message.
5. Helps You Create Rhythm for Your Montage Video
Music allows you to create a rhythm for scenes and clips in your montage video. A good rhythm can hold up your entire montage video.
15 Best Montage Music for Different Video Types
A good montage music track syncs to the beat of the video, and the song plays right on each shot. Keeping this in mind, here are 15 of the best montage music for different video types.
1) Tony Z - Road So Far
Released in 2017, Road So Far is a song by Tony from his album of the same name. The duration of the track is 3:31 minutes. You can use this song in your gaming montage video for free so long as you give the artist credit.
- Tony Z - Road So Far
2) Call Me - LiQWYD
Call Me by LiQWYD is an electronic pop montage music ideal vlogs. The duration of this song is 2:39 minutes, and it has a BPM of 76. The song is available under a Creative Commons Attribution. You can use it for free on your montage, but you have to give LiQWYD credit.
- Call Me - LiQWYD
3) ᴇʀᴇᴅᴀᴢᴇ ɪ ᴛᴇʟʟ ʏᴏᴜ
ᴇʀᴇᴅᴀᴢᴇ ɪ ᴛᴇʟʟ ʏᴏᴜ is suitable for daily life montage video. The length of the songs is 05:12 minutes. The music track does not have copyright, so it’s free to use on your montage video to make it more engaging and send your message.
- ᴇʀᴇᴅᴀᴢᴇ ɪ ᴛᴇʟʟ ʏᴏᴜ
4) NEFFEX - Good Day (Wake Up)
This song is ideal for daily life montage, as it motivates you to wake up and have a great day. The duration of this copyright-free pop song is 2:52 minutes. No attribution is required when you use this song.
- NEFFEX - Good Day (Wake Up)
5) K-391 - This Is Felicitas
K-391’s This Is Felicitas is a piece of good music for montages related to birthdays. The length of the song is 4:41 minutes. It is available under a Creative Commons Attribution license, and reusing is allowed. The track will bring you nostalgia, as it will make you miss being a kid.
- K-391 - This Is Felicitas
6) New York Philharmonic’s “La Gazza Ladra” Overture
“La Gazza Ladra” Overture by New York Philharmonic is a great AFV music montage. The length of this song is 4:15 minutes, and it’s included in the Absolute Masterworks - High Energy album. You can use it in event montage videos.
- New York Philharmonic’s “La Gazza Ladra” Overture
7) Win In The End by Mark Safan
Win In The End by Mark Safan is one of the most popular 80s montage music. The song is suitable for use in event montages such as basketball games. The duration of the song is 4:44 minutes. The track is from the soundtrack of the 1985 Teen Wolf movie.
- Win In The End by Mark Safan
8) We Fight For Love by The Power Station
This 80s montage music is great for birthday videos, as it will remind you of the good old days of the Eighties. The duration of this music track is 4:19 minutes.
- We Fight For Love by The Power Station
9) Night on Bald Mountain by Various Artists
The Night on Bald Mountain is a song from the album Larry Talbot’s Favorite Halloween Music. Suitable for vlog montage, the duration of this AFV music montage is 9:41 minutes.
10) Flight By Tristam and Braken
Flight By Tristam and Braken was released in 2013, and the song is from the album by the same name. The length of this dance/electronic music track is 3:39 minutes, and it’s suitable for event montages.
- Flight By Tristam and Braken
11) Colors - Tobu
Released in 201t, Colors by Tobu from the album of the same name. The track runs 4:39 long with a major mode and a key. You can use it double-time at 256 BPM or half-time at 64 BPM. This sad song has a tempo of 128 BPM, and it’s suitable for a daily life montage.
- Colors - Tobu
12) Ahrix - Nova
Ahrix by Nova is a dance/electronic song from The Beginning album. The song was released in 2015, and it runs 4 minutes and 41 seconds long. The track has a tempo of 128 BPM, meaning it’s less than allegro but moderately fast. This song is the best music for montage for your vlog.
- Ahrix - Nova
13) Renegade - Noisestorm
Renegade by Noisestorm is an electro song that was released in 2021. It’s included in the Renegade EP as the first track, and it’s the 17th track on the compilation album Monstercat 005 - Evolution. The song has a tempo of 127 BPM, and it runs 6 minutes and 10 seconds long. The track is suitable for a sports event montage.
- Renegade - Noisestorm
14) Disfigure - Blank
Blank by Disfigure is a dance/ electronic song from the album Blank (VIP). Released in 2013, the song has a tempo of 140 BPM. The length of this track is 05:2. The song has high energy, and it’s danceable with a 4-beat-per-bar time signature; this makes it suitable for a birthday montage.
- Disfigure - Blank
15) Vince DiCola - Hearts On Fire
Hearts On Fire is a pop/rock song by Vince DiCola from the soundtrack of Rocky IV: The Symphonic Rock Suite, and it features Diego Navarro. The track runs for 4 minutes and 17 seconds. This 80s montage music has a tempo of 96 BPM, making it ideal for a vlog montage.
- Vince DiCola - Hearts On Fire
Make Your Montage Video with Wondershare Filmora
Wondershare Filmora is a video editing program that allows you to create montage videos. To learn how to make a montage video with Filmora, follow the steps below:
01of 04Download & Install Filmora
Head over to https://filmora.wondershare.net/filmora-video-editor.html and download the latest Filmora. Once you have downloaded the Wondesrshare Filmora software, install it on your computer. Filmora supports both Mac and Windows. Launch the program on your computer to use it.
02of 04Import Media
Click New Project, then go to File>Import Media>Import Media File. Doing this will allow you to import your videos and photos to the media library.

03of 04Choose Preferred Music and more
Place your files on Filmora’s timeline by dragging and dropping them. Now, right-click on the video in the timeline to see the available options, which include the options to trim, split, change, speed, zoom, and crop your videos and photos. Navigate to the Audio tab and add sound effects. Then, choose tracks from the Filmora’s music gallery that you would like to use in your montage video.
If you want to add overlays or filters to your montage video, head to the Effects tab. The Effects tab has many options that allow you to create a transition in your montage video.


04of 04Save & Export
The Export button allows you to export your montage video and save it on your device. Once you have exported your video and saved it on your PC, you can upload it directly and share it with your audience on your YouTube channel. You’ll have to enter your login details to share your montage video.
Wondershare Filmora11 Express Better
Acheive More
Grow Together
Free Download Free Download Learn More

![]()
Summarize:
You can use these songs in your montage video to convey your message and attract viewers to your content. You can use Filmora to create attention-grabbing montage videos within a couple of minutes.
- Tony Z - Road So Far
2) Call Me - LiQWYD
Call Me by LiQWYD is an electronic pop montage music ideal vlogs. The duration of this song is 2:39 minutes, and it has a BPM of 76. The song is available under a Creative Commons Attribution. You can use it for free on your montage, but you have to give LiQWYD credit.
- Call Me - LiQWYD
3) ᴇʀᴇᴅᴀᴢᴇ ɪ ᴛᴇʟʟ ʏᴏᴜ
ᴇʀᴇᴅᴀᴢᴇ ɪ ᴛᴇʟʟ ʏᴏᴜ is suitable for daily life montage video. The length of the songs is 05:12 minutes. The music track does not have copyright, so it’s free to use on your montage video to make it more engaging and send your message.
- ᴇʀᴇᴅᴀᴢᴇ ɪ ᴛᴇʟʟ ʏᴏᴜ
4) NEFFEX - Good Day (Wake Up)
This song is ideal for daily life montage, as it motivates you to wake up and have a great day. The duration of this copyright-free pop song is 2:52 minutes. No attribution is required when you use this song.
- NEFFEX - Good Day (Wake Up)
5) K-391 - This Is Felicitas
K-391’s This Is Felicitas is a piece of good music for montages related to birthdays. The length of the song is 4:41 minutes. It is available under a Creative Commons Attribution license, and reusing is allowed. The track will bring you nostalgia, as it will make you miss being a kid.
- K-391 - This Is Felicitas
6) New York Philharmonic’s “La Gazza Ladra” Overture
“La Gazza Ladra” Overture by New York Philharmonic is a great AFV music montage. The length of this song is 4:15 minutes, and it’s included in the Absolute Masterworks - High Energy album. You can use it in event montage videos.
- New York Philharmonic’s “La Gazza Ladra” Overture
7) Win In The End by Mark Safan
Win In The End by Mark Safan is one of the most popular 80s montage music. The song is suitable for use in event montages such as basketball games. The duration of the song is 4:44 minutes. The track is from the soundtrack of the 1985 Teen Wolf movie.
- Win In The End by Mark Safan
8) We Fight For Love by The Power Station
This 80s montage music is great for birthday videos, as it will remind you of the good old days of the Eighties. The duration of this music track is 4:19 minutes.
- We Fight For Love by The Power Station
9) Night on Bald Mountain by Various Artists
The Night on Bald Mountain is a song from the album Larry Talbot’s Favorite Halloween Music. Suitable for vlog montage, the duration of this AFV music montage is 9:41 minutes.
10) Flight By Tristam and Braken
Flight By Tristam and Braken was released in 2013, and the song is from the album by the same name. The length of this dance/electronic music track is 3:39 minutes, and it’s suitable for event montages.
- Flight By Tristam and Braken
11) Colors - Tobu
Released in 201t, Colors by Tobu from the album of the same name. The track runs 4:39 long with a major mode and a key. You can use it double-time at 256 BPM or half-time at 64 BPM. This sad song has a tempo of 128 BPM, and it’s suitable for a daily life montage.
- Colors - Tobu
12) Ahrix - Nova
Ahrix by Nova is a dance/electronic song from The Beginning album. The song was released in 2015, and it runs 4 minutes and 41 seconds long. The track has a tempo of 128 BPM, meaning it’s less than allegro but moderately fast. This song is the best music for montage for your vlog.
- Ahrix - Nova
13) Renegade - Noisestorm
Renegade by Noisestorm is an electro song that was released in 2021. It’s included in the Renegade EP as the first track, and it’s the 17th track on the compilation album Monstercat 005 - Evolution. The song has a tempo of 127 BPM, and it runs 6 minutes and 10 seconds long. The track is suitable for a sports event montage.
- Renegade - Noisestorm
14) Disfigure - Blank
Blank by Disfigure is a dance/ electronic song from the album Blank (VIP). Released in 2013, the song has a tempo of 140 BPM. The length of this track is 05:2. The song has high energy, and it’s danceable with a 4-beat-per-bar time signature; this makes it suitable for a birthday montage.
- Disfigure - Blank
15) Vince DiCola - Hearts On Fire
Hearts On Fire is a pop/rock song by Vince DiCola from the soundtrack of Rocky IV: The Symphonic Rock Suite, and it features Diego Navarro. The track runs for 4 minutes and 17 seconds. This 80s montage music has a tempo of 96 BPM, making it ideal for a vlog montage.
- Vince DiCola - Hearts On Fire
Make Your Montage Video with Wondershare Filmora
Wondershare Filmora is a video editing program that allows you to create montage videos. To learn how to make a montage video with Filmora, follow the steps below:
01of 04Download & Install Filmora
Head over to https://filmora.wondershare.net/filmora-video-editor.html and download the latest Filmora. Once you have downloaded the Wondesrshare Filmora software, install it on your computer. Filmora supports both Mac and Windows. Launch the program on your computer to use it.
02of 04Import Media
Click New Project, then go to File>Import Media>Import Media File. Doing this will allow you to import your videos and photos to the media library.
03of 04Choose Preferred Music and more
Place your files on Filmora’s timeline by dragging and dropping them. Now, right-click on the video in the timeline to see the available options, which include the options to trim, split, change, speed, zoom, and crop your videos and photos. Navigate to the Audio tab and add sound effects. Then, choose tracks from the Filmora’s music gallery that you would like to use in your montage video.
If you want to add overlays or filters to your montage video, head to the Effects tab. The Effects tab has many options that allow you to create a transition in your montage video.
04of 04Save & Export
The Export button allows you to export your montage video and save it on your device. Once you have exported your video and saved it on your PC, you can upload it directly and share it with your audience on your YouTube channel. You’ll have to enter your login details to share your montage video.
Wondershare Filmora11 Express Better
Acheive More
Grow Together
Free Download Free Download Learn More
![]()
Summarize:
You can use these songs in your montage video to convey your message and attract viewers to your content. You can use Filmora to create attention-grabbing montage videos within a couple of minutes.
Also read:
- Updated In 2024, Unlock the Potential of Your Videos with Our Comprehensive List of Best Free Converters (Online/Offline)
- Updated 2024 Approved Guided Vocal Transformation Systems Insights Into Features and Other Options
- Updated From Mundane to Marvelous Zoom Voice Modification Tips & Tricks – Make Every Discussion a Delight for 2024
- New In 2024, Streamline Your Audio Archives with These Top 10 Free MP3 Transcription Apps – Integrated with SoundForge CC
- New Exploring 8 Signature Free Game Sounds That Are a Must-Have
- The Ultimate Safe and Entertaining Directory of Non-Casual Social Networks for 2024
- Mastering Audiovisual Updates Incorporating Sounds in AVI 2023 for 2024
- New 2024 Approved Master the Art of Audio Recording Top 8 Software Platforms to Achieve Professional Mixing and Mastering Results
- 2024 Approved Finding High-Quality Monstrous Soundscapes
- New In 2024, Seeking Out Elaborate Zombie Soundtracks
- New 2024 Approved Top Auditory Supplements for Tranquil Soundscapes
- 2024 Approved Solemn Sonatas Classic Music Selections to Enhance Wedding Cinematography
- The Most Comprehensive Selection of Audio Recording Software
- 10 Zoom-Friendly Vocal Effects to Personalize Your Digital Presence and Entertain Others for 2024
- Updated Discover Hilarious Audio Cues for 2024
- Increase Video Volume & Make Video Sounds Louder -Video Volume Booster
- Updated 2024 Approved Decoding the Process of Anime Dubbing Techniques and Success Stories
- In 2024, Top 6 Introduction-Level Digital Audio Workstation Applications
- Updated Unveiling the Button Tap Acoustic Signature for 2024
- Top Chrome-Compatible Microphones Your Ultimate Selection Guide for 2024
- Updated The Foremost Silence Engineer App Enhance Video Clarity and Focus
- Top-Rated Digital Audio Level Equalizer
- New How to Use Autotune in Audacity with Plugins for Free for 2024
- New Discovering the Top 6 Innovative Tools for Live Voice Modification for 2024
- Updated The Filmmakers Guide to Cutting Out Ambient Sound From iMovie on a Mac for 2024
- Excellent Free Online Audio Calibration Alternatives for 2024
- In 2024, How Does Gain Staging Impact the Overall Fidelity of Recorded Tracks?
- Exploring the Crème De La Crème of Distorted Audio Technology Tools
- New How to Seamlessly Convert Your Podcast Into the Universal MP3 Format
- New 2024 Approved Voice Memos Unveiled Comparing Features and Options Beyond Vocaroo
- Updated Optimize Your Skype Interactions The Top Voice Modification Gadgets and Software
- Updated Fundamental Steps to Create a Premier Auditory Library on YouTube
- The Ultimate Technique for Uniform Audio Amplitude in VLC A Detailed Walkthrough for 2024
- Updated Discovering the Best Voice-Altering Software for Google Meet As
- 2024 Approved Non-Licensed Music Choices Excelling in Video Montages
- Uncovering Fragmentation Auditory Signal
- 10 Best Podcast Recording Software
- Updated In 2024, Essential Websites to Access Pristine Free Audio FX
- Updated 2024 Approved The Modern Listeners Guide to AirPod and PC Syncing (For Windows & macOS Users)
- Updated 2024 Approved Cutting Out Clutter Strategies to Refine Audible Landscapes with Web-Based Audio Processors
- Updated 2024 Approved Navigating to the Pinnacle 5 Leading Audio Mixers for Mac Users
- How To Restore a Bricked Realme 10T 5G Back to Operation | Dr.fone
- How to Get and Use Pokemon Go Promo Codes On Samsung Galaxy XCover 6 Pro Tactical Edition | Dr.fone
- How to Unlock AT&T Apple iPhone XS with 3 Methods
- What Is an AI Video Generator? | Wondershare Virbo Glossary
- Delete Gmail Account With/Without Password On Xiaomi Redmi 13C
- In 2024, How to Transfer Contacts from Nubia Red Magic 9 Pro to Other Android Devices Using Bluetooth? | Dr.fone
- In 2024, Top 10 Fingerprint Lock Apps to Lock Your Nokia XR21 Phone
- Updated Free and Easy AVI Video Editing Software Options
- 2024 Approved Camtasia Tutorial Control Video Speed
- In 2024, Unlock Vivo Y100i Power 5G Phone Password Without Factory Reset Full Guide Here
- New Top 10 Robotic Voice Generators (with Comparison Table) for 2024
- In 2024, How To Remove the Two Factor Authentication On iPhone 12 Pro
- 3 Easy Ways to Factory Reset a Locked Apple iPhone 15 Without iTunes | Dr.fone
- How to Change Google Play Location On Samsung Galaxy A14 4G | Dr.fone
- Possible solutions to restore deleted call logs from Infinix Smart 7 HD
- How to get the dragon scale and evolution-enabled pokemon On Poco X5 Pro? | Dr.fone
- In 2024, How to Use Pokémon Emerald Master Ball Cheat On Tecno Spark 10C | Dr.fone
- 9 Best Phone Monitoring Apps for Oppo K11 5G | Dr.fone
- Easy steps to recover deleted messages from Honor Play 8T
- In 2024, Expert Review Videopad Video Editor - The Good, the Bad, and the Ugly
- Ultimate Guide to Catch the Regional-Located Pokemon For Honor X8b | Dr.fone
- How to Fix Videos Not Playing on 11R?
- How Do You Get Sun Stone Evolutions in Pokémon For OnePlus Open? | Dr.fone
- Updated 2024 Approved Windows 8 AVI File Editor Simple and Efficient Video Editing Solution
- Title: Updated Syncing Audiovisual Elements Adding Soundtracks to Video in Adobe Premiere for 2024
- Author: David
- Created at : 2024-05-05 10:13:49
- Updated at : 2024-05-06 10:13:49
- Link: https://sound-tweaking.techidaily.com/updated-syncing-audiovisual-elements-adding-soundtracks-to-video-in-adobe-premiere-for-2024/
- License: This work is licensed under CC BY-NC-SA 4.0.
