
:max_bytes(150000):strip_icc():format(webp)/001_the-best-teen-movies-on-netflix-october-2023-5104880-3c4ee21786b64df693bfeebd65701d8e.jpg)
Updated Perfect Pacing with Pitch A Comprehensive Guide to Adding and Editing Timestamps in Final Cut Pro X
Perfect Pacing with Pitch: A Comprehensive Guide to Adding and Editing Timestamps in Final Cut Pro X
How to Add and Modify Audio Keyframes in Final Cut Pro X

Benjamin Arango
Aug 18, 2022• Proven solutions
Are you familiar with audio keyframing? So, what is this audio keyframing? Does this term appear new for you? It won’t anymore as we are here to explain. In the world of animation, knowing about keyframes is more critical. Have you ever noticed certain scenes while watching a movie that would reflect different audio volume in other video clips? It is all because of this process of keyframing that allows you to change the parameter values in a video clip. A keyframe on the clip specifies the start and end of the changes that occur in the frames, images, or drawings.
Filmmaking, hand-drawn animation, and short movies are critical applications where keyframing finds the place, especially in changing positions, scaling subjects, and customizing opacity. Although the concept might seem in-depth and confusing, implementing such keyframes isn’t a hassle as you think if you have a handy video editor. Today, let’s look at one such software, Final Cut Pro X, which is the popular tool for Mac at present in keyframing. With no delay, scroll down to add and edit audio keyframes in FCPX at ease.
Part 1: How to Add Audio Keyframes in Final Cut Pro X?
So, how to precisely add the Final Cut Pro keyframes? This session will reveal the answer as we have given a step-by-step guide.
Step 1: Launch and open the Final Cut Pro X software on your Mac device. Select the video clip in the timeline or select a video from the location.
Now, choose “Clip > Show Audio Animation”, or you can also press Ctrl + A.
Step 2: You will now see various automation options to change the audio of the clips.
To add keyframes, you have to hold or press option-K to create a keyframe on the horizontal effect control that will result in a white diamond depicting the created keyframes.
Step 3: Apart from the Audio Animator tool, you can create a Final Cut Pro audio keyframe with the range selection tool. To do so, on the video timeline, you need to sue the keyframe shortcut Final Cut Pro, which is to hold down R.
Hold the R key down, and on the timeline, click the spot where you need to begin the keyframing, drag the mouse pointer to the area where the keyframing should end. It will mark a range with a diamond.
That is the way you can add a fcpx audio keyframe, and is it easy?
Part 2: How to Modify Audio Keyframes in Final Cut Pro X?
Now that you have successfully created or added audio keyframes fcpx, do you wish to adjust or modify them, like changing the volume or any other enhancements? Yes, Final Cut Pro X offers adjustments. Learn how to do it from here.
Step 1: Usually, users follow the same way in the keyframe to change the volume per your requirement on the “Volume and Pan” segment.
You can slide the volume pointer as needed, or from the inverted triangle next to the option, you can choose the “Reset Parameter” option to reset the changes.
Step 2: You can configure the Pan option of the keyframe and FCPX that offers multiples ones like stereo left/right, basic surround, create space, and so on.
Step 3: To adjust the audio animation editor’s keyframes, you can drag the diamond to the left/right to change the keyframe position.
If you want to alter the effect’s parameter value, you can drag the keyframe up or down.
There is one more option by which you can edit the final cut pro audio keyframe. If you click the “Final Cut Pro” option on the top and choose the editing option, it will show you various options to adjust the keyframes like reference waveforms, transitions, etc.
With access to the in-built options offered by Final Cut Pro X, you can easily adjust the created or added fcpx audio keyframe at ease.
Part 3: FAQs about Audio Keyframing in Final Cut Pro X?
1. Will changing the “Show reference waveform” checkbox on the editing window’s audio aspect affect the fcpx audio keyframe?
No. A tick over the “Shoe reference waveforms” checkbox will only make changes over the timeline waveform representation. However, no change will occur on the keyframe unless the duration or still images get altered.
2. Can I add keyframes across a selected area automatically?
Yes, with the Range Selection tool’s assistance, you can add keyframes over a selected range automatically. To do so, execute the “Clip > Audio Animation > select an effect > disclosure button.” From the tools pop-up menu with the mouse icon, choose the option, “Range Selection.”
3. Despite Audio animation, is there any other option to adjust the fcpx keyframe?
Yes. To access many different effects in the Final Cut Pro X software, you can change the parameter values of sole keyframes using Audio Inspector.
4. Is viewing a single effect at a time in the Audio Animation editor is possible in FCPX?
Yes. If you have applied multiple effects to a clip and need to preserve a screen space, you can collapse the Audio Animation editor to view one impact at a time. Tapping the “Solo Animation” option from the Click Menu can execute this task.
5. Can I delete the created Final Cut Pro audio keyframe?
Sure. To delete an audio keyframe, select the keyframe, and press the “Shift + Delete” option. Now, navigate to the Audio Inspector, and hit the “Keyframe” button.
Conclusion
I am sure you are excited to know that working with the Final Cut Pro keyframe is easier than you have imagined. Yes, it is, and I hope with the ultimate guide on how to add keyframe Final Cut Pro X along with specific FAQs regarding fcpx audio keyframe, we have put a full-stop to your queries. So, with no delay, get started to make your video by audio keyframes on Final Cut Pro X!
Benjamin Arango
Benjamin Arango is a writer and a lover of all things video.
Follow @Benjamin Arango
Benjamin Arango
Aug 18, 2022• Proven solutions
Are you familiar with audio keyframing? So, what is this audio keyframing? Does this term appear new for you? It won’t anymore as we are here to explain. In the world of animation, knowing about keyframes is more critical. Have you ever noticed certain scenes while watching a movie that would reflect different audio volume in other video clips? It is all because of this process of keyframing that allows you to change the parameter values in a video clip. A keyframe on the clip specifies the start and end of the changes that occur in the frames, images, or drawings.
Filmmaking, hand-drawn animation, and short movies are critical applications where keyframing finds the place, especially in changing positions, scaling subjects, and customizing opacity. Although the concept might seem in-depth and confusing, implementing such keyframes isn’t a hassle as you think if you have a handy video editor. Today, let’s look at one such software, Final Cut Pro X, which is the popular tool for Mac at present in keyframing. With no delay, scroll down to add and edit audio keyframes in FCPX at ease.
Part 1: How to Add Audio Keyframes in Final Cut Pro X?
So, how to precisely add the Final Cut Pro keyframes? This session will reveal the answer as we have given a step-by-step guide.
Step 1: Launch and open the Final Cut Pro X software on your Mac device. Select the video clip in the timeline or select a video from the location.
Now, choose “Clip > Show Audio Animation”, or you can also press Ctrl + A.
Step 2: You will now see various automation options to change the audio of the clips.
To add keyframes, you have to hold or press option-K to create a keyframe on the horizontal effect control that will result in a white diamond depicting the created keyframes.
Step 3: Apart from the Audio Animator tool, you can create a Final Cut Pro audio keyframe with the range selection tool. To do so, on the video timeline, you need to sue the keyframe shortcut Final Cut Pro, which is to hold down R.
Hold the R key down, and on the timeline, click the spot where you need to begin the keyframing, drag the mouse pointer to the area where the keyframing should end. It will mark a range with a diamond.
That is the way you can add a fcpx audio keyframe, and is it easy?
Part 2: How to Modify Audio Keyframes in Final Cut Pro X?
Now that you have successfully created or added audio keyframes fcpx, do you wish to adjust or modify them, like changing the volume or any other enhancements? Yes, Final Cut Pro X offers adjustments. Learn how to do it from here.
Step 1: Usually, users follow the same way in the keyframe to change the volume per your requirement on the “Volume and Pan” segment.
You can slide the volume pointer as needed, or from the inverted triangle next to the option, you can choose the “Reset Parameter” option to reset the changes.
Step 2: You can configure the Pan option of the keyframe and FCPX that offers multiples ones like stereo left/right, basic surround, create space, and so on.
Step 3: To adjust the audio animation editor’s keyframes, you can drag the diamond to the left/right to change the keyframe position.
If you want to alter the effect’s parameter value, you can drag the keyframe up or down.
There is one more option by which you can edit the final cut pro audio keyframe. If you click the “Final Cut Pro” option on the top and choose the editing option, it will show you various options to adjust the keyframes like reference waveforms, transitions, etc.
With access to the in-built options offered by Final Cut Pro X, you can easily adjust the created or added fcpx audio keyframe at ease.
Part 3: FAQs about Audio Keyframing in Final Cut Pro X?
1. Will changing the “Show reference waveform” checkbox on the editing window’s audio aspect affect the fcpx audio keyframe?
No. A tick over the “Shoe reference waveforms” checkbox will only make changes over the timeline waveform representation. However, no change will occur on the keyframe unless the duration or still images get altered.
2. Can I add keyframes across a selected area automatically?
Yes, with the Range Selection tool’s assistance, you can add keyframes over a selected range automatically. To do so, execute the “Clip > Audio Animation > select an effect > disclosure button.” From the tools pop-up menu with the mouse icon, choose the option, “Range Selection.”
3. Despite Audio animation, is there any other option to adjust the fcpx keyframe?
Yes. To access many different effects in the Final Cut Pro X software, you can change the parameter values of sole keyframes using Audio Inspector.
4. Is viewing a single effect at a time in the Audio Animation editor is possible in FCPX?
Yes. If you have applied multiple effects to a clip and need to preserve a screen space, you can collapse the Audio Animation editor to view one impact at a time. Tapping the “Solo Animation” option from the Click Menu can execute this task.
5. Can I delete the created Final Cut Pro audio keyframe?
Sure. To delete an audio keyframe, select the keyframe, and press the “Shift + Delete” option. Now, navigate to the Audio Inspector, and hit the “Keyframe” button.
Conclusion
I am sure you are excited to know that working with the Final Cut Pro keyframe is easier than you have imagined. Yes, it is, and I hope with the ultimate guide on how to add keyframe Final Cut Pro X along with specific FAQs regarding fcpx audio keyframe, we have put a full-stop to your queries. So, with no delay, get started to make your video by audio keyframes on Final Cut Pro X!
Benjamin Arango
Benjamin Arango is a writer and a lover of all things video.
Follow @Benjamin Arango
“Audiobook Creation Simplified: Your Comprehensive Step-by-Step Tutorial “
How to Make an Audio Book with Ease: a Complete Guide
Benjamin Arango
Mar 27, 2024• Proven solutions
Our busy lives have made reading a physical book nearly impossible. Although we have enough eBooks on the market, it also requires some effort and time to be invested. Most of the people are bothered by not reading enough.
Maybe that is why we have witnessed tremendous growth of audiobooks in the past three years. And as a result, the development of the audiobook market per year is found to be 30%. That implies the audiobook market is growing almost four times faster than the eBook market.
So, don’t you see the necessity to publish your piece of writing in the form of an audiobook, as well?
Are you now wondering how to make an audiobook? It involves no rocket science, but the process is a bit hard than publishing in Kindle. Here are all your queries answered, and you will learn how to make your own audiobook by the end of this article.
- Part 1: What Are the Benefits of Making an Audiobook?
- Part 2: How To Create an Audiobook Effortlessly?
- Part 3: How to Make Your Own Audiobook Creatively?
Part 1: What Are the Benefits of Making an Audiobook?
The benefits of getting your book published in the format of an audiobook are numerous. You are missing out on audiences and profit if you constrain the publication of your book just into the form of paperbacks or eBooks. Nowadays, audiobooks actually make more sense with a large number of audiobook listeners worldwide.
Here are some potential advantages of audiobooks and why you should learn how to create an audiobook:
1.More profit
According to the latest pieces of research, most Americans prefer listening to audiobooks rather than reading an eBook. And as a result, the audiobook industry has now become very profitable.
Apart from the popularity, the cost of making an audiobook from an existing book is comparatively on the lower side. Therefore, the profit of converting books into audiobooks is pretty high.
2.Larger audience
Audiobooks comparatively have a larger audience. The audience of audiobooks is not limited to those who are capable of reading. For example, a person with low or blind vision cannot read an eBook, but he can effortlessly listen to an audiobook. Likewise, an audiobook takes your piece of writing to a completely different and larger group of audience.
3.No worries about stock
When publishing a physical book, you have to constantly worry about keeping the print in stock and meeting readers’ demands. You can avoid such worries when you opt for audiobooks. In the case of audiobooks, there always exists a file accessible for readers to download and read.
4.Easy discovery
Your book will become easily discoverable when you publish it in the version of an audiobook also. Printed books are comparatively least discoverable online unless they have an audiobook version. The more discoverable your book is, the more is its reach to the targeted audience.
5.Save on time and expenses
The creation of audiobooks is comparatively easy and low in cost. You can either hire services like ACX and Audiobook Creation Exchange. Or else, you can nowadays also create audiobooks on your own by using online programs such as Filmii.
Part 2: How To Create an Audiobook Effortlessly?
We have seen the advantages of transferring your book into audiobook format in the last section. Now the question is how to make an audiobook effortlessly. There are actually two ways in which you can create an audiobook.
- You can get the professional help of an audiobook production company.
- Record the audiobook yourself.
At first thought, you may feel like recording the audiobook yourself will help you save the cost of the process. But actually, recording the audiobook yourself will be more expensive in terms of money and time.
Anyways, let us see the basic steps of the creation of an audiobook.
- **Step One:**Prepare the contents of your book for recording. If it is an eBook, better delete the hyperlinks, visuals, and call to action that may cause distractions to the narrator. Ensure that the content or script can be easily read and makes some sense when listened to as an audiobook.
- **Step Two:**Find a narrator. It can be yourself or someone hired for the purpose. You can actually hire an audiobook narrator for the purpose. Surprisingly, audiobook narrators are super-affordable, and they will get the task done effortlessly.
- **Step Three:**Get the audio files recorded by the narrator mastered or edited by an audiobook producer to ensure the quality of the final production file. You can do it yourself if your technical knowledge is sound and good enough.
- Step Four: Now, the last step is uploading your audiobook into ACX or Audiobook Creation Exchange.
And that is how an audiobook is created. By uploading on ACX, you can make your audiobook available and discoverable on most audiobook platforms, including Amazon, Apple audiobook store, and Audible.
You have to open an account on ACX to upload your audiobook. An ACX account can be easily created by entering your Amazon account and tax details. After signing up, you have to choose whether you need an exclusive publication or a non-exclusive publication for your audiobook.
Exclusive publication of your audiobook allows you to get a higher commission or royalty share of 40%. But your audiobook won’t be published on other competing sites. In contrast, your audiobook will get published on multiple sites if you choose a non-exclusive publication. But the royalty share reduces to just 25%. That’s all about ACX.
Now let us see how to make an audiobook of your own.
Part 3: How to Make Your Own Audiobook Creatively?
Most people don’t convert their books to audiobooks mainly for two reasons. Firstly, assuming that creating an audiobook is going to be an expensive task. Secondly, most of them don’t know how to create an audiobook on their own.
So, we are going to discuss how to make your own audiobook.


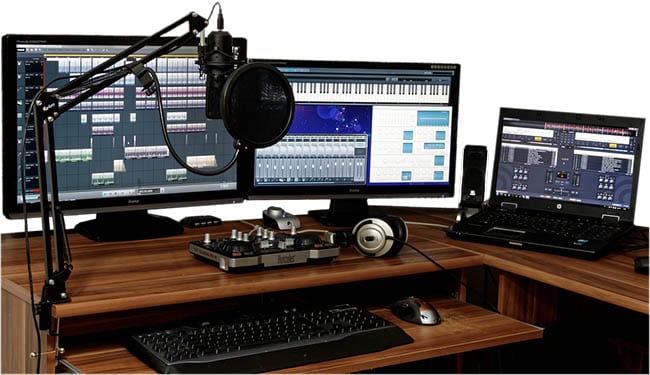
First of all, to make your own audiobook, you need a set of equipment, including a USB mic, pop filter, and audible. Then, choose a studio and quiet place for narration and recording. The task is simple and uncomplicated until here. What most people find difficult is in editing or engineering the audio files.
So, here we are introducing Wondershare Filmora for making the creation of audiobooks effortless.
The audio editing tools on Wondershare Filmora allow you to record audio, add audio-video, and edit the audio. With the audio editing tools on the Filmora, you have the options to adjust, fade-in, fade-out, or de-noise the audio.
You can use the de-noise option to remove the background sounds on your audio files. Wondershare Filmora also allows you to adjust the speed of the audio. You can adjust the speed of your audio file by setting up a duration.
Conclusion
You no longer have to stay confused about how to make an audiobook. We have simplified the creation of the audiobook with our stepwise guide. If you want to make an audiobook your own, you can use audio editors such as Wondershare Filmora.
We hope you won’t be any more intimidated on how to make your own audiobook. An audiobook is a highly potent form to reach your targeted audience. So, don’t allow your lack of knowledge to affect the growth of your book.
Benjamin Arango
Benjamin Arango is a writer and a lover of all things video.
Follow @Benjamin Arango
Benjamin Arango
Mar 27, 2024• Proven solutions
Our busy lives have made reading a physical book nearly impossible. Although we have enough eBooks on the market, it also requires some effort and time to be invested. Most of the people are bothered by not reading enough.
Maybe that is why we have witnessed tremendous growth of audiobooks in the past three years. And as a result, the development of the audiobook market per year is found to be 30%. That implies the audiobook market is growing almost four times faster than the eBook market.
So, don’t you see the necessity to publish your piece of writing in the form of an audiobook, as well?
Are you now wondering how to make an audiobook? It involves no rocket science, but the process is a bit hard than publishing in Kindle. Here are all your queries answered, and you will learn how to make your own audiobook by the end of this article.
- Part 1: What Are the Benefits of Making an Audiobook?
- Part 2: How To Create an Audiobook Effortlessly?
- Part 3: How to Make Your Own Audiobook Creatively?
Part 1: What Are the Benefits of Making an Audiobook?
The benefits of getting your book published in the format of an audiobook are numerous. You are missing out on audiences and profit if you constrain the publication of your book just into the form of paperbacks or eBooks. Nowadays, audiobooks actually make more sense with a large number of audiobook listeners worldwide.
Here are some potential advantages of audiobooks and why you should learn how to create an audiobook:
1.More profit
According to the latest pieces of research, most Americans prefer listening to audiobooks rather than reading an eBook. And as a result, the audiobook industry has now become very profitable.
Apart from the popularity, the cost of making an audiobook from an existing book is comparatively on the lower side. Therefore, the profit of converting books into audiobooks is pretty high.
2.Larger audience
Audiobooks comparatively have a larger audience. The audience of audiobooks is not limited to those who are capable of reading. For example, a person with low or blind vision cannot read an eBook, but he can effortlessly listen to an audiobook. Likewise, an audiobook takes your piece of writing to a completely different and larger group of audience.
3.No worries about stock
When publishing a physical book, you have to constantly worry about keeping the print in stock and meeting readers’ demands. You can avoid such worries when you opt for audiobooks. In the case of audiobooks, there always exists a file accessible for readers to download and read.
4.Easy discovery
Your book will become easily discoverable when you publish it in the version of an audiobook also. Printed books are comparatively least discoverable online unless they have an audiobook version. The more discoverable your book is, the more is its reach to the targeted audience.
5.Save on time and expenses
The creation of audiobooks is comparatively easy and low in cost. You can either hire services like ACX and Audiobook Creation Exchange. Or else, you can nowadays also create audiobooks on your own by using online programs such as Filmii.
Part 2: How To Create an Audiobook Effortlessly?
We have seen the advantages of transferring your book into audiobook format in the last section. Now the question is how to make an audiobook effortlessly. There are actually two ways in which you can create an audiobook.
- You can get the professional help of an audiobook production company.
- Record the audiobook yourself.
At first thought, you may feel like recording the audiobook yourself will help you save the cost of the process. But actually, recording the audiobook yourself will be more expensive in terms of money and time.
Anyways, let us see the basic steps of the creation of an audiobook.
- **Step One:**Prepare the contents of your book for recording. If it is an eBook, better delete the hyperlinks, visuals, and call to action that may cause distractions to the narrator. Ensure that the content or script can be easily read and makes some sense when listened to as an audiobook.
- **Step Two:**Find a narrator. It can be yourself or someone hired for the purpose. You can actually hire an audiobook narrator for the purpose. Surprisingly, audiobook narrators are super-affordable, and they will get the task done effortlessly.
- **Step Three:**Get the audio files recorded by the narrator mastered or edited by an audiobook producer to ensure the quality of the final production file. You can do it yourself if your technical knowledge is sound and good enough.
- Step Four: Now, the last step is uploading your audiobook into ACX or Audiobook Creation Exchange.
And that is how an audiobook is created. By uploading on ACX, you can make your audiobook available and discoverable on most audiobook platforms, including Amazon, Apple audiobook store, and Audible.
You have to open an account on ACX to upload your audiobook. An ACX account can be easily created by entering your Amazon account and tax details. After signing up, you have to choose whether you need an exclusive publication or a non-exclusive publication for your audiobook.
Exclusive publication of your audiobook allows you to get a higher commission or royalty share of 40%. But your audiobook won’t be published on other competing sites. In contrast, your audiobook will get published on multiple sites if you choose a non-exclusive publication. But the royalty share reduces to just 25%. That’s all about ACX.
Now let us see how to make an audiobook of your own.
Part 3: How to Make Your Own Audiobook Creatively?
Most people don’t convert their books to audiobooks mainly for two reasons. Firstly, assuming that creating an audiobook is going to be an expensive task. Secondly, most of them don’t know how to create an audiobook on their own.
So, we are going to discuss how to make your own audiobook.
First of all, to make your own audiobook, you need a set of equipment, including a USB mic, pop filter, and audible. Then, choose a studio and quiet place for narration and recording. The task is simple and uncomplicated until here. What most people find difficult is in editing or engineering the audio files.
So, here we are introducing Wondershare Filmora for making the creation of audiobooks effortless.
The audio editing tools on Wondershare Filmora allow you to record audio, add audio-video, and edit the audio. With the audio editing tools on the Filmora, you have the options to adjust, fade-in, fade-out, or de-noise the audio.
You can use the de-noise option to remove the background sounds on your audio files. Wondershare Filmora also allows you to adjust the speed of the audio. You can adjust the speed of your audio file by setting up a duration.
Conclusion
You no longer have to stay confused about how to make an audiobook. We have simplified the creation of the audiobook with our stepwise guide. If you want to make an audiobook your own, you can use audio editors such as Wondershare Filmora.
We hope you won’t be any more intimidated on how to make your own audiobook. An audiobook is a highly potent form to reach your targeted audience. So, don’t allow your lack of knowledge to affect the growth of your book.
Benjamin Arango
Benjamin Arango is a writer and a lover of all things video.
Follow @Benjamin Arango
“Harmonizing Without Spending - The Ultimate Selection of No-Fee Audio Mixing Programs “
Top 10 Best Audio Mixer Software for FREE
Benjamin Arango
Mar 27, 2024• Proven solutions
You may be a musician who wants to record their music, or just a person wanting to develop his custom ringtone. In either case, a physical or virtual audio mixer is required, whether it be analog or a dedicated audio mixer software.
But you need to have some technical knowledge to make optimal use and funk up your music/sound.
Here we are to give you the knowledge you need and some amazing audio mixer software that could be perfect for you. So buckle up, and get ready to level up the harmoniousness of your creativity!
You will Learn :
- Part 1. 10 Best Sound/Audio Mixer Software - [Video Guide]
- Part 2. All You Know About Audio Mixer
- Part 3. What to Consider While Choosing an Audio Mixer Software?
- Part 4. Basic Audio Mixer Settings You Should Know
- Part 5. Why Audio Mixer Software?
Part 1. 10 Best Sound/Audio Mixer Software
Whether you are pursuing a music career, making a video for a movie clip, or merely creating some hard-core beats for fun, you’ll be needing good sound mixing software.
Selecting an audio mixer software perfect for your requirements and available resources is not an easy task.
Some of them are for free while some charge for it, some offer limited features. At the same time, some are specific to a certain operating system, the options and availabilities are endless, and choosing among them is a hell of a daunting task.
But no need to stress out because we are here to take your burden on our shoulders and help you choose exactly what you want! So sit back and relax!
| 1 - Wondershare Filmora | 2 - Adobe Audition |
|---|---|
| 3 - Logic Pro X | 4 - Audacity |
| 5 - Reaper | 6 - Fl Studio |
| 7 - SoundAtion | 8 - HyaWave |
| 9 - Twisted Wave Online | 10 - Bear Audio Tool |
1. Wondershare Filmora
Filmora Audio Mixer is professional in audio mixing and video editing. This is used for mixing, balancing, and combining different sounds, and audio signals, sources like microphones, instruments, and synthesizers, or previously recorded audio.
Pros
- Imports audio file in the original format and mix the audio with built-in tools.
- Split, rearrange, and apply remix effects on added audio clips.
- Auto remix music to change audio length with high quality.
- Export audio files in MP3, FLAC, M4A, OGG, etc…
- Audio sync option while editing.
- Audio ducking features to lowers the background volume.
Audio formats support: all (import/export and audio/video) file formats.
Compatibility: Windows 7 to windows 10 sound mixer and mac OS.
Price: free and paid.
If you are facing any trouble regarding audio mixing through an audio mixer software, then here’s a video tutorial for Filmora software.
You can download it for free and follow the video guide step by step. Check the below video:
2. Adobe Audition

It is primarily designed for professional users having several features like multi-track editing and mixing, Auto Ducking, clip editing.
Pros:
- Availability of a vast range of features.
- Attractive user interface.
- Good for video sounds or voice-over editing overall, including sound mixing.
Cons:
- A little too complex for a newbie to understand.
- Not good enough for music productions.
- This software is subscription-based.
Audio formats support: MP3, WMA, WAV, AIFF, AC-3, PCM, AIFC, and more.
Compatibility: Mac OS, Windows.
Price: free and paid for both.
3. Logic Pro X

This software is suitable for both professional users and beginners. It combines all the basic and advanced features, including Flex Time, automatic time matching of different tracks, Flex Pitch, arpeggiator, etc.
Pros
- Works wonderfully on Mac.
- Rich Featured software and several plugins.
- Singular notes control.
- Tutorial easily available.
Cons:
- Mac only.
- Expensive.
Audio formats support: WAV, AIFF, CAF, PCM, ALAC, MP3, and more.
Compatibility: macOS.
Price: Paid
4. Audacity

A free, open-source, and features rich software perfect for both professional and beginner users. Its offers multiple effects and tolls like analysis, envelope, time-shift tools, etc.
Pros
- Free.
- Cross-platform.
- Easy to use.
- Features for beginner and pro-level, both.
- Online community available for help.
Cons:
- Not very appealing UI.
- May face crashes on Mac.
Audio formats support: MP3, MP4, AIFF, PCM, WMA, AC3, AMR, and more.
Compatibility: Linux, Windows, and macOS.
Price : free.

Filmora Audio Mixer
Wondershare Filmora - Audio Mixer
• Easily mix audio, sound, music or song as your need
• Edit audio files like denoise, crop, audio ducking, audio auto synchronization, etc…
• Cross-platform supported - (Windows, Mac, iOS, Android)
Mix Your Audio Now Mix Your Audio Now Mix Your Audio Now Learn More >
5. Reaper

This is one of the few software facilities with a bunch of features at such an affordable price. It has multiple tracks, multichannel support, real-time, non-destructive effect application, pitch-shifting, and time-shifting features.
Pros
- Feature-rich.
- More affordable than other audio mixer software.
- Detailed tutorials are available online.
Cons:
- Not very appealing UI as of LPX or Audition.
- Not suitable for beginners.
Audio formats support ACID, AIFF, MP3, MPEG WMV, and more.
Compatibility: Linux, Windows, and macOS.
Price: free and paid.
6. Fl Studio
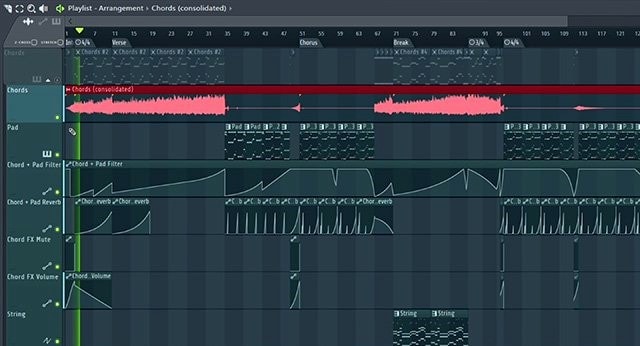
It is one of the top-notch software used for sound mixer and editing purposes. It supports pitch shifting, time stretching and multi-track recording, 80 plugins, VST standards, delay compensation, etc.
Pros
- Comes with abundant Features.
- Works great for music productions.
- Supports 3rd party plugin.
Cons:
- Not very appealing UI.
- May be intimidating for beginners.
Audio formats support: AIFF, DS, MP3, OGG, WAV and more.
Compatibility : Windows and macOS.
Price: free and paid.
7. SoundAtion
It is a browser-based software that facilitates non-destructive Multi-track audio editing, dynamic mixing, several effects selection, and EQ across multiple tracks.
Pros
- Free digital audio Workstation (DAW).
- Works wonderfully for sound effects, podcasting, and general-purpose sound task.
- Supports 3rd party plugin.
Cons:
- Automation not featured in a free trial.
- Limited audio quality in a trial version.
Audio Formats Support: MP3 and WAV.
Compatibility: any operating system.
Price : free and paid.
8. HyaWave
It offers functions like cutting with an online audio cutter, paste and trim audio, and supports 18 filters, effects, and publication through URL and social media with the minimalistic user interface.
Pros
- Easy and simple user interface.
- Audio filter customization.
- Has a built-in audio player, recorder, and editor.
Audio formats support: MP3, WAV, and more.
Compatibility : any operating system.
Price : free.
9. Twisted Wave Online

It is an online software almost equally compatible with many paid sound mixer and editing tools. It also supports uncompressed audio recording, VST effects, and several core effects.
Pros
- Cloud storage of edited audio, saving the disk space.
- Sampling rate conversation.
- Online and free.
Cons:
- Upload file in mono in a trial version.
- Supports 5 minutes audio clip in a trial version.
Audio formats support : MP3.
Compatibility: any operating system.
Price: free and paid.
10. Bear Audio Tool
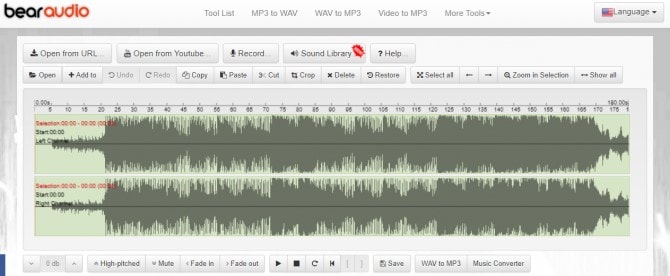
This is online browser-based software that can edit the files from our local storage, and you don’t have to upload the audio to their server. It can cut, apply effects, trim, etc. It has ample own music library, effects and import options.
Pros
- Copyright-free.
- Import audio directly from URL or social media domains.
- Features rich.
Cons:
- Not suitable for very advanced usage.
Audio formats support : MP3, OGG, WAV, WMA, M4R and OGG.
Compatibility : any operating system.
Price: free and paid.
Part 2. All You Know About Audio Mixer
[1] What is an audio mixer?
An audio mixer is used for several significant purposes. It is known with several names. Whether a mixing desk, soundboard, mixing board, audio mixer, or mixing console, all have a coherent purpose. The sole purpose of an audio mixer is to manage either the live or recorded event.
As the name suggests, audio mixing is the process of mixing multiple sounds and consolidating them into one or more channels.
This process is performed in a way that manipulates or enhances the dynamics, source’s volume level, panoramic position, and frequency content. The end moto of this creative and aesthetic treatment is to present the audio appealing to the listeners.
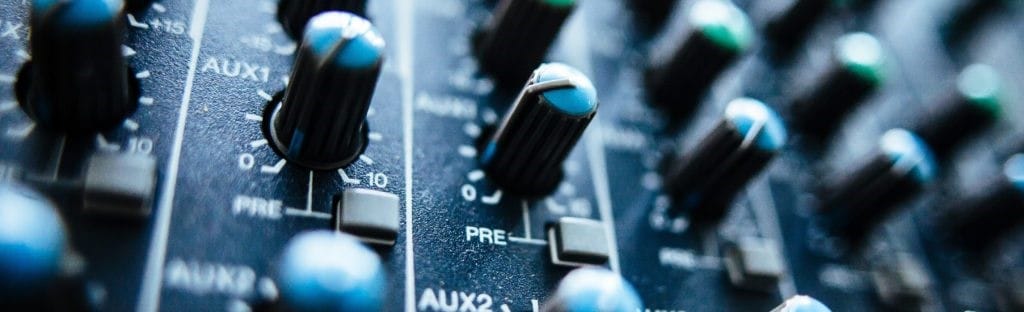
[2] What does an audio mixer do?
As mentioned above, the primary function of an audio mixer is to mix more than one audio signal and combine them into one or more output signals.
As an example, you may think of an audio mixing engineer, let’s say, orchestra conductor, who ensures that all the segregated sound sources mix into one harmonious soundtrack.
For this, they will use an audio mixer for filtering and optimizing sound by level adjusting, developing monitor feeds, using equalization and effects for sound enhancement.
This process is performed by a mixing engineer who operates either a digital audio workstation or a mixing console .
[3] What is audio mixing used for?
Audio mixing can be used in many fields, and it’s very common in our daily life, such as:
- 1. Music
- 2. Live sound
- 3. Film
- 4. Television
Filmora Audio Mixer
Wondershare Filmora - Audio Mixer
• Easily mix audio, sound, music or song as your need
• Edit audio files like denoise, crop, audio ducking, audio auto synchronization, etc…
• Cross-platform supported - (Windows, Mac, iOS, Android)
Mix Your Audio Now Mix Your Audio Now Mix Your Audio Now Learn More >
Part 3. What to consider while choosing an audio mixer software?
Before starting off with the audio mixing activity itself, one must be able to determine which audio mixer software is best for them with respect to their availability of resources or usability. Here are some of the factors to consider while opting for an audio mixer software:
- Check whether the software is paid or free.
- Check whether the limited features offered in a trial/free audio mixer software are enough to satisfy all your needs.
- Choose the paid or the free one depending on the extent of audio mixing quality you want.
- Look for an easy user interface.
- Look for software compatibility with your existing operating system.
- Check for the availability of tutorials related to the use of audio mixer software that you want to opt for better guidance.
- Look for the basic or advanced functions support in the audio mixer software that you choose depending upon your usability.
- Whether the software is available online or you need to install the version.
Part 4. Basic audio mixer settings you should know
It is necessary to know at least somewhat about the fundamental terminologies to decipher the specifications and features of an audio mixer. Here you’ll get to know what it takes to be able to distinguish among different audio mixers and their respective software.
Channel:
It is a signal path. Channels are made to accept microphones, preamps, amplifiers, and signal processors. A mixer with several channels integrated with it allows several things to be integrated and routed through it.
Channel Strip:
It is a cluster of controls and circuits that works together on a specified mixing channel to manipulate the audio that passes through it. Some of which includes the following:
Input jack:
It is the jack where any external instrument, like guitar, microphone etc., integrates with the mixer. The noise and interface are minimized to maximum extent by balancing the XLR inputs. A quarter-inch TRS connector or RCA are connected to other inputs.
Microphone preamp:
It produces weak mic signals by the raise of line-level strength for processing.
Equalization:
Often abbreviated as “EQ”, is used to adjust the frequency response of a signal.
Dynamics:
This process is used to perform grating and compressing.
Routing:
It directs the incoming signals to external devices or mixer circuitry.
Fader:
Its fundamental objective is to control the inputs and outputs of a channel.
Meter:
Kind of a gauge or interface that presents the channel output.
I/O:
I/O is abbreviated as inputs/outputs on a mixer in this regards. The number and category of I/O will depend on the use of a mixer.
Now, let’s understand the scenario of live mixing.
Such a mixer is needed which is enough to handle the outputs needed to connect the mains, microphones, other devices that connect to it and monitor speakers. The devices that are a part of a recording process or signal chain must also be included while calculating I/O for studio mixers.
Such inputs/outputs include headphones, effects processors, monitor speakers, signal processors and other instruments as well that uses direct injection (DI) boxes to connect to the mixer.
Buses:
It can be understood as a circuit intersection where the outputs from different channels meet. The signal channels are routed to a specific bus or set of busses. The main mixer output to a recorder or a speaker by the master mix bus.
Auxiliary buses, often known as aux buses or aux sends, are usually fed by the channel’s volume controls with which they are connected and then send those signals through their own output jacks. This is called as post-fader sends which are used to send the mixes of monitor speakers, signals to headphones or effects processors.
Groups:
Several channels in a mixer often offer a group function that allows one to simultaneously process and control various channels. Its works are similar to that of sub-mixer that shares the coherent signal routing and processing and provides the ease in controlling master bus since a single fader is used to control all the channels.
Inserts:
External and add-on sound processors, such as equalizers and compressors, are connected with the help of a channel insert.
Direct Output:
These feed mixer’s preamplifiers output to recording systems and external sound interfaces.
Cue System:
Cue systems allow listening on the specified channels without affecting the mixer’s output. This usually allows the signal to listen either before fading manipulation or after.
Part 5. Why audio mixer software?
In the early days, analog audio mixers were the only option available to perform sounding mixing. But the rise of the era of the 21st century brings more opportunities for easy and optimized audio mixing by sound mixer software.
All you need is a configured laptop, audio mixer software, and merely a control surface to jump into this world while being within the budget!
This audio mixer software is easily available to do everything or even more than what a physical mixer could have done. Several sound mixer applications are available to start with basic sound mixing using your smartphones or even tablets.
For the sake of recording, software-based mixers allow easy integration with the virtual instruments, drum loops, samples, and several other additions in your productions. The use of advanced MIDI functions with a digital audio workstation (DAW) lets you enlighten with a whole new world of possibilities to elevate your sounds/music to the next level.
Final verdict: Have you decided on your audio mixer software?
The usability and optimality of a sound mixer online software depend solely on the extent of application, available resources, and OS compatibility.
But, it can be said without a doubt that Wondershare Filmora is the most user-friendly, with immense flexibility in terms of uses and compatibility. Its broad-scale usability and promising results make it outshine the most among other audio mixing software.
Benjamin Arango
Benjamin Arango is a writer and a lover of all things video.
Follow @Benjamin Arango
Benjamin Arango
Mar 27, 2024• Proven solutions
You may be a musician who wants to record their music, or just a person wanting to develop his custom ringtone. In either case, a physical or virtual audio mixer is required, whether it be analog or a dedicated audio mixer software.
But you need to have some technical knowledge to make optimal use and funk up your music/sound.
Here we are to give you the knowledge you need and some amazing audio mixer software that could be perfect for you. So buckle up, and get ready to level up the harmoniousness of your creativity!
You will Learn :
- Part 1. 10 Best Sound/Audio Mixer Software - [Video Guide]
- Part 2. All You Know About Audio Mixer
- Part 3. What to Consider While Choosing an Audio Mixer Software?
- Part 4. Basic Audio Mixer Settings You Should Know
- Part 5. Why Audio Mixer Software?
Part 1. 10 Best Sound/Audio Mixer Software
Whether you are pursuing a music career, making a video for a movie clip, or merely creating some hard-core beats for fun, you’ll be needing good sound mixing software.
Selecting an audio mixer software perfect for your requirements and available resources is not an easy task.
Some of them are for free while some charge for it, some offer limited features. At the same time, some are specific to a certain operating system, the options and availabilities are endless, and choosing among them is a hell of a daunting task.
But no need to stress out because we are here to take your burden on our shoulders and help you choose exactly what you want! So sit back and relax!
| 1 - Wondershare Filmora | 2 - Adobe Audition |
|---|---|
| 3 - Logic Pro X | 4 - Audacity |
| 5 - Reaper | 6 - Fl Studio |
| 7 - SoundAtion | 8 - HyaWave |
| 9 - Twisted Wave Online | 10 - Bear Audio Tool |
1. Wondershare Filmora
Filmora Audio Mixer is professional in audio mixing and video editing. This is used for mixing, balancing, and combining different sounds, and audio signals, sources like microphones, instruments, and synthesizers, or previously recorded audio.
Pros
- Imports audio file in the original format and mix the audio with built-in tools.
- Split, rearrange, and apply remix effects on added audio clips.
- Auto remix music to change audio length with high quality.
- Export audio files in MP3, FLAC, M4A, OGG, etc…
- Audio sync option while editing.
- Audio ducking features to lowers the background volume.
Audio formats support: all (import/export and audio/video) file formats.
Compatibility: Windows 7 to windows 10 sound mixer and mac OS.
Price: free and paid.
If you are facing any trouble regarding audio mixing through an audio mixer software, then here’s a video tutorial for Filmora software.
You can download it for free and follow the video guide step by step. Check the below video:
2. Adobe Audition
It is primarily designed for professional users having several features like multi-track editing and mixing, Auto Ducking, clip editing.
Pros:
- Availability of a vast range of features.
- Attractive user interface.
- Good for video sounds or voice-over editing overall, including sound mixing.
Cons:
- A little too complex for a newbie to understand.
- Not good enough for music productions.
- This software is subscription-based.
Audio formats support: MP3, WMA, WAV, AIFF, AC-3, PCM, AIFC, and more.
Compatibility: Mac OS, Windows.
Price: free and paid for both.
3. Logic Pro X
This software is suitable for both professional users and beginners. It combines all the basic and advanced features, including Flex Time, automatic time matching of different tracks, Flex Pitch, arpeggiator, etc.
Pros
- Works wonderfully on Mac.
- Rich Featured software and several plugins.
- Singular notes control.
- Tutorial easily available.
Cons:
- Mac only.
- Expensive.
Audio formats support: WAV, AIFF, CAF, PCM, ALAC, MP3, and more.
Compatibility: macOS.
Price: Paid
4. Audacity
A free, open-source, and features rich software perfect for both professional and beginner users. Its offers multiple effects and tolls like analysis, envelope, time-shift tools, etc.
Pros
- Free.
- Cross-platform.
- Easy to use.
- Features for beginner and pro-level, both.
- Online community available for help.
Cons:
- Not very appealing UI.
- May face crashes on Mac.
Audio formats support: MP3, MP4, AIFF, PCM, WMA, AC3, AMR, and more.
Compatibility: Linux, Windows, and macOS.
Price : free.
Filmora Audio Mixer
Wondershare Filmora - Audio Mixer
• Easily mix audio, sound, music or song as your need
• Edit audio files like denoise, crop, audio ducking, audio auto synchronization, etc…
• Cross-platform supported - (Windows, Mac, iOS, Android)
Mix Your Audio Now Mix Your Audio Now Mix Your Audio Now Learn More >
5. Reaper
This is one of the few software facilities with a bunch of features at such an affordable price. It has multiple tracks, multichannel support, real-time, non-destructive effect application, pitch-shifting, and time-shifting features.
Pros
- Feature-rich.
- More affordable than other audio mixer software.
- Detailed tutorials are available online.
Cons:
- Not very appealing UI as of LPX or Audition.
- Not suitable for beginners.
Audio formats support ACID, AIFF, MP3, MPEG WMV, and more.
Compatibility: Linux, Windows, and macOS.
Price: free and paid.
6. Fl Studio
It is one of the top-notch software used for sound mixer and editing purposes. It supports pitch shifting, time stretching and multi-track recording, 80 plugins, VST standards, delay compensation, etc.
Pros
- Comes with abundant Features.
- Works great for music productions.
- Supports 3rd party plugin.
Cons:
- Not very appealing UI.
- May be intimidating for beginners.
Audio formats support: AIFF, DS, MP3, OGG, WAV and more.
Compatibility : Windows and macOS.
Price: free and paid.
7. SoundAtion
It is a browser-based software that facilitates non-destructive Multi-track audio editing, dynamic mixing, several effects selection, and EQ across multiple tracks.
Pros
- Free digital audio Workstation (DAW).
- Works wonderfully for sound effects, podcasting, and general-purpose sound task.
- Supports 3rd party plugin.
Cons:
- Automation not featured in a free trial.
- Limited audio quality in a trial version.
Audio Formats Support: MP3 and WAV.
Compatibility: any operating system.
Price : free and paid.
8. HyaWave
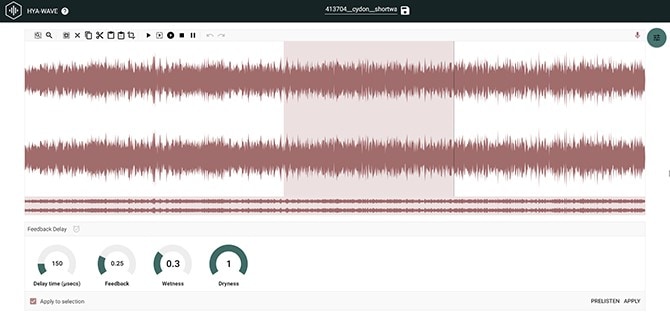
It offers functions like cutting with an online audio cutter, paste and trim audio, and supports 18 filters, effects, and publication through URL and social media with the minimalistic user interface.
Pros
- Easy and simple user interface.
- Audio filter customization.
- Has a built-in audio player, recorder, and editor.
Audio formats support: MP3, WAV, and more.
Compatibility : any operating system.
Price : free.
9. Twisted Wave Online
It is an online software almost equally compatible with many paid sound mixer and editing tools. It also supports uncompressed audio recording, VST effects, and several core effects.
Pros
- Cloud storage of edited audio, saving the disk space.
- Sampling rate conversation.
- Online and free.
Cons:
- Upload file in mono in a trial version.
- Supports 5 minutes audio clip in a trial version.
Audio formats support : MP3.
Compatibility: any operating system.
Price: free and paid.
10. Bear Audio Tool
This is online browser-based software that can edit the files from our local storage, and you don’t have to upload the audio to their server. It can cut, apply effects, trim, etc. It has ample own music library, effects and import options.
Pros
- Copyright-free.
- Import audio directly from URL or social media domains.
- Features rich.
Cons:
- Not suitable for very advanced usage.
Audio formats support : MP3, OGG, WAV, WMA, M4R and OGG.
Compatibility : any operating system.
Price: free and paid.
Part 2. All You Know About Audio Mixer
[1] What is an audio mixer?
An audio mixer is used for several significant purposes. It is known with several names. Whether a mixing desk, soundboard, mixing board, audio mixer, or mixing console, all have a coherent purpose. The sole purpose of an audio mixer is to manage either the live or recorded event.
As the name suggests, audio mixing is the process of mixing multiple sounds and consolidating them into one or more channels.
This process is performed in a way that manipulates or enhances the dynamics, source’s volume level, panoramic position, and frequency content. The end moto of this creative and aesthetic treatment is to present the audio appealing to the listeners.
[2] What does an audio mixer do?
As mentioned above, the primary function of an audio mixer is to mix more than one audio signal and combine them into one or more output signals.
As an example, you may think of an audio mixing engineer, let’s say, orchestra conductor, who ensures that all the segregated sound sources mix into one harmonious soundtrack.
For this, they will use an audio mixer for filtering and optimizing sound by level adjusting, developing monitor feeds, using equalization and effects for sound enhancement.
This process is performed by a mixing engineer who operates either a digital audio workstation or a mixing console .
[3] What is audio mixing used for?
Audio mixing can be used in many fields, and it’s very common in our daily life, such as:
- 1. Music
- 2. Live sound
- 3. Film
- 4. Television
Filmora Audio Mixer
Wondershare Filmora - Audio Mixer
• Easily mix audio, sound, music or song as your need
• Edit audio files like denoise, crop, audio ducking, audio auto synchronization, etc…
• Cross-platform supported - (Windows, Mac, iOS, Android)
Mix Your Audio Now Mix Your Audio Now Mix Your Audio Now Learn More >
Part 3. What to consider while choosing an audio mixer software?
Before starting off with the audio mixing activity itself, one must be able to determine which audio mixer software is best for them with respect to their availability of resources or usability. Here are some of the factors to consider while opting for an audio mixer software:
- Check whether the software is paid or free.
- Check whether the limited features offered in a trial/free audio mixer software are enough to satisfy all your needs.
- Choose the paid or the free one depending on the extent of audio mixing quality you want.
- Look for an easy user interface.
- Look for software compatibility with your existing operating system.
- Check for the availability of tutorials related to the use of audio mixer software that you want to opt for better guidance.
- Look for the basic or advanced functions support in the audio mixer software that you choose depending upon your usability.
- Whether the software is available online or you need to install the version.
Part 4. Basic audio mixer settings you should know
It is necessary to know at least somewhat about the fundamental terminologies to decipher the specifications and features of an audio mixer. Here you’ll get to know what it takes to be able to distinguish among different audio mixers and their respective software.
Channel:
It is a signal path. Channels are made to accept microphones, preamps, amplifiers, and signal processors. A mixer with several channels integrated with it allows several things to be integrated and routed through it.
Channel Strip:
It is a cluster of controls and circuits that works together on a specified mixing channel to manipulate the audio that passes through it. Some of which includes the following:
Input jack:
It is the jack where any external instrument, like guitar, microphone etc., integrates with the mixer. The noise and interface are minimized to maximum extent by balancing the XLR inputs. A quarter-inch TRS connector or RCA are connected to other inputs.
Microphone preamp:
It produces weak mic signals by the raise of line-level strength for processing.
Equalization:
Often abbreviated as “EQ”, is used to adjust the frequency response of a signal.
Dynamics:
This process is used to perform grating and compressing.
Routing:
It directs the incoming signals to external devices or mixer circuitry.
Fader:
Its fundamental objective is to control the inputs and outputs of a channel.
Meter:
Kind of a gauge or interface that presents the channel output.
I/O:
I/O is abbreviated as inputs/outputs on a mixer in this regards. The number and category of I/O will depend on the use of a mixer.
Now, let’s understand the scenario of live mixing.
Such a mixer is needed which is enough to handle the outputs needed to connect the mains, microphones, other devices that connect to it and monitor speakers. The devices that are a part of a recording process or signal chain must also be included while calculating I/O for studio mixers.
Such inputs/outputs include headphones, effects processors, monitor speakers, signal processors and other instruments as well that uses direct injection (DI) boxes to connect to the mixer.
Buses:
It can be understood as a circuit intersection where the outputs from different channels meet. The signal channels are routed to a specific bus or set of busses. The main mixer output to a recorder or a speaker by the master mix bus.
Auxiliary buses, often known as aux buses or aux sends, are usually fed by the channel’s volume controls with which they are connected and then send those signals through their own output jacks. This is called as post-fader sends which are used to send the mixes of monitor speakers, signals to headphones or effects processors.
Groups:
Several channels in a mixer often offer a group function that allows one to simultaneously process and control various channels. Its works are similar to that of sub-mixer that shares the coherent signal routing and processing and provides the ease in controlling master bus since a single fader is used to control all the channels.
Inserts:
External and add-on sound processors, such as equalizers and compressors, are connected with the help of a channel insert.
Direct Output:
These feed mixer’s preamplifiers output to recording systems and external sound interfaces.
Cue System:
Cue systems allow listening on the specified channels without affecting the mixer’s output. This usually allows the signal to listen either before fading manipulation or after.
Part 5. Why audio mixer software?
In the early days, analog audio mixers were the only option available to perform sounding mixing. But the rise of the era of the 21st century brings more opportunities for easy and optimized audio mixing by sound mixer software.
All you need is a configured laptop, audio mixer software, and merely a control surface to jump into this world while being within the budget!
This audio mixer software is easily available to do everything or even more than what a physical mixer could have done. Several sound mixer applications are available to start with basic sound mixing using your smartphones or even tablets.
For the sake of recording, software-based mixers allow easy integration with the virtual instruments, drum loops, samples, and several other additions in your productions. The use of advanced MIDI functions with a digital audio workstation (DAW) lets you enlighten with a whole new world of possibilities to elevate your sounds/music to the next level.
Final verdict: Have you decided on your audio mixer software?
The usability and optimality of a sound mixer online software depend solely on the extent of application, available resources, and OS compatibility.
But, it can be said without a doubt that Wondershare Filmora is the most user-friendly, with immense flexibility in terms of uses and compatibility. Its broad-scale usability and promising results make it outshine the most among other audio mixing software.
Benjamin Arango
Benjamin Arango is a writer and a lover of all things video.
Follow @Benjamin Arango
Benjamin Arango
Mar 27, 2024• Proven solutions
You may be a musician who wants to record their music, or just a person wanting to develop his custom ringtone. In either case, a physical or virtual audio mixer is required, whether it be analog or a dedicated audio mixer software.
But you need to have some technical knowledge to make optimal use and funk up your music/sound.
Here we are to give you the knowledge you need and some amazing audio mixer software that could be perfect for you. So buckle up, and get ready to level up the harmoniousness of your creativity!
You will Learn :
- Part 1. 10 Best Sound/Audio Mixer Software - [Video Guide]
- Part 2. All You Know About Audio Mixer
- Part 3. What to Consider While Choosing an Audio Mixer Software?
- Part 4. Basic Audio Mixer Settings You Should Know
- Part 5. Why Audio Mixer Software?
Part 1. 10 Best Sound/Audio Mixer Software
Whether you are pursuing a music career, making a video for a movie clip, or merely creating some hard-core beats for fun, you’ll be needing good sound mixing software.
Selecting an audio mixer software perfect for your requirements and available resources is not an easy task.
Some of them are for free while some charge for it, some offer limited features. At the same time, some are specific to a certain operating system, the options and availabilities are endless, and choosing among them is a hell of a daunting task.
But no need to stress out because we are here to take your burden on our shoulders and help you choose exactly what you want! So sit back and relax!
| 1 - Wondershare Filmora | 2 - Adobe Audition |
|---|---|
| 3 - Logic Pro X | 4 - Audacity |
| 5 - Reaper | 6 - Fl Studio |
| 7 - SoundAtion | 8 - HyaWave |
| 9 - Twisted Wave Online | 10 - Bear Audio Tool |
1. Wondershare Filmora
Filmora Audio Mixer is professional in audio mixing and video editing. This is used for mixing, balancing, and combining different sounds, and audio signals, sources like microphones, instruments, and synthesizers, or previously recorded audio.
Pros
- Imports audio file in the original format and mix the audio with built-in tools.
- Split, rearrange, and apply remix effects on added audio clips.
- Auto remix music to change audio length with high quality.
- Export audio files in MP3, FLAC, M4A, OGG, etc…
- Audio sync option while editing.
- Audio ducking features to lowers the background volume.
Audio formats support: all (import/export and audio/video) file formats.
Compatibility: Windows 7 to windows 10 sound mixer and mac OS.
Price: free and paid.
If you are facing any trouble regarding audio mixing through an audio mixer software, then here’s a video tutorial for Filmora software.
You can download it for free and follow the video guide step by step. Check the below video:
2. Adobe Audition
It is primarily designed for professional users having several features like multi-track editing and mixing, Auto Ducking, clip editing.
Pros:
- Availability of a vast range of features.
- Attractive user interface.
- Good for video sounds or voice-over editing overall, including sound mixing.
Cons:
- A little too complex for a newbie to understand.
- Not good enough for music productions.
- This software is subscription-based.
Audio formats support: MP3, WMA, WAV, AIFF, AC-3, PCM, AIFC, and more.
Compatibility: Mac OS, Windows.
Price: free and paid for both.
3. Logic Pro X
This software is suitable for both professional users and beginners. It combines all the basic and advanced features, including Flex Time, automatic time matching of different tracks, Flex Pitch, arpeggiator, etc.
Pros
- Works wonderfully on Mac.
- Rich Featured software and several plugins.
- Singular notes control.
- Tutorial easily available.
Cons:
- Mac only.
- Expensive.
Audio formats support: WAV, AIFF, CAF, PCM, ALAC, MP3, and more.
Compatibility: macOS.
Price: Paid
4. Audacity
A free, open-source, and features rich software perfect for both professional and beginner users. Its offers multiple effects and tolls like analysis, envelope, time-shift tools, etc.
Pros
- Free.
- Cross-platform.
- Easy to use.
- Features for beginner and pro-level, both.
- Online community available for help.
Cons:
- Not very appealing UI.
- May face crashes on Mac.
Audio formats support: MP3, MP4, AIFF, PCM, WMA, AC3, AMR, and more.
Compatibility: Linux, Windows, and macOS.
Price : free.
Filmora Audio Mixer
Wondershare Filmora - Audio Mixer
• Easily mix audio, sound, music or song as your need
• Edit audio files like denoise, crop, audio ducking, audio auto synchronization, etc…
• Cross-platform supported - (Windows, Mac, iOS, Android)
Mix Your Audio Now Mix Your Audio Now Mix Your Audio Now Learn More >
5. Reaper
This is one of the few software facilities with a bunch of features at such an affordable price. It has multiple tracks, multichannel support, real-time, non-destructive effect application, pitch-shifting, and time-shifting features.
Pros
- Feature-rich.
- More affordable than other audio mixer software.
- Detailed tutorials are available online.
Cons:
- Not very appealing UI as of LPX or Audition.
- Not suitable for beginners.
Audio formats support ACID, AIFF, MP3, MPEG WMV, and more.
Compatibility: Linux, Windows, and macOS.
Price: free and paid.
6. Fl Studio
It is one of the top-notch software used for sound mixer and editing purposes. It supports pitch shifting, time stretching and multi-track recording, 80 plugins, VST standards, delay compensation, etc.
Pros
- Comes with abundant Features.
- Works great for music productions.
- Supports 3rd party plugin.
Cons:
- Not very appealing UI.
- May be intimidating for beginners.
Audio formats support: AIFF, DS, MP3, OGG, WAV and more.
Compatibility : Windows and macOS.
Price: free and paid.
7. SoundAtion
It is a browser-based software that facilitates non-destructive Multi-track audio editing, dynamic mixing, several effects selection, and EQ across multiple tracks.
Pros
- Free digital audio Workstation (DAW).
- Works wonderfully for sound effects, podcasting, and general-purpose sound task.
- Supports 3rd party plugin.
Cons:
- Automation not featured in a free trial.
- Limited audio quality in a trial version.
Audio Formats Support: MP3 and WAV.
Compatibility: any operating system.
Price : free and paid.
8. HyaWave
It offers functions like cutting with an online audio cutter, paste and trim audio, and supports 18 filters, effects, and publication through URL and social media with the minimalistic user interface.
Pros
- Easy and simple user interface.
- Audio filter customization.
- Has a built-in audio player, recorder, and editor.
Audio formats support: MP3, WAV, and more.
Compatibility : any operating system.
Price : free.
9. Twisted Wave Online
It is an online software almost equally compatible with many paid sound mixer and editing tools. It also supports uncompressed audio recording, VST effects, and several core effects.
Pros
- Cloud storage of edited audio, saving the disk space.
- Sampling rate conversation.
- Online and free.
Cons:
- Upload file in mono in a trial version.
- Supports 5 minutes audio clip in a trial version.
Audio formats support : MP3.
Compatibility: any operating system.
Price: free and paid.
10. Bear Audio Tool
This is online browser-based software that can edit the files from our local storage, and you don’t have to upload the audio to their server. It can cut, apply effects, trim, etc. It has ample own music library, effects and import options.
Pros
- Copyright-free.
- Import audio directly from URL or social media domains.
- Features rich.
Cons:
- Not suitable for very advanced usage.
Audio formats support : MP3, OGG, WAV, WMA, M4R and OGG.
Compatibility : any operating system.
Price: free and paid.
Part 2. All You Know About Audio Mixer
[1] What is an audio mixer?
An audio mixer is used for several significant purposes. It is known with several names. Whether a mixing desk, soundboard, mixing board, audio mixer, or mixing console, all have a coherent purpose. The sole purpose of an audio mixer is to manage either the live or recorded event.
As the name suggests, audio mixing is the process of mixing multiple sounds and consolidating them into one or more channels.
This process is performed in a way that manipulates or enhances the dynamics, source’s volume level, panoramic position, and frequency content. The end moto of this creative and aesthetic treatment is to present the audio appealing to the listeners.
[2] What does an audio mixer do?
As mentioned above, the primary function of an audio mixer is to mix more than one audio signal and combine them into one or more output signals.
As an example, you may think of an audio mixing engineer, let’s say, orchestra conductor, who ensures that all the segregated sound sources mix into one harmonious soundtrack.
For this, they will use an audio mixer for filtering and optimizing sound by level adjusting, developing monitor feeds, using equalization and effects for sound enhancement.
This process is performed by a mixing engineer who operates either a digital audio workstation or a mixing console .
[3] What is audio mixing used for?
Audio mixing can be used in many fields, and it’s very common in our daily life, such as:
- 1. Music
- 2. Live sound
- 3. Film
- 4. Television
Filmora Audio Mixer
Wondershare Filmora - Audio Mixer
• Easily mix audio, sound, music or song as your need
• Edit audio files like denoise, crop, audio ducking, audio auto synchronization, etc…
• Cross-platform supported - (Windows, Mac, iOS, Android)
Mix Your Audio Now Mix Your Audio Now Mix Your Audio Now Learn More >
Part 3. What to consider while choosing an audio mixer software?
Before starting off with the audio mixing activity itself, one must be able to determine which audio mixer software is best for them with respect to their availability of resources or usability. Here are some of the factors to consider while opting for an audio mixer software:
- Check whether the software is paid or free.
- Check whether the limited features offered in a trial/free audio mixer software are enough to satisfy all your needs.
- Choose the paid or the free one depending on the extent of audio mixing quality you want.
- Look for an easy user interface.
- Look for software compatibility with your existing operating system.
- Check for the availability of tutorials related to the use of audio mixer software that you want to opt for better guidance.
- Look for the basic or advanced functions support in the audio mixer software that you choose depending upon your usability.
- Whether the software is available online or you need to install the version.
Part 4. Basic audio mixer settings you should know
It is necessary to know at least somewhat about the fundamental terminologies to decipher the specifications and features of an audio mixer. Here you’ll get to know what it takes to be able to distinguish among different audio mixers and their respective software.
Channel:
It is a signal path. Channels are made to accept microphones, preamps, amplifiers, and signal processors. A mixer with several channels integrated with it allows several things to be integrated and routed through it.
Channel Strip:
It is a cluster of controls and circuits that works together on a specified mixing channel to manipulate the audio that passes through it. Some of which includes the following:
Input jack:
It is the jack where any external instrument, like guitar, microphone etc., integrates with the mixer. The noise and interface are minimized to maximum extent by balancing the XLR inputs. A quarter-inch TRS connector or RCA are connected to other inputs.
Microphone preamp:
It produces weak mic signals by the raise of line-level strength for processing.
Equalization:
Often abbreviated as “EQ”, is used to adjust the frequency response of a signal.
Dynamics:
This process is used to perform grating and compressing.
Routing:
It directs the incoming signals to external devices or mixer circuitry.
Fader:
Its fundamental objective is to control the inputs and outputs of a channel.
Meter:
Kind of a gauge or interface that presents the channel output.
I/O:
I/O is abbreviated as inputs/outputs on a mixer in this regards. The number and category of I/O will depend on the use of a mixer.
Now, let’s understand the scenario of live mixing.
Such a mixer is needed which is enough to handle the outputs needed to connect the mains, microphones, other devices that connect to it and monitor speakers. The devices that are a part of a recording process or signal chain must also be included while calculating I/O for studio mixers.
Such inputs/outputs include headphones, effects processors, monitor speakers, signal processors and other instruments as well that uses direct injection (DI) boxes to connect to the mixer.
Buses:
It can be understood as a circuit intersection where the outputs from different channels meet. The signal channels are routed to a specific bus or set of busses. The main mixer output to a recorder or a speaker by the master mix bus.
Auxiliary buses, often known as aux buses or aux sends, are usually fed by the channel’s volume controls with which they are connected and then send those signals through their own output jacks. This is called as post-fader sends which are used to send the mixes of monitor speakers, signals to headphones or effects processors.
Groups:
Several channels in a mixer often offer a group function that allows one to simultaneously process and control various channels. Its works are similar to that of sub-mixer that shares the coherent signal routing and processing and provides the ease in controlling master bus since a single fader is used to control all the channels.
Inserts:
External and add-on sound processors, such as equalizers and compressors, are connected with the help of a channel insert.
Direct Output:
These feed mixer’s preamplifiers output to recording systems and external sound interfaces.
Cue System:
Cue systems allow listening on the specified channels without affecting the mixer’s output. This usually allows the signal to listen either before fading manipulation or after.
Part 5. Why audio mixer software?
In the early days, analog audio mixers were the only option available to perform sounding mixing. But the rise of the era of the 21st century brings more opportunities for easy and optimized audio mixing by sound mixer software.
All you need is a configured laptop, audio mixer software, and merely a control surface to jump into this world while being within the budget!
This audio mixer software is easily available to do everything or even more than what a physical mixer could have done. Several sound mixer applications are available to start with basic sound mixing using your smartphones or even tablets.
For the sake of recording, software-based mixers allow easy integration with the virtual instruments, drum loops, samples, and several other additions in your productions. The use of advanced MIDI functions with a digital audio workstation (DAW) lets you enlighten with a whole new world of possibilities to elevate your sounds/music to the next level.
Final verdict: Have you decided on your audio mixer software?
The usability and optimality of a sound mixer online software depend solely on the extent of application, available resources, and OS compatibility.
But, it can be said without a doubt that Wondershare Filmora is the most user-friendly, with immense flexibility in terms of uses and compatibility. Its broad-scale usability and promising results make it outshine the most among other audio mixing software.
Benjamin Arango
Benjamin Arango is a writer and a lover of all things video.
Follow @Benjamin Arango
Also read:
- 2024 Approved The Digital DJ Harnessing Software to Separate Song Beats
- Updated Steps for Incorporating Musical Elements Into Windows-Compatible GIFs
- Updated In 2024, Revolutionizing Audio Capture on Android The 7 Best Alternatives to Audacity Revealed
- New In 2024, Mastering Silence Techniques for Quieting Unwanted Sounds in Video Editing
- Comprehensive Guide to 6 Premium Online Audio Resources Featuring Whoosh Effects
- In 2024, Premiered 7 Techniques for Nonchalant Vocal Suppression Online & Offline
- Updated In 2024, Voice Modification Mastery The Best 5 Mobile Solutions for iPhone and Android Phone Calls
- New Audio Transition Techniques with Keyframes A Mac-Based Filmorians Handbook for 2024
- Updated Pitch Control Made Easy A Comprehensive Guide to Altering Voices with Audacity
- Updated In 2024, The Path to Pristine Sounds A Guide to Clearing Up Internet-Based Auditory Interruptions
- New Perfecting the Symphony Techniques for Seamless Blending of Auditory Elements and Visuals in MP4 for 2024
- Updated How to Use Morphvox Voice Changer for Online Game Streaming for 2024
- Updated Mastering Sound Integration Enhancing Videos with Adobe Premiere Pro for 2024
- New A Comprehensive Guide to Each Cast and Crews Purpose on Set for 2024
- In 2024, An In-Depth Analysis of WaveEdits Latest Features
- 2024 Approved Free Methods to Embed Songs Within Video Content Creation Processes
- 2024 Approved Chromebook Guide Integrating Audacity - Setup & Removal Tips
- New 2024 Approved Guide to Isolating and Removing Audio Tracks in Video Editing Using Premiere Pro
- In 2024, Quick and Easy Vocal Removal in Audacity A Guide
- New Harmonizing Sound Innovative Solutions to Tackle Distorted Audio Problems
- Step-by-Step Guide to Embedding Tracks in KineMaster for 2024
- New 2024 Approved The Ultimate List of Green-Themed Audio Apps for Smartphones
- Updated Discovering the Ideal Digital Studio Ranking the Top 7 DAWs for Guitar Enthusiasts
- New 2024 Approved Creating Cinematic Experiences A Guide to Adding and Tweaking Background Sounds with Filmora
- New In 2024, Innovations in Digital Vocal Alteration Top-Notch Applications
- In 2024, Ranking the Ultimate Selection The 9 Superior Podcast Microphones
- New Mastering Sound Silence Essential Techniques for Noise Reduction with Offline and Online Solutions
- New In 2024, Audiophiles Toolkit Implementing Smooth Audio Transitions with Ducking in Adobe Premiere Pro (Mac)
- Updated 2024 Approved Unveiling the Ultimate Frequency Tuner Configurations
- 2024 Approved Silencing Audio in MP4 Format A Step-by-Step Guide
- Harmonizing Visuals & Sounds Displaying Audio Waves & Adding Expressive Animation in Magix Movie Edit Pro
- Updated Chord Connoisseurs Top Choice Mobile Apps for Identifying Songs on Android Devices for 2024
- New 2024 Approved Free MPEG Video Assembly Top Rated Programs
- 9 Quick Fixes to Unfortunately TouchWiz has stopped Of Oppo Find X6 | Dr.fone
- In 2024, 7 Ways to Unlock a Locked Samsung Galaxy A14 4G Phone
- How can I get more stardust in pokemon go On Oppo A56s 5G? | Dr.fone
- Stream Your Personal Video Collection to Chromecast A Beginners Guide for 2024
- In 2024, Top 7 iCloud Activation Bypass Tools For your iPhone 8 Plus
- Updated Back to Basic for 2024
- Nubia Data Retrieval tool – restore lost data from Nubia
- Downloading SamFw FRP Tool 3.0 for HTC U23 Pro
- How to Cast Vivo Y200 to Computer for iPhone and Android? | Dr.fone
- In 2024, How to Show Wi-Fi Password on Vivo Y17s
- Title: Updated Perfect Pacing with Pitch A Comprehensive Guide to Adding and Editing Timestamps in Final Cut Pro X
- Author: David
- Created at : 2024-05-20 05:45:50
- Updated at : 2024-05-21 05:45:50
- Link: https://sound-tweaking.techidaily.com/updated-perfect-pacing-with-pitch-a-comprehensive-guide-to-adding-and-editing-timestamps-in-final-cut-pro-x/
- License: This work is licensed under CC BY-NC-SA 4.0.
