
:max_bytes(150000):strip_icc():format(webp)/MorningShow-aed160f9cfd448cc8034b23bb3073314.jpg)
Updated 2024 Approved The Insiders Guide to Removing Background Noise From Videos in Adobe Premiere Pro
The Insider’s Guide to Removing Background Noise From Videos in Adobe Premiere Pro
Are you into the creative industry? Do you need to detach audio from a video? Are you a fan of Premiere Pro?
With the media industry progressing, advanced features are on the rise. Each upgrade is for the creator’s ease. The well-developed functions limit the stress at the workplace. Don’t you agree? The media production needs to detach audio from video. It is essential to censor audio out or eliminate unwanted background noise.
Most often, audio has to be detached for B-roll. One can detach audio Premiere Pro effortlessly. The article covers the procedure to extract and separate audio from a video. We shall also have a preview of Filmora. So, what are we waiting for? Let us commence this!
In this article
01 How Can You Extract, Separate, or Detach Audio from Video? [Premiere Pro]
02 Tips to Detach or Remove Audio From Video in Filmora
Part 1: How Can You Extract, Separate, or Detach Audio from Video? [Premiere Pro]
Premiere Pro detaches audio flawlessly. Adobe Premiere Pro is a video editing software. With creative tools, a flexible interface, and powerful capabilities, Premiere Pro turns your raw footage into something extraordinary. It enables you to perform color grading, color correction, and transitions effectively. The largest toolset has made life bearable for creators.
Additionally, Adobe Premiere Pro has an excellent range of collaboration tools. There are learning tools to guide the beginner towards a successful process. These tutorials have assisted the user in performing basic operations productively. The refined video editing tools have created a revolution in the market. The Auto Reframe feature changes the crop selection by keeping the attention where it is due.
Are you invested in detaching the audio process? Worry no more as we have got you. Premiere Pro doesn’t leave its users empty-handed. Audio extraction and separation both would be included in this section.
Audio Extraction Process
The audio extraction procedure is a great way to lubricate the editing process. The audio is extracted to add new audio master clips in this phenomenon. The channel mapping, duration, gain, speed, and footage adjustment are applied to the extracted clips. The original content remains preserved.
Before detaching audio, let us shift our focus to extracting it. So, are you with us? Follow the step-by-step below to extract audio from the video.
Step 1: Launching Premiere Pro
Open Adobe Premiere Pro. Press ‘New Project’ from the interface that appears. The default settings are good to go. However, make sure that the output location is appropriate. Hit ‘OK.’

Step 2: Importing the Clips
Now, click on ‘Media Browser’ from the middle panel. Import the targeted video clips to initiate the process. Select the videos whose audio has to be extracted. Head to the ‘Clip’ section and choose ‘Audio Options.’ Hit ‘Extract Audio’ afterward.

Step 3: File Extraction
In a couple of seconds, Premiere Pro creates duplicate audio files. The original video clips are not affected in any way. Moving on, let us move on to export the extracted audio clips.

Step 4: Exporting Process
Mark in and out points on your sequence for the session you wish to export. Mute the rest of the tracks. Now, navigate to the ‘File,’ press ‘Export,’ and then ‘Media.’ For encoding format, choose between MP3 and WAV form audio based on the original file format. Choose the output location. Hit ‘Export,’ and you are done.

Audio Detaching Process
Similarly, audio separation is another way to access a part of the audio. It permits you to use any audio section and make necessary edits to it. To detach audio in Premiere Pro, kindly follow the guidelines below.
Step 1: Importing the Media Files
Launch Premiere Pro from your computer. The interface opens up in seconds. The user is recommended to browse the targeted video with attached audio. Add it to the timeline of the Premiere Pro.

Step 2: Unlinking Process
After that, right-click on the clip. Choose ‘Unlink’ from the list of options that appear. The user can easily select and edit both the audio and video content. However, you can also separate audio using another faster process.

Step 3: Deleting Process
Hold down the ALT key from your keyboard and click on the audio clip to do this more effectively. Use the ‘Delete’ button and get rid of it once and for all. Now, make necessary edits, and you are done for the day!

Part 2: Tips to Detach or Remove Audio From Video in Filmora
Wondershare Filmora needs no introduction. Filmora has always had something refined to offer in a world full of video editors. Wouldn’t you agree? A content creator needs a video editing tool with an interactive interface with balanced functions.
Filmora knows different tricks to keep creative professionals invested in it. From keyframing to motion tracking and green screen to color matching, Wondershare Filmora wouldn’t disappoint you. The optimized GPU detection brings productivity to work. As far as audio editing is concerned, Filmora has advanced tools on the go.
The audio equalizer and audio mixer fine-tune the music and adjust the audio of separate tracks, respectively. You can split audio, adjust the audio volume, and perform audio ducking. The creative creators can also add a voiceover and trim the clips. The original audio of the video can also be replaced technically. Isn’t that the whole dream?
In short, Filmora has everything under one platform. There is no need to download extensive video editors for each functionality.
Moving on to the section, we shall discuss the procedure to detach or remove audio using this exceptional tool. So, let us try this!
For Win 7 or later (64-bit)
For macOS 10.12 or later
Step 1: Browsing the Video
Download Wondershare Filmora in your system. Launch it as soon as the process is concluded. Import the targeted video files into the program. Drag the video from the library onto the timeline.

Step 2: Removing Audio
To remove the audio, right-click on the video file from the timeline. Click on ‘Detach audio’ from the options that appear. The audio file is separated from the video file. It is displayed in another track below the video track.

Step 3: Final Process
Now, the user is free to make edits to the audio and perform modifications as deemed necessary. Delete the separated audio track if you wish to add a new voiceover or audio in the background. You can do so by clicking on the trash button above the timeline.

Conclusion
The raw videos undergo treatment to look ravishing. Don’t you think? Without the needed editing, these videos wouldn’t stand anywhere. After the original audio is detached, a better message is expressed to replace it with promising content.
The article introduced Premiere Pro. Moreover, how to detach audio from video Premiere Pro was also discussed in detail. If you want to extract audio from video, this write-up will help you. Wondershare Filmora is a video editing software with great tools to get the trick done in seconds.
Versatile Video Editor - Wondershare Filmora
An easy yet powerful editor
Numerous effects to choose from
Detailed tutorials provided by the official channel
02 Tips to Detach or Remove Audio From Video in Filmora
Part 1: How Can You Extract, Separate, or Detach Audio from Video? [Premiere Pro]
Premiere Pro detaches audio flawlessly. Adobe Premiere Pro is a video editing software. With creative tools, a flexible interface, and powerful capabilities, Premiere Pro turns your raw footage into something extraordinary. It enables you to perform color grading, color correction, and transitions effectively. The largest toolset has made life bearable for creators.
Additionally, Adobe Premiere Pro has an excellent range of collaboration tools. There are learning tools to guide the beginner towards a successful process. These tutorials have assisted the user in performing basic operations productively. The refined video editing tools have created a revolution in the market. The Auto Reframe feature changes the crop selection by keeping the attention where it is due.
Are you invested in detaching the audio process? Worry no more as we have got you. Premiere Pro doesn’t leave its users empty-handed. Audio extraction and separation both would be included in this section.
Audio Extraction Process
The audio extraction procedure is a great way to lubricate the editing process. The audio is extracted to add new audio master clips in this phenomenon. The channel mapping, duration, gain, speed, and footage adjustment are applied to the extracted clips. The original content remains preserved.
Before detaching audio, let us shift our focus to extracting it. So, are you with us? Follow the step-by-step below to extract audio from the video.
Step 1: Launching Premiere Pro
Open Adobe Premiere Pro. Press ‘New Project’ from the interface that appears. The default settings are good to go. However, make sure that the output location is appropriate. Hit ‘OK.’
Step 2: Importing the Clips
Now, click on ‘Media Browser’ from the middle panel. Import the targeted video clips to initiate the process. Select the videos whose audio has to be extracted. Head to the ‘Clip’ section and choose ‘Audio Options.’ Hit ‘Extract Audio’ afterward.
Step 3: File Extraction
In a couple of seconds, Premiere Pro creates duplicate audio files. The original video clips are not affected in any way. Moving on, let us move on to export the extracted audio clips.
Step 4: Exporting Process
Mark in and out points on your sequence for the session you wish to export. Mute the rest of the tracks. Now, navigate to the ‘File,’ press ‘Export,’ and then ‘Media.’ For encoding format, choose between MP3 and WAV form audio based on the original file format. Choose the output location. Hit ‘Export,’ and you are done.
Audio Detaching Process
Similarly, audio separation is another way to access a part of the audio. It permits you to use any audio section and make necessary edits to it. To detach audio in Premiere Pro, kindly follow the guidelines below.
Step 1: Importing the Media Files
Launch Premiere Pro from your computer. The interface opens up in seconds. The user is recommended to browse the targeted video with attached audio. Add it to the timeline of the Premiere Pro.
Step 2: Unlinking Process
After that, right-click on the clip. Choose ‘Unlink’ from the list of options that appear. The user can easily select and edit both the audio and video content. However, you can also separate audio using another faster process.
Step 3: Deleting Process
Hold down the ALT key from your keyboard and click on the audio clip to do this more effectively. Use the ‘Delete’ button and get rid of it once and for all. Now, make necessary edits, and you are done for the day!
Part 2: Tips to Detach or Remove Audio From Video in Filmora
Wondershare Filmora needs no introduction. Filmora has always had something refined to offer in a world full of video editors. Wouldn’t you agree? A content creator needs a video editing tool with an interactive interface with balanced functions.
Filmora knows different tricks to keep creative professionals invested in it. From keyframing to motion tracking and green screen to color matching, Wondershare Filmora wouldn’t disappoint you. The optimized GPU detection brings productivity to work. As far as audio editing is concerned, Filmora has advanced tools on the go.
The audio equalizer and audio mixer fine-tune the music and adjust the audio of separate tracks, respectively. You can split audio, adjust the audio volume, and perform audio ducking. The creative creators can also add a voiceover and trim the clips. The original audio of the video can also be replaced technically. Isn’t that the whole dream?
In short, Filmora has everything under one platform. There is no need to download extensive video editors for each functionality.
Moving on to the section, we shall discuss the procedure to detach or remove audio using this exceptional tool. So, let us try this!
For Win 7 or later (64-bit)
For macOS 10.12 or later
Step 1: Browsing the Video
Download Wondershare Filmora in your system. Launch it as soon as the process is concluded. Import the targeted video files into the program. Drag the video from the library onto the timeline.
Step 2: Removing Audio
To remove the audio, right-click on the video file from the timeline. Click on ‘Detach audio’ from the options that appear. The audio file is separated from the video file. It is displayed in another track below the video track.
Step 3: Final Process
Now, the user is free to make edits to the audio and perform modifications as deemed necessary. Delete the separated audio track if you wish to add a new voiceover or audio in the background. You can do so by clicking on the trash button above the timeline.
Conclusion
The raw videos undergo treatment to look ravishing. Don’t you think? Without the needed editing, these videos wouldn’t stand anywhere. After the original audio is detached, a better message is expressed to replace it with promising content.
The article introduced Premiere Pro. Moreover, how to detach audio from video Premiere Pro was also discussed in detail. If you want to extract audio from video, this write-up will help you. Wondershare Filmora is a video editing software with great tools to get the trick done in seconds.
Versatile Video Editor - Wondershare Filmora
An easy yet powerful editor
Numerous effects to choose from
Detailed tutorials provided by the official channel
Sculpting the Visual Narrative: A Composer’s Approach to Transition Craftsmanship
How to Add Video and Audio Transition Between Scenes/Clips

Liza Brown
Mar 27, 2024• Proven solutions
Transition effects appear when one slide/clip replaces another one. It helps make the presentation, slideshow or movie good looking and impressive. Transition effects are widely used in and video editing software, such as Windows Movie Maker, iMovie, DVD Slideshow Builder, etc. You can also use transition sound effects to make amazing videos.
This article will show you how to add transitions (including video and audio transitions) between scenes and clips in Wondershare Filmora . Tips and tricks for transitions are also included.
How to Add Transitions Between clips
Part 1: Add video transitions
1. Download Wondershare Filmora
Wondershare Filmora is an easy-to-use while powerful video editing tool that is available both on Windows and Mac. Download it from the button below to get started.
 Download Mac Version ](https://tools.techidaily.com/wondershare/filmora/download/ )
2. Import video/photos to the project
Before adding video/photo files to the Timeline, you need to import them first into the project. There are mainly 2 ways to import video/photo files: “Import” button on primary windows, or dragging and dropping files from Windows File Explorer to the User’s Album. Wondershare Filmora supports all popular video/audio/photo formats, including but not limited to AVI, MP4, MOV, MPEG, MPG, FLV, M4V, WMV, TS, MOD, TOD, VOB, MP3, WMA, M4A, JPG, PNG, BMP, and GIF. Then drag and drop the media files from the Media album to the video track on timline for editing

3. Add transitions between video and photo files
All clips will be played one by one without a gap. But no transition effects will be applied by default. To add transitions, switch to Transition tab and drag any transition to the joint of two clips from almost 200 transitions (when the white box appears, release your mouse). Now, you could also add transition at the end or start of a clip.

You can also change the transition mode among Overlap, Prefix, and Postfix by double-clicking on the transition on timeline

Tips and Tricks for Transition Effects
1. If you want to set the transition duration, it’s better to enlarge the Timeline view through the Zoom in tool or slider above the Timeline. Next, double click the transition thumbnail to open the setting panel and input the time. Click “Apply to All” if you want all transition effects to have the same duration.
2. To delete a transition, highlight it and click the Delete button in the toolbar above Timeline, or press Delete key on the keyboard.
3. If you especially love a transition, you can add it to Favorite by right clicking transition in the list and selecting “Add to Favorites” from the menu.
4Export video with transitions
When you are happy with your video and transition effects, click “Create” to save the video with transitions. You can save video in all popular formats on the computer by clicking “Format” and choosing a format from the list. If you want to play your video on iPod, iPhone, iPad, click “Device” and select a thumbnail of the device. It’s also available to upload your videos to YouTube to share with your friends. To play video on TV, you can burn it to DVD with your DVD burner.

In the end, if you have problems with adding transitions, please click here to get in touch with supporters.
Part 3: Add audio transitions
Filmora also allows you to add transitions between audio files. Using the fade-in and fade-out feature to make your audio process smoontly. With the complete new waveform and audio keyframing. Check this video to see the details about video transition in Filmora.
Download Mac Version ](https://tools.techidaily.com/wondershare/filmora/download/ )
Liza Brown
Liza Brown is a writer and a lover of all things video.
Follow @Liza Brown
Liza Brown
Mar 27, 2024• Proven solutions
Transition effects appear when one slide/clip replaces another one. It helps make the presentation, slideshow or movie good looking and impressive. Transition effects are widely used in and video editing software, such as Windows Movie Maker, iMovie, DVD Slideshow Builder, etc. You can also use transition sound effects to make amazing videos.
This article will show you how to add transitions (including video and audio transitions) between scenes and clips in Wondershare Filmora . Tips and tricks for transitions are also included.
How to Add Transitions Between clips
Part 1: Add video transitions
1. Download Wondershare Filmora
Wondershare Filmora is an easy-to-use while powerful video editing tool that is available both on Windows and Mac. Download it from the button below to get started.
Download Mac Version ](https://tools.techidaily.com/wondershare/filmora/download/ )
2. Import video/photos to the project
Before adding video/photo files to the Timeline, you need to import them first into the project. There are mainly 2 ways to import video/photo files: “Import” button on primary windows, or dragging and dropping files from Windows File Explorer to the User’s Album. Wondershare Filmora supports all popular video/audio/photo formats, including but not limited to AVI, MP4, MOV, MPEG, MPG, FLV, M4V, WMV, TS, MOD, TOD, VOB, MP3, WMA, M4A, JPG, PNG, BMP, and GIF. Then drag and drop the media files from the Media album to the video track on timline for editing
3. Add transitions between video and photo files
All clips will be played one by one without a gap. But no transition effects will be applied by default. To add transitions, switch to Transition tab and drag any transition to the joint of two clips from almost 200 transitions (when the white box appears, release your mouse). Now, you could also add transition at the end or start of a clip.
You can also change the transition mode among Overlap, Prefix, and Postfix by double-clicking on the transition on timeline
Tips and Tricks for Transition Effects
1. If you want to set the transition duration, it’s better to enlarge the Timeline view through the Zoom in tool or slider above the Timeline. Next, double click the transition thumbnail to open the setting panel and input the time. Click “Apply to All” if you want all transition effects to have the same duration.
2. To delete a transition, highlight it and click the Delete button in the toolbar above Timeline, or press Delete key on the keyboard.
3. If you especially love a transition, you can add it to Favorite by right clicking transition in the list and selecting “Add to Favorites” from the menu.
4Export video with transitions
When you are happy with your video and transition effects, click “Create” to save the video with transitions. You can save video in all popular formats on the computer by clicking “Format” and choosing a format from the list. If you want to play your video on iPod, iPhone, iPad, click “Device” and select a thumbnail of the device. It’s also available to upload your videos to YouTube to share with your friends. To play video on TV, you can burn it to DVD with your DVD burner.
In the end, if you have problems with adding transitions, please click here to get in touch with supporters.
Part 3: Add audio transitions
Filmora also allows you to add transitions between audio files. Using the fade-in and fade-out feature to make your audio process smoontly. With the complete new waveform and audio keyframing. Check this video to see the details about video transition in Filmora.
Download Mac Version ](https://tools.techidaily.com/wondershare/filmora/download/ )
Liza Brown
Liza Brown is a writer and a lover of all things video.
Follow @Liza Brown
Best 11 FREE Voice Changer Apps for iOS and Android
Best Voice Changer Apps for iPhone and Android

Benjamin Arango
Mar 27, 2024• Proven solutions
Have you ever wondered what your voice would sound like if you were a cartoon character, a robot, or an older version of yourself? Changing how your voice sounds has never been easier, regardless of the Smartphone model you have, since voice changer apps can be used on both iPhone and Android devices.
Even though there is nothing wrong with modulating your voice to have fun with your friends, using voice changer apps to pull malicious pranks or bully strangers online is far from acceptable. Read on if you would like to find out more about the best voice changer apps for iPhone and Android devices and discover the one you enjoy using the most.
Best Voice Changer Apps for iPhone and Android
Creating a new ringtone, making a voice recording, or having fun with your friends are only a few reasons why so many people choose to try out voice changer apps. The vast majority of these apps feature well-equipped audio effects libraries that enable users to have fun with their friends and hear how they would sound if they were drunk or after inhaling helium. So, let’s take a look at some of the best voice changer apps on the market.


Changing video voice on Windows and Mac with Wondershare Filmora
Do you want to change the voice in video on Windows and Mac and don’t know which software can meet this requirement? Try Filmra video editor , which provides several ways to change voice over, such as changing the voice speed or changing the pitch. Download the trial version below and find out more possibility in video creation with Filmora.
1. Celebrity Voice Changer – Face
Price: Free, but offers in-app purchases
Compatibility: iOS 9.0 or later
User Rating: 4.0
In case you would like to sound like your favorite movie star of TV host, then Celebrity Voice Changer is one of the best choices you can make. Besides the standard set of options, the app also lets you request new voices since its machine learning technology can mimic virtually anyone’s voice. However, Celebrity Voice Changer is currently only available in English and it cannot modulate speech in other languages. In addition, you must make an in-app purchase in order to gain access to all of the app’s features or unlock the unlimited usage of the app.
Pros
- Automatic voice modulation
- Huge selection of voice filters
- The app generates video files that are better adjusted to the audience on social media than audio files
- Excellent impressions of celebrities
Cons
- Unreasonably expensive
- The app’s Deep Learning technology still has a lot of room for improvement
2. Snapchat
Price: Free, but offers in-app purchases
Compatibility: iOS 10.0 or later, Android 4.4 or up
User Rating: 3.8
With more than 203 million daily users, Snapchat is one of the largest messaging platforms on the market. Previously, we’ve shared how to change gender on Snapchat , beside that, the app lets its users capture short moments or the so-called Snaps and share them with friends. In addition to hundreds of video filters , Snapchat also features a broad spectrum of voice changing effects that make Snaps more entertaining. Even so, the audio recording options Snapchat offers are far from ideal, because the app doesn’t allow you to edit the files you create with it. Using Snapchat will drain your battery quickly, which is why you must pay attention to how frequently you use this app.
Pros
- The easy voice modulation process
- Excellent messaging options
- Grants you access to a large community of likeminded people
- Lenses and filters are updated on a daily basis
Cons
- Editing voice changes after you create a Snap is not possible
- Snapchat is not primarily a voice changer app
Check the detailed information about How to Change Voice on Snapchat with 2 Easy Methods >>
3. Voice Changer
Price: Free
Compatibility: Android 4.1 and up
User Rating: 4.3

Changing your voice with this app won’t take more than a few moments of your time. You just have to launch the app and hit the microphone button to record a message or a joke you would like to modulate. Once you’re happy with the audio recording you made, you can proceed to choose from more than twenty voice effects that will make you sound like a dwarf, a robot, or an alien. The app’s file-sharing capabilities enable you to post your audio recordings to any social media platform of your choosing or store your files and use them as many times as you want.
Pros
- Entertaining and easy to use
- The simple three-step voice modulation process
- Good selection of voice filters
- Excellent file sharing options
Cons
- The app displays ads
- No audio editing tools
4. Voicy: Celebrity Voice Changer
**Price:**Free, but offers in-app purchases
Compatibility: iOS 10 or later
User Rating: 4.3

Impersonating your favorite celebrity can be a fun way to prank your friends on social media. Voicy features a broad selection of celebrity voice impersonations you can use to make you sound like a famous actress or TV personality. The app utilizes a machine learning technology that can generate more than forty avatars and allows the users to experiment with different voice effects. The free version of the app offers only limited capabilities, so if you want to gain access to all of the Voicy’s features, you must choose a weekly, monthly or an annual subscription.
Pros
- Equipped with a powerful machine learning technology
- Offers a vast selection of voice avatars
- The quick voice modification process
- A great choice if you want to make a parody
Cons
- More expensive than the competition
- Support only the English language
5. Video Voice Changer – Fun Editor
Price: Free, but offers in-app purchases
Compatibility: iOS 8.0 or later
User Rating: 4.4

Changing the voices in the videos you record with your iPhones or iPads is a straightforward process that takes a minimum amount of effort. You can either use this iOS-based app to capture videos you’re going to dub or import them from the albums in which they are stored. The Video Voice Changer app is a great option if you want to dub videos directly from your phone because it enables you to change the voices in your videos and make them sound like mice, bears or ghosts. There are over thirty voice effects to choose from, so you can easily pick the one that best fits the video you’re editing.
Pros
- Equipped with video recording tools
- Excellent dubbing features
- A rich selection of voice effects
- Allows users to share their creations on Facebook, Instagram, and other social media platforms
Cons
- You must make an in-app purchase to unlock all of the app’s features
- No audio mixing options
6. Video Voice Changer FX
**Price:**Free, but offers in-app purchases
Compatibility: Android 4.1 and up
User Rating: 4.1

This is a simple app, anyone can use to change the voices in a video. Simply upload a video file from an SD card in your phone and choose an audio effect you want to apply. The app’s collection of funny voices includes options like echo, squirrel, space ship or chipmunk. As soon as you select the voice effect you want to add to a video, the app will start generating a new video that will be saved to your phone. Sharing the videos you edit with Video Voice Changer FX to social media directly from the app is not an option.
Pros
- Fun and easy to use
- Great price to performance ratio
- Changing a voice requires just a few taps
- Allows users to switch between effects while the video is playing
Cons
- No audio or video recording capability
- Doesn’t support social media sharing
7. Squeak Voice Changer
**Price:**Free, but offers in-app purchases
Compatibility: Android 4.3 and up
User Rating: 3.9

Every joke you want to share with your online friends is going to be a little funnier if you record it with Squeak Voice Changer. You just have to tap on the Record button and choose one of the available effects. Each voice changing effect this app offers is represented by a character so you should select Jamie the Jolly if you want to make your voice sound like you’re at a party or Bruce the Sentimental Bot if you want your voice to sound artificial. All the recordings you make with Squeak Voice Changer can be easily shared on social media.
Pros
- Equipped with audio recording options
- Cute and memorable characters that represent voice effects
- Inexpensive and fun to use
- Functional app design
Cons
- Poor selection of voice effects
- The AI only recognizes the English language
8. Voice Changer with Effects
**Price:**Free
Compatibility: Android 4.1 and up
User Rating: 4.5
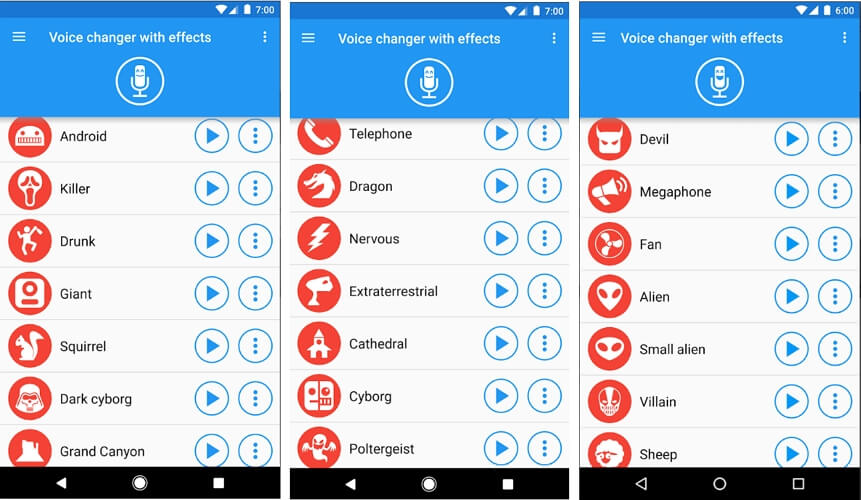
This Android-based app is designed to make fun and easy since voice modulation features enable you to play voice recording backward or change your voice to sound robotic or even alien. Besides recording your voice, the app also lets you modulate pre-recorded sounds and save them to your phone or use them as ringtones or notification sounds. Furthermore, the app lets you add sounds to images and share them to Facebook. The Voice Changer with Effects enables you to share all audio files you process with it to any of the most popular social media platforms.
Pros
- The app has over 50,000,000 installs
- Equipped with a text to voice feature
- Setting a new ringtone with this app is easy
- Supports editing of pre-recorded audio files
Cons
- Contains ads
- No audio or video editing options
9. Voice Changer
**Price:**Free
Compatibility: Android 4.1 and up
User Rating: 4.4

If you are looking for an Android app that lets you modulate your voice quickly and effortlessly, then Voice Changer may be one of the best options you can find on the market. You can record your voice by simply tapping on the microphone and speaking into your phone’s speaker and then apply one of the audio effects this app offers. Optionally, you can import an audio file you already recorded into the app and then apply Martian, Foreigner, Giant or Child effects to your voice recording. The best part is that you can apply each effect to the audio files you’re editing as many times as you want.
Pros
- Loads of funny effects
- Simple audio recording setup
- Intuitive and modernly designed interface
- Enables users to share audio files via Bluetooth or social media platforms
Cons
- No video editing tools
- The quality of output audio files can vary
10. Voice FX
**Price:**Free, but offers in-app purchases
Compatibility: Android 4.0.3 and up
User Rating: 3.8

Modulating voices in all types of audio files is a straightforward and fun process that can be completed in just a few taps. During the audio recording session, you can apply all voice effects to the sound you are recording and stream it live to your web browsers or media players you’re using. Voice FX changes your voice in real time, which enables you to preview your results before deciding if you want to save them. All files you export from this app will be saved in the MP3 format so you can use them as ringtones on your Android device.
Pros
- Allows users to modulate pre-recorded audio files
- Voice effects are applied in real time
- Offers live streaming features
- Exports files in the MP3 format
Cons
- Prone to glitches
- A limited selection of voice effects
11. Voice Changer Plus
**Price:**Free, but offers in-app purchases
Compatibility: iOS 8.0 or later
User Rating: 4.8
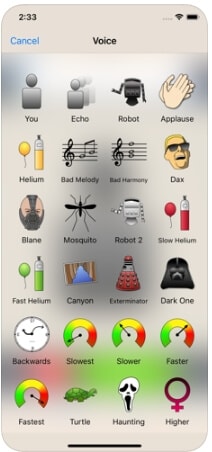
iPhone and iPad owners in need of a voice changer app that grants them complete creative freedom over the modulation of the voices they record, should consider using the Voice Changer Plus. The app features more than fifty voice effects and it provides support for voiceover recordings. Moreover, you can edit all your audio files even after you saved them, enabling you to find new ways to improve your recordings over time. Voice Changer Plus is also equipped with trim controls, so you can remove all parts of your audio files you don’t want to share with your friends on social media.
Pros
- Offers more voice effects than most of its competitors
- Provides voiceover recording options
- Users can trim their audio files
- All audio recordings can be edited after the voice modulation
Cons
- In-app purchase is required in order to unlock all of the app’s features
- Modulating audio in video files is not an option
Below is a quick comparison table among these voice changer apps, hope it will be helpful.
| App | Supported OS | User Rating | Voice Templates |
|---|---|---|---|
| Celebrity Voice Changer - Face | iOS 9.0 or later | 4.0 | Yes |
| Snapchat | iOS 10.0 or later, Android 4.4 or up | 3.8 | No |
| Voice Changer by e3games | Android 4.1 and up | 4.3 | Yes |
| Voicy: Celebrity Voice Changer | iOS 10 or later | 4.3 | Yes |
| Video Voice Changer – Fun Editor | iOS 8.0 or later | 4.4 | Yes |
| Video Voice Changer FX | Android 4.1 and up | 4.1 | Yes |
| Squeak Voice Changer | Android 4.3 and up | 3.9 | Yes |
| Voice Changer with Effects | Android 4.1 and up | 4.5 | Yes |
| Voice Changer | Android 4.1 and up | 4.4 | Yes |
| Voice FX | Android 4.0.3 and up | 3.8 | Yes |
| Voice Changer Plus | iOS 8.0 or later | 4.8 | Yes |
Conclusion
Everybody enjoys a good joke, and the apps we featured in this article enable you to have a lot of fun while experimenting with different voice modulation options. All of the voice effects these apps offer can change a voice automatically, but if you would like to alter the voices in your videos you must choose an app that supports this option. Which of the best voice changer apps for iPhone and Android devices are you going to choose? Leave a comment, and share your opinions with us.
Benjamin Arango
Benjamin Arango is a writer and a lover of all things video.
Follow @Benjamin Arango
Benjamin Arango
Mar 27, 2024• Proven solutions
Have you ever wondered what your voice would sound like if you were a cartoon character, a robot, or an older version of yourself? Changing how your voice sounds has never been easier, regardless of the Smartphone model you have, since voice changer apps can be used on both iPhone and Android devices.
Even though there is nothing wrong with modulating your voice to have fun with your friends, using voice changer apps to pull malicious pranks or bully strangers online is far from acceptable. Read on if you would like to find out more about the best voice changer apps for iPhone and Android devices and discover the one you enjoy using the most.
Best Voice Changer Apps for iPhone and Android
Creating a new ringtone, making a voice recording, or having fun with your friends are only a few reasons why so many people choose to try out voice changer apps. The vast majority of these apps feature well-equipped audio effects libraries that enable users to have fun with their friends and hear how they would sound if they were drunk or after inhaling helium. So, let’s take a look at some of the best voice changer apps on the market.
Changing video voice on Windows and Mac with Wondershare Filmora
Do you want to change the voice in video on Windows and Mac and don’t know which software can meet this requirement? Try Filmra video editor , which provides several ways to change voice over, such as changing the voice speed or changing the pitch. Download the trial version below and find out more possibility in video creation with Filmora.
1. Celebrity Voice Changer – Face
Price: Free, but offers in-app purchases
Compatibility: iOS 9.0 or later
User Rating: 4.0
In case you would like to sound like your favorite movie star of TV host, then Celebrity Voice Changer is one of the best choices you can make. Besides the standard set of options, the app also lets you request new voices since its machine learning technology can mimic virtually anyone’s voice. However, Celebrity Voice Changer is currently only available in English and it cannot modulate speech in other languages. In addition, you must make an in-app purchase in order to gain access to all of the app’s features or unlock the unlimited usage of the app.
Pros
- Automatic voice modulation
- Huge selection of voice filters
- The app generates video files that are better adjusted to the audience on social media than audio files
- Excellent impressions of celebrities
Cons
- Unreasonably expensive
- The app’s Deep Learning technology still has a lot of room for improvement
2. Snapchat
Price: Free, but offers in-app purchases
Compatibility: iOS 10.0 or later, Android 4.4 or up
User Rating: 3.8
With more than 203 million daily users, Snapchat is one of the largest messaging platforms on the market. Previously, we’ve shared how to change gender on Snapchat , beside that, the app lets its users capture short moments or the so-called Snaps and share them with friends. In addition to hundreds of video filters , Snapchat also features a broad spectrum of voice changing effects that make Snaps more entertaining. Even so, the audio recording options Snapchat offers are far from ideal, because the app doesn’t allow you to edit the files you create with it. Using Snapchat will drain your battery quickly, which is why you must pay attention to how frequently you use this app.
Pros
- The easy voice modulation process
- Excellent messaging options
- Grants you access to a large community of likeminded people
- Lenses and filters are updated on a daily basis
Cons
- Editing voice changes after you create a Snap is not possible
- Snapchat is not primarily a voice changer app
Check the detailed information about How to Change Voice on Snapchat with 2 Easy Methods >>
3. Voice Changer
Price: Free
Compatibility: Android 4.1 and up
User Rating: 4.3
Changing your voice with this app won’t take more than a few moments of your time. You just have to launch the app and hit the microphone button to record a message or a joke you would like to modulate. Once you’re happy with the audio recording you made, you can proceed to choose from more than twenty voice effects that will make you sound like a dwarf, a robot, or an alien. The app’s file-sharing capabilities enable you to post your audio recordings to any social media platform of your choosing or store your files and use them as many times as you want.
Pros
- Entertaining and easy to use
- The simple three-step voice modulation process
- Good selection of voice filters
- Excellent file sharing options
Cons
- The app displays ads
- No audio editing tools
4. Voicy: Celebrity Voice Changer
**Price:**Free, but offers in-app purchases
Compatibility: iOS 10 or later
User Rating: 4.3
Impersonating your favorite celebrity can be a fun way to prank your friends on social media. Voicy features a broad selection of celebrity voice impersonations you can use to make you sound like a famous actress or TV personality. The app utilizes a machine learning technology that can generate more than forty avatars and allows the users to experiment with different voice effects. The free version of the app offers only limited capabilities, so if you want to gain access to all of the Voicy’s features, you must choose a weekly, monthly or an annual subscription.
Pros
- Equipped with a powerful machine learning technology
- Offers a vast selection of voice avatars
- The quick voice modification process
- A great choice if you want to make a parody
Cons
- More expensive than the competition
- Support only the English language
5. Video Voice Changer – Fun Editor
Price: Free, but offers in-app purchases
Compatibility: iOS 8.0 or later
User Rating: 4.4
Changing the voices in the videos you record with your iPhones or iPads is a straightforward process that takes a minimum amount of effort. You can either use this iOS-based app to capture videos you’re going to dub or import them from the albums in which they are stored. The Video Voice Changer app is a great option if you want to dub videos directly from your phone because it enables you to change the voices in your videos and make them sound like mice, bears or ghosts. There are over thirty voice effects to choose from, so you can easily pick the one that best fits the video you’re editing.
Pros
- Equipped with video recording tools
- Excellent dubbing features
- A rich selection of voice effects
- Allows users to share their creations on Facebook, Instagram, and other social media platforms
Cons
- You must make an in-app purchase to unlock all of the app’s features
- No audio mixing options
6. Video Voice Changer FX
**Price:**Free, but offers in-app purchases
Compatibility: Android 4.1 and up
User Rating: 4.1
This is a simple app, anyone can use to change the voices in a video. Simply upload a video file from an SD card in your phone and choose an audio effect you want to apply. The app’s collection of funny voices includes options like echo, squirrel, space ship or chipmunk. As soon as you select the voice effect you want to add to a video, the app will start generating a new video that will be saved to your phone. Sharing the videos you edit with Video Voice Changer FX to social media directly from the app is not an option.
Pros
- Fun and easy to use
- Great price to performance ratio
- Changing a voice requires just a few taps
- Allows users to switch between effects while the video is playing
Cons
- No audio or video recording capability
- Doesn’t support social media sharing
7. Squeak Voice Changer
**Price:**Free, but offers in-app purchases
Compatibility: Android 4.3 and up
User Rating: 3.9
Every joke you want to share with your online friends is going to be a little funnier if you record it with Squeak Voice Changer. You just have to tap on the Record button and choose one of the available effects. Each voice changing effect this app offers is represented by a character so you should select Jamie the Jolly if you want to make your voice sound like you’re at a party or Bruce the Sentimental Bot if you want your voice to sound artificial. All the recordings you make with Squeak Voice Changer can be easily shared on social media.
Pros
- Equipped with audio recording options
- Cute and memorable characters that represent voice effects
- Inexpensive and fun to use
- Functional app design
Cons
- Poor selection of voice effects
- The AI only recognizes the English language
8. Voice Changer with Effects
**Price:**Free
Compatibility: Android 4.1 and up
User Rating: 4.5
This Android-based app is designed to make fun and easy since voice modulation features enable you to play voice recording backward or change your voice to sound robotic or even alien. Besides recording your voice, the app also lets you modulate pre-recorded sounds and save them to your phone or use them as ringtones or notification sounds. Furthermore, the app lets you add sounds to images and share them to Facebook. The Voice Changer with Effects enables you to share all audio files you process with it to any of the most popular social media platforms.
Pros
- The app has over 50,000,000 installs
- Equipped with a text to voice feature
- Setting a new ringtone with this app is easy
- Supports editing of pre-recorded audio files
Cons
- Contains ads
- No audio or video editing options
9. Voice Changer
**Price:**Free
Compatibility: Android 4.1 and up
User Rating: 4.4
If you are looking for an Android app that lets you modulate your voice quickly and effortlessly, then Voice Changer may be one of the best options you can find on the market. You can record your voice by simply tapping on the microphone and speaking into your phone’s speaker and then apply one of the audio effects this app offers. Optionally, you can import an audio file you already recorded into the app and then apply Martian, Foreigner, Giant or Child effects to your voice recording. The best part is that you can apply each effect to the audio files you’re editing as many times as you want.
Pros
- Loads of funny effects
- Simple audio recording setup
- Intuitive and modernly designed interface
- Enables users to share audio files via Bluetooth or social media platforms
Cons
- No video editing tools
- The quality of output audio files can vary
10. Voice FX
**Price:**Free, but offers in-app purchases
Compatibility: Android 4.0.3 and up
User Rating: 3.8
Modulating voices in all types of audio files is a straightforward and fun process that can be completed in just a few taps. During the audio recording session, you can apply all voice effects to the sound you are recording and stream it live to your web browsers or media players you’re using. Voice FX changes your voice in real time, which enables you to preview your results before deciding if you want to save them. All files you export from this app will be saved in the MP3 format so you can use them as ringtones on your Android device.
Pros
- Allows users to modulate pre-recorded audio files
- Voice effects are applied in real time
- Offers live streaming features
- Exports files in the MP3 format
Cons
- Prone to glitches
- A limited selection of voice effects
11. Voice Changer Plus
**Price:**Free, but offers in-app purchases
Compatibility: iOS 8.0 or later
User Rating: 4.8
iPhone and iPad owners in need of a voice changer app that grants them complete creative freedom over the modulation of the voices they record, should consider using the Voice Changer Plus. The app features more than fifty voice effects and it provides support for voiceover recordings. Moreover, you can edit all your audio files even after you saved them, enabling you to find new ways to improve your recordings over time. Voice Changer Plus is also equipped with trim controls, so you can remove all parts of your audio files you don’t want to share with your friends on social media.
Pros
- Offers more voice effects than most of its competitors
- Provides voiceover recording options
- Users can trim their audio files
- All audio recordings can be edited after the voice modulation
Cons
- In-app purchase is required in order to unlock all of the app’s features
- Modulating audio in video files is not an option
Below is a quick comparison table among these voice changer apps, hope it will be helpful.
| App | Supported OS | User Rating | Voice Templates |
|---|---|---|---|
| Celebrity Voice Changer - Face | iOS 9.0 or later | 4.0 | Yes |
| Snapchat | iOS 10.0 or later, Android 4.4 or up | 3.8 | No |
| Voice Changer by e3games | Android 4.1 and up | 4.3 | Yes |
| Voicy: Celebrity Voice Changer | iOS 10 or later | 4.3 | Yes |
| Video Voice Changer – Fun Editor | iOS 8.0 or later | 4.4 | Yes |
| Video Voice Changer FX | Android 4.1 and up | 4.1 | Yes |
| Squeak Voice Changer | Android 4.3 and up | 3.9 | Yes |
| Voice Changer with Effects | Android 4.1 and up | 4.5 | Yes |
| Voice Changer | Android 4.1 and up | 4.4 | Yes |
| Voice FX | Android 4.0.3 and up | 3.8 | Yes |
| Voice Changer Plus | iOS 8.0 or later | 4.8 | Yes |
Conclusion
Everybody enjoys a good joke, and the apps we featured in this article enable you to have a lot of fun while experimenting with different voice modulation options. All of the voice effects these apps offer can change a voice automatically, but if you would like to alter the voices in your videos you must choose an app that supports this option. Which of the best voice changer apps for iPhone and Android devices are you going to choose? Leave a comment, and share your opinions with us.
Benjamin Arango
Benjamin Arango is a writer and a lover of all things video.
Follow @Benjamin Arango
Also read:
- Updated 2024 Approved Streamlining Access The Best Approaches for Downloading Spotify Music Content
- Updated The Ultimate List of Royalty-Free Beats for Dynamic Videography for 2024
- 2024 Approved Effortless Audio Extraction Discovering the Best Six Cost-Free Techniques to Transform Videos Into Audible Media
- Updated 2024 Approved Installing and Removing Audacity An Ubuntu Users Handbook
- New Premier 11 Auditory Editing Utilities on Android Devices
- New Finding High-Quality Wolf Howl Noises for Projects
- Updated In 2024, The Investment in Sound Quality Ranked List of Excellent, No-Cost and Full-Priced Podcast Editors
- Updated Techniques for Eradicating Background Echoes Quickly for 2024
- Updated 2024 Approved The Complete Manual of GarageBand Audio Sessions
- New Comprehensive Manual for Capturing Sound with Your iPhone
- Updated Mastering the Mix An Introduction to REAPERs Capabilities
- New In 2024, Soundscape Synthesis Techniques for Customizing Timestamps and Soundscapes in Final Cut Pro X
- Steps for Creating MP3 From Audacity Recordings
- Achieving Crystal-Cleared Voices Tools for Subtracting Unwanted Acoustics in Digital Recordings for 2024
- Updated In 2024, Streamlining Access The Best Approaches for Downloading Spotify Music Content
- 2024 Approved 5 Best Sound Mixer for Windows 10
- Beats & Bits Creating Seamless Synchronization Between Soundtracks and Visuals in the 2023 Edition of FCPX
- Audio Recording Made Easy Exploring Options and Tutorials Outside of Apowersofts Offerings
- Updated Mastering Microphone Use in Microsoft PowerPoint Windows & macOS Guide for 2024
- Updated Streamlining Sound Creation The 6 Most User-Friendly, Free Online Auditory Editing Tools
- Top 5 Free Hits of Humorous Background Music for Video Productions for 2024
- New Vocaroo Voice Recorder Tutorial and Alternatives for 2024
- Updated In 2024, The Essential Manual Tackling Unwanted Audio Elements with Precision in Audacity
- New 2024 Approved Mastering Sound Integrating Music Into KineMaster
- Updated In 2024, Crafting Free-to-Use Music-Enhanced Videos A Step-by-Step Guide
- Updated Free Music Production Software Top Picks for Windows/Mac Users
- New Mastering Silence A Comprehensive Tutorial on Stripping Audio From iOS Videos
- Updated In 2024, Premier Free Audio-To-Image Software for iPhones and Tablets
- New 2024 Approved Navigating Internet-Based Audio Manipulation Techniques
- New The Ultimate Guide to Implementing Audio Keyframes Using Adobe Premiere Pro for Mac Users for 2024
- New In 2024, How to Mute Zoom Audio on Desktop and Mobile Phone?
- New Locate Kitty-Inspired Sound Effects Amp Up Your MP3 Library for 2024
- Plugging Into Precision The Guide to Free Plugins for AutoTuning Audio with Audacity for 2024
- Discovering the Best Animated Sounds A Curated List for Download for 2024
- 2024 Approved Navigating Through the Best Windows Software for Converting Speech to Text
- New Ahead of Time Tomorrows Melancholic Masterpieces and Their Origins
- In 2024, 15 Best Strongest Pokémon To Use in Pokémon GO PvP Leagues For Apple iPhone XR | Dr.fone
- How To Fake GPS On Vivo T2 Pro 5G For Mobile Legends? | Dr.fone
- Set Your Preferred Job Location on LinkedIn App of your Lava Blaze 2 Pro | Dr.fone
- 5 Easy Ways to Copy Contacts from ZTE Nubia Z60 Ultra to iPhone 14 and 15 | Dr.fone
- In 2024, 5 Solutions For Samsung Galaxy A14 4G Unlock Without Password
- Video Dimensions for Instagram How to Choose the Right Aspect Ratio for 2024
- Android Screen Stuck General Huawei Nova Y91 Partly Screen Unresponsive | Dr.fone
- Updated Windows 8 MP4 Video Editor Simple and Efficient Editing Solution
- In 2024, How to Make a Slideshow with Icecream Slideshow Maker
- In 2024, How to Get and Use Pokemon Go Promo Codes On Vivo V30 | Dr.fone
- Updated 2024 Approved Easy Cartoon Characters Drawing Tutorials for You Beginners
- Audio Conversion Made Easy 12 Essential Tools You Need for 2024
- Updated In 2024, 10 Leading Aspect Ratio Conversion Apps for Mobile and Desktop
- Best Free iPhone 6s Plus IMEI Checker
- New Smooth Footage Guaranteed Best Video Stabilizers for iPhone and Android
- Latest Guide How To Bypass Oppo Find X6 FRP Without Computer
- In 2024, How to Fake GPS on Android without Mock Location For your Samsung Galaxy M54 5G | Dr.fone
- Updated 2024 Approved Premiere Pro on Mac The Industry Standard for Video Editing Pros
- Updated Rapid Video Resizing Techniques for Professionals
- Title: Updated 2024 Approved The Insiders Guide to Removing Background Noise From Videos in Adobe Premiere Pro
- Author: David
- Created at : 2024-05-05 10:15:58
- Updated at : 2024-05-06 10:15:58
- Link: https://sound-tweaking.techidaily.com/updated-2024-approved-the-insiders-guide-to-removing-background-noise-from-videos-in-adobe-premiere-pro/
- License: This work is licensed under CC BY-NC-SA 4.0.
