
:max_bytes(150000):strip_icc():format(webp)/tiktok-messages-889fef4cdfac41babb84770288f32cf2.jpg)
Updated 2024 Approved Clearing Up Clarity Advanced Noise Reduction Tips for Adobe Premiere Users
Clearing Up Clarity: Advanced Noise Reduction Tips for Adobe Premiere Users
Adobe Premiere Pro is a video editing tool. In the editing world, Premiere Pro has a separate fan base; people use this video editing tool because of its unmatchable features. People love the quality of editing that Premiere Pro delivers. Among its many features, few are color correction, safe margins, rulers, and audio assign.
Moreover, the video editor has an Auto Reframe feature. Along with this, Premiere Pro offers Comparison View and many other things. If you want to learn more about Premiere Pro and how to remove noise from video in Premiere Pro, then stay with us.
In this article
01 Remove Background Noise Premiere Pro
02 How to Mute A Clip in Premiere Pro
03 Tips and Tricks to Help You Better Editing Audio in Premiere Pro
Part 1. Remove Background Noise Premiere Pro
While recording a video, you cannot control every noise. Sometimes, you get disturbed by your doorbell. Sometimes, it’s your neighbor’s horn that might bother you or anything else. What do you do when this happens to you? Do you stop the recording and wait until it’s quiet?
If this is what you do, then let us share a smart solution with you. Background noise can be removed from your video using the remove background noise Premiere Pro feature. Allow us to share its steps to guide you more about it.
Step 1: Import the File
To remove background noise from your videos, you first need to import the media file to Premiere Pro. Then drag and drop the file onto the timeline. After that, you need to select and open the ‘Effects’ menu.

Step 2: Add Denoise Effect
On the right side of the Effects menu, type and search for ‘Denoise.’ Then, you should select the Denoise option and drag it onto the timeline over the media file. The Denoise feature removes nearly 50% of the noise automatically.

Step 3: Denoise Effects Control
The rest of the background noise can be customized. For that, head to the ‘Effects Control’ section. You will see Denoise-related options. There, click on ‘Edit’ for Custom Setup. You can adjust both the ‘Frequency’ and ‘Amount’ values.

Step 4: Voice Enhance Effect
Removing background noise damages the quality of voice. This quality can be improved by using ‘Vocal Enhance.’ You can search it from the search bar in the Effects tab and drag it over to the media file in the timeline. You can also customize this from the ‘Effects Control’ tab.

Part 2. How to Mute A Clip in Premiere Pro
Sometimes, you might need to mute a clip. You can use such clips as your status. You can also add your desired background music and then share the clips. In any case, you need to mute the clip, but what if you don’t know how to mute the clip in Premiere Pro?
Don’t worry because we are here to help you. The following section of this article will share different methods to mute clips in Adobe Premiere Pro.
Method 1: The first method is to mute an entire clip on the timeline. This could be done by checking the Mute Track ‘M’ button. You will find the mute button beside the track name.

Method 2: The next method is to mute a specific clip. For that, go to the ‘Audio’ section from the menu bar. Then, look at the ‘Essential Sound’ panel on the right side of the screen. From you will see various tags. Open your desired tag and check the box against the ‘Mute’ option.

Method 3: Another method that could be used to mute a clip is by right-clicking on the clip that you want to mute. A menu appears on the screen. From that menu, you need to uncheck the ‘Enable’ button. This mutes the clip.

Method 4: The next method demands you to first select the video clip. Then, from the menu bar, head over to the ‘Editing’ tab. There go to the ‘Audio Clip Mixer’ section. You will see volume sliders; drag down the Volume slider to negative to mute the clip.

Part 3. Tips and Tricks to Help You Better Editing Audio in Premiere Pro
As we have mentioned earlier, noise removal damages the overall quality of the audio. All your effort goes to waste if your voice is not clear or anything else. Now that you know how you can handle background noise removal, it’s time to talk about something new and different.
The following section of this article is going to share tips and tricks that could be adopted. These will help you to get better and improved quality while editing audio.
1. Restore Bass
The first tip that we are going to introduce is restoring the bass of the media file. You can do this by using the Parametric Equalizer and dragging it onto the timeline. With an equalizer, you can play with different audio frequencies. Whatsoever suits the best, you can set it.
2. Atmosphere Setting
Its essential to first of all create an atmosphere. For this, you can mix sounds, add reverb and even adjust the loudness. An ambiance audio tag can be used for background noise. You need to set the scene for your music or the dialogue.
3. Compress the Audio
To make the audio better and more consistent, it is essential to compress it. Like the name is presenting, compression lowers the volume of loud parts, increases the volume of fairly quiet parts, it compresses the waveform of audio. After compression, your audio sounds instantly better, especially the voices.
4. Dialogue Adjustments
You can unify different recordings for a common loudness if you tag audio clips as Dialogue. If you plan to add a voiceover to your video, then you must improve the clarity, reduce or remove any background noise and also, adjust the reverb. Subtitles could be added to make the conversation understandable in your video.
5. Remove Noise
The noise of the computer fan or the weird hissing noise of the microphone and other similar things are referred to as Background noise. This can become a distracting element. While editing the audio, it matters that you remove the background noise because it does not get automatically removed. So, to have good audio, always remove background noise.
Bottom Line
If background noise is bothering you, then this problem is resolved. The article above has shared how to remove noise from video in premiere pro. The easy step-by-step guide for removing background noise with Premiere Pro has been shared.
To remove background noise, Premiere Pro is not the only editor. Wondershare Filmora is another stunning and known video editor. You can use the tool to remove background noise from your videos. With this editor, you can also mute your clips.
Not just this, but the editor has many more classic features. Filmora allows keyframing, motion tracking, and doing cool edits with a split-screen. Color match is another offered feature among the many other features of Filmora. It also has an asset library. You can get fantastic effects, transitions, elements, and whatnot from its library.
For Win 7 or later (64-bit)
For macOS 10.12 or later
02 How to Mute A Clip in Premiere Pro
03 Tips and Tricks to Help You Better Editing Audio in Premiere Pro
Part 1. Remove Background Noise Premiere Pro
While recording a video, you cannot control every noise. Sometimes, you get disturbed by your doorbell. Sometimes, it’s your neighbor’s horn that might bother you or anything else. What do you do when this happens to you? Do you stop the recording and wait until it’s quiet?
If this is what you do, then let us share a smart solution with you. Background noise can be removed from your video using the remove background noise Premiere Pro feature. Allow us to share its steps to guide you more about it.
Step 1: Import the File
To remove background noise from your videos, you first need to import the media file to Premiere Pro. Then drag and drop the file onto the timeline. After that, you need to select and open the ‘Effects’ menu.
Step 2: Add Denoise Effect
On the right side of the Effects menu, type and search for ‘Denoise.’ Then, you should select the Denoise option and drag it onto the timeline over the media file. The Denoise feature removes nearly 50% of the noise automatically.
Step 3: Denoise Effects Control
The rest of the background noise can be customized. For that, head to the ‘Effects Control’ section. You will see Denoise-related options. There, click on ‘Edit’ for Custom Setup. You can adjust both the ‘Frequency’ and ‘Amount’ values.
Step 4: Voice Enhance Effect
Removing background noise damages the quality of voice. This quality can be improved by using ‘Vocal Enhance.’ You can search it from the search bar in the Effects tab and drag it over to the media file in the timeline. You can also customize this from the ‘Effects Control’ tab.
Part 2. How to Mute A Clip in Premiere Pro
Sometimes, you might need to mute a clip. You can use such clips as your status. You can also add your desired background music and then share the clips. In any case, you need to mute the clip, but what if you don’t know how to mute the clip in Premiere Pro?
Don’t worry because we are here to help you. The following section of this article will share different methods to mute clips in Adobe Premiere Pro.
Method 1: The first method is to mute an entire clip on the timeline. This could be done by checking the Mute Track ‘M’ button. You will find the mute button beside the track name.
Method 2: The next method is to mute a specific clip. For that, go to the ‘Audio’ section from the menu bar. Then, look at the ‘Essential Sound’ panel on the right side of the screen. From you will see various tags. Open your desired tag and check the box against the ‘Mute’ option.
Method 3: Another method that could be used to mute a clip is by right-clicking on the clip that you want to mute. A menu appears on the screen. From that menu, you need to uncheck the ‘Enable’ button. This mutes the clip.
Method 4: The next method demands you to first select the video clip. Then, from the menu bar, head over to the ‘Editing’ tab. There go to the ‘Audio Clip Mixer’ section. You will see volume sliders; drag down the Volume slider to negative to mute the clip.
Part 3. Tips and Tricks to Help You Better Editing Audio in Premiere Pro
As we have mentioned earlier, noise removal damages the overall quality of the audio. All your effort goes to waste if your voice is not clear or anything else. Now that you know how you can handle background noise removal, it’s time to talk about something new and different.
The following section of this article is going to share tips and tricks that could be adopted. These will help you to get better and improved quality while editing audio.
1. Restore Bass
The first tip that we are going to introduce is restoring the bass of the media file. You can do this by using the Parametric Equalizer and dragging it onto the timeline. With an equalizer, you can play with different audio frequencies. Whatsoever suits the best, you can set it.
2. Atmosphere Setting
Its essential to first of all create an atmosphere. For this, you can mix sounds, add reverb and even adjust the loudness. An ambiance audio tag can be used for background noise. You need to set the scene for your music or the dialogue.
3. Compress the Audio
To make the audio better and more consistent, it is essential to compress it. Like the name is presenting, compression lowers the volume of loud parts, increases the volume of fairly quiet parts, it compresses the waveform of audio. After compression, your audio sounds instantly better, especially the voices.
4. Dialogue Adjustments
You can unify different recordings for a common loudness if you tag audio clips as Dialogue. If you plan to add a voiceover to your video, then you must improve the clarity, reduce or remove any background noise and also, adjust the reverb. Subtitles could be added to make the conversation understandable in your video.
5. Remove Noise
The noise of the computer fan or the weird hissing noise of the microphone and other similar things are referred to as Background noise. This can become a distracting element. While editing the audio, it matters that you remove the background noise because it does not get automatically removed. So, to have good audio, always remove background noise.
Bottom Line
If background noise is bothering you, then this problem is resolved. The article above has shared how to remove noise from video in premiere pro. The easy step-by-step guide for removing background noise with Premiere Pro has been shared.
To remove background noise, Premiere Pro is not the only editor. Wondershare Filmora is another stunning and known video editor. You can use the tool to remove background noise from your videos. With this editor, you can also mute your clips.
Not just this, but the editor has many more classic features. Filmora allows keyframing, motion tracking, and doing cool edits with a split-screen. Color match is another offered feature among the many other features of Filmora. It also has an asset library. You can get fantastic effects, transitions, elements, and whatnot from its library.
For Win 7 or later (64-bit)
For macOS 10.12 or later
“Behind the Scenes: The Essential Roles of Film Production Team Members”
When shooting a small-scale video, only one person handles all department workings. He or she works not only as a director, but also a cinematographer and the camera operator.
However, as the production grows and needs large-scale filming, more specific members are needed for different departments. Whether you want to set up a filming studio, or join a movie-making workshop, you’d better figure out the entire composition of the film crew and choose the best one according to your capabilities.
To simplify the scenario, we have divided the crew into these major departments, as shown below, with their work areas.
What Is the Role of a Producer?
The producer is the main handler of the filming. Before filming, he finds out the content and directions and links with the director and DP for each direction to get the best vision of the music video. The producer are responsible for:
1. Schedule the crew members
Producers can make the call sheets for the crew members to maintain their schedule according to the specific timelines.
2. Find the studio space
To find the studio space, the producers work with the directors to get the exact location according to the script of their music video for better illustrations.
3. Find the gear
Producers found the gear for the studio space and handled the renting of the equipment from the warehouse.
4. Build relationships with the industries
If the filming is starting and you don’t know who to choose, you should build a relationship with the appropriate people in the industry. So that when you are in trouble, you can call them off to get the solution.

Roles of a Director Department
The director is considered to be in charge of filmmaking. His main responsibility is creatively giving the idea to the production and communicating to the crew and characters to check out what they want in their scenes to play out.
The director department mainly consists of the director and the first assistant director, and sometimes there is a 2nd, a 3rd, and 4th AD. For example,
1st AD
The first lead is mainly in charge of time management, communicate with the crew member, and ensuring that the shorts get done safely and readily.
![]()
Note: If there is no dialogue in the shorts, then the director usually gives reference pictures of the scenes and moods to act in that way.
You need to work with different people in the industry to check their personalities and work according to them. There is no need to work with the same people repeatedly.
Team for Production Designing
The next and foremost department is the production design. In this the production designer is the leader of all and has to work with the art director. He is mainly in charge of the set builders, set dressers, prop makers, hair and makeup, and costume and wardrobe departments.
In this department, the production designer is mainly involved in decorating the sets, making props, and setting up the lighting.

Cinematographers Department
The cinematic department comes to the frontline to give the shots and the lit music video final touches. In this, the head of the department is also known as the director of photography.
Director of photography
He mainly decides how the shots and the music video footage look. The main action is to handle the lightning and interact with the lights with the environment and the characters. He should build relationships with each other for better illusions.
Director’s monitor
The director’s monitor is the screen that displays a live shoot and filming of everything happening on camera. It mainly gives each take’s exact position and views for coordinating with the director and the DP.
Due to this, they can change the direction and the setup wherever they want and whenever they want.

Camera operators
To operate the camera, the DPs are not involved, but there is a specific job of the camera operators, which handle the shots and moves according to the director’s directions. There are also 1st and 2nd Assistant Cameras (AC) with the camera operators.
1st Assistant Camera
The duty of the 1st AC is to focus on the required target, pulling, swapping the lenses from the camera. He is ensuring that the camera is all set and workable on the shoot day without any trouble.
2nd Assistant Camera
The 2nd AC has to consider the slates of the shots, place exact locations and markers for the characters, and give exposed footage to save for the backup.
Gaffers and key grip
Gaffers and key grip have their own teams for maintaining the lighting and grip work assigned by the DP according to the creative plans.
Digital media technician
It is essential to get the backup of footage of every shot. If you are working on a large scale, the backup planner is recognized as the Digital Media Technician (DMT).
DMT will handle the exposed footage, which Digital Memory Card will do with tapes denoting the card’s number. Make sure to make two backups of the footage to prevent any trouble.

![]()
Note: Making two copies for the backup will reduce the risk of corrupted files and physical accidents of losing the footage.
Additional Roles
If you are the music video director, you need a Cinematographer with Camera Operators. He will be in charge of pulling and adjusting all the camera alignments. If you have enough budget, go with the co-producer to help you direct the talents.

To make your subject looks good and modern according to the theme, you should hire hair and makeup artist. If you have more budget, you can do it professionally with more and more crew members.
Conclusion
If you are a starter, then there is no need to worry to pull-off all the roles in a crew; you just need two to three people for the start-up. That’s all about the large production, but whenever you scale up, you should know how to manage all the members with their required areas.
You need to work with different people in the industry to check their personalities and work according to them. There is no need to work with the same people repeatedly.
Team for Production Designing
The next and foremost department is the production design. In this the production designer is the leader of all and has to work with the art director. He is mainly in charge of the set builders, set dressers, prop makers, hair and makeup, and costume and wardrobe departments.
In this department, the production designer is mainly involved in decorating the sets, making props, and setting up the lighting.
Cinematographers Department
The cinematic department comes to the frontline to give the shots and the lit music video final touches. In this, the head of the department is also known as the director of photography.
Director of photography
He mainly decides how the shots and the music video footage look. The main action is to handle the lightning and interact with the lights with the environment and the characters. He should build relationships with each other for better illusions.
Director’s monitor
The director’s monitor is the screen that displays a live shoot and filming of everything happening on camera. It mainly gives each take’s exact position and views for coordinating with the director and the DP.
Due to this, they can change the direction and the setup wherever they want and whenever they want.
Camera operators
To operate the camera, the DPs are not involved, but there is a specific job of the camera operators, which handle the shots and moves according to the director’s directions. There are also 1st and 2nd Assistant Cameras (AC) with the camera operators.
1st Assistant Camera
The duty of the 1st AC is to focus on the required target, pulling, swapping the lenses from the camera. He is ensuring that the camera is all set and workable on the shoot day without any trouble.
2nd Assistant Camera
The 2nd AC has to consider the slates of the shots, place exact locations and markers for the characters, and give exposed footage to save for the backup.
Gaffers and key grip
Gaffers and key grip have their own teams for maintaining the lighting and grip work assigned by the DP according to the creative plans.
Digital media technician
It is essential to get the backup of footage of every shot. If you are working on a large scale, the backup planner is recognized as the Digital Media Technician (DMT).
DMT will handle the exposed footage, which Digital Memory Card will do with tapes denoting the card’s number. Make sure to make two backups of the footage to prevent any trouble.
![]()
Note: Making two copies for the backup will reduce the risk of corrupted files and physical accidents of losing the footage.
Additional Roles
If you are the music video director, you need a Cinematographer with Camera Operators. He will be in charge of pulling and adjusting all the camera alignments. If you have enough budget, go with the co-producer to help you direct the talents.
To make your subject looks good and modern according to the theme, you should hire hair and makeup artist. If you have more budget, you can do it professionally with more and more crew members.
Conclusion
If you are a starter, then there is no need to worry to pull-off all the roles in a crew; you just need two to three people for the start-up. That’s all about the large production, but whenever you scale up, you should know how to manage all the members with their required areas.
“Discover the Best Free Beats and Tunes Creation Programs for PC & Mac, Updated “
13 Free Music Production Software for Windows/Mac/Online

Benjamin Arango
Mar 27, 2024• Proven solutions
13 Free Music Production Software for Windows/Mac/Online
Technology advances have spread through all fields of human activity, including music recording and development. The invention of music development tools has made it simpler for people engaged in the creation of music in one form or another.
Numerous applications for music development are on the market, and some are meant for musicians, and others are for educators and teachers. There is also a need to direct prospective customers to the right free music production software.
A comprehensive analysis of some of the best music development tools has been conducted to help you make the correct decision while you’re ready to purchase the app. This comprehensive Music Production Software Guide will provide solutions to many of your unanswered questions relating to the purchase of music production software.
- Part 1: Free Music Production Software for Windows
- Part 2: Free Music Production Software for Mac
- Part 3: Free Music Production Software Online
Part 1: Free Music Production Software for Windows
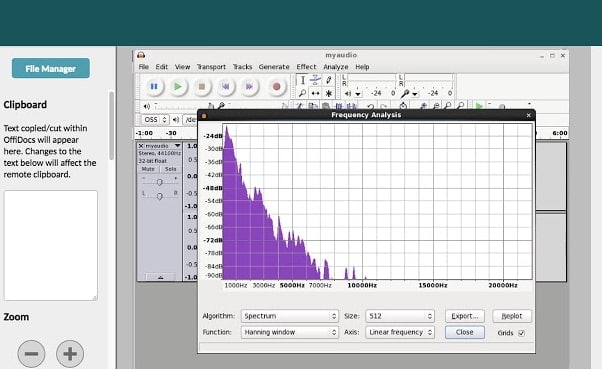
1. Audacity
The system for music development is not complete without an audio editor. Audacity is the best free music creation software available on the market. Audacity is open-source and extensive and provides a wide range of tools and effects for performing all audio editing and recording activities. It is created by a community of volunteers and provides regular notifications almost every month. It’s lightweight, safe, and intuitive enough to be used by novice music makers.
Pros
- It is open-source
- It can load VST plugins
Cons
- Only 32-bit plugins are allowed
- Limited features
2. Ardour
Ardour is a highly integrated program of music production that allows users to record and edit on Mac, Linux, and Windows operating systems. Ardour Music Production Software was created by integrating the efforts of the world’s skilled team, such as recording technicians, programmers, and musicians. Such experienced technicians make their concerted and thorough efforts to build the program. Ardour is one of the few applications in music production that respects honesty. The accessibility of this program allows app developers to concentrate on functionality that matters to consumers rather than to construct compelling apps for advertising purposes. This is a system that should be celebrated for its user-focused functionality.
Pros
- It has excellent user-friendliness
- It is available on Mac, Linux, and Windows
Cons
- It lacks a few integral features
- It is difficult to operate for people new to audio editing

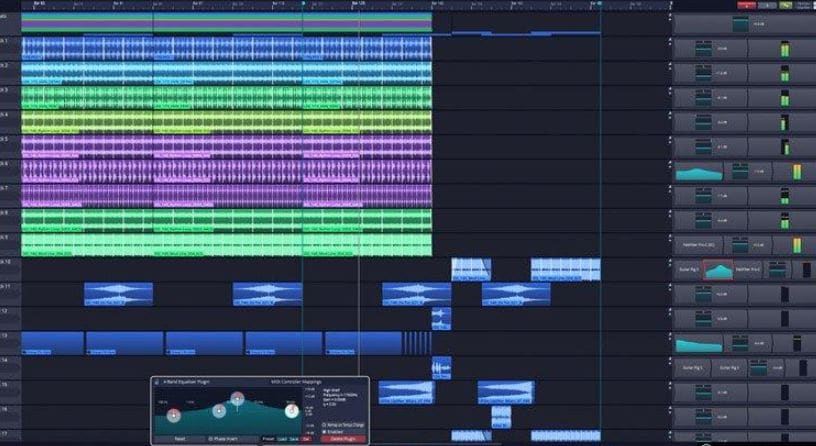
3. Tracktion T7
The people at Tracktion seem to have reached a reasonably canny business model by launching older DAW versions for free and without anything removed.
The convention appears to make it possible to access the edition without charge of two iterations before the new one. You will not be provided with all new functionality, but you will receive an update every time the company updates its flagship DAW, which it does nearly every year.
The growing section is adjustable to match the workflow, and the bottom panel adjusts so that any parameters anywhere on the screen can be seen.
Pros
- It features an unlimited number of audio and MIDI tracks
- It is able to host multiple plugin formats
Cons
- It doesn’t provide all the features at once
- It does not support many plugins
4. LMMS
LMMS is a fully free music production software for windows for music development. It is an open-source and also a project platform for the community. LMMS is a cross-platform device app. It makes it easier to manufacture beats, particularly when many music production professionals have to manufacture quality music with their computers.
Thanks to the powerful sample, beat and melody design, mixing and synthetic sound processes, and many other features, the LMMS music production software provides high-quality audio output. The product also features playback tools, plugins, and samples to produce powerful, high-quality sound.
Pros
- It is compatible with Linux, Windows, and Mac
- Hydrogen project files and MIDI can be imported easily for editing
Cons
- It eats a lot of memory and requires a high-end device to support it
- Some users complained that understanding its working is difficult

5. Cakewalk
This is an exciting app for music production to purchase. It is a fantastic tech to invest in music production. Cakewalk Sonar Artist Software is one of Cakewalk Sonar Artist ‘s great productions. Cakewalk is known for an excellent GUI, an excellent mixing console, an excellent commercial radio system, and limitless MIDI tracks.
A good device to use as part of your instruments for the development of music is the Cakewalk Sonar Artist Music Production program. It stands out as a program packed with excellent features amongst its counterparts. And the app is unmatched in the area of apps.
Pros
- You can share music compilation directly to social media
- You can easily add effects to your tracks
Cons
- It is priced, very high
- One window interface makes it hectic

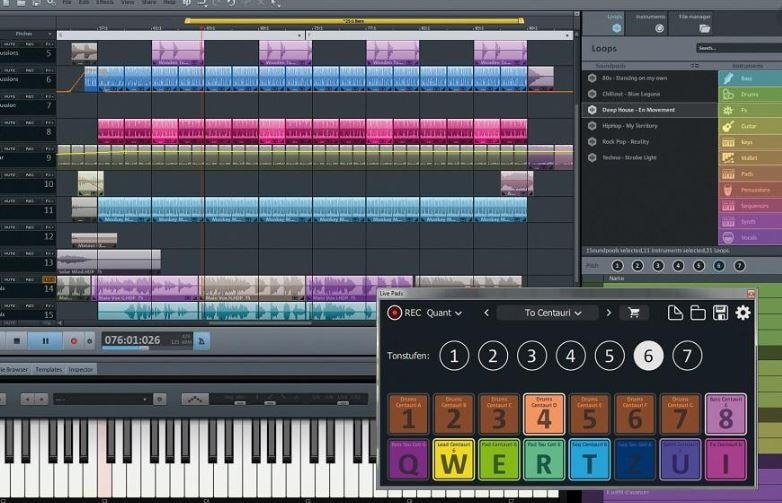
6. Music Maker by Magix
This app is a special program for sound engineers, skilled musicians, and accomplished music producers, developed by US Magix Entertainment. It offers an excellent forum for creative music development in music production professionals.
In reality, the software for music production is excellent software for the Music Maker by Magix. In the field of music post-production and music mastering, mixing and arrangement, recording, and more, the software achieved remarkable breakthroughs. Thanks to the successful combination of a technical device and highly flexible workflow, the Music Maker by Magix has achieved this groundbreaking success.
With creative algorithm and superb plugin effects, the Music Maker by Magix program enables music manufacturers to develop their ideas in line with the highest quality in this industry.
Pros
- It is great for EDM producers
Cons
- It is not suitable for newbies
- The GUI feels a bit cluttered
Part 2: Free Music Production Software for Mac
7. Garageband
This is a music development studio app that is designed to function on Mac. It is a great free music production software for Mac. This software has a full sound collection, which includes virtual instruments, voice, and guitar preset.
GarageBand is a well-known app for music development and is an excellent tool for music beginners. Many people have chosen GarageBand because it does not match the ease and ease of use for recording purposes in particular.
The user-friendly interface makes you easy to create music with a more unobstructed view of what you’re recording. Apps from GarageBand captured the attention of others because of their ease-to-use and user-friendliness.
Pros
- The software offers some nicely packaged preset for vocal and guitar recording
- Productive workflow
Cons
- It has limited plugins
- It is only supported for Mac platforms

8. Ableton Live
The Ableton Live 10 Suite is a dynamic and comprehensive program for the creation and performance of musical recordings.
An essential feature of this software is that it allows you to work on your time-based workflow without affecting the live session. This means that the software gives you a rare chance to get involved with the workflow without stopping live performance.
The Multitrack Recording Technology of Ableton Live10 Suite allows music producers to adjust the speed and pacing of any audio during the recording. To make these adjustments, you don’t have to pause the recording. This is one of the striking characteristics which makes this product a good option for all.
Pros
- Adjusting the speed and pace of audio is a delight
- Sophisticated MIDI/audio routing capabilities
Cons
- It has a traditional design
- Not enough updates to fix the buggy features

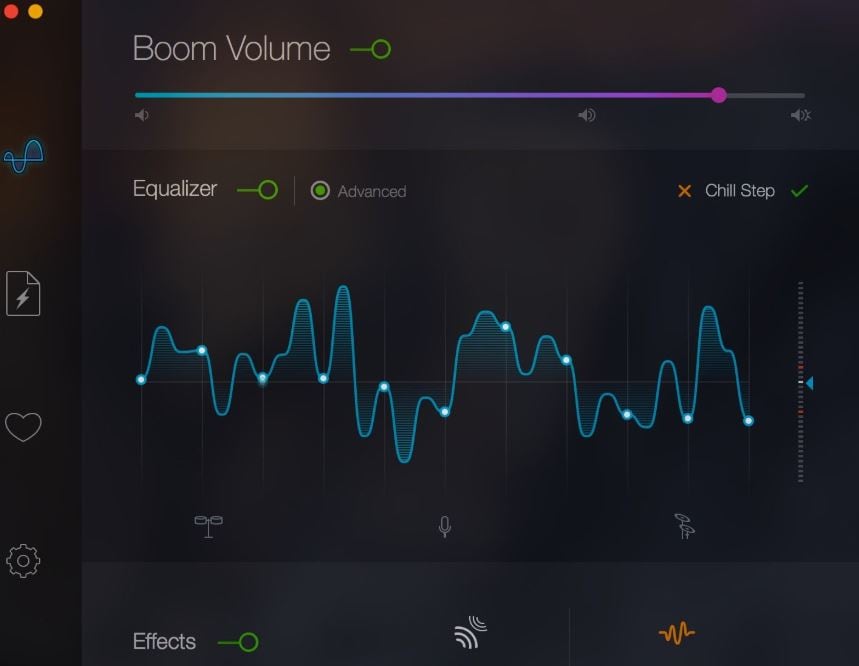
9. Boom 3D
Boom 3D for Mac & Windows is an award-winning pro sound improvement software designed to play your media content on any and all of your devices, phones, or streaming services with amazing 3D effects. No costly headphones or sound boosters will be needed to make your music feel like it! Designed in a new immersive 3D surround sound technology, Boom 3D redefines how people listen to music, watch films, or play games with some headphones on their devices. 3D sound provides the option to check the LFE (subwoofer), and the audio intensity of each Virtual 3D Surround audio system speaker.
Pros
- It comes with loads of content
- Audio quality can be enhanced
Cons
- The design is not suitable for everybody
- It does not have a Linux version
10. Mixxx
For beginners, Mixxx is just another great device. This is also one of the best free music production software downloads for your music. This software supports all Mac, Windows, and Linux platforms.
The application provides you with a DJ-mixing environment and supports all standard formats such as Mp3 and many other formats.
Pros
- It is a great app for beginners
- Supported by Mac, Windows, and Linux
Cons
- It doesn’t support many plugins
- GUI isn’t that great

Part 3: Free Music Production Software Online
11. Soundation
Soundation is a platform that provides free music production software online only capabilities. The free version and three paid versions are offered. You can use this to build your tracks unless you have the resources to do so if you need a web-based music maker and editor.
If you pay, even after you have made your music, you can always cancel. Remember first to save them to your hard drive. If you need paid characteristics, pay for the monthly plan again through PayPal, and you have to use it for a month.
Pros
- Great SSL-modelled mixer
- You can use its devices as a plugin
Cons
- It works only online

12. Audiotool
Audiotool is a popular app for music production hosted online and can be used without installation from inside your browser. It uses a cloud-based network to store all your music and files wherever you are. It is also confirmed that you will share music and tracks directly with YouTube, SoundCloud, and Facebook on its own publishing site. They have premium releases from Loopmasters and some fantastic online VSTs, for example, Heisenberg, Machiniste, Bassline, and Beatbox 8 & 9.
Pros
- No installation needed
- You can directly share it to your social media
Cons
- It works only online
- No upgrades

13. Soundtrap
Soundtrap is not only an online music studio but a training site for students and instructors. The STEAM Curriculum is an online learning resource that helps students to follow music and podcasts, incorporated into the Web app. As we mentioned earlier, in addition to the online Web App, you can also use it on different devices, share it with other users, and work in innovative projects for your music.
The interface is simple, easy to use, and easy to understand. It is simply an instrument for innovation; you don’t have to learn how to apply VST or any other technical elements to music creation. You can also record your MIDI instruments directly from your machine or device’s mic.
Pros
- It provides a great platform for teachers to teach their students
- It is very easy to use
Cons
- It only has a limited number of plugins
- It cannot be used professionally

Conclusion
If you make music on a computer, the most important resource in your artistic arsenal is your DAW; in your home recording system, you ‘re probably going to have the MIDI keyboard, audio interface, studio monitor speakers, and maybe a microphone or two. But your program is at the core of it all. Not everyone can afford expensive DAWs, but one must not worry as free music production software are present to aid us.
It is important to have a DAW with which you are pleased and, perhaps more importantly, a DAW, which allows you to turn your ideas into music as quickly and painlessly as possible. So make sure you choose the best one for you according to your needs. Hopefully, this guide will aid you!


Benjamin Arango
Benjamin Arango is a writer and a lover of all things video.
Follow @Benjamin Arango
Benjamin Arango
Mar 27, 2024• Proven solutions
13 Free Music Production Software for Windows/Mac/Online
Technology advances have spread through all fields of human activity, including music recording and development. The invention of music development tools has made it simpler for people engaged in the creation of music in one form or another.
Numerous applications for music development are on the market, and some are meant for musicians, and others are for educators and teachers. There is also a need to direct prospective customers to the right free music production software.
A comprehensive analysis of some of the best music development tools has been conducted to help you make the correct decision while you’re ready to purchase the app. This comprehensive Music Production Software Guide will provide solutions to many of your unanswered questions relating to the purchase of music production software.
- Part 1: Free Music Production Software for Windows
- Part 2: Free Music Production Software for Mac
- Part 3: Free Music Production Software Online
Part 1: Free Music Production Software for Windows
1. Audacity
The system for music development is not complete without an audio editor. Audacity is the best free music creation software available on the market. Audacity is open-source and extensive and provides a wide range of tools and effects for performing all audio editing and recording activities. It is created by a community of volunteers and provides regular notifications almost every month. It’s lightweight, safe, and intuitive enough to be used by novice music makers.
Pros
- It is open-source
- It can load VST plugins
Cons
- Only 32-bit plugins are allowed
- Limited features
2. Ardour
Ardour is a highly integrated program of music production that allows users to record and edit on Mac, Linux, and Windows operating systems. Ardour Music Production Software was created by integrating the efforts of the world’s skilled team, such as recording technicians, programmers, and musicians. Such experienced technicians make their concerted and thorough efforts to build the program. Ardour is one of the few applications in music production that respects honesty. The accessibility of this program allows app developers to concentrate on functionality that matters to consumers rather than to construct compelling apps for advertising purposes. This is a system that should be celebrated for its user-focused functionality.
Pros
- It has excellent user-friendliness
- It is available on Mac, Linux, and Windows
Cons
- It lacks a few integral features
- It is difficult to operate for people new to audio editing
3. Tracktion T7
The people at Tracktion seem to have reached a reasonably canny business model by launching older DAW versions for free and without anything removed.
The convention appears to make it possible to access the edition without charge of two iterations before the new one. You will not be provided with all new functionality, but you will receive an update every time the company updates its flagship DAW, which it does nearly every year.
The growing section is adjustable to match the workflow, and the bottom panel adjusts so that any parameters anywhere on the screen can be seen.
Pros
- It features an unlimited number of audio and MIDI tracks
- It is able to host multiple plugin formats
Cons
- It doesn’t provide all the features at once
- It does not support many plugins
4. LMMS
LMMS is a fully free music production software for windows for music development. It is an open-source and also a project platform for the community. LMMS is a cross-platform device app. It makes it easier to manufacture beats, particularly when many music production professionals have to manufacture quality music with their computers.
Thanks to the powerful sample, beat and melody design, mixing and synthetic sound processes, and many other features, the LMMS music production software provides high-quality audio output. The product also features playback tools, plugins, and samples to produce powerful, high-quality sound.
Pros
- It is compatible with Linux, Windows, and Mac
- Hydrogen project files and MIDI can be imported easily for editing
Cons
- It eats a lot of memory and requires a high-end device to support it
- Some users complained that understanding its working is difficult
5. Cakewalk
This is an exciting app for music production to purchase. It is a fantastic tech to invest in music production. Cakewalk Sonar Artist Software is one of Cakewalk Sonar Artist ‘s great productions. Cakewalk is known for an excellent GUI, an excellent mixing console, an excellent commercial radio system, and limitless MIDI tracks.
A good device to use as part of your instruments for the development of music is the Cakewalk Sonar Artist Music Production program. It stands out as a program packed with excellent features amongst its counterparts. And the app is unmatched in the area of apps.
Pros
- You can share music compilation directly to social media
- You can easily add effects to your tracks
Cons
- It is priced, very high
- One window interface makes it hectic
6. Music Maker by Magix
This app is a special program for sound engineers, skilled musicians, and accomplished music producers, developed by US Magix Entertainment. It offers an excellent forum for creative music development in music production professionals.
In reality, the software for music production is excellent software for the Music Maker by Magix. In the field of music post-production and music mastering, mixing and arrangement, recording, and more, the software achieved remarkable breakthroughs. Thanks to the successful combination of a technical device and highly flexible workflow, the Music Maker by Magix has achieved this groundbreaking success.
With creative algorithm and superb plugin effects, the Music Maker by Magix program enables music manufacturers to develop their ideas in line with the highest quality in this industry.
Pros
- It is great for EDM producers
Cons
- It is not suitable for newbies
- The GUI feels a bit cluttered
Part 2: Free Music Production Software for Mac
7. Garageband
This is a music development studio app that is designed to function on Mac. It is a great free music production software for Mac. This software has a full sound collection, which includes virtual instruments, voice, and guitar preset.
GarageBand is a well-known app for music development and is an excellent tool for music beginners. Many people have chosen GarageBand because it does not match the ease and ease of use for recording purposes in particular.
The user-friendly interface makes you easy to create music with a more unobstructed view of what you’re recording. Apps from GarageBand captured the attention of others because of their ease-to-use and user-friendliness.
Pros
- The software offers some nicely packaged preset for vocal and guitar recording
- Productive workflow
Cons
- It has limited plugins
- It is only supported for Mac platforms
8. Ableton Live
The Ableton Live 10 Suite is a dynamic and comprehensive program for the creation and performance of musical recordings.
An essential feature of this software is that it allows you to work on your time-based workflow without affecting the live session. This means that the software gives you a rare chance to get involved with the workflow without stopping live performance.
The Multitrack Recording Technology of Ableton Live10 Suite allows music producers to adjust the speed and pacing of any audio during the recording. To make these adjustments, you don’t have to pause the recording. This is one of the striking characteristics which makes this product a good option for all.
Pros
- Adjusting the speed and pace of audio is a delight
- Sophisticated MIDI/audio routing capabilities
Cons
- It has a traditional design
- Not enough updates to fix the buggy features
9. Boom 3D
Boom 3D for Mac & Windows is an award-winning pro sound improvement software designed to play your media content on any and all of your devices, phones, or streaming services with amazing 3D effects. No costly headphones or sound boosters will be needed to make your music feel like it! Designed in a new immersive 3D surround sound technology, Boom 3D redefines how people listen to music, watch films, or play games with some headphones on their devices. 3D sound provides the option to check the LFE (subwoofer), and the audio intensity of each Virtual 3D Surround audio system speaker.
Pros
- It comes with loads of content
- Audio quality can be enhanced
Cons
- The design is not suitable for everybody
- It does not have a Linux version
10. Mixxx
For beginners, Mixxx is just another great device. This is also one of the best free music production software downloads for your music. This software supports all Mac, Windows, and Linux platforms.
The application provides you with a DJ-mixing environment and supports all standard formats such as Mp3 and many other formats.
Pros
- It is a great app for beginners
- Supported by Mac, Windows, and Linux
Cons
- It doesn’t support many plugins
- GUI isn’t that great
Part 3: Free Music Production Software Online
11. Soundation
Soundation is a platform that provides free music production software online only capabilities. The free version and three paid versions are offered. You can use this to build your tracks unless you have the resources to do so if you need a web-based music maker and editor.
If you pay, even after you have made your music, you can always cancel. Remember first to save them to your hard drive. If you need paid characteristics, pay for the monthly plan again through PayPal, and you have to use it for a month.
Pros
- Great SSL-modelled mixer
- You can use its devices as a plugin
Cons
- It works only online
12. Audiotool
Audiotool is a popular app for music production hosted online and can be used without installation from inside your browser. It uses a cloud-based network to store all your music and files wherever you are. It is also confirmed that you will share music and tracks directly with YouTube, SoundCloud, and Facebook on its own publishing site. They have premium releases from Loopmasters and some fantastic online VSTs, for example, Heisenberg, Machiniste, Bassline, and Beatbox 8 & 9.
Pros
- No installation needed
- You can directly share it to your social media
Cons
- It works only online
- No upgrades
13. Soundtrap
Soundtrap is not only an online music studio but a training site for students and instructors. The STEAM Curriculum is an online learning resource that helps students to follow music and podcasts, incorporated into the Web app. As we mentioned earlier, in addition to the online Web App, you can also use it on different devices, share it with other users, and work in innovative projects for your music.
The interface is simple, easy to use, and easy to understand. It is simply an instrument for innovation; you don’t have to learn how to apply VST or any other technical elements to music creation. You can also record your MIDI instruments directly from your machine or device’s mic.
Pros
- It provides a great platform for teachers to teach their students
- It is very easy to use
Cons
- It only has a limited number of plugins
- It cannot be used professionally
Conclusion
If you make music on a computer, the most important resource in your artistic arsenal is your DAW; in your home recording system, you ‘re probably going to have the MIDI keyboard, audio interface, studio monitor speakers, and maybe a microphone or two. But your program is at the core of it all. Not everyone can afford expensive DAWs, but one must not worry as free music production software are present to aid us.
It is important to have a DAW with which you are pleased and, perhaps more importantly, a DAW, which allows you to turn your ideas into music as quickly and painlessly as possible. So make sure you choose the best one for you according to your needs. Hopefully, this guide will aid you!
Benjamin Arango
Benjamin Arango is a writer and a lover of all things video.
Follow @Benjamin Arango
Also read:
- In 2024, Mastering Mobile A Guide to Free Audio-to-Text Conversion on Android & iOS
- New 2024 Approved Eliminating Lyrics and Choirs with Precision A Complete Guide to Using Adobe Auditions Voice Reduction Capabilities
- New 2024 Approved Top Picks Compiling a Collection of Gratis Tracks for Filmmaking
- Updated Professional Audio Enhancements Ranking the Top 6 Multitrack Mixers for Live Events for 2024
- Updated 10 Leading Alternatives for Interacting and Networking in Cyberspace
- Updated Heartstrings Unleashed The Most Impactful Ballads for 2024
- Updated Essential Steps for Perfect Audio Capture in GarageBand for 2024
- Updated In 2024, A Comprehensive Look at the Roots of Hip-Hop and Its Artistic Expression
- Updated From Sight to Sound Modern Methods for Pulling Audio From Visual Media
- Simplifying Vocal Alterations The Audacity Technique for 2024
- Updated 2024 Approved Sustaining Sonic Excellence While Changing Octave Levels in Audacity
- New In 2024, The Soft-Spoken Symphony Candid Choirs and Soloists in Sadness
- Quick and Easy Techniques for Standardizing Sound Amplitude
- In 2024, A Comprehensive Tutorial on Audio Standardization in DaVinci Resolve
- New 2024 Approved How to Make Your Voice Deeper With Filmora
- Updated Journalistic Jazzy Numbers for Daily Updates
- Top 13 Gratis Audio Creation Tools for PC and Mac, Updated List for 2024
- Best 10 Volume Boosters for Windows-Increase Volume Right Now
- How to Remove Audio From MOV Files on Windows/Mac for 2024
- Updated How to Design an Awesome Podcast Cover Art An Ultimate Guide
- 2024 Approved Montage Music The Top 10 Online Compilations and Direct Links
- Leading 10 Voice Alteration Software Mastering Female Tones From Male Vocals for 2024
- New In 2024, Streamlining Your Audio Setup Efficiently Manage M4A Files on Android
- 2024 Approved Echo Eradicator The Complete Guide to Clean Auditory Experience
- Updated 2024 Approved Premium 10 Sound Enhancement Apps for Android and iOS Devices
- New How to Add Music to Final Cut Pro, In 2024
- Updated Echoes of Interaction Searching for Buttons Acoustic Footprints for 2024
- In 2024, Windows Auditory Enhancement Tools Selecting the Prime Candidates for Decibel Reduction
- 2024 Approved How to Fade in and Fade Out Audio in iMovie?
- Updated 2024 Approved The Premier List of Windows-Compatible Automatic Speech Recognition Systems
- The Quintessential Compilation 3 A+ Online Services for Elevated Sound in Media
- Updated Crafting a Silent AVI Film A Hands-On Approach (AVI 2023) for 2024
- From Stage to Studio Advanced Methods for Altering Celebrity Vocals
- Updated The Ultimate Technique for Voice Extraction From Songs
- Audacity Made Simple An Easy Installation & Uninstall Guide S Ubuntu Users
- In 2024, Mastering the Art of Syncing Sound and Imagery
- New Top 10 Online Tools for Professional Studio Recording - FREE vs PAID Versions for 2024
- New The Quintessential Guide to Websites That Whisper Peace Into Your Psyche
- In 2024, Streamline Your Audio Capture with These Top 5 MP3-Specific Recording Devices
- New Hunt for Amusing Sound Layers and Tones for 2024
- Updated Step-by-Step Getting Audacity Running on Your Ubuntu System for 2024
- Captivating Sound Design Essentials Review of Premier Audio Editors, Pros & Cons
- Updated 2024 Approved From Silence to Symphony Incorporating Music Into Animated Graphics on macOS
- MP3 Speech-to-Text Conversion Explained 3 Streamlined Online Approaches
- Updated Must-Have Music Selections for Peaceful Environmental Scenarios for 2024
- Updated In 2024, 7 Premier Choices for Androids Audio Editing Needs – A Comprehensive Guide Beyond Audacity
- New 2024 Approved 5 Best Free Open-Source Audio Editor for Windows
- Updated In 2024, Unveiling the Best Voice-to-Text Software for Windows Enthusiasts
- Victory Vibrations Locating Dynamic Cheer Noises for 2024
- New Deciphering Sound Quality Improvement Leveraging Adobe Audition for Clear Music Production for 2024
- Strategies for Apps That Wont Download From Play Store On Honor Play 40C | Dr.fone
- Updated Elevate Your Brand 10 Best Intro Builder Websites for 2024
- All About Kapwing Video Translation
- Apply These Techniques to Improve How to Detect Fake GPS Location On Vivo Y02T | Dr.fone
- New In 2024, Top 11 Deepfake Voice Apps and Software You Need to Know About
- FilmForge for Mac
- Online Video Editors Handbook From Download to Final Cut for 2024
- How to Factory Reset Tecno Phantom V Fold If I Forgot Security Code or Password? | Dr.fone
- In 2024, The Magnificent Art of Pokemon Go Streaming On Vivo V29e? | Dr.fone
- Three Solutions to Hard Reset Xiaomi 13 Ultra? | Dr.fone
- How to Reset Vivo Y200 without Losing Data | Dr.fone
- New 5 Best Free MOV Video Joiners
- iSpoofer is not working On Oppo A79 5G? Fixed | Dr.fone
- New Ubuntus Finest 10 Free Video Editing Software You Need to Try
- In 2024, The Ultimate Guide to Get the Rare Candy on Pokemon Go Fire Red On Vivo Y200 | Dr.fone
- In 2024, How to Transfer Contacts from Vivo V29 Pro to Other Android Devices Devices? | Dr.fone
- In 2024, Why Your WhatsApp Live Location is Not Updating and How to Fix on your Lava Yuva 3 Pro | Dr.fone
- In 2024, 10 Best Fake GPS Location Spoofers for Nubia Red Magic 9 Pro | Dr.fone
- In 2024, For People Wanting to Mock GPS on OnePlus Ace 2 Pro Devices | Dr.fone
- In 2024, How to Remove Find My iPhone without Apple ID From your iPhone SE (2020)?
- Android Screen Stuck General Oppo A56s 5G Partly Screen Unresponsive | Dr.fone
- In 2024, 5 Easy Ways to Copy Contacts from OnePlus 12 to iPhone 14 and 15 | Dr.fone
- Best 5 TikTok Voice Generators You Should Try for 2024
- Updated Adobe Animate Text Effects Skills You Need to Know
- Updated In 2024, Capture Lifes Moments with Clarity Top Video Stabilizer Apps
- How to Unlock Itel Phone Pattern Lock without Factory Reset
- 2024 Approved A Step-by-Step Guide to Finding a Trustworthy YouTube MP3 Converter
- Elevate Your Video Experience Best Resolution Enhancement Tools for 2024
- In 2024, Turning Off Two Factor Authentication On iPhone 8? 5 Tips You Must Know
- In 2024, Why Your WhatsApp Live Location is Not Updating and How to Fix on your Oppo K11x | Dr.fone
- 2024 Approved Replace Sky Background in Video Figuring Out the Best Options
- Bypassing Google Account With vnROM Bypass For Samsung Galaxy A25 5G
- How to Unlock iCloud lock from your iPhone 15 Pro and iPad?
- How To Get Out of DFU Mode on iPhone 13? | Dr.fone
- In 2024, Ways To Find Unlocking Codes For Motorola Razr 40 Ultra Phones
- Updated Free and Easy The 5 Best Online Tone Makers for 2024
- Updated In 2024, Unlocking Canon Video Potential Best Editing Software and Tutorials
- Top IMEI Unlokers for Your Lava Yuva 2 Pro Phone
- 8 Workable Fixes to the SIM not provisioned MM#2 Error on Samsung Galaxy A25 5G | Dr.fone
- How To Upgrade or Downgrade Apple iPhone 11 Pro Without iTunes? | Dr.fone
- New 2024 Approved 8 Tips to Apply Cinematic Color Grading to Your Videos
- The Art of Attention-Grabbing Thumbnails YouTube Size Guide and More for 2024
- In 2024, How To Fix OEM Unlock Missing on Realme 10T 5G?
- Easy steps to recover deleted messages from Samsung Galaxy A14 4G
- Repair damaged, unplayable video files of Realme Narzo 60x 5G on Windows
- In 2024, What Is the Selective Color Effect, and How Can You Add This Effect to Your Videos Using Wondershare Filmora? A Complete Guide for Beginners
- New Want to Know the Simplest Way to Match the Colors of Your Photos in Photoshop? The Following Discussion Will Help Match Color in Photoshop, Almost Effortlessly
- Complete Guide For iPhone XS Max Lock Screen | Dr.fone
- Things You Should Know When Unlocking Total Wireless Of iPhone SE (2022)
- 2024 Approved How to Make a Video a Live Photo
- Title: Updated 2024 Approved Clearing Up Clarity Advanced Noise Reduction Tips for Adobe Premiere Users
- Author: David
- Created at : 2024-05-05 09:53:50
- Updated at : 2024-05-06 09:53:50
- Link: https://sound-tweaking.techidaily.com/updated-2024-approved-clearing-up-clarity-advanced-noise-reduction-tips-for-adobe-premiere-users/
- License: This work is licensed under CC BY-NC-SA 4.0.
