
:max_bytes(150000):strip_icc():format(webp)/GettyImages-1365158534-d6952b03afff43f7a1c5f0405f31dc92.jpg)
Step-by-Step Techniques for Audio Retrieval in Multimedia Content (Windows, Mac, iOS/Android)
Step-by-Step Techniques for Audio Retrieval in Multimedia Content (Windows, Mac, iOS/Android)
How to Extract Audio from Videos on Win/Mac/Phone

Shanoon Cox
Mar 27, 2024• Proven solutions
Remake a remix from raw audio, dub the movie dialogues in a different language or simply use the same audio in one of yours YouTube or Instagram video, all it requires is a high-end audio extractor program and you are good to go.
So if you are on an exploration of some good audio extractor software from a video, here we are to guide you all along the way for each of the platforms ranging from phones to PC.
You will Learn :
- How to Make Audio Extraction from Videos Using Mac and Windows?
- How to Extract Audio on Mac Using QuickTime?
- How to Make Audio Extraction on Windows Using Movie Maker?
- How to Extract Audio from Videos on Mobile Phones
- How to Extract Audio from Video Online?
- How to Extract Audio from YouTube Video?
- How to Extract Audio from a Facebook Video?
- How to Extract Audio from an Instagram Video?
- How to Extract Audio from Streaming Video?
So, let’s begin!
How to Make Audio Extraction from Videos Using Mac and Windows?
When you extract audio from videos on PC, you need a tool to make it done. That can be a very easy job if you use the professional video editing software-Wondershare Filmora . Just follow this guide to extract audio from video with ease.
Wondershare filmora is one of the best professional video editing software which can make a job of audio extraction from a video.
Here’s how to extract audio from a video using Filmora:


Step 1: Download Wondershare Filmora and run the program.
Step 2: Click on “import” button and include the desired video. You can also directly drag and drop the video to the program. The loaded video will be listed in the media library like the following picture shows.
Step 3: Start extracting audio from video.
After importing video to Wondershare Filmora, drag the video from the media library to the video Timeline.
Step 4: You can then right-click the video clip and choose “Audio Detach” to extract audio from the video.
After a while, video and audio will be displayed on different tracks. This will extract the audio from the video and display both the files separately.
If you don’t want to keep the video file, right-click it and choose “Delete” to remove it from the video timeline. Bring the video to the video timeline from the library by drag option.
Step 5: Edit the audio you desired.
Then double click to edit the audio in the popup window.
Here you can change the Volume, Fade in, Fade out, and Pitch, etc. as you like.
If you want to delete part of the audio, just put the cursor to the place where you would like the deletion to start and press the “Split” button above the timeline.
The end of the deletion area is marked similarly – play the audio and select the final point of the area to be excluded from the output audio, and then press the “Split” button again.
Besides that, you can also add an image to the newly extracted audio. Here is a detailed guide about it >>
Step 6: Select the desired output method and save the audio file
After that, click the “Create” button to export the audio track. Choose the desired file format and adjust settings accordingly.
Here different options are provided.
For example, you can save the audio in regular formats such as MP3, MP4, WMV, AVI and so on in the “Format” tab and adjust the settings such as Encoder, Sample Rate, Bit Rate, and Channel as you like.
Or export it for playback on portable devices, burn it to DVD disc or share it to YouTube directly.
After you select the desired output method, simply select a desirable output method and then click the “Create” button to save the audio track.
How to Extract Audio on Mac Using QuickTime?
This section entails you about how to extract audio from video mac
QuickTime Player is a pre-installed player in Mac PCs that you can utilize to extract the audio from a video with merely some clicks away in seconds. Hence, you don’t need to download this player. All you need is to follow the below step:
Step 1: Open the QuickTime Player.
Step 2: Open the targeted video on this player.
Step 3: Click on “file” from the top bar of the player.
Step 4: On the “export as” option, click on “audio-only”.

Step 5: Give a name to the audio file, select a location to store and click on “save”.
How to Make Audio Extraction on Windows Using Movie Maker?
On Windows you can use the free utility, Movie Maker, to extract the audio and save as an MP4 file.
Movie Maker is a free utility on windows that you can utilize for multiple purposes. So, if you are wondering how to extract audio from video in windows movie maker then look no further! All you have to do is:
Step 1: Download “movie maker” and “photo gallery” if you don’t own one or both of them already.
Step 2: Due to the sharing of ample coherent features, both of these software has to be downloaded together.
Step 3: Open “movie maker” and select “add video and photo” option to select the desired targeted video from a location on your computer.
Step 4: After the loading of the video, you need to click on “file”.
Step 5: Select “save movie” and scroll down to click “audio-only”.

Step 6: Name the audio file and save the file. The file gets saved with MP4 file format by default. You can save the file with WMA format as well but the most common and standard format is MP4 that can easily be played on any of the mobile devices having any operating system.
Step 7: The progress bar is displayed during the conversion of a video into the audio-only file. This may take some time as time varies depending upon the length and size of the file to be extracted from.
Step 8: When it’s done converting, you can play the audio right away or may move the file to another folder wherever you want it to be.
How to Extract Audio from Videos on Mobile Phones
Extracting the audio from a video file through mobile phones is often a tedious process to do so. But all thanks to the applications that come for a specific or general mobile operating systems to make a slow-paced job much easier and faster.
We have several mobile applications specific foe android phones and iPhone users that can do video to audio conversions within a wink of an eye. So, let’s explore the ways:
How to Extract Audio Using Android
This section entails you about how to extract audio from videos on android by the converter App, Video to Mp3 Converter .

Step 1: First off, Make and save or simply download a video in the local memory or SD card on your phone if you don’t already have a video.
Step 2: Open video to MP3 converter.
Step 3: You’ll see 4 options in the middle of the interface.
Step 4: Press the “video to audio” option.
Step 5: Select the targeted video file from where you want to extract the audio.
Step 6: You will be given a simple and advanced option. The simple option lets you perform basic operations on the video while the advance option will let you perform operations like bit rate and audio encoding etc.
Step 7: If you want the best quality audio output then set the quality to maximum, 9.
Step 8: Click on the “convert” button at the bottom to start the conversion process.
Step 9: When completed with the process, you can play the audio right away or may set it as a new ringtone as well.
How to Extract Audio from Video on iPhone or iPda?
This section entails you about how to extract audio from the iPhone video by MP3 Converter -Audio Extractor .

This is one of the free applications available on both iPhones and iPad. These handy applications will let you extract the audio from any of the videos on the phone. So if you are seeking about how to extract audio from a video file using your phone then the MP3 converter will serve the purpose.
Step 1: Open the MP3 converter application.
Step 2: Tap on the plus sign in the middle of the screen at the bottom.
Step 3: Select the import option according to where you want to choose the video, either the camera gallery or iCloud.
Step 4: Select a targeted video and tap on the “Add” button at the bottom right.
Step 5: Click on the video on the following screen.
Step 6: Select “convert”.
Step 7: Select MP3 by clicking on the “default mode”.
Step 8: If m4a is the desired file format you can to convert your audio file in then click on “advanced mode” and select the desired output format.
Step 9: You may also amend other settings like Audio Sample, Output Range etc.
Step 10: Click on “converted media” to access the converted audio file.
Step 11: You can play the audio right away or you may click “open in” option which lets you provide several options like saving, storing and sending to some platforms.
How to Extract Audio from Video Online?
This section entails you about how to extract audio from videos online by the Audio converter .
You don’t have to own an application-specific for audio extraction. You can do the same with online software, named as an audio converter.
This will save the internal memory of your system since you don’t need to download an app.
The steps are very simple as defined below:
Step 1: Open “audio converter” and Click on the “open files” option.
Step 2: Choose the file in the window from where you need the audio to be extracted with 2048 Mb as the maximum file size supported by this converter.

Step 3: While the sound extraction process is still going on, select the audio file format you want to convert in.
Step 4: If you are confused with the file formats options, then go with the default on, MP3 which is a standard format.
Step 5: Tap on the “convert” button and wait until the extraction process completes.
Step 6: After being extracted, click on “download”.
How to Extract Audio from YouTube Video?
Audials One , It is a user-friendly software suitable for audio extraction from a YouTube video. You can extract the file and save it in any of the file formats like WMV, MP4, and MP3, etc.
Before starting off with the extraction process, you will require a video file locally.
Below are the steps to extract audio from a YouTube publication using Audials one.
Step 1: Download and run Audials One
Step 2: Open this software and select “converter” below Universal Converter in the left window. Click on files>>add files

Step 3: Select a downloaded file of YouTube
Step 4: Tap on “close” when prompted with a window of adding files being done.
Step 5: Check the “Convert video to audio” checkbox.
Step 6: Select “start”.
Step 7: The free version of Audials one will allow 30 minutes of recording. You need to buy a pro version to be able to extract audio for a YouTube video longer than 30 minutes. Click on “no thanks” if you don’t need to upgrade the version. The conversion process will be continued.
Step 8: After conversion, you can play the audio by clicking the “edit” option given at the right corner and then tap on “open folder”
How to Extract Audio from a Facebook Video?
You can easily extract audio from the Facebook video by Any Audio Converter . Steps are as following:
Step 1: Download the converter software.
Step 2: Tap on “Add URLs”. This will pop a dialogue box. Select the plus tab and paste there the download link.
Step 3: Tap the “start download” option to begin the downloading process.

Step 4: Tap on the “Set output profile” option and from the drop-down, select MP3 Audio.
Step 5: The customize the audio configuration, click on “ Audio Options” which gives you Volume, Channel, Bit Rate, Audio Codec options respectively.
Step 6: To save the output file in a specified folder, tap on the “setting” option.
Step 7: Select “convert now!” option which will initiate the conversion of Facebook video into an MP3 audio file.
Not only limited to this option, but you can also perform basic editing operation as well by using this software.
How to Extract Audio from an Instagram Video?
You can easily download an Instagram video through this online application Instagram Video Downloader and can extract the audio from an Instagram video with very few steps:
Step 1: Open the post on the Instagram platform from which you want to extract the audio.
Step 2: Locate the post URL link and copy it.
Step 3: Then paste the copied link in the white bar on the top.

Step 4: Click on “submit” to download the Instagram video.
Step 5: Then convert the video into an MP3 audio file by selecting the desired file format.
How to Extract Multiple Audio Tracks from the Video?
Here you’ll get to know how to extract audio from video with the use of Handbrake software in order to extract multiple audio tracks from a video.
Step 1: Download and open handbrake software.
Step 2: You have to select a video having multiple audio tracks on “source selection” pane.
Step 3: File selection will generate an interface beneath. Select “audio tab” and expand the first dropdown which lists down all the audio tracks in a selected file. Select one of them and name the file and enter the output directory.
Step 4: Tap on “start encode” which will convert the audio in MP4 format. Now the audio extraction from the video is done using VLC player.
Step 5: Open the VLC player and select the “convert” option inside “media”.
Step 6: Tap on “add” in the Open Media pane then select the recently created handbrake video. From the drop-down next to the Convert/Save option, tap on “convert”.
Step 7: Below profile, tap on “MP3” on the following screen, name the file and enter the directory then select “start” and voila! You are done.
How to Extract Audio from Streaming Video?
You can use Video Downloader if you use Chrome as a web browser or DownloadHelper for Firefox users in order to download any streaming video as a file locally in your system. If one asks how to extract audio from the mp4 video, the process remains the same.
After the downloading process, there exist several programs for audio extraction from a video.
Below are the steps for the VLC player :
Step 1: Open VLC player, select “media” then click “convert/save” option, click “Add” beside File Selection box.
Step 2: Browse the desired downloaded file from PC and press “OK”.
Step 3: Select “audio-MP3” from “profile” and then select “start”.

Conclusion
Depending upon the availability of resources, all of the aforementioned approaches are great in their own way.
But considering that Wondershare filmora runs smoothly given the easiest interface and requiring least steps to perform audio extraction whilst being compatible with Mac and Windows both operating system, I would personally recommend this software for ease of accessibility and usability.
Shanoon Cox
Shanoon Cox is a writer and a lover of all things video.
Follow @Shanoon Cox
Shanoon Cox
Mar 27, 2024• Proven solutions
Remake a remix from raw audio, dub the movie dialogues in a different language or simply use the same audio in one of yours YouTube or Instagram video, all it requires is a high-end audio extractor program and you are good to go.
So if you are on an exploration of some good audio extractor software from a video, here we are to guide you all along the way for each of the platforms ranging from phones to PC.
You will Learn :
- How to Make Audio Extraction from Videos Using Mac and Windows?
- How to Extract Audio on Mac Using QuickTime?
- How to Make Audio Extraction on Windows Using Movie Maker?
- How to Extract Audio from Videos on Mobile Phones
- How to Extract Audio from Video Online?
- How to Extract Audio from YouTube Video?
- How to Extract Audio from a Facebook Video?
- How to Extract Audio from an Instagram Video?
- How to Extract Audio from Streaming Video?
So, let’s begin!
How to Make Audio Extraction from Videos Using Mac and Windows?
When you extract audio from videos on PC, you need a tool to make it done. That can be a very easy job if you use the professional video editing software-Wondershare Filmora . Just follow this guide to extract audio from video with ease.
Wondershare filmora is one of the best professional video editing software which can make a job of audio extraction from a video.
Here’s how to extract audio from a video using Filmora:
Step 1: Download Wondershare Filmora and run the program.
Step 2: Click on “import” button and include the desired video. You can also directly drag and drop the video to the program. The loaded video will be listed in the media library like the following picture shows.
Step 3: Start extracting audio from video.
After importing video to Wondershare Filmora, drag the video from the media library to the video Timeline.
Step 4: You can then right-click the video clip and choose “Audio Detach” to extract audio from the video.
After a while, video and audio will be displayed on different tracks. This will extract the audio from the video and display both the files separately.
If you don’t want to keep the video file, right-click it and choose “Delete” to remove it from the video timeline. Bring the video to the video timeline from the library by drag option.
Step 5: Edit the audio you desired.
Then double click to edit the audio in the popup window.
Here you can change the Volume, Fade in, Fade out, and Pitch, etc. as you like.
If you want to delete part of the audio, just put the cursor to the place where you would like the deletion to start and press the “Split” button above the timeline.
The end of the deletion area is marked similarly – play the audio and select the final point of the area to be excluded from the output audio, and then press the “Split” button again.
Besides that, you can also add an image to the newly extracted audio. Here is a detailed guide about it >>
Step 6: Select the desired output method and save the audio file
After that, click the “Create” button to export the audio track. Choose the desired file format and adjust settings accordingly.
Here different options are provided.
For example, you can save the audio in regular formats such as MP3, MP4, WMV, AVI and so on in the “Format” tab and adjust the settings such as Encoder, Sample Rate, Bit Rate, and Channel as you like.
Or export it for playback on portable devices, burn it to DVD disc or share it to YouTube directly.
After you select the desired output method, simply select a desirable output method and then click the “Create” button to save the audio track.
How to Extract Audio on Mac Using QuickTime?
This section entails you about how to extract audio from video mac
QuickTime Player is a pre-installed player in Mac PCs that you can utilize to extract the audio from a video with merely some clicks away in seconds. Hence, you don’t need to download this player. All you need is to follow the below step:
Step 1: Open the QuickTime Player.
Step 2: Open the targeted video on this player.
Step 3: Click on “file” from the top bar of the player.
Step 4: On the “export as” option, click on “audio-only”.
Step 5: Give a name to the audio file, select a location to store and click on “save”.
How to Make Audio Extraction on Windows Using Movie Maker?
On Windows you can use the free utility, Movie Maker, to extract the audio and save as an MP4 file.
Movie Maker is a free utility on windows that you can utilize for multiple purposes. So, if you are wondering how to extract audio from video in windows movie maker then look no further! All you have to do is:
Step 1: Download “movie maker” and “photo gallery” if you don’t own one or both of them already.
Step 2: Due to the sharing of ample coherent features, both of these software has to be downloaded together.
Step 3: Open “movie maker” and select “add video and photo” option to select the desired targeted video from a location on your computer.
Step 4: After the loading of the video, you need to click on “file”.
Step 5: Select “save movie” and scroll down to click “audio-only”.
Step 6: Name the audio file and save the file. The file gets saved with MP4 file format by default. You can save the file with WMA format as well but the most common and standard format is MP4 that can easily be played on any of the mobile devices having any operating system.
Step 7: The progress bar is displayed during the conversion of a video into the audio-only file. This may take some time as time varies depending upon the length and size of the file to be extracted from.
Step 8: When it’s done converting, you can play the audio right away or may move the file to another folder wherever you want it to be.
How to Extract Audio from Videos on Mobile Phones
Extracting the audio from a video file through mobile phones is often a tedious process to do so. But all thanks to the applications that come for a specific or general mobile operating systems to make a slow-paced job much easier and faster.
We have several mobile applications specific foe android phones and iPhone users that can do video to audio conversions within a wink of an eye. So, let’s explore the ways:
How to Extract Audio Using Android
This section entails you about how to extract audio from videos on android by the converter App, Video to Mp3 Converter .
Step 1: First off, Make and save or simply download a video in the local memory or SD card on your phone if you don’t already have a video.
Step 2: Open video to MP3 converter.
Step 3: You’ll see 4 options in the middle of the interface.
Step 4: Press the “video to audio” option.
Step 5: Select the targeted video file from where you want to extract the audio.
Step 6: You will be given a simple and advanced option. The simple option lets you perform basic operations on the video while the advance option will let you perform operations like bit rate and audio encoding etc.
Step 7: If you want the best quality audio output then set the quality to maximum, 9.
Step 8: Click on the “convert” button at the bottom to start the conversion process.
Step 9: When completed with the process, you can play the audio right away or may set it as a new ringtone as well.
How to Extract Audio from Video on iPhone or iPda?
This section entails you about how to extract audio from the iPhone video by MP3 Converter -Audio Extractor .
This is one of the free applications available on both iPhones and iPad. These handy applications will let you extract the audio from any of the videos on the phone. So if you are seeking about how to extract audio from a video file using your phone then the MP3 converter will serve the purpose.
Step 1: Open the MP3 converter application.
Step 2: Tap on the plus sign in the middle of the screen at the bottom.
Step 3: Select the import option according to where you want to choose the video, either the camera gallery or iCloud.
Step 4: Select a targeted video and tap on the “Add” button at the bottom right.
Step 5: Click on the video on the following screen.
Step 6: Select “convert”.
Step 7: Select MP3 by clicking on the “default mode”.
Step 8: If m4a is the desired file format you can to convert your audio file in then click on “advanced mode” and select the desired output format.
Step 9: You may also amend other settings like Audio Sample, Output Range etc.
Step 10: Click on “converted media” to access the converted audio file.
Step 11: You can play the audio right away or you may click “open in” option which lets you provide several options like saving, storing and sending to some platforms.
How to Extract Audio from Video Online?
This section entails you about how to extract audio from videos online by the Audio converter .
You don’t have to own an application-specific for audio extraction. You can do the same with online software, named as an audio converter.
This will save the internal memory of your system since you don’t need to download an app.
The steps are very simple as defined below:
Step 1: Open “audio converter” and Click on the “open files” option.
Step 2: Choose the file in the window from where you need the audio to be extracted with 2048 Mb as the maximum file size supported by this converter.
Step 3: While the sound extraction process is still going on, select the audio file format you want to convert in.
Step 4: If you are confused with the file formats options, then go with the default on, MP3 which is a standard format.
Step 5: Tap on the “convert” button and wait until the extraction process completes.
Step 6: After being extracted, click on “download”.
How to Extract Audio from YouTube Video?
Audials One , It is a user-friendly software suitable for audio extraction from a YouTube video. You can extract the file and save it in any of the file formats like WMV, MP4, and MP3, etc.
Before starting off with the extraction process, you will require a video file locally.
Below are the steps to extract audio from a YouTube publication using Audials one.
Step 1: Download and run Audials One
Step 2: Open this software and select “converter” below Universal Converter in the left window. Click on files>>add files
Step 3: Select a downloaded file of YouTube
Step 4: Tap on “close” when prompted with a window of adding files being done.
Step 5: Check the “Convert video to audio” checkbox.
Step 6: Select “start”.
Step 7: The free version of Audials one will allow 30 minutes of recording. You need to buy a pro version to be able to extract audio for a YouTube video longer than 30 minutes. Click on “no thanks” if you don’t need to upgrade the version. The conversion process will be continued.
Step 8: After conversion, you can play the audio by clicking the “edit” option given at the right corner and then tap on “open folder”
How to Extract Audio from a Facebook Video?
You can easily extract audio from the Facebook video by Any Audio Converter . Steps are as following:
Step 1: Download the converter software.
Step 2: Tap on “Add URLs”. This will pop a dialogue box. Select the plus tab and paste there the download link.
Step 3: Tap the “start download” option to begin the downloading process.
Step 4: Tap on the “Set output profile” option and from the drop-down, select MP3 Audio.
Step 5: The customize the audio configuration, click on “ Audio Options” which gives you Volume, Channel, Bit Rate, Audio Codec options respectively.
Step 6: To save the output file in a specified folder, tap on the “setting” option.
Step 7: Select “convert now!” option which will initiate the conversion of Facebook video into an MP3 audio file.
Not only limited to this option, but you can also perform basic editing operation as well by using this software.
How to Extract Audio from an Instagram Video?
You can easily download an Instagram video through this online application Instagram Video Downloader and can extract the audio from an Instagram video with very few steps:
Step 1: Open the post on the Instagram platform from which you want to extract the audio.
Step 2: Locate the post URL link and copy it.
Step 3: Then paste the copied link in the white bar on the top.
Step 4: Click on “submit” to download the Instagram video.
Step 5: Then convert the video into an MP3 audio file by selecting the desired file format.
How to Extract Multiple Audio Tracks from the Video?
Here you’ll get to know how to extract audio from video with the use of Handbrake software in order to extract multiple audio tracks from a video.
Step 1: Download and open handbrake software.
Step 2: You have to select a video having multiple audio tracks on “source selection” pane.
Step 3: File selection will generate an interface beneath. Select “audio tab” and expand the first dropdown which lists down all the audio tracks in a selected file. Select one of them and name the file and enter the output directory.
Step 4: Tap on “start encode” which will convert the audio in MP4 format. Now the audio extraction from the video is done using VLC player.
Step 5: Open the VLC player and select the “convert” option inside “media”.
Step 6: Tap on “add” in the Open Media pane then select the recently created handbrake video. From the drop-down next to the Convert/Save option, tap on “convert”.
Step 7: Below profile, tap on “MP3” on the following screen, name the file and enter the directory then select “start” and voila! You are done.
How to Extract Audio from Streaming Video?
You can use Video Downloader if you use Chrome as a web browser or DownloadHelper for Firefox users in order to download any streaming video as a file locally in your system. If one asks how to extract audio from the mp4 video, the process remains the same.
After the downloading process, there exist several programs for audio extraction from a video.
Below are the steps for the VLC player :
Step 1: Open VLC player, select “media” then click “convert/save” option, click “Add” beside File Selection box.
Step 2: Browse the desired downloaded file from PC and press “OK”.
Step 3: Select “audio-MP3” from “profile” and then select “start”.
Conclusion
Depending upon the availability of resources, all of the aforementioned approaches are great in their own way.
But considering that Wondershare filmora runs smoothly given the easiest interface and requiring least steps to perform audio extraction whilst being compatible with Mac and Windows both operating system, I would personally recommend this software for ease of accessibility and usability.
Shanoon Cox
Shanoon Cox is a writer and a lover of all things video.
Follow @Shanoon Cox
10 Best Nature Sounds Apps for iOS and Android
Best Nature Sounds Apps for iOS and Android

Benjamin Arango
Apr 26, 2024• Proven solutions
In today’s challenging times, when stress and anxiety has become inevitable for a majority of population, there is a constant search for solutions that will enable people to live a peaceful and pleasant life. Here, the technology comes to their rescue with nature sound effects app.
These applications provide multiple sounds related to the Nature. The users just need to download any of these programs, and select the desired tone according to their choice. Such mobile software also offer numerous relaxing audios that assist in achieving a deeper level of concentration during the meditation.
10 Best Nature Sounds Apps
1. YouTube
YouTube is also one of the important apps for nature sounds where one can get almost any kind of relaxing sounds related to the Nature.
Binaural beats videos, where two different frequencies of sounds are combined to create a new frequency tone are getting highly popular among people. These are believed to help in lowering stress, anxiety and depression and increase concentration, attention, and efficiency of an individual.
It can also be helpful in attaining mental peace and serenity. The app even contains peaceful meditation sounds that ease the ability to focus and remain relaxed during the whole process. It is highly a user-friendly app and is absolutely free to download on the Android Smartphones.
2. Atmosphere: Relaxing Sounds
Compatible with Android 5.0 or up , and iOS 10.0 or later

Atmosphere is one of the best apps for nature sounds. It is custom-made to help people relieve stress and relax their mind.
The key feature of this application is that it allows users to import their personalized audios and mix them with various default acoustics available within the app itself.
The soothing sounds available here are divided into 8 different environments such as Beach, City, Park, Countryside, Home, Underwater, Forest and Oriental. Users can also mix and match the sounds between environments to produce a tailored theme.
3. Rainy Mood
Compatible with both iOS and Android OS 5.0 and up

Rainy Mood provides the most genuine rain, thunderstorm, and lightening sounds available online.
It not only relieves tension and anxiety but also helps users suffering from insomnia.
This app even contains natural white noise facility that helps in getting rid of any unwanted sounds around us.
The various rain sounds are available here in different environments such as heavy rain, tropical rain, umbrella, rain on tent, rain on porch etc. The best thing about this app is that it can work in offline mode, i.e. without any Internet connection. This eventually results in less power consumption.
4. Animal Sounds
Compatible with Android 4.1 and up
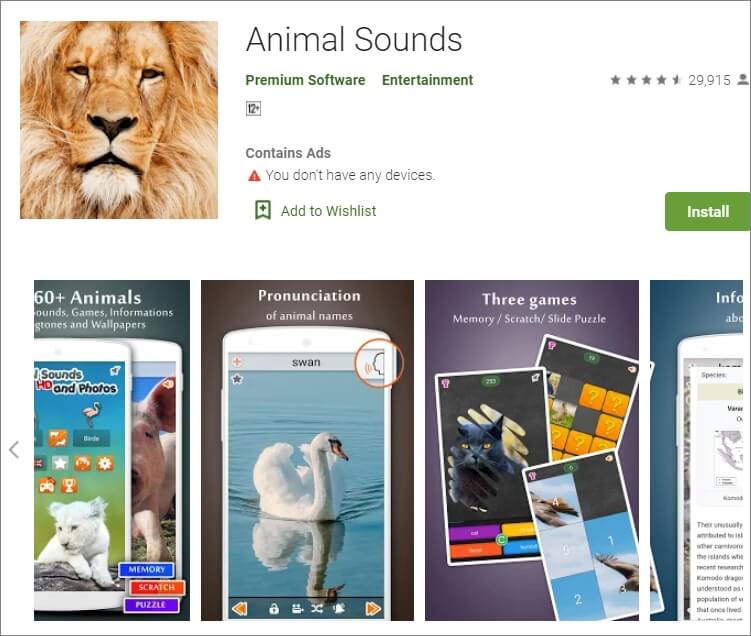
Animal Sounds is a one-stop destination for all animal lovers. The program provides the most detailed information about animals, and also contains hundreds of animal sounds and photographs from all over the globe.
The quality of audios and pictures is remarkably high and clear. The sounds here are categorized under pet animals, mammals, farm animals, bird sounds, wild animals, reptiles and amphibians.
The application also provides the facility of customized ringtones and wallpapers to its users.
5. Sleep Sounds
Compatible with Android 4.4 or later
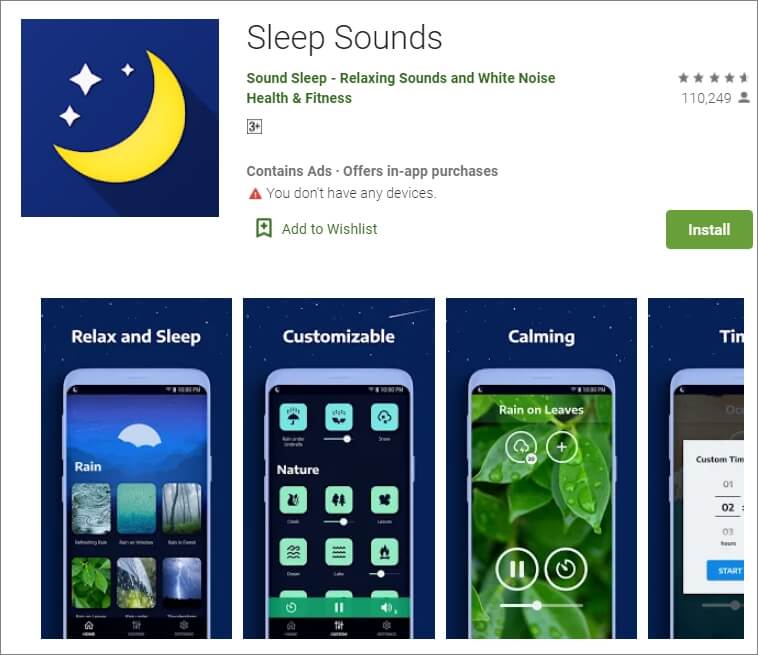
Sleep Sounds is one of the top trending apps nowadays owing to the increasing problems of insomnia and irregular sleep patterns among people. It is very helpful for an uninterrupted quality sleep.
The calm and soft music gradually tranquilizes the mind and the user eases into a good sleep. Its interface is user-friendly with beautiful images in the background.
The sounds here are categorized under rain, nature, relax, transport, noise, and white noise classes. This app also works without an Internet connection.
6.Calm
Compatible with Android and iOS 10.0 and watchOS 6.0 or later
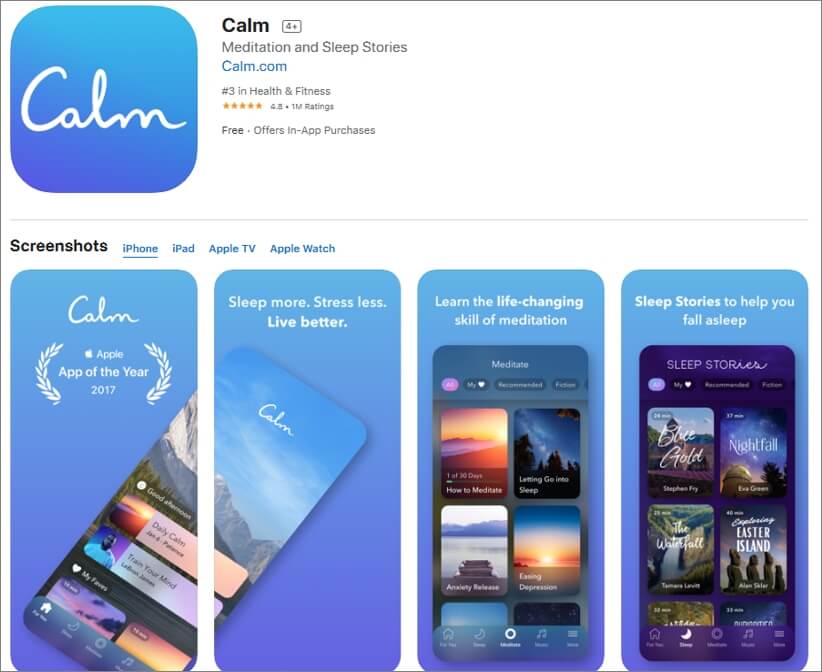
Calm is best suitable for the people who practice meditation on a daily basis. It is available for free and can be used by the beginners as well as experienced users.
The main features include guided meditation programs, breathing sessions, adult bed-time stories, masterclasses by the international coaches, etc.
Here, one can choose a personalized guide for meditation from several topics such as relationships, self-esteem, breaking habits, forgiveness, mindfulness, etc. Users can even track their daily progress on the basis of time spent by them on the app.
7. Ambience – Nature sounds: sleep and meditation
Compatible with Android 4.2 and up .
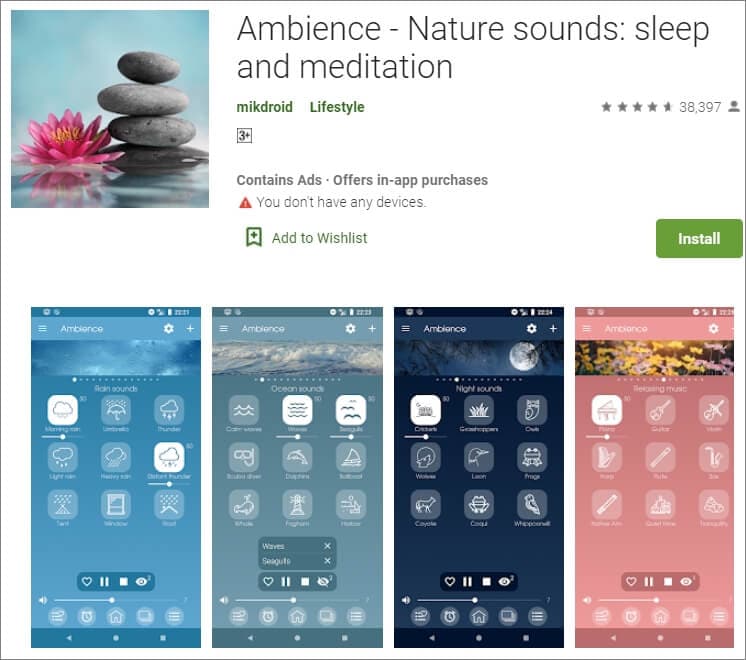
Ambience is another one of the most popular apps for nature sounds providing peace and serenity to its users through relaxing and soothing tones.
It has a very simple and clean user interface which makes it a highly demanding program. The main features include the facility of mixing maximum 10 sounds at the same time. Along with various preset mixtures of audios that are available here, users can also save their customized combinations for future use.
8. Naturespace: Sleep Relax Focus
Compatible with Android 4.0 or up and iOS 9.0 or later
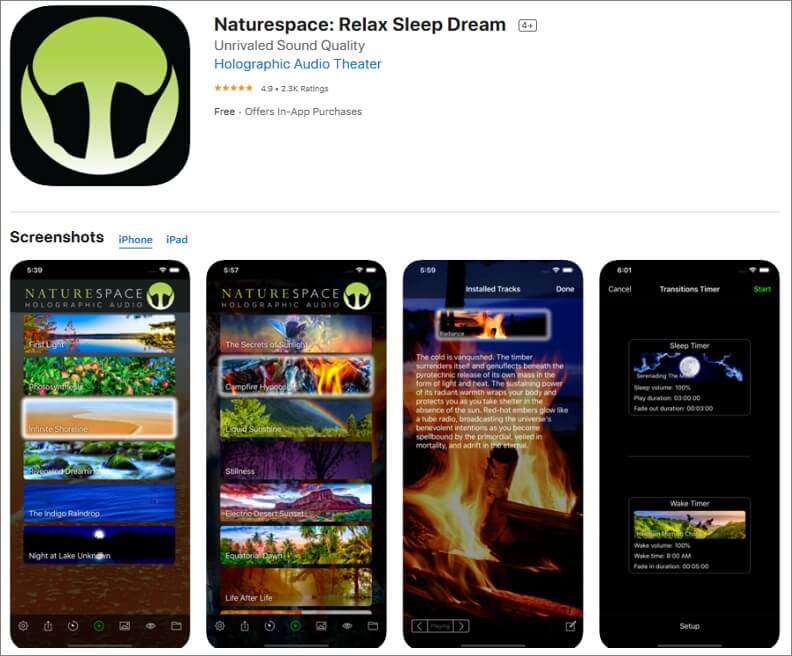
Naturespace is a unique app containing real time 3D recordings of natural places such as forests, deserts, mountains, etc. The equipment used in the program for recording the sounds are of extremely high quality, and as a result, the listening experience is out of this world.
The clarity of the sound surpasses almost every other application available in this genre of nature sound apps. It also provides the facility of sleep and wake timer to its users. The simple user interface along with earbud optimisation facility makes the software highly efficient and popular among people.
9. SimplyNoise – Free White Noise
Compatible with iOS 8.0 or later and Android
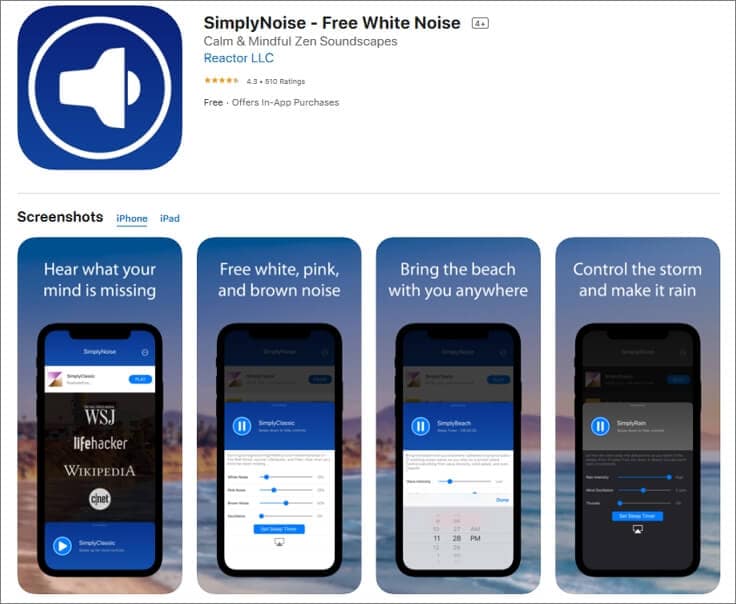
Simply Noise is one of the most basic apps for nature sounds as it provides only one acoustic without any background noises. As there are no such complexities involved, it can also be used by people who are not tech-savvy.
The categorization of sounds is done here as white noise, pink noise, and brown noise. Users can select any of these according to their requirement.
This app is best suitable for people who are unable to concentrate on a particular thing, or suffer from sleeping disorder. Sleep-timer option is also available here.
10. aSleep
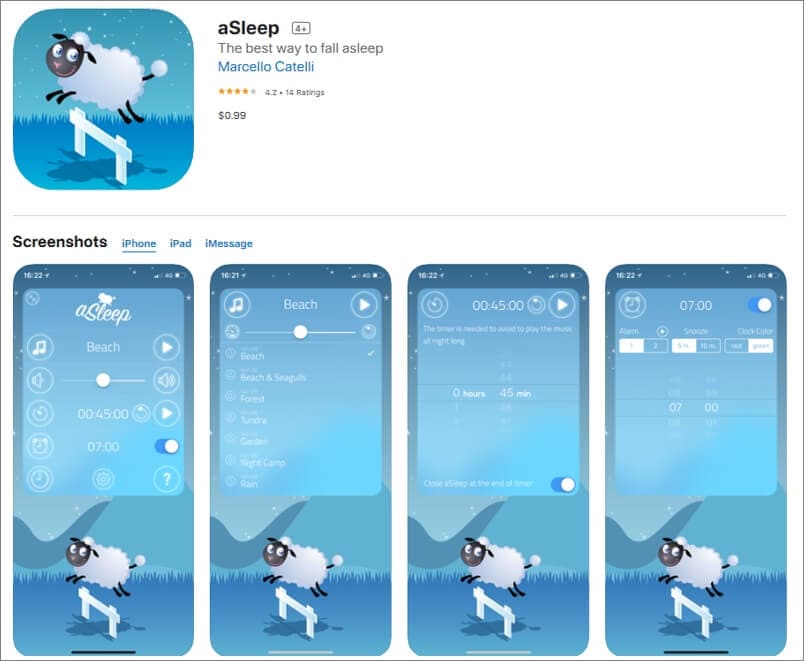
Available for iOS devices like iPhone and iPad, aSleep offers around 64 realistic stereo nature sounds to help you relax your mind and fall asleep almost instantaneously. With the built-in Timer feature, the music can be programmed to stop automatically after a certain amount of time to save your device’s battery.
Furthermore, the also works as an alarm clock that wakes you up with nature sounds at your predefined hour. The application is also good for kids as it can be used to play lullabies to help them get a tight sleep at night. And the program does all this without collecting any data from your iDevice.
What Is the Best Rain Sound App?
Among various rain sound applications available online, Rainy Mood is the most popular one that enjoys high star rating. When it comes to rain sounds, there is no match to it. It mainly includes 4 rain scenes namely Classic, Ocean, Countryside and Cafe. These genres can be customized according to different tastes and preferences.
What Are the Different Sounds of Nature?
The nature is made up of 5 basic elements which include Air, Water, Fire, Earth and Space. These components constitute various natural acoustics. Some examples are music of the rain, thunderstorm or a waterfall, wind blows, sounds of leaves and water streams, chirping of birds or grasshoppers, stridulation of insects like crickets, etc. All these sounds are beautifully incorporated in nature sound effects app.
In case that you want to add some nature sound to your video clip, you can try Wondershare Filmora, which features an audio library containing different nature sound effects as well. Download the free trial version of Filmora and have a try.
Besides adding sound to video, you can also add some elemental 2D visual effects to videos to make it cooler.
Benjamin Arango
Benjamin Arango is a writer and a lover of all things video.
Follow @Benjamin Arango
Benjamin Arango
Apr 26, 2024• Proven solutions
In today’s challenging times, when stress and anxiety has become inevitable for a majority of population, there is a constant search for solutions that will enable people to live a peaceful and pleasant life. Here, the technology comes to their rescue with nature sound effects app.
These applications provide multiple sounds related to the Nature. The users just need to download any of these programs, and select the desired tone according to their choice. Such mobile software also offer numerous relaxing audios that assist in achieving a deeper level of concentration during the meditation.
10 Best Nature Sounds Apps
1. YouTube
YouTube is also one of the important apps for nature sounds where one can get almost any kind of relaxing sounds related to the Nature.
Binaural beats videos, where two different frequencies of sounds are combined to create a new frequency tone are getting highly popular among people. These are believed to help in lowering stress, anxiety and depression and increase concentration, attention, and efficiency of an individual.
It can also be helpful in attaining mental peace and serenity. The app even contains peaceful meditation sounds that ease the ability to focus and remain relaxed during the whole process. It is highly a user-friendly app and is absolutely free to download on the Android Smartphones.
2. Atmosphere: Relaxing Sounds
Compatible with Android 5.0 or up , and iOS 10.0 or later
Atmosphere is one of the best apps for nature sounds. It is custom-made to help people relieve stress and relax their mind.
The key feature of this application is that it allows users to import their personalized audios and mix them with various default acoustics available within the app itself.
The soothing sounds available here are divided into 8 different environments such as Beach, City, Park, Countryside, Home, Underwater, Forest and Oriental. Users can also mix and match the sounds between environments to produce a tailored theme.
3. Rainy Mood
Compatible with both iOS and Android OS 5.0 and up
Rainy Mood provides the most genuine rain, thunderstorm, and lightening sounds available online.
It not only relieves tension and anxiety but also helps users suffering from insomnia.
This app even contains natural white noise facility that helps in getting rid of any unwanted sounds around us.
The various rain sounds are available here in different environments such as heavy rain, tropical rain, umbrella, rain on tent, rain on porch etc. The best thing about this app is that it can work in offline mode, i.e. without any Internet connection. This eventually results in less power consumption.
4. Animal Sounds
Compatible with Android 4.1 and up
Animal Sounds is a one-stop destination for all animal lovers. The program provides the most detailed information about animals, and also contains hundreds of animal sounds and photographs from all over the globe.
The quality of audios and pictures is remarkably high and clear. The sounds here are categorized under pet animals, mammals, farm animals, bird sounds, wild animals, reptiles and amphibians.
The application also provides the facility of customized ringtones and wallpapers to its users.
5. Sleep Sounds
Compatible with Android 4.4 or later
Sleep Sounds is one of the top trending apps nowadays owing to the increasing problems of insomnia and irregular sleep patterns among people. It is very helpful for an uninterrupted quality sleep.
The calm and soft music gradually tranquilizes the mind and the user eases into a good sleep. Its interface is user-friendly with beautiful images in the background.
The sounds here are categorized under rain, nature, relax, transport, noise, and white noise classes. This app also works without an Internet connection.
6.Calm
Compatible with Android and iOS 10.0 and watchOS 6.0 or later
Calm is best suitable for the people who practice meditation on a daily basis. It is available for free and can be used by the beginners as well as experienced users.
The main features include guided meditation programs, breathing sessions, adult bed-time stories, masterclasses by the international coaches, etc.
Here, one can choose a personalized guide for meditation from several topics such as relationships, self-esteem, breaking habits, forgiveness, mindfulness, etc. Users can even track their daily progress on the basis of time spent by them on the app.
7. Ambience – Nature sounds: sleep and meditation
Compatible with Android 4.2 and up .
Ambience is another one of the most popular apps for nature sounds providing peace and serenity to its users through relaxing and soothing tones.
It has a very simple and clean user interface which makes it a highly demanding program. The main features include the facility of mixing maximum 10 sounds at the same time. Along with various preset mixtures of audios that are available here, users can also save their customized combinations for future use.
8. Naturespace: Sleep Relax Focus
Compatible with Android 4.0 or up and iOS 9.0 or later
Naturespace is a unique app containing real time 3D recordings of natural places such as forests, deserts, mountains, etc. The equipment used in the program for recording the sounds are of extremely high quality, and as a result, the listening experience is out of this world.
The clarity of the sound surpasses almost every other application available in this genre of nature sound apps. It also provides the facility of sleep and wake timer to its users. The simple user interface along with earbud optimisation facility makes the software highly efficient and popular among people.
9. SimplyNoise – Free White Noise
Compatible with iOS 8.0 or later and Android
Simply Noise is one of the most basic apps for nature sounds as it provides only one acoustic without any background noises. As there are no such complexities involved, it can also be used by people who are not tech-savvy.
The categorization of sounds is done here as white noise, pink noise, and brown noise. Users can select any of these according to their requirement.
This app is best suitable for people who are unable to concentrate on a particular thing, or suffer from sleeping disorder. Sleep-timer option is also available here.
10. aSleep
Available for iOS devices like iPhone and iPad, aSleep offers around 64 realistic stereo nature sounds to help you relax your mind and fall asleep almost instantaneously. With the built-in Timer feature, the music can be programmed to stop automatically after a certain amount of time to save your device’s battery.
Furthermore, the also works as an alarm clock that wakes you up with nature sounds at your predefined hour. The application is also good for kids as it can be used to play lullabies to help them get a tight sleep at night. And the program does all this without collecting any data from your iDevice.
What Is the Best Rain Sound App?
Among various rain sound applications available online, Rainy Mood is the most popular one that enjoys high star rating. When it comes to rain sounds, there is no match to it. It mainly includes 4 rain scenes namely Classic, Ocean, Countryside and Cafe. These genres can be customized according to different tastes and preferences.
What Are the Different Sounds of Nature?
The nature is made up of 5 basic elements which include Air, Water, Fire, Earth and Space. These components constitute various natural acoustics. Some examples are music of the rain, thunderstorm or a waterfall, wind blows, sounds of leaves and water streams, chirping of birds or grasshoppers, stridulation of insects like crickets, etc. All these sounds are beautifully incorporated in nature sound effects app.
In case that you want to add some nature sound to your video clip, you can try Wondershare Filmora, which features an audio library containing different nature sound effects as well. Download the free trial version of Filmora and have a try.
Besides adding sound to video, you can also add some elemental 2D visual effects to videos to make it cooler.
Benjamin Arango
Benjamin Arango is a writer and a lover of all things video.
Follow @Benjamin Arango
Podcast Pioneering: Utilizing the Latest Features of Audacity
Free audio recording & editing software audacity for podcasts is available for Windows, Linux, & macOS. Even though it’s not expressly built for podcasts, it is a popular option for recording podcasts. If you don’t mind a steep learning curve, you can easily record, edit, & export a high-quality podcast with this software.
How to Record a Podcast using Audacity
Despite its complexity, audacity for podcasts doesn’t need a detailed understanding of the software’s internals to begin using it. As a beginner, we explain all of the initial settings and basic editing choices you’ll need to know and how to output in a format that can be used for podcasting.
Here’s how to get started recording your podcast using Audacity for Podcasts:
- By selecting the box to the left of your microphone, you may choose your audio host. Select MME for Windows and Core Audio for Mac OS X.

- Select the audio interface or microphone from the menu to the right of the microphone icon. In order to record your Audacity for Podcasts, Audacity utilizes the device that you pick from this menu.

- Select your headphones by checking the box to the right of a speaker symbol. To playback, the audio files, Audacity for Podcasts utilizes the device you specify from this option.

What you need to know about Audacity’s Input Tester
Test your input before you begin recording your podcast. This helps you to make totally clear that everything is set up properly and that your podcast is recorded.
- The monitor meter may be found on the menu bar at the very top, at the very center. “Click to begin monitoring” is what it says.

- Speak normally into the microphone you’ve placed on your computer.

- Ensure that the Microphone Volume meter doesn’t go over -12dB by adjusting the volume controls.

Audacity for Podcasts Recording Tutorial
Audacity recording is simple after you’ve set up all of the settings you need. Make sure to pick just one (Mono) Recording Channel while you’re recording with a single microphone.
Each microphone is assigned a separate audio channel if you have numerous microphones connected to an audio interface or mixer. There must be a separate microphone and channel for each participant on your podcast so that you can edit them separately and make sure they all sound well together.
Each of these mono channels will be blended into stereo when you export your podcast later.
There is nothing complicated about the actual recording procedure.
- To begin recording your podcast, press the red Record button.

- When you’ve finished recording your podcast, press the black Stop button.

- Once you’ve finished recording, use Ctrl+S to save the project. If Audacity crashes or you shut it by mistake, you won’t be able to recover your edited audio file.
Using Audacity to Edit Your Podcast
Audacity for Podcasts not only allows you to record your podcast, but it also allows you to edit it afterward. It is possible to send your raw podcast to the internet as soon as you complete the recording, but editing may add a degree of polish that makes it more pleasurable for the listener.
You may use Audacity to re-arrange your podcast’s flow by cutting and relocating portions, reducing clipping, and even deleting background noise if one of your mics was too near or someone was talking too loudly. Audacity can even alter the levels of individual recordings.
Some of these editing chores are more difficult than others, but if you just have high-quality equipment & have your settings ideal, the podcast may not need a lot of effort. Check over a few different portions of your podcast to get a sense of how much work has to be done on it before publishing.
In Audacity, you may add music, clips, & sound effects to your podcast intro and outro.
In Audacity, add music, clips, & sound effects for the podcast intro and outro
In Audacity, you may add & move sound clips, such as intro music.
- Click File > Import > Audio or press Ctrl+Shift+I to import your podcast audio into Audacity.

- Make your choice of music for the opening, outro, or anything else you’d want to include.

- It is possible to go back and forth between the past and future by clicking on the top toolbar’s time shift function.

- When your opening music stops, click and drag the main podcast audio track so that it begins when the music ends.

- Add an outro or other sound effects & music that play throughout your podcast by following these similar instructions. There should be a separate channel for each sound file so that they may be easily moved across devices.
- Using the time shift tool, you may relocate an outro to the conclusion of your podcast if necessary. If you wish to add sound effects or music to your podcast, use the time shift tool to move them around.
- To test whether your audio tracks are positioned appropriately, just click the green Play button at any moment. The cursor icon in the toolbar may be used to start listening to a podcast at a different place in the track.
In Audacity, here’s how to export your podcast
After you’ve finished editing your podcast, listen to it one more time to ensure you’re satisfied with the outcome, then save it to ensure you don’t lose your work if anything goes wrong during the export process. When you export your podcast, you’re creating an audio file that you can publish to your podcast host and share with others.
Here’s how to export the Audacity podcast:
- Select File > Export > Export as… from the File menu.
- After giving your podcast a name, click Save.
- If you wish to add metadata, you may do so now, or just hit OK to begin the exporting process.
- This procedure may take a long time if the podcast is lengthy or your machine is sluggish. During this procedure, keep your computer turned on & prevent it from sleeping and hibernating.
- You’re ready to publish your podcast to the podcast host once it’s finished exporting.
Conclusions
For recording, editing, & mixing your own podcast, an Audacity is a great option. And, like many podcasters, you could discover it meets your long-term requirements. With regard to voice effects, we talk about how people may use Filmora to modify and improve their voices. Filmora has the ability to re-speak video and audio, as well as previously recorded voiceovers. Video, audio, and voiceover files may all benefit from the Timeline’s Pitch feature. Change the tonality of a video or recording to give it a unique sound. It’s easy to replace the voices in the videos using Filmora. A video or narrative should accompany your viral in order for it to be effective. Changing Pitch allows you to alter the pitch of your voice. You may modify the pace of the video to alter the voice (Optional). Make a backup copy of the altered media.
For Win 7 or later (64-bit)
For macOS 10.12 or later
- Select the audio interface or microphone from the menu to the right of the microphone icon. In order to record your Audacity for Podcasts, Audacity utilizes the device that you pick from this menu.
- Select your headphones by checking the box to the right of a speaker symbol. To playback, the audio files, Audacity for Podcasts utilizes the device you specify from this option.
What you need to know about Audacity’s Input Tester
Test your input before you begin recording your podcast. This helps you to make totally clear that everything is set up properly and that your podcast is recorded.
- The monitor meter may be found on the menu bar at the very top, at the very center. “Click to begin monitoring” is what it says.
- Speak normally into the microphone you’ve placed on your computer.
- Ensure that the Microphone Volume meter doesn’t go over -12dB by adjusting the volume controls.
Audacity for Podcasts Recording Tutorial
Audacity recording is simple after you’ve set up all of the settings you need. Make sure to pick just one (Mono) Recording Channel while you’re recording with a single microphone.
Each microphone is assigned a separate audio channel if you have numerous microphones connected to an audio interface or mixer. There must be a separate microphone and channel for each participant on your podcast so that you can edit them separately and make sure they all sound well together.
Each of these mono channels will be blended into stereo when you export your podcast later.
There is nothing complicated about the actual recording procedure.
- To begin recording your podcast, press the red Record button.
- When you’ve finished recording your podcast, press the black Stop button.
- Once you’ve finished recording, use Ctrl+S to save the project. If Audacity crashes or you shut it by mistake, you won’t be able to recover your edited audio file.
Using Audacity to Edit Your Podcast
Audacity for Podcasts not only allows you to record your podcast, but it also allows you to edit it afterward. It is possible to send your raw podcast to the internet as soon as you complete the recording, but editing may add a degree of polish that makes it more pleasurable for the listener.
You may use Audacity to re-arrange your podcast’s flow by cutting and relocating portions, reducing clipping, and even deleting background noise if one of your mics was too near or someone was talking too loudly. Audacity can even alter the levels of individual recordings.
Some of these editing chores are more difficult than others, but if you just have high-quality equipment & have your settings ideal, the podcast may not need a lot of effort. Check over a few different portions of your podcast to get a sense of how much work has to be done on it before publishing.
In Audacity, you may add music, clips, & sound effects to your podcast intro and outro.
In Audacity, add music, clips, & sound effects for the podcast intro and outro
In Audacity, you may add & move sound clips, such as intro music.
- Click File > Import > Audio or press Ctrl+Shift+I to import your podcast audio into Audacity.
- Make your choice of music for the opening, outro, or anything else you’d want to include.
- It is possible to go back and forth between the past and future by clicking on the top toolbar’s time shift function.
- When your opening music stops, click and drag the main podcast audio track so that it begins when the music ends.
- Add an outro or other sound effects & music that play throughout your podcast by following these similar instructions. There should be a separate channel for each sound file so that they may be easily moved across devices.
- Using the time shift tool, you may relocate an outro to the conclusion of your podcast if necessary. If you wish to add sound effects or music to your podcast, use the time shift tool to move them around.
- To test whether your audio tracks are positioned appropriately, just click the green Play button at any moment. The cursor icon in the toolbar may be used to start listening to a podcast at a different place in the track.
In Audacity, here’s how to export your podcast
After you’ve finished editing your podcast, listen to it one more time to ensure you’re satisfied with the outcome, then save it to ensure you don’t lose your work if anything goes wrong during the export process. When you export your podcast, you’re creating an audio file that you can publish to your podcast host and share with others.
Here’s how to export the Audacity podcast:
- Select File > Export > Export as… from the File menu.
- After giving your podcast a name, click Save.
- If you wish to add metadata, you may do so now, or just hit OK to begin the exporting process.
- This procedure may take a long time if the podcast is lengthy or your machine is sluggish. During this procedure, keep your computer turned on & prevent it from sleeping and hibernating.
- You’re ready to publish your podcast to the podcast host once it’s finished exporting.
Conclusions
For recording, editing, & mixing your own podcast, an Audacity is a great option. And, like many podcasters, you could discover it meets your long-term requirements. With regard to voice effects, we talk about how people may use Filmora to modify and improve their voices. Filmora has the ability to re-speak video and audio, as well as previously recorded voiceovers. Video, audio, and voiceover files may all benefit from the Timeline’s Pitch feature. Change the tonality of a video or recording to give it a unique sound. It’s easy to replace the voices in the videos using Filmora. A video or narrative should accompany your viral in order for it to be effective. Changing Pitch allows you to alter the pitch of your voice. You may modify the pace of the video to alter the voice (Optional). Make a backup copy of the altered media.
For Win 7 or later (64-bit)
For macOS 10.12 or later
Also read:
- In 2024, The Novices Blueprint for Efficient Audio Track Mixing in Adobe Premiere Pro
- New Full Disclosure on Nero AudioManipulation Kit Features
- Updated 2024 Approved Star Power Adjustments An Overview of Cutting-Edge Sound Enhancement Devices & Tutorials
- Updated 2024 Approved Exploring the Best Dawn and Rise of Browser-Based DAWs Top 10 Selection
- Tracking Down Immersive Echoes Resembling a Paintbrushs Path
- 2024 Approved 10 Best MP3 Recorder for Windows and Mac
- New Audiophiles Playbook Removing Intrusive Online Audio Distractions
- Updated Chromecast to the Future Exploring Popular Audio Recorders for 2024
- Updated Chrome-Compatible Audio Capture The Most Advanced Microphones Ranked for 2024
- Updated 2024 Approved Expert Tips on Selecting and Merging Songs with Your iMovie Content
- In 2024, Top 10 Windows/Mac/Linux-Friendly Audio Editors That Match Audacitys Capabilities
- Updated 2024 Approved The Essential Tutorial for Archiving Your Google Voice Dialogue with Both Mobile & Computer Devices
- Updated 2024 Approved Reversing the Flow A Comprehensive List of Advanced Audio Reversal Tools
- Audiophiles Choice Identifying the Top 5 Android Audio Editors to Invest In
- Updated Discover the Leading Online Havens for Free, Premium HD Video Backdrops
- Top 5 Effective Complimentary Audio Level Optimizers for 2024
- Updated Inspirational Audio Bridges to Current Affairs Volume 15
- Crew Collaboration The Vital Roles and Responsibilities on a Film Production Team for 2024
- New Best Audio Capture Tools for Strummers, Ranked A 2024 Guide
- 2024 Approved Seamless Blending of Audio with Visuals Using QuickTime Tools and Techniques
- New 2024 Approved HushHour Pro Advanced Application Crafted to Mute the Chaos, Now Available on Android & iOS As
- New 2024 Approved Prime 10 Selection Accessible, No-Cost Acoustic Adjustment Services
- Illuminating Soundscapes with Imagery Techniques for Photographic Audio Amalgamation 2023 Art & Technology Insights for 2024
- New Embark on a Journey with These Top 9 State-of-the-Art AI-Enabled Voice Assistants for a Better Day
- In 2024, Explore the Leading Audio Editors A Windows & Mac Comparison Guide
- New The Editors Edge Techniques for Removing Background Noise and Selective Muting in Video Post-Production
- New The Windows Waveform Guide A Step-by-Step on Incorporating Echo Effects Into Your Music Productions for 2024
- Updated 2024 Approved Perfect Harmony Unveiling the Best 5 Mixers for Mac Enthusiasts
- New 2024 Approved The Invisible Singer Technique Extracting Lyrics From the Symphony of Soundtracks
- New In 2024, Compatibility Made Easy The Best 5 Audio Mixers for Your Mac Device
- How to Cast Realme GT 5 Screen to PC Using WiFi | Dr.fone
- Unlock Apple ID without Phone Number On Apple iPhone 12 Pro Max
- How to Factory Reset Honor X7b If I Forgot Security Code or Password? | Dr.fone
- In 2024, How to Detect and Stop mSpy from Spying on Your Itel A60 | Dr.fone
- iPhone 14 Backup Password Never Set But Still Asking? Heres the Fix | Dr.fone
- In 2024, How to Reset Gmail Password on Xiaomi Redmi A2 Devices
- 2024 Approved The Secret to a Professional-Looking Facebook Video Cover Size Matters
- In 2024, How to Screen Share on Apple iPhone 12 Pro? | Dr.fone
- In 2024, How to Transfer Contacts from Xiaomi Redmi Note 12 4G to Other Android Devices Devices? | Dr.fone
- 3 Easy Solutions to Hard Reset Xiaomi Civi 3 | Dr.fone
- Solved Warning Camera Failed on OnePlus Nord CE 3 Lite 5G | Dr.fone
- Title: Step-by-Step Techniques for Audio Retrieval in Multimedia Content (Windows, Mac, iOS/Android)
- Author: David
- Created at : 2024-05-20 05:45:12
- Updated at : 2024-05-21 05:45:12
- Link: https://sound-tweaking.techidaily.com/step-by-step-techniques-for-audio-retrieval-in-multimedia-content-windows-mac-iosandroid/
- License: This work is licensed under CC BY-NC-SA 4.0.
