
:max_bytes(150000):strip_icc():format(webp)/how-to-fix-it-when-pngs-wont-open-in-windows-11-41107f6a55db4318b6c2b64437de5b75.jpg)
New The Ultimate Voice Transformation Handbook Ranking the Leading 11 Speech Alteration Software for Mobile Platforms, No Cost
The Ultimate Voice Transformation Handbook: Ranking the Leading 11 Speech Alteration Software for Mobile Platforms, No Cost
Best Voice Changer Apps for iPhone and Android

Benjamin Arango
Mar 27, 2024• Proven solutions
Have you ever wondered what your voice would sound like if you were a cartoon character, a robot, or an older version of yourself? Changing how your voice sounds has never been easier, regardless of the Smartphone model you have, since voice changer apps can be used on both iPhone and Android devices.
Even though there is nothing wrong with modulating your voice to have fun with your friends, using voice changer apps to pull malicious pranks or bully strangers online is far from acceptable. Read on if you would like to find out more about the best voice changer apps for iPhone and Android devices and discover the one you enjoy using the most.
Best Voice Changer Apps for iPhone and Android
Creating a new ringtone, making a voice recording, or having fun with your friends are only a few reasons why so many people choose to try out voice changer apps. The vast majority of these apps feature well-equipped audio effects libraries that enable users to have fun with their friends and hear how they would sound if they were drunk or after inhaling helium. So, let’s take a look at some of the best voice changer apps on the market.


Changing video voice on Windows and Mac with Wondershare Filmora
Do you want to change the voice in video on Windows and Mac and don’t know which software can meet this requirement? Try Filmra video editor , which provides several ways to change voice over, such as changing the voice speed or changing the pitch. Download the trial version below and find out more possibility in video creation with Filmora.
1. Celebrity Voice Changer – Face
Price: Free, but offers in-app purchases
Compatibility: iOS 9.0 or later
User Rating: 4.0
In case you would like to sound like your favorite movie star of TV host, then Celebrity Voice Changer is one of the best choices you can make. Besides the standard set of options, the app also lets you request new voices since its machine learning technology can mimic virtually anyone’s voice. However, Celebrity Voice Changer is currently only available in English and it cannot modulate speech in other languages. In addition, you must make an in-app purchase in order to gain access to all of the app’s features or unlock the unlimited usage of the app.
Pros
- Automatic voice modulation
- Huge selection of voice filters
- The app generates video files that are better adjusted to the audience on social media than audio files
- Excellent impressions of celebrities
Cons
- Unreasonably expensive
- The app’s Deep Learning technology still has a lot of room for improvement
2. Snapchat
Price: Free, but offers in-app purchases
Compatibility: iOS 10.0 or later, Android 4.4 or up
User Rating: 3.8
With more than 203 million daily users, Snapchat is one of the largest messaging platforms on the market. Previously, we’ve shared how to change gender on Snapchat , beside that, the app lets its users capture short moments or the so-called Snaps and share them with friends. In addition to hundreds of video filters , Snapchat also features a broad spectrum of voice changing effects that make Snaps more entertaining. Even so, the audio recording options Snapchat offers are far from ideal, because the app doesn’t allow you to edit the files you create with it. Using Snapchat will drain your battery quickly, which is why you must pay attention to how frequently you use this app.
Pros
- The easy voice modulation process
- Excellent messaging options
- Grants you access to a large community of likeminded people
- Lenses and filters are updated on a daily basis
Cons
- Editing voice changes after you create a Snap is not possible
- Snapchat is not primarily a voice changer app
Check the detailed information about How to Change Voice on Snapchat with 2 Easy Methods >>
3. Voice Changer
Price: Free
Compatibility: Android 4.1 and up
User Rating: 4.3

Changing your voice with this app won’t take more than a few moments of your time. You just have to launch the app and hit the microphone button to record a message or a joke you would like to modulate. Once you’re happy with the audio recording you made, you can proceed to choose from more than twenty voice effects that will make you sound like a dwarf, a robot, or an alien. The app’s file-sharing capabilities enable you to post your audio recordings to any social media platform of your choosing or store your files and use them as many times as you want.
Pros
- Entertaining and easy to use
- The simple three-step voice modulation process
- Good selection of voice filters
- Excellent file sharing options
Cons
- The app displays ads
- No audio editing tools
4. Voicy: Celebrity Voice Changer
**Price:**Free, but offers in-app purchases
Compatibility: iOS 10 or later
User Rating: 4.3

Impersonating your favorite celebrity can be a fun way to prank your friends on social media. Voicy features a broad selection of celebrity voice impersonations you can use to make you sound like a famous actress or TV personality. The app utilizes a machine learning technology that can generate more than forty avatars and allows the users to experiment with different voice effects. The free version of the app offers only limited capabilities, so if you want to gain access to all of the Voicy’s features, you must choose a weekly, monthly or an annual subscription.
Pros
- Equipped with a powerful machine learning technology
- Offers a vast selection of voice avatars
- The quick voice modification process
- A great choice if you want to make a parody
Cons
- More expensive than the competition
- Support only the English language
5. Video Voice Changer – Fun Editor
Price: Free, but offers in-app purchases
Compatibility: iOS 8.0 or later
User Rating: 4.4

Changing the voices in the videos you record with your iPhones or iPads is a straightforward process that takes a minimum amount of effort. You can either use this iOS-based app to capture videos you’re going to dub or import them from the albums in which they are stored. The Video Voice Changer app is a great option if you want to dub videos directly from your phone because it enables you to change the voices in your videos and make them sound like mice, bears or ghosts. There are over thirty voice effects to choose from, so you can easily pick the one that best fits the video you’re editing.
Pros
- Equipped with video recording tools
- Excellent dubbing features
- A rich selection of voice effects
- Allows users to share their creations on Facebook, Instagram, and other social media platforms
Cons
- You must make an in-app purchase to unlock all of the app’s features
- No audio mixing options
6. Video Voice Changer FX
**Price:**Free, but offers in-app purchases
Compatibility: Android 4.1 and up
User Rating: 4.1

This is a simple app, anyone can use to change the voices in a video. Simply upload a video file from an SD card in your phone and choose an audio effect you want to apply. The app’s collection of funny voices includes options like echo, squirrel, space ship or chipmunk. As soon as you select the voice effect you want to add to a video, the app will start generating a new video that will be saved to your phone. Sharing the videos you edit with Video Voice Changer FX to social media directly from the app is not an option.
Pros
- Fun and easy to use
- Great price to performance ratio
- Changing a voice requires just a few taps
- Allows users to switch between effects while the video is playing
Cons
- No audio or video recording capability
- Doesn’t support social media sharing
7. Squeak Voice Changer
**Price:**Free, but offers in-app purchases
Compatibility: Android 4.3 and up
User Rating: 3.9

Every joke you want to share with your online friends is going to be a little funnier if you record it with Squeak Voice Changer. You just have to tap on the Record button and choose one of the available effects. Each voice changing effect this app offers is represented by a character so you should select Jamie the Jolly if you want to make your voice sound like you’re at a party or Bruce the Sentimental Bot if you want your voice to sound artificial. All the recordings you make with Squeak Voice Changer can be easily shared on social media.
Pros
- Equipped with audio recording options
- Cute and memorable characters that represent voice effects
- Inexpensive and fun to use
- Functional app design
Cons
- Poor selection of voice effects
- The AI only recognizes the English language
8. Voice Changer with Effects
**Price:**Free
Compatibility: Android 4.1 and up
User Rating: 4.5
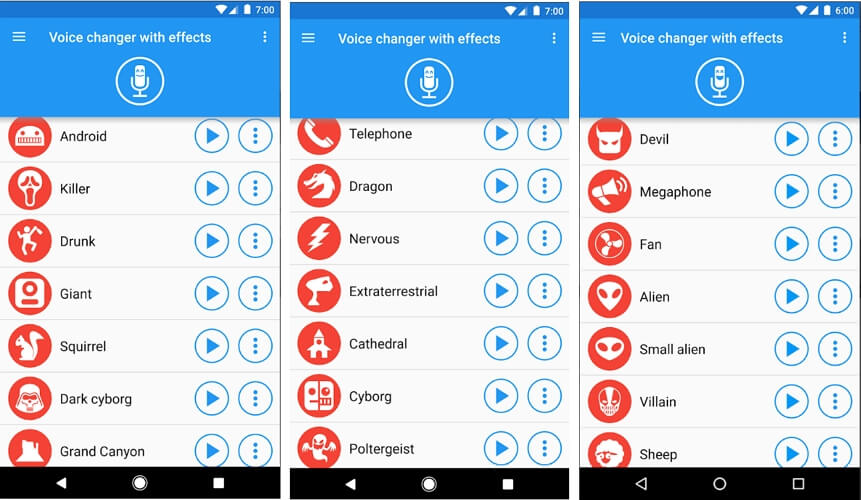
This Android-based app is designed to make fun and easy since voice modulation features enable you to play voice recording backward or change your voice to sound robotic or even alien. Besides recording your voice, the app also lets you modulate pre-recorded sounds and save them to your phone or use them as ringtones or notification sounds. Furthermore, the app lets you add sounds to images and share them to Facebook. The Voice Changer with Effects enables you to share all audio files you process with it to any of the most popular social media platforms.
Pros
- The app has over 50,000,000 installs
- Equipped with a text to voice feature
- Setting a new ringtone with this app is easy
- Supports editing of pre-recorded audio files
Cons
- Contains ads
- No audio or video editing options
9. Voice Changer
**Price:**Free
Compatibility: Android 4.1 and up
User Rating: 4.4

If you are looking for an Android app that lets you modulate your voice quickly and effortlessly, then Voice Changer may be one of the best options you can find on the market. You can record your voice by simply tapping on the microphone and speaking into your phone’s speaker and then apply one of the audio effects this app offers. Optionally, you can import an audio file you already recorded into the app and then apply Martian, Foreigner, Giant or Child effects to your voice recording. The best part is that you can apply each effect to the audio files you’re editing as many times as you want.
Pros
- Loads of funny effects
- Simple audio recording setup
- Intuitive and modernly designed interface
- Enables users to share audio files via Bluetooth or social media platforms
Cons
- No video editing tools
- The quality of output audio files can vary
10. Voice FX
**Price:**Free, but offers in-app purchases
Compatibility: Android 4.0.3 and up
User Rating: 3.8

Modulating voices in all types of audio files is a straightforward and fun process that can be completed in just a few taps. During the audio recording session, you can apply all voice effects to the sound you are recording and stream it live to your web browsers or media players you’re using. Voice FX changes your voice in real time, which enables you to preview your results before deciding if you want to save them. All files you export from this app will be saved in the MP3 format so you can use them as ringtones on your Android device.
Pros
- Allows users to modulate pre-recorded audio files
- Voice effects are applied in real time
- Offers live streaming features
- Exports files in the MP3 format
Cons
- Prone to glitches
- A limited selection of voice effects
11. Voice Changer Plus
**Price:**Free, but offers in-app purchases
Compatibility: iOS 8.0 or later
User Rating: 4.8
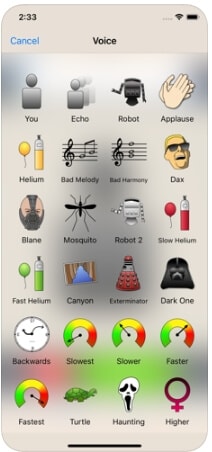
iPhone and iPad owners in need of a voice changer app that grants them complete creative freedom over the modulation of the voices they record, should consider using the Voice Changer Plus. The app features more than fifty voice effects and it provides support for voiceover recordings. Moreover, you can edit all your audio files even after you saved them, enabling you to find new ways to improve your recordings over time. Voice Changer Plus is also equipped with trim controls, so you can remove all parts of your audio files you don’t want to share with your friends on social media.
Pros
- Offers more voice effects than most of its competitors
- Provides voiceover recording options
- Users can trim their audio files
- All audio recordings can be edited after the voice modulation
Cons
- In-app purchase is required in order to unlock all of the app’s features
- Modulating audio in video files is not an option
Below is a quick comparison table among these voice changer apps, hope it will be helpful.
| App | Supported OS | User Rating | Voice Templates |
|---|---|---|---|
| Celebrity Voice Changer - Face | iOS 9.0 or later | 4.0 | Yes |
| Snapchat | iOS 10.0 or later, Android 4.4 or up | 3.8 | No |
| Voice Changer by e3games | Android 4.1 and up | 4.3 | Yes |
| Voicy: Celebrity Voice Changer | iOS 10 or later | 4.3 | Yes |
| Video Voice Changer – Fun Editor | iOS 8.0 or later | 4.4 | Yes |
| Video Voice Changer FX | Android 4.1 and up | 4.1 | Yes |
| Squeak Voice Changer | Android 4.3 and up | 3.9 | Yes |
| Voice Changer with Effects | Android 4.1 and up | 4.5 | Yes |
| Voice Changer | Android 4.1 and up | 4.4 | Yes |
| Voice FX | Android 4.0.3 and up | 3.8 | Yes |
| Voice Changer Plus | iOS 8.0 or later | 4.8 | Yes |
Conclusion
Everybody enjoys a good joke, and the apps we featured in this article enable you to have a lot of fun while experimenting with different voice modulation options. All of the voice effects these apps offer can change a voice automatically, but if you would like to alter the voices in your videos you must choose an app that supports this option. Which of the best voice changer apps for iPhone and Android devices are you going to choose? Leave a comment, and share your opinions with us.
Benjamin Arango
Benjamin Arango is a writer and a lover of all things video.
Follow @Benjamin Arango
Benjamin Arango
Mar 27, 2024• Proven solutions
Have you ever wondered what your voice would sound like if you were a cartoon character, a robot, or an older version of yourself? Changing how your voice sounds has never been easier, regardless of the Smartphone model you have, since voice changer apps can be used on both iPhone and Android devices.
Even though there is nothing wrong with modulating your voice to have fun with your friends, using voice changer apps to pull malicious pranks or bully strangers online is far from acceptable. Read on if you would like to find out more about the best voice changer apps for iPhone and Android devices and discover the one you enjoy using the most.
Best Voice Changer Apps for iPhone and Android
Creating a new ringtone, making a voice recording, or having fun with your friends are only a few reasons why so many people choose to try out voice changer apps. The vast majority of these apps feature well-equipped audio effects libraries that enable users to have fun with their friends and hear how they would sound if they were drunk or after inhaling helium. So, let’s take a look at some of the best voice changer apps on the market.
Changing video voice on Windows and Mac with Wondershare Filmora
Do you want to change the voice in video on Windows and Mac and don’t know which software can meet this requirement? Try Filmra video editor , which provides several ways to change voice over, such as changing the voice speed or changing the pitch. Download the trial version below and find out more possibility in video creation with Filmora.
1. Celebrity Voice Changer – Face
Price: Free, but offers in-app purchases
Compatibility: iOS 9.0 or later
User Rating: 4.0
In case you would like to sound like your favorite movie star of TV host, then Celebrity Voice Changer is one of the best choices you can make. Besides the standard set of options, the app also lets you request new voices since its machine learning technology can mimic virtually anyone’s voice. However, Celebrity Voice Changer is currently only available in English and it cannot modulate speech in other languages. In addition, you must make an in-app purchase in order to gain access to all of the app’s features or unlock the unlimited usage of the app.
Pros
- Automatic voice modulation
- Huge selection of voice filters
- The app generates video files that are better adjusted to the audience on social media than audio files
- Excellent impressions of celebrities
Cons
- Unreasonably expensive
- The app’s Deep Learning technology still has a lot of room for improvement
2. Snapchat
Price: Free, but offers in-app purchases
Compatibility: iOS 10.0 or later, Android 4.4 or up
User Rating: 3.8
With more than 203 million daily users, Snapchat is one of the largest messaging platforms on the market. Previously, we’ve shared how to change gender on Snapchat , beside that, the app lets its users capture short moments or the so-called Snaps and share them with friends. In addition to hundreds of video filters , Snapchat also features a broad spectrum of voice changing effects that make Snaps more entertaining. Even so, the audio recording options Snapchat offers are far from ideal, because the app doesn’t allow you to edit the files you create with it. Using Snapchat will drain your battery quickly, which is why you must pay attention to how frequently you use this app.
Pros
- The easy voice modulation process
- Excellent messaging options
- Grants you access to a large community of likeminded people
- Lenses and filters are updated on a daily basis
Cons
- Editing voice changes after you create a Snap is not possible
- Snapchat is not primarily a voice changer app
Check the detailed information about How to Change Voice on Snapchat with 2 Easy Methods >>
3. Voice Changer
Price: Free
Compatibility: Android 4.1 and up
User Rating: 4.3
Changing your voice with this app won’t take more than a few moments of your time. You just have to launch the app and hit the microphone button to record a message or a joke you would like to modulate. Once you’re happy with the audio recording you made, you can proceed to choose from more than twenty voice effects that will make you sound like a dwarf, a robot, or an alien. The app’s file-sharing capabilities enable you to post your audio recordings to any social media platform of your choosing or store your files and use them as many times as you want.
Pros
- Entertaining and easy to use
- The simple three-step voice modulation process
- Good selection of voice filters
- Excellent file sharing options
Cons
- The app displays ads
- No audio editing tools
4. Voicy: Celebrity Voice Changer
**Price:**Free, but offers in-app purchases
Compatibility: iOS 10 or later
User Rating: 4.3
Impersonating your favorite celebrity can be a fun way to prank your friends on social media. Voicy features a broad selection of celebrity voice impersonations you can use to make you sound like a famous actress or TV personality. The app utilizes a machine learning technology that can generate more than forty avatars and allows the users to experiment with different voice effects. The free version of the app offers only limited capabilities, so if you want to gain access to all of the Voicy’s features, you must choose a weekly, monthly or an annual subscription.
Pros
- Equipped with a powerful machine learning technology
- Offers a vast selection of voice avatars
- The quick voice modification process
- A great choice if you want to make a parody
Cons
- More expensive than the competition
- Support only the English language
5. Video Voice Changer – Fun Editor
Price: Free, but offers in-app purchases
Compatibility: iOS 8.0 or later
User Rating: 4.4
Changing the voices in the videos you record with your iPhones or iPads is a straightforward process that takes a minimum amount of effort. You can either use this iOS-based app to capture videos you’re going to dub or import them from the albums in which they are stored. The Video Voice Changer app is a great option if you want to dub videos directly from your phone because it enables you to change the voices in your videos and make them sound like mice, bears or ghosts. There are over thirty voice effects to choose from, so you can easily pick the one that best fits the video you’re editing.
Pros
- Equipped with video recording tools
- Excellent dubbing features
- A rich selection of voice effects
- Allows users to share their creations on Facebook, Instagram, and other social media platforms
Cons
- You must make an in-app purchase to unlock all of the app’s features
- No audio mixing options
6. Video Voice Changer FX
**Price:**Free, but offers in-app purchases
Compatibility: Android 4.1 and up
User Rating: 4.1
This is a simple app, anyone can use to change the voices in a video. Simply upload a video file from an SD card in your phone and choose an audio effect you want to apply. The app’s collection of funny voices includes options like echo, squirrel, space ship or chipmunk. As soon as you select the voice effect you want to add to a video, the app will start generating a new video that will be saved to your phone. Sharing the videos you edit with Video Voice Changer FX to social media directly from the app is not an option.
Pros
- Fun and easy to use
- Great price to performance ratio
- Changing a voice requires just a few taps
- Allows users to switch between effects while the video is playing
Cons
- No audio or video recording capability
- Doesn’t support social media sharing
7. Squeak Voice Changer
**Price:**Free, but offers in-app purchases
Compatibility: Android 4.3 and up
User Rating: 3.9
Every joke you want to share with your online friends is going to be a little funnier if you record it with Squeak Voice Changer. You just have to tap on the Record button and choose one of the available effects. Each voice changing effect this app offers is represented by a character so you should select Jamie the Jolly if you want to make your voice sound like you’re at a party or Bruce the Sentimental Bot if you want your voice to sound artificial. All the recordings you make with Squeak Voice Changer can be easily shared on social media.
Pros
- Equipped with audio recording options
- Cute and memorable characters that represent voice effects
- Inexpensive and fun to use
- Functional app design
Cons
- Poor selection of voice effects
- The AI only recognizes the English language
8. Voice Changer with Effects
**Price:**Free
Compatibility: Android 4.1 and up
User Rating: 4.5
This Android-based app is designed to make fun and easy since voice modulation features enable you to play voice recording backward or change your voice to sound robotic or even alien. Besides recording your voice, the app also lets you modulate pre-recorded sounds and save them to your phone or use them as ringtones or notification sounds. Furthermore, the app lets you add sounds to images and share them to Facebook. The Voice Changer with Effects enables you to share all audio files you process with it to any of the most popular social media platforms.
Pros
- The app has over 50,000,000 installs
- Equipped with a text to voice feature
- Setting a new ringtone with this app is easy
- Supports editing of pre-recorded audio files
Cons
- Contains ads
- No audio or video editing options
9. Voice Changer
**Price:**Free
Compatibility: Android 4.1 and up
User Rating: 4.4
If you are looking for an Android app that lets you modulate your voice quickly and effortlessly, then Voice Changer may be one of the best options you can find on the market. You can record your voice by simply tapping on the microphone and speaking into your phone’s speaker and then apply one of the audio effects this app offers. Optionally, you can import an audio file you already recorded into the app and then apply Martian, Foreigner, Giant or Child effects to your voice recording. The best part is that you can apply each effect to the audio files you’re editing as many times as you want.
Pros
- Loads of funny effects
- Simple audio recording setup
- Intuitive and modernly designed interface
- Enables users to share audio files via Bluetooth or social media platforms
Cons
- No video editing tools
- The quality of output audio files can vary
10. Voice FX
**Price:**Free, but offers in-app purchases
Compatibility: Android 4.0.3 and up
User Rating: 3.8
Modulating voices in all types of audio files is a straightforward and fun process that can be completed in just a few taps. During the audio recording session, you can apply all voice effects to the sound you are recording and stream it live to your web browsers or media players you’re using. Voice FX changes your voice in real time, which enables you to preview your results before deciding if you want to save them. All files you export from this app will be saved in the MP3 format so you can use them as ringtones on your Android device.
Pros
- Allows users to modulate pre-recorded audio files
- Voice effects are applied in real time
- Offers live streaming features
- Exports files in the MP3 format
Cons
- Prone to glitches
- A limited selection of voice effects
11. Voice Changer Plus
**Price:**Free, but offers in-app purchases
Compatibility: iOS 8.0 or later
User Rating: 4.8
iPhone and iPad owners in need of a voice changer app that grants them complete creative freedom over the modulation of the voices they record, should consider using the Voice Changer Plus. The app features more than fifty voice effects and it provides support for voiceover recordings. Moreover, you can edit all your audio files even after you saved them, enabling you to find new ways to improve your recordings over time. Voice Changer Plus is also equipped with trim controls, so you can remove all parts of your audio files you don’t want to share with your friends on social media.
Pros
- Offers more voice effects than most of its competitors
- Provides voiceover recording options
- Users can trim their audio files
- All audio recordings can be edited after the voice modulation
Cons
- In-app purchase is required in order to unlock all of the app’s features
- Modulating audio in video files is not an option
Below is a quick comparison table among these voice changer apps, hope it will be helpful.
| App | Supported OS | User Rating | Voice Templates |
|---|---|---|---|
| Celebrity Voice Changer - Face | iOS 9.0 or later | 4.0 | Yes |
| Snapchat | iOS 10.0 or later, Android 4.4 or up | 3.8 | No |
| Voice Changer by e3games | Android 4.1 and up | 4.3 | Yes |
| Voicy: Celebrity Voice Changer | iOS 10 or later | 4.3 | Yes |
| Video Voice Changer – Fun Editor | iOS 8.0 or later | 4.4 | Yes |
| Video Voice Changer FX | Android 4.1 and up | 4.1 | Yes |
| Squeak Voice Changer | Android 4.3 and up | 3.9 | Yes |
| Voice Changer with Effects | Android 4.1 and up | 4.5 | Yes |
| Voice Changer | Android 4.1 and up | 4.4 | Yes |
| Voice FX | Android 4.0.3 and up | 3.8 | Yes |
| Voice Changer Plus | iOS 8.0 or later | 4.8 | Yes |
Conclusion
Everybody enjoys a good joke, and the apps we featured in this article enable you to have a lot of fun while experimenting with different voice modulation options. All of the voice effects these apps offer can change a voice automatically, but if you would like to alter the voices in your videos you must choose an app that supports this option. Which of the best voice changer apps for iPhone and Android devices are you going to choose? Leave a comment, and share your opinions with us.
Benjamin Arango
Benjamin Arango is a writer and a lover of all things video.
Follow @Benjamin Arango
“A Comprehensive Guide to Adobe Audition’s Tools and Functionalities”
What can be more useful than audio editing on a single platform? There is software that will solve this problem under the name of ‘Adobe Audition.’ This Adobe audio editor has got all the facilities that you might need while editing audio. The audio might be edited for professional purposes or random fun sessions.
Do you want to know more about this particular Adobe voice editor? Continue reading this article to enhance your knowledge of this specific editor.
In this article
01 What Is Adobe Audio Editor?
02 Key Features of Adobe Auditionos
03 Pros and Cons of Adobe Audio Editor-Adobe Audition
04 How Do You Edit Audio in Adobe Audition?
Part 1. What Is Adobe Audio Editor?
Adobe developed ‘Audition ,’ an Adobe audio editor that is a powerful platform that you can use for making significant changes in audio files. Audition is an editor for mastering audio editing for different purposes. You can use this Adobe voice editor to control the audio you want to edit, and it can remove the background noises.
This Adobe audio editor has an intuitive interface that attracts users. It has a straightforward way of editing that helps beginner-level users a lot. You can edit single track and also multi-tracks and use tons of plug-ins as they are supported by this Adobe voice editor.

Part 2. Key Features of Adobe Audition
This Adobe audio editor is a very famous editor among both beginners and professionals. It is loaded with amazing features and editing options. You can completely transform your audio files with Adobe Audition. Let’s share some of the key features of this Adobe voice editor.
· Audio Restoration
The biggest factor that attracts users is the AI Audio Restoration feature of Adobe Audition. This is not just an editor; it can automatically restore your damaged files. Moreover, the sound sampling tool also helps remove sounds like crack, rumble, etc.
· Spectral Analysis
Do you know that this Adobe voice editor offers spectral analysis? With this feature, you can look at the audio but in frequency. In addition to this, you can also select the unwanted part of the audio and easily remove it.
· Essential Sounds
For adding effects on Adobe Audition, this is the best option. Users can easily access this feature and assign a category like SFX, Music, Ambience, and Dialogue. After selecting a category, you get different effects like; In a large Room, From Outside, Podcast Voice, Make Distant, etc.
· Envelopes
What are envelopes in this Adobe audio editor? Each track has lines running through them in Adobe Audition. With these, you can control the volume the ability of the pan. Moreover, you can also have control over the EQ envelope.
Part 3. Pros and Cons of Adobe Audio Editor-Adobe Audition
There are a lot of audio editors available in the world that you can use. There is always some downside to any product you use, as nothing is perfect. In this section, we are discussing the pros and cons of Adobe Audition, Adobe Audio Editor.
Pros
- Have you used any software that allows the user to have AI recovery? Adobe Audition has given AI recovery access to users with ease.
- You must have used noise reduction in other software. The quality of the noise reduction services provided by this editor is among the top-notch service providers available.
- Have you used 100+ effects for audios? Audition provides 100+ audio effects. They can be edited on individual clips or over the whole track.
- Moreover, background noises like hum crackle can be reduced using AI tools, while sounds like barking dogs or cars passing by can be removed by Spectral Frequency Display.
Con
- Adobe voice editor has inconvenient subscription options. For example, you can buy Adobe Audition for 20.99$ per month; on the other hand; you can have all the Adobe applications for 52.99$ per month.
Part 4. How Do You Edit Audio in Adobe Audition?
This Adobe audio editor is an impressive audio editing software. You get different and unique editing options that are very useful for creating great audio files. If you are looking for steps to edit in Adobe Audition, this section is for you.
1. Adobe Audition Workflow for Beginner
Are you a beginner? Let’s share some basic details about Adobe Audition. You can start by recording the audio, and once done; you can pause it. The waveform view of the recording will appear on the screen. Furthermore, you have a Files option in the top left corner where all the files appear. Just below this, you get the Media Browser tab, where you can browse the media files from your device.
Do you know something about the Effects Rack? This part of the interface allows you to add and save effects for editing. If you record things and make notes, the Markers tab is great for noting things along the timeline. For adding audio effects, the Essential Sound section will be visible on the right side of the screen.
2. Getting Started with Audition Audio Mixing
Mixing files is always fun, but what about mixing files with Adobe voice editor? Let’s share the steps for this mixing purpose.
Step 1: Start by importing all the media files you plan to mix. Next, head to the Multitrack option from the top left corner to mix multiple tracks. Then, you have to drag and drop the audio files on the timeline.

Step 2: Now, listen to the audio files and analyze the volumes. If you need to adjust the volume, select the tracks, and from the sub-menu, hit on ‘Match Clip Loudness.’

Step 3: If you wish to add effects to the tracks, head to the ‘Effects Rack’ section. There you can get options like Amplify, Compression, etc.

Step 4: While mixing files with Adobe, you can also edit and add volume envelope points. Select the audio file, right-click on it, and look for the Remix option for smart mixing.

3. How Can You Apply Effects in Adobe Audition ?
If you have successfully mixed the files, we should discuss audio effects. So, let’s get started.
Step 1: For adding effects, start by heading to the Windows tab. From the submenu, select the Effects Rack option. Or else, you can also access Effect racks from the left screen pane. Remember, you can add effects in both forms, either its Waveform timeline or Multitrack.

Step 2: After this, it’s time to add your favorite effect; for that, hit the side arrow in front of every effect number. A list of offered effects will appear; you can select an effect of your choice.

Step 3: After adding an effect, the effect will be added to the list in the effect rack. Secondly, a window appears on the screen, it’s the Effect Control Box, to customize and adjust the settings of the added effect.

Step 4: This exceptional Adobe audio editor offers different presets that could be used instead of using the default effect. Moreover, you can also add the effect to the preset section after adjusting the Effect Control Box. You can also turn off or turn on individual effects by pressing the button along every option in Effect Rack.

4. How to Do Noise Reduction & Restoration in Adobe Audition
You might have recorded a great podcast or voiceover, but when you check it, you are devastated. This is because there is a lot of background noise, disturbing the file quality. Try Noise Reduction in Adobe voice editor by following these steps.
Step 1: Start by importing the audio file to Adobe Audition. Then, carefully listen and analyze the file. This is because you have to identify the part where you get the extra noise to work on it.

Step 2: After the part has been identified, let’s move further and head to the Effects tab. From the submenu, hover on the Noise Reduction/ Restoration option. Now, select the Capture Noise Print option; this feature finds all the highlighted part information.

Step 3: Next step demands you to open the Effects tab. Once that is done, go to the Noise Reduction / Restoration option. Further, select the Noise Reduction Process.

Step 4: This will open a pop-up window for Noise Reduction Control where you can adjust things. This Adobe voice editor allows you to adjust Noise reduction by using the slider. For detailed editing, open Advanced options like Smoothing, etc.

Final Thoughts
Adobe Audition is a known and stunning Adobe audio editor. For you to learn everything, we discussed Adobe Audition in detail. The article talked about its features, pros, cons, and various ways to edit files with this Adobe voice editor. An equally amazing audio editor is Filmora Audio Editor. An amazing, all-in-one audio editor.
Filmora offers a list of basic as well as advanced editing options. Wondershare Filmora is easy to download and quite simple to use. Users who have multiple uses of the software across the video along the audio should consider using this tool.
Wondershare Filmora
Get started easily with Filmora’s powerful performance, intuitive interface, and countless effects!
Try It Free Try It Free Try It Free Learn More >

02 Key Features of Adobe Auditionos
03 Pros and Cons of Adobe Audio Editor-Adobe Audition
04 How Do You Edit Audio in Adobe Audition?
Part 1. What Is Adobe Audio Editor?
Adobe developed ‘Audition ,’ an Adobe audio editor that is a powerful platform that you can use for making significant changes in audio files. Audition is an editor for mastering audio editing for different purposes. You can use this Adobe voice editor to control the audio you want to edit, and it can remove the background noises.
This Adobe audio editor has an intuitive interface that attracts users. It has a straightforward way of editing that helps beginner-level users a lot. You can edit single track and also multi-tracks and use tons of plug-ins as they are supported by this Adobe voice editor.
Part 2. Key Features of Adobe Audition
This Adobe audio editor is a very famous editor among both beginners and professionals. It is loaded with amazing features and editing options. You can completely transform your audio files with Adobe Audition. Let’s share some of the key features of this Adobe voice editor.
· Audio Restoration
The biggest factor that attracts users is the AI Audio Restoration feature of Adobe Audition. This is not just an editor; it can automatically restore your damaged files. Moreover, the sound sampling tool also helps remove sounds like crack, rumble, etc.
· Spectral Analysis
Do you know that this Adobe voice editor offers spectral analysis? With this feature, you can look at the audio but in frequency. In addition to this, you can also select the unwanted part of the audio and easily remove it.
· Essential Sounds
For adding effects on Adobe Audition, this is the best option. Users can easily access this feature and assign a category like SFX, Music, Ambience, and Dialogue. After selecting a category, you get different effects like; In a large Room, From Outside, Podcast Voice, Make Distant, etc.
· Envelopes
What are envelopes in this Adobe audio editor? Each track has lines running through them in Adobe Audition. With these, you can control the volume the ability of the pan. Moreover, you can also have control over the EQ envelope.
Part 3. Pros and Cons of Adobe Audio Editor-Adobe Audition
There are a lot of audio editors available in the world that you can use. There is always some downside to any product you use, as nothing is perfect. In this section, we are discussing the pros and cons of Adobe Audition, Adobe Audio Editor.
Pros
- Have you used any software that allows the user to have AI recovery? Adobe Audition has given AI recovery access to users with ease.
- You must have used noise reduction in other software. The quality of the noise reduction services provided by this editor is among the top-notch service providers available.
- Have you used 100+ effects for audios? Audition provides 100+ audio effects. They can be edited on individual clips or over the whole track.
- Moreover, background noises like hum crackle can be reduced using AI tools, while sounds like barking dogs or cars passing by can be removed by Spectral Frequency Display.
Con
- Adobe voice editor has inconvenient subscription options. For example, you can buy Adobe Audition for 20.99$ per month; on the other hand; you can have all the Adobe applications for 52.99$ per month.
Part 4. How Do You Edit Audio in Adobe Audition?
This Adobe audio editor is an impressive audio editing software. You get different and unique editing options that are very useful for creating great audio files. If you are looking for steps to edit in Adobe Audition, this section is for you.
1. Adobe Audition Workflow for Beginner
Are you a beginner? Let’s share some basic details about Adobe Audition. You can start by recording the audio, and once done; you can pause it. The waveform view of the recording will appear on the screen. Furthermore, you have a Files option in the top left corner where all the files appear. Just below this, you get the Media Browser tab, where you can browse the media files from your device.
Do you know something about the Effects Rack? This part of the interface allows you to add and save effects for editing. If you record things and make notes, the Markers tab is great for noting things along the timeline. For adding audio effects, the Essential Sound section will be visible on the right side of the screen.
2. Getting Started with Audition Audio Mixing
Mixing files is always fun, but what about mixing files with Adobe voice editor? Let’s share the steps for this mixing purpose.
Step 1: Start by importing all the media files you plan to mix. Next, head to the Multitrack option from the top left corner to mix multiple tracks. Then, you have to drag and drop the audio files on the timeline.
Step 2: Now, listen to the audio files and analyze the volumes. If you need to adjust the volume, select the tracks, and from the sub-menu, hit on ‘Match Clip Loudness.’
Step 3: If you wish to add effects to the tracks, head to the ‘Effects Rack’ section. There you can get options like Amplify, Compression, etc.
Step 4: While mixing files with Adobe, you can also edit and add volume envelope points. Select the audio file, right-click on it, and look for the Remix option for smart mixing.
3. How Can You Apply Effects in Adobe Audition ?
If you have successfully mixed the files, we should discuss audio effects. So, let’s get started.
Step 1: For adding effects, start by heading to the Windows tab. From the submenu, select the Effects Rack option. Or else, you can also access Effect racks from the left screen pane. Remember, you can add effects in both forms, either its Waveform timeline or Multitrack.
Step 2: After this, it’s time to add your favorite effect; for that, hit the side arrow in front of every effect number. A list of offered effects will appear; you can select an effect of your choice.
Step 3: After adding an effect, the effect will be added to the list in the effect rack. Secondly, a window appears on the screen, it’s the Effect Control Box, to customize and adjust the settings of the added effect.
Step 4: This exceptional Adobe audio editor offers different presets that could be used instead of using the default effect. Moreover, you can also add the effect to the preset section after adjusting the Effect Control Box. You can also turn off or turn on individual effects by pressing the button along every option in Effect Rack.
4. How to Do Noise Reduction & Restoration in Adobe Audition
You might have recorded a great podcast or voiceover, but when you check it, you are devastated. This is because there is a lot of background noise, disturbing the file quality. Try Noise Reduction in Adobe voice editor by following these steps.
Step 1: Start by importing the audio file to Adobe Audition. Then, carefully listen and analyze the file. This is because you have to identify the part where you get the extra noise to work on it.
Step 2: After the part has been identified, let’s move further and head to the Effects tab. From the submenu, hover on the Noise Reduction/ Restoration option. Now, select the Capture Noise Print option; this feature finds all the highlighted part information.
Step 3: Next step demands you to open the Effects tab. Once that is done, go to the Noise Reduction / Restoration option. Further, select the Noise Reduction Process.
Step 4: This will open a pop-up window for Noise Reduction Control where you can adjust things. This Adobe voice editor allows you to adjust Noise reduction by using the slider. For detailed editing, open Advanced options like Smoothing, etc.
Final Thoughts
Adobe Audition is a known and stunning Adobe audio editor. For you to learn everything, we discussed Adobe Audition in detail. The article talked about its features, pros, cons, and various ways to edit files with this Adobe voice editor. An equally amazing audio editor is Filmora Audio Editor. An amazing, all-in-one audio editor.
Filmora offers a list of basic as well as advanced editing options. Wondershare Filmora is easy to download and quite simple to use. Users who have multiple uses of the software across the video along the audio should consider using this tool.
Wondershare Filmora
Get started easily with Filmora’s powerful performance, intuitive interface, and countless effects!
Try It Free Try It Free Try It Free Learn More >
Best Volume Normalizers: How to Normalize Audio in Videos?
Best Volume Normalizers: How to Normalize Audio in Videos?

Shanoon Cox
Mar 27, 2024• Proven solutions
Audio recordings are not always perfect since they can often be too loud or nearly inaudible. In case you are dealing with an audio or video file that has an unbalanced volume you can try to fix this issue by using the audio normalization features which video and audio editing apps for Mac and PC computers offer.

- Part 1: What is Audio Normalization?
- Part 2: How to Normalize Audio [Tutorial]
- Part 3: Top Sound Normalizers
- Part 4: Audio Normalization Tips
What is Audio Normalization?
There are two different types of audio normalization, peak normalization, and loudness normalization. The peak normalization changes the gain that is being applied in order to reduce the highest PCM sample value down to 0 dB, while the loudness normalization reduces the average amplitude to the chosen level. However, the majority of video and audio editing apps combine these two types of audio normalization into a single feature. So, in this article, we are going to show you how you can quickly normalize audio with different video and audio editing apps.
How to Normalize Audio?
The most common reason for using audio normalization features is to bring the audio level of several different audio clips to the same level. In addition, audio normalization can help you make inaudible narration or dialogue a bit louder. If you want to make your vocals pop over the background music, all you have to do is download a versatile software - Filmora from Wondershare . The latest version of Filmora has released a new function - audio ducking, which helps you increase your vocals while lower the background music with ease. Download it for free!
After installing Wondershare Filmora, just read this complete guide of using audio ducking in Filmora .
Step 1: Drag and drop multiple video or audio files into the timeline and select one clip you want to hear more clearly.

Step 2: After right-clicking the clip, you can select “Adjust Audio”.

Step 3: Click “Lower the volume of other clips” and adjust the percentage according to your need.

Best 3 Audio Normalizers
Except for Wondershare Filmora, there are other audio normalizers that you can use when you are edit videos. Moreover, we will know the steps of normalizing audios with these sound normalizers.
1. iMovie

Price: Free
Compatibility: macOS
Mac users don’t need a special introduction to this iconic video editing app that has been featured on all versions of macOS that were released since 2003. The process of normalizing audio with iMovie is rather simple as you just have to import an audio or video file that contains sound into the Project Browser and double-click on it. Once the Inspector pops up on the screen you should select the Audio option and click on the Normalize Clip Volume setting. iMovie will then normalize the audio in the selected file, so you should just wait for the process to be over and click Done afterward.
2. Movavi

Price: $79.95 for a lifetime license
Compatibility: Windows, macOS
Movavi video editor offers all the tools you are going to need to finish the video editing process quickly. This video editing software for Mac and PC computers is best suited for video content creators who don’t have a lot of experience, although skilled video editing professionals can also use it to edit their footage. The audio normalization process in Movavi can be completed in just a few easy steps. After creating the project in the Full Feature Mode, you should click on the Add Media Files icon and import the files you’d like to use in that project. Place the files to the appropriate track on the timeline and then double-click on the file that is located on the audio track. Once the Tools panel appears on the screen, you just have to make sure that the Normalize tickbox is checked and Movavi will normalize the audio automatically.
3. Audacity

Price: Free
Compatibility: Linux, Windows, macOS
Audacity is a professional audio editing app that lets you record and edit sound for your videos. You can use this app to create sound effects, merge multiple audio files together, or record narration for each new video you create. Normalizing audio with Audacity is easy because you just have to add the audio clips to the timeline and make sure that the track to which you added a file is selected. The app also lets you select more than just one track, so you can place audio files to two or more tracks and files from each track are going to be adjusted to the same audio level. Once you’ve selected a track or tracks that contain audio clips you’d like to normalize, head over to the Effects menu, choose the Normalize option, and hit OK.
Tips on Audio Normalization
A single scene can contain a lot of different sounds. The sound of someone’s footsteps, ambient sounds, or the dialogue are just a few examples of sounds that are frequently used in videos and movies. The audio volume of each of these sounds shouldn’t be the same, because if the ambient sounds are as loud as the dialogue the audience may find it hard to understand what the characters in that scene are saying. That’s why you should use audio normalization only when you are absolutely sure that using the same audio volume level for two or more audio clips won’t disrupt the flow of your video.
Conclusion
Even though normalizing audio with each of the video editing software products we featured in this article is a straightforward process, this option should only be used if you have no other way to balance the audio volume of a video or an audio file. Which video editing app for Mac and PC computers do you like to use the most to normalize audio in your videos? Leave a comment and share your experiences with us.
Shanoon Cox
Shanoon Cox is a writer and a lover of all things video.
Follow @Shanoon Cox
Shanoon Cox
Mar 27, 2024• Proven solutions
Audio recordings are not always perfect since they can often be too loud or nearly inaudible. In case you are dealing with an audio or video file that has an unbalanced volume you can try to fix this issue by using the audio normalization features which video and audio editing apps for Mac and PC computers offer.
- Part 1: What is Audio Normalization?
- Part 2: How to Normalize Audio [Tutorial]
- Part 3: Top Sound Normalizers
- Part 4: Audio Normalization Tips
What is Audio Normalization?
There are two different types of audio normalization, peak normalization, and loudness normalization. The peak normalization changes the gain that is being applied in order to reduce the highest PCM sample value down to 0 dB, while the loudness normalization reduces the average amplitude to the chosen level. However, the majority of video and audio editing apps combine these two types of audio normalization into a single feature. So, in this article, we are going to show you how you can quickly normalize audio with different video and audio editing apps.
How to Normalize Audio?
The most common reason for using audio normalization features is to bring the audio level of several different audio clips to the same level. In addition, audio normalization can help you make inaudible narration or dialogue a bit louder. If you want to make your vocals pop over the background music, all you have to do is download a versatile software - Filmora from Wondershare . The latest version of Filmora has released a new function - audio ducking, which helps you increase your vocals while lower the background music with ease. Download it for free!
After installing Wondershare Filmora, just read this complete guide of using audio ducking in Filmora .
Step 1: Drag and drop multiple video or audio files into the timeline and select one clip you want to hear more clearly.
Step 2: After right-clicking the clip, you can select “Adjust Audio”.
Step 3: Click “Lower the volume of other clips” and adjust the percentage according to your need.
Best 3 Audio Normalizers
Except for Wondershare Filmora, there are other audio normalizers that you can use when you are edit videos. Moreover, we will know the steps of normalizing audios with these sound normalizers.
1. iMovie
Price: Free
Compatibility: macOS
Mac users don’t need a special introduction to this iconic video editing app that has been featured on all versions of macOS that were released since 2003. The process of normalizing audio with iMovie is rather simple as you just have to import an audio or video file that contains sound into the Project Browser and double-click on it. Once the Inspector pops up on the screen you should select the Audio option and click on the Normalize Clip Volume setting. iMovie will then normalize the audio in the selected file, so you should just wait for the process to be over and click Done afterward.
2. Movavi
Price: $79.95 for a lifetime license
Compatibility: Windows, macOS
Movavi video editor offers all the tools you are going to need to finish the video editing process quickly. This video editing software for Mac and PC computers is best suited for video content creators who don’t have a lot of experience, although skilled video editing professionals can also use it to edit their footage. The audio normalization process in Movavi can be completed in just a few easy steps. After creating the project in the Full Feature Mode, you should click on the Add Media Files icon and import the files you’d like to use in that project. Place the files to the appropriate track on the timeline and then double-click on the file that is located on the audio track. Once the Tools panel appears on the screen, you just have to make sure that the Normalize tickbox is checked and Movavi will normalize the audio automatically.
3. Audacity
Price: Free
Compatibility: Linux, Windows, macOS
Audacity is a professional audio editing app that lets you record and edit sound for your videos. You can use this app to create sound effects, merge multiple audio files together, or record narration for each new video you create. Normalizing audio with Audacity is easy because you just have to add the audio clips to the timeline and make sure that the track to which you added a file is selected. The app also lets you select more than just one track, so you can place audio files to two or more tracks and files from each track are going to be adjusted to the same audio level. Once you’ve selected a track or tracks that contain audio clips you’d like to normalize, head over to the Effects menu, choose the Normalize option, and hit OK.
Tips on Audio Normalization
A single scene can contain a lot of different sounds. The sound of someone’s footsteps, ambient sounds, or the dialogue are just a few examples of sounds that are frequently used in videos and movies. The audio volume of each of these sounds shouldn’t be the same, because if the ambient sounds are as loud as the dialogue the audience may find it hard to understand what the characters in that scene are saying. That’s why you should use audio normalization only when you are absolutely sure that using the same audio volume level for two or more audio clips won’t disrupt the flow of your video.
Conclusion
Even though normalizing audio with each of the video editing software products we featured in this article is a straightforward process, this option should only be used if you have no other way to balance the audio volume of a video or an audio file. Which video editing app for Mac and PC computers do you like to use the most to normalize audio in your videos? Leave a comment and share your experiences with us.
Shanoon Cox
Shanoon Cox is a writer and a lover of all things video.
Follow @Shanoon Cox
Also read:
- 2024 Approved Maximizing Your Devices Audio Quality Top 10 Improvement Software for iPhones & Tablets
- New 2024 Approved Eliminating Audible Hum Techniques for Silence in Recorded Sounds
- 2024 Approved 6 Top Voice Changer for Zoom to Make Your Voice Special and Funny
- Updated 15 Aesthetic Background Music For YouTube Video
- Updated Complementing Your Visual Storytelling with Cost-Free Melodies Techniques for PC/Mobile Devices
- New The Ultimate Compendium Selecting Your Best Software to Record Guitars for 2024
- New Quick-Fix Guide Resolving Auditory Import Problems in Premiere Pro 2023
- Updated 2024 Approved Elevating Music Production A Curated List of the Top 8 MacDAWS
- New 2024 Approved The Insiders Guide to Quieting Ambient Sounds on Stage or Studio Setup
- In 2024, Achieving Pristine Soundtracks Effortless Noise Suppression in Audacity and FilmoraPro
- Updated Innovative Approaches to Amplify Online Films with Free Audio Sources
- Premier List of the Most Reliable Song Recorders on the Market
- Updated Understanding Vimeo Content A Focus on Different Aspect Ratios
- New The Art of Auditory Alignment Fusing Audio to Video in Adobe Premiere Pro
- Updated 2024 Approved Demystifying Clubhouse Understanding the Social Networks Foundation, Purpose, and Potential Impact
- Thunderous Acclaim Unearthing Powerful Applause Sounds for 2024
- New In 2024, Seek Out Articulated Sigh Tones
- The Fins of Conversation Mastering the Technique of Clownfish-Inspired Sound Effects on Online Platforms for 2024
- New 2024 Approved The Ultimate Guide to Music-Driven Editing Perfect Pacing with Beat Alignment in Final Cut Pro X
- Understanding Vimeo Content A Focus on Different Aspect Ratios for 2024
- Updated Discover 5 Trustworthy Websites Offering Humorous Background Sounds Legally for 2024
- 2024 Approved Extensive Info on Vimeo Video - Aspect Ratio Detailled
- Updated Find Angry Dog Bark Effect for 2024
- New In 2024, Lively Soundtrack Compilation for Joyous Yearly Celebration Film
- New 2024 Approved Lose the Extra Bits Effortless MP3 Downscaling for Spotless Sing-Along Sessions.
- New 2024 Approved How to Select the Best Voice Changer for Gaming?
- New 2024 Approved The Role of Dissonant Harmonies and Pacing in Creating Film Music Suspense
- Updated Interrupt In-App Audio Amplification Adjustments on iPhone for 2024
- Unleash Your Creativity with These 5 Premium MP3 Recorder Apps for 2024
- 2024 Approved From Novice to Pro Harnessing the Potential of Adobes Audio Editor (Adobe Audition)
- 2024 Approved Audience Approval Acoustic Amplifier
- Streamlining Your Chromebook for Effective Audio Capture for 2024
- How To Reset iPhone SE (2022)? | Dr.fone
- How to Rescue Lost Contacts from Oppo ?
- In 2024, How To Remove Passcode From iPhone 11 Pro? Complete Guide
- New Easy Video Editing Best Free Tools for Starters Desktop/Online/Mobile for 2024
- How To Unlock Any Itel Phone Password Using Emergency Call
- 2024 Approved FCP X Pro Tutorials Creating Realistic Green Screen Effects
- In 2024, Resolve Your iPhone 14 Pro Keeps Asking for Outlook Password
- Make Eye Zoom Transition Effect with Filmora for 2024
- In 2024, Easiest Guide How to Clone Motorola Edge 40 Neo Phone? | Dr.fone
- In 2024, Can Life360 Track You When Your ZTE Blade A73 5G is off? | Dr.fone
- Life360 Learn How Everything Works On Itel P55 5G | Dr.fone
- How does the stardust trade cost In pokemon go On Vivo Y28 5G? | Dr.fone
- In 2024, How to Change Google Play Location On Tecno Phantom V Flip | Dr.fone
- 2024 Approved Best 12 Best Freeze Frame Video Editing Examples
- New Filmora Free Trial vs Torrent Which One Is Safe and Legit?
- New Best 5 Apps To Add Song To Video
- How to Make a Video by Mouse with Filmora for 2024
- How to recover old call logs from your Narzo 60 Pro 5G?
- How to play MP4 files on Samsung Galaxy S24+?
- New Translate Videos with Subtitle Cat Your Essential Guide
- New Transform Your Videos Into Cinematic Masterpieces with FCPX for 2024
- Forgot Your Apple ID Password and Email On Apple iPhone 13 Pro Max? Heres the Best Fixes
- New Image Aspect Ratio Converter 8 Essential Online Tools for 2024
- New Windows Live Movie Maker Tutorial Adding Slow Motion to Your Videos
- New From Zero to Hero 5 Best Movie Intro Makers for Beginners for 2024
- How to Send and Fake Live Location on Facebook Messenger Of your Nokia C110 | Dr.fone
- Title: New The Ultimate Voice Transformation Handbook Ranking the Leading 11 Speech Alteration Software for Mobile Platforms, No Cost
- Author: David
- Created at : 2024-05-05 09:44:11
- Updated at : 2024-05-06 09:44:11
- Link: https://sound-tweaking.techidaily.com/new-the-ultimate-voice-transformation-handbook-ranking-the-leading-11-speech-alteration-software-for-mobile-platforms-no-cost/
- License: This work is licensed under CC BY-NC-SA 4.0.
