
:max_bytes(150000):strip_icc():format(webp)/GettyImages-Macys-59e6c3699abed500118af858.jpg)
New Mastering Silence Techniques for Quieting Unwanted Sounds in Video Editing for 2024
“Mastering Silence: Techniques for Quieting Unwanted Sounds in Video Editing”
Adobe Premiere Pro is a video editing tool. In the editing world, Premiere Pro has a separate fan base; people use this video editing tool because of its unmatchable features. People love the quality of editing that Premiere Pro delivers. Among its many features, few are color correction, safe margins, rulers, and audio assign.
Moreover, the video editor has an Auto Reframe feature. Along with this, Premiere Pro offers Comparison View and many other things. If you want to learn more about Premiere Pro and how to remove noise from video in Premiere Pro, then stay with us.
In this article
01 Remove Background Noise Premiere Pro
02 How to Mute A Clip in Premiere Pro
03 Tips and Tricks to Help You Better Editing Audio in Premiere Pro
Part 1. Remove Background Noise Premiere Pro
While recording a video, you cannot control every noise. Sometimes, you get disturbed by your doorbell. Sometimes, it’s your neighbor’s horn that might bother you or anything else. What do you do when this happens to you? Do you stop the recording and wait until it’s quiet?
If this is what you do, then let us share a smart solution with you. Background noise can be removed from your video using the remove background noise Premiere Pro feature. Allow us to share its steps to guide you more about it.
Step 1: Import the File
To remove background noise from your videos, you first need to import the media file to Premiere Pro. Then drag and drop the file onto the timeline. After that, you need to select and open the ‘Effects’ menu.

Step 2: Add Denoise Effect
On the right side of the Effects menu, type and search for ‘Denoise.’ Then, you should select the Denoise option and drag it onto the timeline over the media file. The Denoise feature removes nearly 50% of the noise automatically.

Step 3: Denoise Effects Control
The rest of the background noise can be customized. For that, head to the ‘Effects Control’ section. You will see Denoise-related options. There, click on ‘Edit’ for Custom Setup. You can adjust both the ‘Frequency’ and ‘Amount’ values.

Step 4: Voice Enhance Effect
Removing background noise damages the quality of voice. This quality can be improved by using ‘Vocal Enhance.’ You can search it from the search bar in the Effects tab and drag it over to the media file in the timeline. You can also customize this from the ‘Effects Control’ tab.

Part 2. How to Mute A Clip in Premiere Pro
Sometimes, you might need to mute a clip. You can use such clips as your status. You can also add your desired background music and then share the clips. In any case, you need to mute the clip, but what if you don’t know how to mute the clip in Premiere Pro?
Don’t worry because we are here to help you. The following section of this article will share different methods to mute clips in Adobe Premiere Pro.
Method 1: The first method is to mute an entire clip on the timeline. This could be done by checking the Mute Track ‘M’ button. You will find the mute button beside the track name.

Method 2: The next method is to mute a specific clip. For that, go to the ‘Audio’ section from the menu bar. Then, look at the ‘Essential Sound’ panel on the right side of the screen. From you will see various tags. Open your desired tag and check the box against the ‘Mute’ option.

Method 3: Another method that could be used to mute a clip is by right-clicking on the clip that you want to mute. A menu appears on the screen. From that menu, you need to uncheck the ‘Enable’ button. This mutes the clip.

Method 4: The next method demands you to first select the video clip. Then, from the menu bar, head over to the ‘Editing’ tab. There go to the ‘Audio Clip Mixer’ section. You will see volume sliders; drag down the Volume slider to negative to mute the clip.

Part 3. Tips and Tricks to Help You Better Editing Audio in Premiere Pro
As we have mentioned earlier, noise removal damages the overall quality of the audio. All your effort goes to waste if your voice is not clear or anything else. Now that you know how you can handle background noise removal, it’s time to talk about something new and different.
The following section of this article is going to share tips and tricks that could be adopted. These will help you to get better and improved quality while editing audio.
1. Restore Bass
The first tip that we are going to introduce is restoring the bass of the media file. You can do this by using the Parametric Equalizer and dragging it onto the timeline. With an equalizer, you can play with different audio frequencies. Whatsoever suits the best, you can set it.
2. Atmosphere Setting
Its essential to first of all create an atmosphere. For this, you can mix sounds, add reverb and even adjust the loudness. An ambiance audio tag can be used for background noise. You need to set the scene for your music or the dialogue.
3. Compress the Audio
To make the audio better and more consistent, it is essential to compress it. Like the name is presenting, compression lowers the volume of loud parts, increases the volume of fairly quiet parts, it compresses the waveform of audio. After compression, your audio sounds instantly better, especially the voices.
4. Dialogue Adjustments
You can unify different recordings for a common loudness if you tag audio clips as Dialogue. If you plan to add a voiceover to your video, then you must improve the clarity, reduce or remove any background noise and also, adjust the reverb. Subtitles could be added to make the conversation understandable in your video.
5. Remove Noise
The noise of the computer fan or the weird hissing noise of the microphone and other similar things are referred to as Background noise. This can become a distracting element. While editing the audio, it matters that you remove the background noise because it does not get automatically removed. So, to have good audio, always remove background noise.
Bottom Line
If background noise is bothering you, then this problem is resolved. The article above has shared how to remove noise from video in premiere pro. The easy step-by-step guide for removing background noise with Premiere Pro has been shared.
To remove background noise, Premiere Pro is not the only editor. Wondershare Filmora is another stunning and known video editor. You can use the tool to remove background noise from your videos. With this editor, you can also mute your clips.
Not just this, but the editor has many more classic features. Filmora allows keyframing, motion tracking, and doing cool edits with a split-screen. Color match is another offered feature among the many other features of Filmora. It also has an asset library. You can get fantastic effects, transitions, elements, and whatnot from its library.
For Win 7 or later (64-bit)
For macOS 10.12 or later
02 How to Mute A Clip in Premiere Pro
03 Tips and Tricks to Help You Better Editing Audio in Premiere Pro
Part 1. Remove Background Noise Premiere Pro
While recording a video, you cannot control every noise. Sometimes, you get disturbed by your doorbell. Sometimes, it’s your neighbor’s horn that might bother you or anything else. What do you do when this happens to you? Do you stop the recording and wait until it’s quiet?
If this is what you do, then let us share a smart solution with you. Background noise can be removed from your video using the remove background noise Premiere Pro feature. Allow us to share its steps to guide you more about it.
Step 1: Import the File
To remove background noise from your videos, you first need to import the media file to Premiere Pro. Then drag and drop the file onto the timeline. After that, you need to select and open the ‘Effects’ menu.
Step 2: Add Denoise Effect
On the right side of the Effects menu, type and search for ‘Denoise.’ Then, you should select the Denoise option and drag it onto the timeline over the media file. The Denoise feature removes nearly 50% of the noise automatically.
Step 3: Denoise Effects Control
The rest of the background noise can be customized. For that, head to the ‘Effects Control’ section. You will see Denoise-related options. There, click on ‘Edit’ for Custom Setup. You can adjust both the ‘Frequency’ and ‘Amount’ values.
Step 4: Voice Enhance Effect
Removing background noise damages the quality of voice. This quality can be improved by using ‘Vocal Enhance.’ You can search it from the search bar in the Effects tab and drag it over to the media file in the timeline. You can also customize this from the ‘Effects Control’ tab.
Part 2. How to Mute A Clip in Premiere Pro
Sometimes, you might need to mute a clip. You can use such clips as your status. You can also add your desired background music and then share the clips. In any case, you need to mute the clip, but what if you don’t know how to mute the clip in Premiere Pro?
Don’t worry because we are here to help you. The following section of this article will share different methods to mute clips in Adobe Premiere Pro.
Method 1: The first method is to mute an entire clip on the timeline. This could be done by checking the Mute Track ‘M’ button. You will find the mute button beside the track name.
Method 2: The next method is to mute a specific clip. For that, go to the ‘Audio’ section from the menu bar. Then, look at the ‘Essential Sound’ panel on the right side of the screen. From you will see various tags. Open your desired tag and check the box against the ‘Mute’ option.
Method 3: Another method that could be used to mute a clip is by right-clicking on the clip that you want to mute. A menu appears on the screen. From that menu, you need to uncheck the ‘Enable’ button. This mutes the clip.
Method 4: The next method demands you to first select the video clip. Then, from the menu bar, head over to the ‘Editing’ tab. There go to the ‘Audio Clip Mixer’ section. You will see volume sliders; drag down the Volume slider to negative to mute the clip.
Part 3. Tips and Tricks to Help You Better Editing Audio in Premiere Pro
As we have mentioned earlier, noise removal damages the overall quality of the audio. All your effort goes to waste if your voice is not clear or anything else. Now that you know how you can handle background noise removal, it’s time to talk about something new and different.
The following section of this article is going to share tips and tricks that could be adopted. These will help you to get better and improved quality while editing audio.
1. Restore Bass
The first tip that we are going to introduce is restoring the bass of the media file. You can do this by using the Parametric Equalizer and dragging it onto the timeline. With an equalizer, you can play with different audio frequencies. Whatsoever suits the best, you can set it.
2. Atmosphere Setting
Its essential to first of all create an atmosphere. For this, you can mix sounds, add reverb and even adjust the loudness. An ambiance audio tag can be used for background noise. You need to set the scene for your music or the dialogue.
3. Compress the Audio
To make the audio better and more consistent, it is essential to compress it. Like the name is presenting, compression lowers the volume of loud parts, increases the volume of fairly quiet parts, it compresses the waveform of audio. After compression, your audio sounds instantly better, especially the voices.
4. Dialogue Adjustments
You can unify different recordings for a common loudness if you tag audio clips as Dialogue. If you plan to add a voiceover to your video, then you must improve the clarity, reduce or remove any background noise and also, adjust the reverb. Subtitles could be added to make the conversation understandable in your video.
5. Remove Noise
The noise of the computer fan or the weird hissing noise of the microphone and other similar things are referred to as Background noise. This can become a distracting element. While editing the audio, it matters that you remove the background noise because it does not get automatically removed. So, to have good audio, always remove background noise.
Bottom Line
If background noise is bothering you, then this problem is resolved. The article above has shared how to remove noise from video in premiere pro. The easy step-by-step guide for removing background noise with Premiere Pro has been shared.
To remove background noise, Premiere Pro is not the only editor. Wondershare Filmora is another stunning and known video editor. You can use the tool to remove background noise from your videos. With this editor, you can also mute your clips.
Not just this, but the editor has many more classic features. Filmora allows keyframing, motion tracking, and doing cool edits with a split-screen. Color match is another offered feature among the many other features of Filmora. It also has an asset library. You can get fantastic effects, transitions, elements, and whatnot from its library.
For Win 7 or later (64-bit)
For macOS 10.12 or later
“Exploring the Best Tools for Men’s Voices Adopting a Female Characteristic”
If you’ve been searching for the best android and iOS voice-changing apps around the internet, you’re on the right spot. Voice-changing applications are always fun. They’re handy when you’re pulling a prank on a friend, or you want some amazing effects to test your voice. Thus, we provide you with all the best male to female voice changer apps in the list below.
Record & Edit Voice Fast before Changing Voice
Before changing your voice from male to female, I suggest you edit your voice first. Filmora is an easy-to-use yet powerful video editor helping you quickly edit voice no matter your voice or the audio extracted from videos. Explore Filmora’s audio editing features and get ready for changing voice!
For Win 7 or later (64-bit)
For macOS 10.12 or later


Part 1: Changing Voice Online for Free with Media.io

If you want to change voice without downloading and installing any app on your mobile phone, you can try some online solutions. Media.io is an all-in-one online video toolkit that allows you to edit, convert and compress video, audio and image files easily. The online voice changer from Media.io can transform your voice to a male voice, female voice, child voice, robot voice, and Donald Duck voice. If you wish to have voice filters, you won’t have any problems in the future with the Media.io voice changer.

This online voice changer works best on the Chrome browser, so you can utilize it whether using a Windows, Mac, Linux, or Chromebook device. As a result, you can deceive your family or friends by speaking in another people’s voice rather than your own. Doesn’t that sound like fun?
![]()
A cross-platform for making videos anywhere for all creators

Why your video editing isn’t good enough? How about some creative inspo?
- 100 Million+ Users
- 150+ Countries and Regions
- 4 Million+ Social Media Followers
- 5 Million+ Stock Media for Use
* Secure Download

Part 2: Best Male to Female Voice Changer Apps for iPhone and Android
- Girls Voice Changer
- Voice Changer Voice Recorder Editor & Effect
- VoiceFX
- Voice Changer
- Voice Changer - Audio effects
- Magic Call App
- Voice Changer and Sound Recorder
- Super Voice Editor
- Voice Changer with Effects
- Voice Changer - Girls Voice changer Male to Female
1. Girls Voice Changer
Available for: Android, iOS
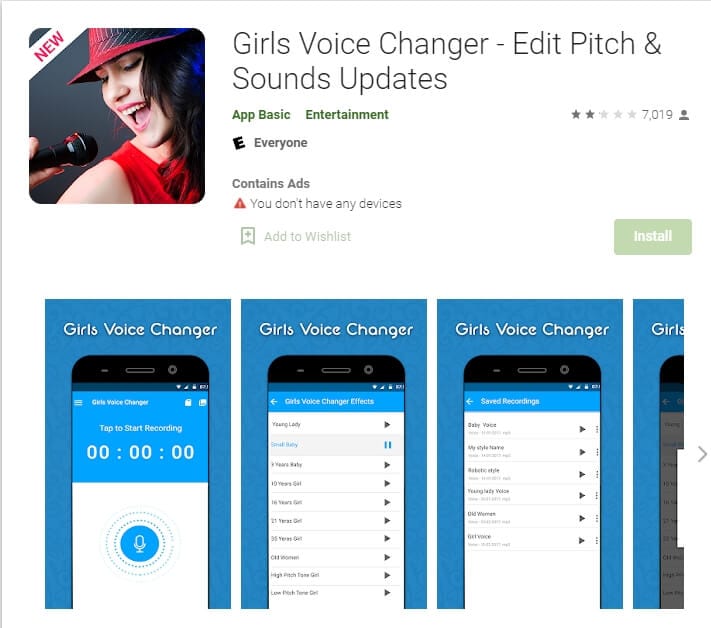
This girl voice changer app is highly portable and easy for any user to use comfortably. It is specifically more popular for changing male voice to female and for pitch adjustments. It’s completely free, so download on your android if you have a storage of about 8MB ready, and start using it!
This male-to-female voice changer app has several options in the library. Though the pitch adjustments are easy to make, some users have informed a lack of performance on very high-pitched settings. However, the smoothness of an android application also depends on how much space is readily available in the device. So next time you’re bored at a part, you have the perfect partner!
2. Voice Changer Voice Recorder Editor & Effect
Available for: Android
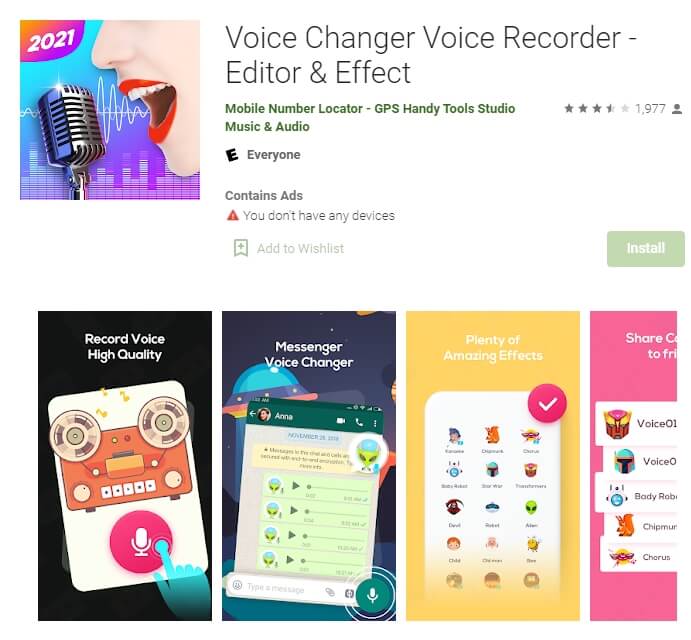
This voice changer application is for multi-purpose. Yes, you can use it as a girl voice changer smoothly and with ease. But apart from male to female voice changing, The “voice changer - voice editor application” can also be used to autotune your voice.
Now autotune is a big feature that every singer uses to make their voices tuned perfectly. With this app, you can also do the same to record your music or have fun while you are bored. The application is pretty to use and can be used as a girl voice changer not only for entertainment but also if you’re practicing. Many people who wish to seek a career in background voices might find this useful.
3. VoiceFX
Available for: Android

The VoiceFX application is filled with a lot of exciting options and features. If you are looking for an app that is more than just a male-to-female voice changer app, the voice fx is highly recommended.
You can also convert your voice into a robot or even an animal from male to female voice. Yes, you read it right. You can turn your manly voice into any of the fictional cartoons you want. This one’s a very easy and efficient way of filming a video with added effects or developing a mini-game with different voice characters. If you haven’t forgotten, there was a very big trend of converting famous music into chipmunk voices. With this app, you can convert your favorite songs into a chipmunk addition song without any problem.
4. Voice Changer
Available for: Android

The voice changer is a very famous male-to-female voice changer app. With over 10 million downloads on the google play store, the voice changer is highly recommended for users who have fun changing their voices from male to female. Compared to other voice changer applications, The Voice changer app has a very elegant and sleek design that makes it very easy to use.
Apart from the male to female voice change option, There are more than 50 other options that you can enjoy. Furthermore, you can share your creations with your friends through Bluetooth or other social media.
5. Voice Changer - Audio effects
Available for: Android

There are a lot of girl voice changer applications on the google play store. But not all of them are up to the mark. The Voice changer - audio effects is another highly recommended voice changer application.
The Voice Changer - Audio effects have a lot of other things to offer as well. Converting your voice from a male to a female has never been easier. Not only can you convert your voice into a girl, but you can also modify it. Furthermore, you can talk to your friends on the phone while you use the voice changer application. Moreover, the voices of animals and robots can also be an alternative to the female voice if you ever get bored of it.
6. Magic Call App
Available for: Android

The magic call is a real-time voice changer app that you can use for changing your voice during a call specifically. It is a really fun app which you can use with your friends to prank even your family!
This is a perfect option for people looking for a real-time girl voice changer app. The main purpose of this application is real-time calls. The magic call is ideal specifically for a male-to-female voice modification. And you can operate this application easily in call durations.
All you have to do is open the voice changer app and dial your call. Apart from Female voice, you can also convert your voice into a cartoon or an animal.
7. Voice Changer and Sound Recorder
Available for: iOS

If you are an iPhone user, then you must know that finding a voice changer on the apple store is like digging a diamond from the ground.
The Voice changer and sound recorder application is found exclusively on the apple store for people who love girl voice changer apps. It is a live call voice changer app, which means converting your voice from a male to a female in between the call. Furthermore, you can even add background voices such as traffic and echo to make your call even funnier. If you are looking for an excuse to get off from your call, then this application has got your back.
8. Super Voice Editor
Available for: Android
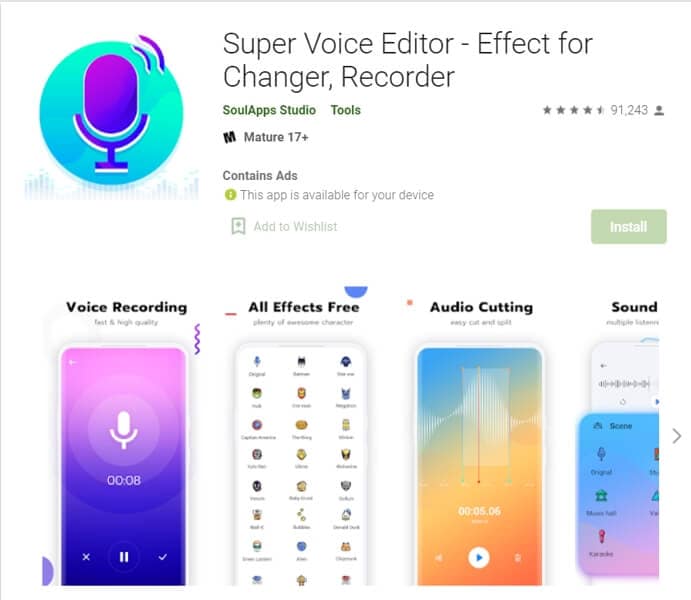
This one is a fun application for people searching for a voice changer app male to female. Not only can you record the audio that you edit, but also use it in real-time! Amazing right? Super voice editor enables you to add effects to your voice while you’re on a call as well. This feature means, next time you’re pulling a prank on the birthday boy, he won’t ever know! Sound like the wonder woman or dexter from his laboratory. The Super-Voice editor is perfect for kids playing in the house and even teenagers looking for something interesting. The SoulApps studio has made it easy for you to sound like your dream faces on the screen. With an MP3 cutter and Ringtone maker, this girl voice changer app is pure creativity.
9. Voice Changer with Effects
Available for: Android

Our list of girl voice changers, Voice changer with effects, is a very practical application that we highly recommend to our users.
With over 50 million downloads on google play, Voice changer with effects is highly suited for anyone looking for more than just a male-to-female voice changer. It has over 40 plus options such as helium, chipmunk, zombie, alien, and many more. With this application, you can even import a favorite audio clip of yours, and then you can easily convert it into a voice you like. If you want to modify your ringtone to an audio clip you just converted, then there is no better application than this one.
10. Voice Changer - Girls Voice changer Male to Female
Available for: Android

If you are looking for a girl voice changer app solely, this application perfectly fits you. The application is specifically designed only to change your voice from a male to a female. Although this application does provide options apart from female voice conversions, those features don’t function ideally. However, if you want a girl voice changer, you won’t have any trouble.
You can use this application while you are on a call. Hence, you can fool your family or friends by using a girl voice instead of your own. We recommend this as an average application that would fit your needs sufficiently.
In conclusion, you have now gone through the list of the perfect options for your android or iOS. Therefore, now you must be ready to choose the best girl voice changer app. So head on to your play store and search for your favorite app right now!
For Win 7 or later (64-bit)
For macOS 10.12 or later
Part 1: Changing Voice Online for Free with Media.io
If you want to change voice without downloading and installing any app on your mobile phone, you can try some online solutions. Media.io is an all-in-one online video toolkit that allows you to edit, convert and compress video, audio and image files easily. The online voice changer from Media.io can transform your voice to a male voice, female voice, child voice, robot voice, and Donald Duck voice. If you wish to have voice filters, you won’t have any problems in the future with the Media.io voice changer.
This online voice changer works best on the Chrome browser, so you can utilize it whether using a Windows, Mac, Linux, or Chromebook device. As a result, you can deceive your family or friends by speaking in another people’s voice rather than your own. Doesn’t that sound like fun?
![]()
A cross-platform for making videos anywhere for all creators
Why your video editing isn’t good enough? How about some creative inspo?
- 100 Million+ Users
- 150+ Countries and Regions
- 4 Million+ Social Media Followers
- 5 Million+ Stock Media for Use
* Secure Download
Part 2: Best Male to Female Voice Changer Apps for iPhone and Android
- Girls Voice Changer
- Voice Changer Voice Recorder Editor & Effect
- VoiceFX
- Voice Changer
- Voice Changer - Audio effects
- Magic Call App
- Voice Changer and Sound Recorder
- Super Voice Editor
- Voice Changer with Effects
- Voice Changer - Girls Voice changer Male to Female
1. Girls Voice Changer
Available for: Android, iOS
This girl voice changer app is highly portable and easy for any user to use comfortably. It is specifically more popular for changing male voice to female and for pitch adjustments. It’s completely free, so download on your android if you have a storage of about 8MB ready, and start using it!
This male-to-female voice changer app has several options in the library. Though the pitch adjustments are easy to make, some users have informed a lack of performance on very high-pitched settings. However, the smoothness of an android application also depends on how much space is readily available in the device. So next time you’re bored at a part, you have the perfect partner!
2. Voice Changer Voice Recorder Editor & Effect
Available for: Android
This voice changer application is for multi-purpose. Yes, you can use it as a girl voice changer smoothly and with ease. But apart from male to female voice changing, The “voice changer - voice editor application” can also be used to autotune your voice.
Now autotune is a big feature that every singer uses to make their voices tuned perfectly. With this app, you can also do the same to record your music or have fun while you are bored. The application is pretty to use and can be used as a girl voice changer not only for entertainment but also if you’re practicing. Many people who wish to seek a career in background voices might find this useful.
3. VoiceFX
Available for: Android
The VoiceFX application is filled with a lot of exciting options and features. If you are looking for an app that is more than just a male-to-female voice changer app, the voice fx is highly recommended.
You can also convert your voice into a robot or even an animal from male to female voice. Yes, you read it right. You can turn your manly voice into any of the fictional cartoons you want. This one’s a very easy and efficient way of filming a video with added effects or developing a mini-game with different voice characters. If you haven’t forgotten, there was a very big trend of converting famous music into chipmunk voices. With this app, you can convert your favorite songs into a chipmunk addition song without any problem.
4. Voice Changer
Available for: Android
The voice changer is a very famous male-to-female voice changer app. With over 10 million downloads on the google play store, the voice changer is highly recommended for users who have fun changing their voices from male to female. Compared to other voice changer applications, The Voice changer app has a very elegant and sleek design that makes it very easy to use.
Apart from the male to female voice change option, There are more than 50 other options that you can enjoy. Furthermore, you can share your creations with your friends through Bluetooth or other social media.
5. Voice Changer - Audio effects
Available for: Android
There are a lot of girl voice changer applications on the google play store. But not all of them are up to the mark. The Voice changer - audio effects is another highly recommended voice changer application.
The Voice Changer - Audio effects have a lot of other things to offer as well. Converting your voice from a male to a female has never been easier. Not only can you convert your voice into a girl, but you can also modify it. Furthermore, you can talk to your friends on the phone while you use the voice changer application. Moreover, the voices of animals and robots can also be an alternative to the female voice if you ever get bored of it.
6. Magic Call App
Available for: Android
The magic call is a real-time voice changer app that you can use for changing your voice during a call specifically. It is a really fun app which you can use with your friends to prank even your family!
This is a perfect option for people looking for a real-time girl voice changer app. The main purpose of this application is real-time calls. The magic call is ideal specifically for a male-to-female voice modification. And you can operate this application easily in call durations.
All you have to do is open the voice changer app and dial your call. Apart from Female voice, you can also convert your voice into a cartoon or an animal.
7. Voice Changer and Sound Recorder
Available for: iOS
If you are an iPhone user, then you must know that finding a voice changer on the apple store is like digging a diamond from the ground.
The Voice changer and sound recorder application is found exclusively on the apple store for people who love girl voice changer apps. It is a live call voice changer app, which means converting your voice from a male to a female in between the call. Furthermore, you can even add background voices such as traffic and echo to make your call even funnier. If you are looking for an excuse to get off from your call, then this application has got your back.
8. Super Voice Editor
Available for: Android
This one is a fun application for people searching for a voice changer app male to female. Not only can you record the audio that you edit, but also use it in real-time! Amazing right? Super voice editor enables you to add effects to your voice while you’re on a call as well. This feature means, next time you’re pulling a prank on the birthday boy, he won’t ever know! Sound like the wonder woman or dexter from his laboratory. The Super-Voice editor is perfect for kids playing in the house and even teenagers looking for something interesting. The SoulApps studio has made it easy for you to sound like your dream faces on the screen. With an MP3 cutter and Ringtone maker, this girl voice changer app is pure creativity.
9. Voice Changer with Effects
Available for: Android
Our list of girl voice changers, Voice changer with effects, is a very practical application that we highly recommend to our users.
With over 50 million downloads on google play, Voice changer with effects is highly suited for anyone looking for more than just a male-to-female voice changer. It has over 40 plus options such as helium, chipmunk, zombie, alien, and many more. With this application, you can even import a favorite audio clip of yours, and then you can easily convert it into a voice you like. If you want to modify your ringtone to an audio clip you just converted, then there is no better application than this one.
10. Voice Changer - Girls Voice changer Male to Female
Available for: Android
If you are looking for a girl voice changer app solely, this application perfectly fits you. The application is specifically designed only to change your voice from a male to a female. Although this application does provide options apart from female voice conversions, those features don’t function ideally. However, if you want a girl voice changer, you won’t have any trouble.
You can use this application while you are on a call. Hence, you can fool your family or friends by using a girl voice instead of your own. We recommend this as an average application that would fit your needs sufficiently.
In conclusion, you have now gone through the list of the perfect options for your android or iOS. Therefore, now you must be ready to choose the best girl voice changer app. So head on to your play store and search for your favorite app right now!
Modern Methods of Mixing Media: The Latest on Adding Sound to AE Projects (2023’S Insights and Tips)
How to Add Audio in After Effects

Benjamin Arango
Mar 27, 2024• Proven solutions
Working with audio files in Adobe After Effects would be challenging since it is basically a visual effects and motion graphics software, but audio can be added to a video in After Effects by the following method we are going to introduce in this guide.
How to Add Audio in After Effects
1. Start the program and open a new project.
2. Import the files in the project panel. Mute the video sound if neccesary

3. Import the audio file to the project file as well (that is required to be added).
4. Make sure to convert the audio file to .mp3 format.
5. Drag and drop the audio onto the composition.
To preview the audio in After Effects, enable the audio in the timeline first and then Press cmd+0 on Mac to preview.
6. Adjust the audio settings. Double click “L” on you keyboard to show the audio waveform.

Check this video tutorial to know the details on adding, adjusting audio in After Effects
5 Best Audio Editing Software to Add Audio to Video
1. WavePad from NCH Software
This is definitely one of the most popular editing tools because of how simple and easy it is to use. It is great for beginners who need professional-level editing tools. It is possible to use any audio format on this software including MP3, WMA, OGG, VOX, GSM, etc.
2. Audacity: Free open source audio editing software
This is free software that works on multiple platforms and supports multi-track editing and even live audio recording. It has a very simple user interface that makes it easy to learn on and get used to while offering professional features and ensuring the best quality.
3. Wondershare Filmora
Users are not restricted to working across After Effects to manage their audios. There are a lot of options available in the market that feature simplicity and efficiency. Wondershare Filmora is a unique example of such a platform that provides users with a simple user interface integrated with advanced features to work on. There are a lot of functions that can be performed across audio that is added across Filmora.
Multiple audio adjustment options are available across Wondershare Filmora. While fading the audio and managing its pitch, users can utilize denoising and ducking tools to make different edits across the audio.


To add audio in Wondershare Filmora, you need to follow the steps as explained below.
Step 1: Start a New Project on Wondershare Filmora
Download and install the official software of Wondershare Filmora on your device. Once installed, you need to launch it and tap on “New Project” to start working on Filmora.

Step 2: Import Audio File
Once a new project starts, tap on ‘File’ followed by “Import Media.” Select the option of “Import Media Files” to proceed to the next screen. Add in the required audio successfully.

Step 3: Drag Audio to Timeline
To perform different edits across the audio, the user needs to drag the audio on the timeline.

Step 4: Export Audio File
Once you are done editing the audio, you can easily save it across your device. For that, tap on “Export” to open a new window. Across the “Local” section, select “MP3” from the list of formats and figuratively set all the other settings before tapping on “Export.”

3. FL Studio 12.1.2
This digital editing workstation is definitely not for beginners. Trained professionals who are familiar with editing software will not have a lot of trouble adjusting to this format. This is a professional tool that offers a convenient platform for editing and mixing.
4. Adobe Audition
Here you will get a mix of simplicity and professionalism. It is easy to get used to but progresses in complexity with time.
5. Wavosaur
Wavosaur is an old tool that doesn’t run on most modern computers and laptops. But it does offer many features and methods of processing for audio clips.
Benjamin Arango
Benjamin Arango is a writer and a lover of all things video.
Follow @Benjamin Arango
Benjamin Arango
Mar 27, 2024• Proven solutions
Working with audio files in Adobe After Effects would be challenging since it is basically a visual effects and motion graphics software, but audio can be added to a video in After Effects by the following method we are going to introduce in this guide.
How to Add Audio in After Effects
1. Start the program and open a new project.
2. Import the files in the project panel. Mute the video sound if neccesary
3. Import the audio file to the project file as well (that is required to be added).
4. Make sure to convert the audio file to .mp3 format.
5. Drag and drop the audio onto the composition.
To preview the audio in After Effects, enable the audio in the timeline first and then Press cmd+0 on Mac to preview.
6. Adjust the audio settings. Double click “L” on you keyboard to show the audio waveform.
Check this video tutorial to know the details on adding, adjusting audio in After Effects
5 Best Audio Editing Software to Add Audio to Video
1. WavePad from NCH Software
This is definitely one of the most popular editing tools because of how simple and easy it is to use. It is great for beginners who need professional-level editing tools. It is possible to use any audio format on this software including MP3, WMA, OGG, VOX, GSM, etc.
2. Audacity: Free open source audio editing software
This is free software that works on multiple platforms and supports multi-track editing and even live audio recording. It has a very simple user interface that makes it easy to learn on and get used to while offering professional features and ensuring the best quality.
3. Wondershare Filmora
Users are not restricted to working across After Effects to manage their audios. There are a lot of options available in the market that feature simplicity and efficiency. Wondershare Filmora is a unique example of such a platform that provides users with a simple user interface integrated with advanced features to work on. There are a lot of functions that can be performed across audio that is added across Filmora.
Multiple audio adjustment options are available across Wondershare Filmora. While fading the audio and managing its pitch, users can utilize denoising and ducking tools to make different edits across the audio.
To add audio in Wondershare Filmora, you need to follow the steps as explained below.
Step 1: Start a New Project on Wondershare Filmora
Download and install the official software of Wondershare Filmora on your device. Once installed, you need to launch it and tap on “New Project” to start working on Filmora.
Step 2: Import Audio File
Once a new project starts, tap on ‘File’ followed by “Import Media.” Select the option of “Import Media Files” to proceed to the next screen. Add in the required audio successfully.
Step 3: Drag Audio to Timeline
To perform different edits across the audio, the user needs to drag the audio on the timeline.
Step 4: Export Audio File
Once you are done editing the audio, you can easily save it across your device. For that, tap on “Export” to open a new window. Across the “Local” section, select “MP3” from the list of formats and figuratively set all the other settings before tapping on “Export.”
3. FL Studio 12.1.2
This digital editing workstation is definitely not for beginners. Trained professionals who are familiar with editing software will not have a lot of trouble adjusting to this format. This is a professional tool that offers a convenient platform for editing and mixing.
4. Adobe Audition
Here you will get a mix of simplicity and professionalism. It is easy to get used to but progresses in complexity with time.
5. Wavosaur
Wavosaur is an old tool that doesn’t run on most modern computers and laptops. But it does offer many features and methods of processing for audio clips.
Benjamin Arango
Benjamin Arango is a writer and a lover of all things video.
Follow @Benjamin Arango
Also read:
- Updated Acoustic Aesthetics Mastering Speed and Pitch Variations in Adobe Rush
- Updated Cutting Through Clutter Effective Background Noise Removal in iMovie for 2024
- Updated Silence iPhone Volume Automation Feature
- 2024 Approved Discovering the Ultimate Voice Overhaul Mobile Tools
- Updated 2024 Approved Mastering Audio Amplitude Control in Audacity
- New 2024 Approved The Ultimate Compilation of Advanced MP3 Reduction Software
- Updated 2024 Approved Melody and Motion Best-Sync Videography Applications of the Decades First Half
- Updated 2024 Approved Instantaneous Techniques for Cutting Down Residual Hum in Recordings
- Updated 2024 Approved Audio-Visual Synergy Incorporate Free Soundtracks Into Photos
- 2024 Approved Auditory Landmarks Pinpointing Button-Induced Sounds in Software
- Updated Audacitys Magic Wand Techniques for Effortless Removal of Singers From Soundscapes
- Updated Bridal Ballad Blues Classical Compositions for the Wedding Documentary for 2024
- Updated 2024 Approved Compiling Echoes and Ambiances Key Sites for Podcast Soundtracks
- Updated In 2024, Voicing Your Ideas with Confidence A Comprehensive List of Top Voice Altering Tools for Google Meet
- Evaluation Report on Sound Forges Audio Editing Tools for 2024
- Updated In 2024, Peaceful Productions Simplified Noise Elimination Strategies for Premiere Pro Users
- 2024 Approved Notable Sites to Download Popular Lofi Visuals and Audio Pieces
- New How to Add Audio to MKV-2023 Update for 2024
- Top-Tier Approaches for Enhancing IGTV with Soundtracks for 2024
- New 2024 Approved Guidelines for Exporting Audio From Audacity to MP3
- New Expert Sound Engineers to Elevate Live and On-Demand Streams
- Updated From Novice to Pro Harnessing the Potential of Adobes Audio Editor (Adobe Audition) for 2024
- Dynamic Sound Design Modifying Audio Velocity & Frequency in Adobe Rush for 2024
- The Remote Auditory Engineers Toolkit Optimizing Playback Velocity and Harmonic Content Online for 2024
- Updated Improve Auditory Experience Through Crossfade Adjustments
- New Step-by-Step Guide to Eradicating Audios in Video Projects Using iMovie
- The Social Sphere Selecting the Best Marketing-Focused Podcasts for Todays Businesses for 2024
- Unveiling the Most Trustworthy Digital Chat Services for Social Engagement
- New A Detailed Exploration of Integrating Audio with MKV Videos Insights for the 2023 Update for 2024
- Updated 2024 Approved Movie Magic at Work The Crucial Functions and Impact of Every Film Set Team Member
- Clearer Soundscape Achieving Clean Audio Beds via Wondershare Filmora
- Updated Locate Horrifying Noise Sample for 2024
- Updated Cadence in Coding Envisioning the Leading Luminaries Amongst AI Music Architects
- Updated Clearer Audio Aesthetics Removing Distractions with iMovie on macOS
- New 2024 Approved Chorus Cutter Suite Construct Individualized Musical Backdrops
- Updated Clap Quest Unearthing Enthusiastic Reactions for 2024
- Harnessing Free Speech-to-Text Technology A 2023 Roundup of Online Resources for 2024
- Updated Elevating Your Viewing Experience 2023 Guide to Audio Volume Adjustment in Videos
- New Where Can I Find Whistle Sounds Effect for 2024
- Updated The Editors Manual Mastering the Art of Attaching and Aligning Soundtracks in Final Cut Pro
- Discovering the Finest No-Cost Auditory Effects Vaults for 2024
- New Maximizing Clarity in Recordings A Comprehensive Study on Noise Reduction in Adobe Audition
- Updated 2024 Approved Recommendations for Music Video Editors
- In 2024, 10 Free Location Spoofers to Fake GPS Location on your Samsung Galaxy M34 | Dr.fone
- Pattern Locks Are Unsafe Secure Your Vivo Y100t Phone Now with These Tips
- In 2024, Which Pokémon can Evolve with a Moon Stone For Nokia C300? | Dr.fone
- In 2024, Is Fake GPS Location Spoofer a Good Choice On Oppo A56s 5G? | Dr.fone
- Updated Discover the Best Top 10 Free 4K Video Converters for PC and Mac
- New 2024 Approved Get Started with Video Editing on Mac OS X Yosemite A Quick Start Guide
- In 2024, What Legendaries Are In Pokemon Platinum On Samsung Galaxy F34 5G? | Dr.fone
- Updated How To Make Talking Emoji on iPhone in Easy Steps for 2024
- In 2024, How to Show Wi-Fi Password on Infinix Hot 30i
- In 2024, 5 Quick Methods to Bypass Samsung Galaxy A14 5G FRP
- 3 Easy Solutions to Hard Reset Honor Magic 6 Pro | Dr.fone
- Google Play Services Wont Update? 12 Fixes are Here on Infinix Note 30 | Dr.fone
- In 2024, How to Transfer Apps from Oppo A78 5G to Another | Dr.fone
- 3 Ways to Fake GPS Without Root On Realme GT Neo 5 SE | Dr.fone
- Download YouTube Songs A Simple and Easy Method for 2024
- In 2024, Why Your WhatsApp Live Location is Not Updating and How to Fix on your Realme GT Neo 5 | Dr.fone
- Complete guide for recovering pictures files on Google Pixel Fold.
- 8 Quick Fixes Unfortunately, Snapchat has Stopped on Infinix Hot 40i | Dr.fone
- How to Rescue Lost Music from Lava Blaze 2 5G
- How to Stop My Spouse from Spying on My Apple iPhone 15 Pro | Dr.fone
- Guide How To Unbrick a Bricked Nokia C300 Phone | Dr.fone
- What is Fake GPS Location Pro and Is It Good On Nokia C12 Plus? | Dr.fone
- How to recover deleted photos from Android Gallery without backup on Hot 30i
- Updated Learn Color Correction in After Effects with These Videos for 2024
- What Pokémon Evolve with A Dawn Stone For Vivo S17e? | Dr.fone
- In 2024, The Ultimate Guide to Creating a Photo Video with Music
- Top 10 Fingerprint Lock Apps to Lock Your Motorola Moto G34 5G Phone
- 9 Solutions to Fix Xiaomi Redmi K70 System Crash Issue | Dr.fone
- How To Transfer WhatsApp From iPhone 6 Plus to other iPhone 12 Pro Max devices? | Dr.fone
- In 2024, Best Anti Tracker Software For Oppo Reno 10 5G | Dr.fone
- The Ultimate Guide to Vivo S17 Pro Pattern Lock Screen Everything You Need to Know
- Do You Want to Add an Adjustment Layer to Your Video for Easier Editing? Read This Article to Find Out How to Efficiently Add an Adjustment Layer in After Effects
- CatchEmAll Celebrate National Pokémon Day with Virtual Location On Apple iPhone SE | Dr.fone
- In 2024, How to Unlock Oppo F25 Pro 5G Phone Pattern Lock without Factory Reset
- Fix Realme V30 Android System Webview Crash 2024 Issue | Dr.fone
- How to recover deleted contacts from 13 Ultra.
- In 2024, How To Stream Anything From Nokia G42 5G to Apple TV | Dr.fone
- How to Reset Apple ID and Apple Password From iPhone XS Max
- Title: New Mastering Silence Techniques for Quieting Unwanted Sounds in Video Editing for 2024
- Author: David
- Created at : 2024-05-05 10:06:29
- Updated at : 2024-05-06 10:06:29
- Link: https://sound-tweaking.techidaily.com/new-mastering-silence-techniques-for-quieting-unwanted-sounds-in-video-editing-for-2024/
- License: This work is licensed under CC BY-NC-SA 4.0.
