
:max_bytes(150000):strip_icc():format(webp)/AnneParkShedloskytvOS-2d4178dd6b7d46a08c34ab8b750fe23e.jpg)
New In 2024, Premier Collection 11 Complimentary Mobile Audio Modification Tools for Both iOS and Android
Premier Collection: 11 Complimentary Mobile Audio Modification Tools for Both iOS and Android
Best Voice Changer Apps for iPhone and Android

Benjamin Arango
Mar 27, 2024• Proven solutions
Have you ever wondered what your voice would sound like if you were a cartoon character, a robot, or an older version of yourself? Changing how your voice sounds has never been easier, regardless of the Smartphone model you have, since voice changer apps can be used on both iPhone and Android devices.
Even though there is nothing wrong with modulating your voice to have fun with your friends, using voice changer apps to pull malicious pranks or bully strangers online is far from acceptable. Read on if you would like to find out more about the best voice changer apps for iPhone and Android devices and discover the one you enjoy using the most.
Best Voice Changer Apps for iPhone and Android
Creating a new ringtone, making a voice recording, or having fun with your friends are only a few reasons why so many people choose to try out voice changer apps. The vast majority of these apps feature well-equipped audio effects libraries that enable users to have fun with their friends and hear how they would sound if they were drunk or after inhaling helium. So, let’s take a look at some of the best voice changer apps on the market.


Changing video voice on Windows and Mac with Wondershare Filmora
Do you want to change the voice in video on Windows and Mac and don’t know which software can meet this requirement? Try Filmra video editor , which provides several ways to change voice over, such as changing the voice speed or changing the pitch. Download the trial version below and find out more possibility in video creation with Filmora.
1. Celebrity Voice Changer – Face
Price: Free, but offers in-app purchases
Compatibility: iOS 9.0 or later
User Rating: 4.0
In case you would like to sound like your favorite movie star of TV host, then Celebrity Voice Changer is one of the best choices you can make. Besides the standard set of options, the app also lets you request new voices since its machine learning technology can mimic virtually anyone’s voice. However, Celebrity Voice Changer is currently only available in English and it cannot modulate speech in other languages. In addition, you must make an in-app purchase in order to gain access to all of the app’s features or unlock the unlimited usage of the app.
Pros
- Automatic voice modulation
- Huge selection of voice filters
- The app generates video files that are better adjusted to the audience on social media than audio files
- Excellent impressions of celebrities
Cons
- Unreasonably expensive
- The app’s Deep Learning technology still has a lot of room for improvement
2. Snapchat
Price: Free, but offers in-app purchases
Compatibility: iOS 10.0 or later, Android 4.4 or up
User Rating: 3.8
With more than 203 million daily users, Snapchat is one of the largest messaging platforms on the market. Previously, we’ve shared how to change gender on Snapchat , beside that, the app lets its users capture short moments or the so-called Snaps and share them with friends. In addition to hundreds of video filters , Snapchat also features a broad spectrum of voice changing effects that make Snaps more entertaining. Even so, the audio recording options Snapchat offers are far from ideal, because the app doesn’t allow you to edit the files you create with it. Using Snapchat will drain your battery quickly, which is why you must pay attention to how frequently you use this app.
Pros
- The easy voice modulation process
- Excellent messaging options
- Grants you access to a large community of likeminded people
- Lenses and filters are updated on a daily basis
Cons
- Editing voice changes after you create a Snap is not possible
- Snapchat is not primarily a voice changer app
Check the detailed information about How to Change Voice on Snapchat with 2 Easy Methods >>
3. Voice Changer
Price: Free
Compatibility: Android 4.1 and up
User Rating: 4.3

Changing your voice with this app won’t take more than a few moments of your time. You just have to launch the app and hit the microphone button to record a message or a joke you would like to modulate. Once you’re happy with the audio recording you made, you can proceed to choose from more than twenty voice effects that will make you sound like a dwarf, a robot, or an alien. The app’s file-sharing capabilities enable you to post your audio recordings to any social media platform of your choosing or store your files and use them as many times as you want.
Pros
- Entertaining and easy to use
- The simple three-step voice modulation process
- Good selection of voice filters
- Excellent file sharing options
Cons
- The app displays ads
- No audio editing tools
4. Voicy: Celebrity Voice Changer
**Price:**Free, but offers in-app purchases
Compatibility: iOS 10 or later
User Rating: 4.3

Impersonating your favorite celebrity can be a fun way to prank your friends on social media. Voicy features a broad selection of celebrity voice impersonations you can use to make you sound like a famous actress or TV personality. The app utilizes a machine learning technology that can generate more than forty avatars and allows the users to experiment with different voice effects. The free version of the app offers only limited capabilities, so if you want to gain access to all of the Voicy’s features, you must choose a weekly, monthly or an annual subscription.
Pros
- Equipped with a powerful machine learning technology
- Offers a vast selection of voice avatars
- The quick voice modification process
- A great choice if you want to make a parody
Cons
- More expensive than the competition
- Support only the English language
5. Video Voice Changer – Fun Editor
Price: Free, but offers in-app purchases
Compatibility: iOS 8.0 or later
User Rating: 4.4

Changing the voices in the videos you record with your iPhones or iPads is a straightforward process that takes a minimum amount of effort. You can either use this iOS-based app to capture videos you’re going to dub or import them from the albums in which they are stored. The Video Voice Changer app is a great option if you want to dub videos directly from your phone because it enables you to change the voices in your videos and make them sound like mice, bears or ghosts. There are over thirty voice effects to choose from, so you can easily pick the one that best fits the video you’re editing.
Pros
- Equipped with video recording tools
- Excellent dubbing features
- A rich selection of voice effects
- Allows users to share their creations on Facebook, Instagram, and other social media platforms
Cons
- You must make an in-app purchase to unlock all of the app’s features
- No audio mixing options
6. Video Voice Changer FX
**Price:**Free, but offers in-app purchases
Compatibility: Android 4.1 and up
User Rating: 4.1

This is a simple app, anyone can use to change the voices in a video. Simply upload a video file from an SD card in your phone and choose an audio effect you want to apply. The app’s collection of funny voices includes options like echo, squirrel, space ship or chipmunk. As soon as you select the voice effect you want to add to a video, the app will start generating a new video that will be saved to your phone. Sharing the videos you edit with Video Voice Changer FX to social media directly from the app is not an option.
Pros
- Fun and easy to use
- Great price to performance ratio
- Changing a voice requires just a few taps
- Allows users to switch between effects while the video is playing
Cons
- No audio or video recording capability
- Doesn’t support social media sharing
7. Squeak Voice Changer
**Price:**Free, but offers in-app purchases
Compatibility: Android 4.3 and up
User Rating: 3.9

Every joke you want to share with your online friends is going to be a little funnier if you record it with Squeak Voice Changer. You just have to tap on the Record button and choose one of the available effects. Each voice changing effect this app offers is represented by a character so you should select Jamie the Jolly if you want to make your voice sound like you’re at a party or Bruce the Sentimental Bot if you want your voice to sound artificial. All the recordings you make with Squeak Voice Changer can be easily shared on social media.
Pros
- Equipped with audio recording options
- Cute and memorable characters that represent voice effects
- Inexpensive and fun to use
- Functional app design
Cons
- Poor selection of voice effects
- The AI only recognizes the English language
8. Voice Changer with Effects
**Price:**Free
Compatibility: Android 4.1 and up
User Rating: 4.5
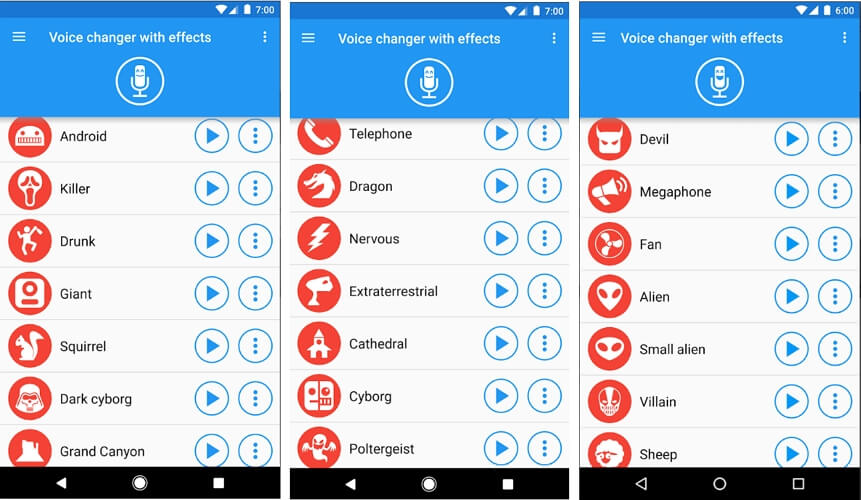
This Android-based app is designed to make fun and easy since voice modulation features enable you to play voice recording backward or change your voice to sound robotic or even alien. Besides recording your voice, the app also lets you modulate pre-recorded sounds and save them to your phone or use them as ringtones or notification sounds. Furthermore, the app lets you add sounds to images and share them to Facebook. The Voice Changer with Effects enables you to share all audio files you process with it to any of the most popular social media platforms.
Pros
- The app has over 50,000,000 installs
- Equipped with a text to voice feature
- Setting a new ringtone with this app is easy
- Supports editing of pre-recorded audio files
Cons
- Contains ads
- No audio or video editing options
9. Voice Changer
**Price:**Free
Compatibility: Android 4.1 and up
User Rating: 4.4

If you are looking for an Android app that lets you modulate your voice quickly and effortlessly, then Voice Changer may be one of the best options you can find on the market. You can record your voice by simply tapping on the microphone and speaking into your phone’s speaker and then apply one of the audio effects this app offers. Optionally, you can import an audio file you already recorded into the app and then apply Martian, Foreigner, Giant or Child effects to your voice recording. The best part is that you can apply each effect to the audio files you’re editing as many times as you want.
Pros
- Loads of funny effects
- Simple audio recording setup
- Intuitive and modernly designed interface
- Enables users to share audio files via Bluetooth or social media platforms
Cons
- No video editing tools
- The quality of output audio files can vary
10. Voice FX
**Price:**Free, but offers in-app purchases
Compatibility: Android 4.0.3 and up
User Rating: 3.8

Modulating voices in all types of audio files is a straightforward and fun process that can be completed in just a few taps. During the audio recording session, you can apply all voice effects to the sound you are recording and stream it live to your web browsers or media players you’re using. Voice FX changes your voice in real time, which enables you to preview your results before deciding if you want to save them. All files you export from this app will be saved in the MP3 format so you can use them as ringtones on your Android device.
Pros
- Allows users to modulate pre-recorded audio files
- Voice effects are applied in real time
- Offers live streaming features
- Exports files in the MP3 format
Cons
- Prone to glitches
- A limited selection of voice effects
11. Voice Changer Plus
**Price:**Free, but offers in-app purchases
Compatibility: iOS 8.0 or later
User Rating: 4.8
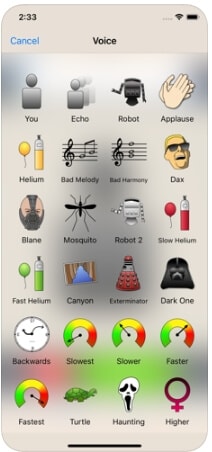
iPhone and iPad owners in need of a voice changer app that grants them complete creative freedom over the modulation of the voices they record, should consider using the Voice Changer Plus. The app features more than fifty voice effects and it provides support for voiceover recordings. Moreover, you can edit all your audio files even after you saved them, enabling you to find new ways to improve your recordings over time. Voice Changer Plus is also equipped with trim controls, so you can remove all parts of your audio files you don’t want to share with your friends on social media.
Pros
- Offers more voice effects than most of its competitors
- Provides voiceover recording options
- Users can trim their audio files
- All audio recordings can be edited after the voice modulation
Cons
- In-app purchase is required in order to unlock all of the app’s features
- Modulating audio in video files is not an option
Below is a quick comparison table among these voice changer apps, hope it will be helpful.
| App | Supported OS | User Rating | Voice Templates |
|---|---|---|---|
| Celebrity Voice Changer - Face | iOS 9.0 or later | 4.0 | Yes |
| Snapchat | iOS 10.0 or later, Android 4.4 or up | 3.8 | No |
| Voice Changer by e3games | Android 4.1 and up | 4.3 | Yes |
| Voicy: Celebrity Voice Changer | iOS 10 or later | 4.3 | Yes |
| Video Voice Changer – Fun Editor | iOS 8.0 or later | 4.4 | Yes |
| Video Voice Changer FX | Android 4.1 and up | 4.1 | Yes |
| Squeak Voice Changer | Android 4.3 and up | 3.9 | Yes |
| Voice Changer with Effects | Android 4.1 and up | 4.5 | Yes |
| Voice Changer | Android 4.1 and up | 4.4 | Yes |
| Voice FX | Android 4.0.3 and up | 3.8 | Yes |
| Voice Changer Plus | iOS 8.0 or later | 4.8 | Yes |
Conclusion
Everybody enjoys a good joke, and the apps we featured in this article enable you to have a lot of fun while experimenting with different voice modulation options. All of the voice effects these apps offer can change a voice automatically, but if you would like to alter the voices in your videos you must choose an app that supports this option. Which of the best voice changer apps for iPhone and Android devices are you going to choose? Leave a comment, and share your opinions with us.
Benjamin Arango
Benjamin Arango is a writer and a lover of all things video.
Follow @Benjamin Arango
Benjamin Arango
Mar 27, 2024• Proven solutions
Have you ever wondered what your voice would sound like if you were a cartoon character, a robot, or an older version of yourself? Changing how your voice sounds has never been easier, regardless of the Smartphone model you have, since voice changer apps can be used on both iPhone and Android devices.
Even though there is nothing wrong with modulating your voice to have fun with your friends, using voice changer apps to pull malicious pranks or bully strangers online is far from acceptable. Read on if you would like to find out more about the best voice changer apps for iPhone and Android devices and discover the one you enjoy using the most.
Best Voice Changer Apps for iPhone and Android
Creating a new ringtone, making a voice recording, or having fun with your friends are only a few reasons why so many people choose to try out voice changer apps. The vast majority of these apps feature well-equipped audio effects libraries that enable users to have fun with their friends and hear how they would sound if they were drunk or after inhaling helium. So, let’s take a look at some of the best voice changer apps on the market.
Changing video voice on Windows and Mac with Wondershare Filmora
Do you want to change the voice in video on Windows and Mac and don’t know which software can meet this requirement? Try Filmra video editor , which provides several ways to change voice over, such as changing the voice speed or changing the pitch. Download the trial version below and find out more possibility in video creation with Filmora.
1. Celebrity Voice Changer – Face
Price: Free, but offers in-app purchases
Compatibility: iOS 9.0 or later
User Rating: 4.0
In case you would like to sound like your favorite movie star of TV host, then Celebrity Voice Changer is one of the best choices you can make. Besides the standard set of options, the app also lets you request new voices since its machine learning technology can mimic virtually anyone’s voice. However, Celebrity Voice Changer is currently only available in English and it cannot modulate speech in other languages. In addition, you must make an in-app purchase in order to gain access to all of the app’s features or unlock the unlimited usage of the app.
Pros
- Automatic voice modulation
- Huge selection of voice filters
- The app generates video files that are better adjusted to the audience on social media than audio files
- Excellent impressions of celebrities
Cons
- Unreasonably expensive
- The app’s Deep Learning technology still has a lot of room for improvement
2. Snapchat
Price: Free, but offers in-app purchases
Compatibility: iOS 10.0 or later, Android 4.4 or up
User Rating: 3.8
With more than 203 million daily users, Snapchat is one of the largest messaging platforms on the market. Previously, we’ve shared how to change gender on Snapchat , beside that, the app lets its users capture short moments or the so-called Snaps and share them with friends. In addition to hundreds of video filters , Snapchat also features a broad spectrum of voice changing effects that make Snaps more entertaining. Even so, the audio recording options Snapchat offers are far from ideal, because the app doesn’t allow you to edit the files you create with it. Using Snapchat will drain your battery quickly, which is why you must pay attention to how frequently you use this app.
Pros
- The easy voice modulation process
- Excellent messaging options
- Grants you access to a large community of likeminded people
- Lenses and filters are updated on a daily basis
Cons
- Editing voice changes after you create a Snap is not possible
- Snapchat is not primarily a voice changer app
Check the detailed information about How to Change Voice on Snapchat with 2 Easy Methods >>
3. Voice Changer
Price: Free
Compatibility: Android 4.1 and up
User Rating: 4.3
Changing your voice with this app won’t take more than a few moments of your time. You just have to launch the app and hit the microphone button to record a message or a joke you would like to modulate. Once you’re happy with the audio recording you made, you can proceed to choose from more than twenty voice effects that will make you sound like a dwarf, a robot, or an alien. The app’s file-sharing capabilities enable you to post your audio recordings to any social media platform of your choosing or store your files and use them as many times as you want.
Pros
- Entertaining and easy to use
- The simple three-step voice modulation process
- Good selection of voice filters
- Excellent file sharing options
Cons
- The app displays ads
- No audio editing tools
4. Voicy: Celebrity Voice Changer
**Price:**Free, but offers in-app purchases
Compatibility: iOS 10 or later
User Rating: 4.3
Impersonating your favorite celebrity can be a fun way to prank your friends on social media. Voicy features a broad selection of celebrity voice impersonations you can use to make you sound like a famous actress or TV personality. The app utilizes a machine learning technology that can generate more than forty avatars and allows the users to experiment with different voice effects. The free version of the app offers only limited capabilities, so if you want to gain access to all of the Voicy’s features, you must choose a weekly, monthly or an annual subscription.
Pros
- Equipped with a powerful machine learning technology
- Offers a vast selection of voice avatars
- The quick voice modification process
- A great choice if you want to make a parody
Cons
- More expensive than the competition
- Support only the English language
5. Video Voice Changer – Fun Editor
Price: Free, but offers in-app purchases
Compatibility: iOS 8.0 or later
User Rating: 4.4
Changing the voices in the videos you record with your iPhones or iPads is a straightforward process that takes a minimum amount of effort. You can either use this iOS-based app to capture videos you’re going to dub or import them from the albums in which they are stored. The Video Voice Changer app is a great option if you want to dub videos directly from your phone because it enables you to change the voices in your videos and make them sound like mice, bears or ghosts. There are over thirty voice effects to choose from, so you can easily pick the one that best fits the video you’re editing.
Pros
- Equipped with video recording tools
- Excellent dubbing features
- A rich selection of voice effects
- Allows users to share their creations on Facebook, Instagram, and other social media platforms
Cons
- You must make an in-app purchase to unlock all of the app’s features
- No audio mixing options
6. Video Voice Changer FX
**Price:**Free, but offers in-app purchases
Compatibility: Android 4.1 and up
User Rating: 4.1
This is a simple app, anyone can use to change the voices in a video. Simply upload a video file from an SD card in your phone and choose an audio effect you want to apply. The app’s collection of funny voices includes options like echo, squirrel, space ship or chipmunk. As soon as you select the voice effect you want to add to a video, the app will start generating a new video that will be saved to your phone. Sharing the videos you edit with Video Voice Changer FX to social media directly from the app is not an option.
Pros
- Fun and easy to use
- Great price to performance ratio
- Changing a voice requires just a few taps
- Allows users to switch between effects while the video is playing
Cons
- No audio or video recording capability
- Doesn’t support social media sharing
7. Squeak Voice Changer
**Price:**Free, but offers in-app purchases
Compatibility: Android 4.3 and up
User Rating: 3.9
Every joke you want to share with your online friends is going to be a little funnier if you record it with Squeak Voice Changer. You just have to tap on the Record button and choose one of the available effects. Each voice changing effect this app offers is represented by a character so you should select Jamie the Jolly if you want to make your voice sound like you’re at a party or Bruce the Sentimental Bot if you want your voice to sound artificial. All the recordings you make with Squeak Voice Changer can be easily shared on social media.
Pros
- Equipped with audio recording options
- Cute and memorable characters that represent voice effects
- Inexpensive and fun to use
- Functional app design
Cons
- Poor selection of voice effects
- The AI only recognizes the English language
8. Voice Changer with Effects
**Price:**Free
Compatibility: Android 4.1 and up
User Rating: 4.5
This Android-based app is designed to make fun and easy since voice modulation features enable you to play voice recording backward or change your voice to sound robotic or even alien. Besides recording your voice, the app also lets you modulate pre-recorded sounds and save them to your phone or use them as ringtones or notification sounds. Furthermore, the app lets you add sounds to images and share them to Facebook. The Voice Changer with Effects enables you to share all audio files you process with it to any of the most popular social media platforms.
Pros
- The app has over 50,000,000 installs
- Equipped with a text to voice feature
- Setting a new ringtone with this app is easy
- Supports editing of pre-recorded audio files
Cons
- Contains ads
- No audio or video editing options
9. Voice Changer
**Price:**Free
Compatibility: Android 4.1 and up
User Rating: 4.4
If you are looking for an Android app that lets you modulate your voice quickly and effortlessly, then Voice Changer may be one of the best options you can find on the market. You can record your voice by simply tapping on the microphone and speaking into your phone’s speaker and then apply one of the audio effects this app offers. Optionally, you can import an audio file you already recorded into the app and then apply Martian, Foreigner, Giant or Child effects to your voice recording. The best part is that you can apply each effect to the audio files you’re editing as many times as you want.
Pros
- Loads of funny effects
- Simple audio recording setup
- Intuitive and modernly designed interface
- Enables users to share audio files via Bluetooth or social media platforms
Cons
- No video editing tools
- The quality of output audio files can vary
10. Voice FX
**Price:**Free, but offers in-app purchases
Compatibility: Android 4.0.3 and up
User Rating: 3.8
Modulating voices in all types of audio files is a straightforward and fun process that can be completed in just a few taps. During the audio recording session, you can apply all voice effects to the sound you are recording and stream it live to your web browsers or media players you’re using. Voice FX changes your voice in real time, which enables you to preview your results before deciding if you want to save them. All files you export from this app will be saved in the MP3 format so you can use them as ringtones on your Android device.
Pros
- Allows users to modulate pre-recorded audio files
- Voice effects are applied in real time
- Offers live streaming features
- Exports files in the MP3 format
Cons
- Prone to glitches
- A limited selection of voice effects
11. Voice Changer Plus
**Price:**Free, but offers in-app purchases
Compatibility: iOS 8.0 or later
User Rating: 4.8
iPhone and iPad owners in need of a voice changer app that grants them complete creative freedom over the modulation of the voices they record, should consider using the Voice Changer Plus. The app features more than fifty voice effects and it provides support for voiceover recordings. Moreover, you can edit all your audio files even after you saved them, enabling you to find new ways to improve your recordings over time. Voice Changer Plus is also equipped with trim controls, so you can remove all parts of your audio files you don’t want to share with your friends on social media.
Pros
- Offers more voice effects than most of its competitors
- Provides voiceover recording options
- Users can trim their audio files
- All audio recordings can be edited after the voice modulation
Cons
- In-app purchase is required in order to unlock all of the app’s features
- Modulating audio in video files is not an option
Below is a quick comparison table among these voice changer apps, hope it will be helpful.
| App | Supported OS | User Rating | Voice Templates |
|---|---|---|---|
| Celebrity Voice Changer - Face | iOS 9.0 or later | 4.0 | Yes |
| Snapchat | iOS 10.0 or later, Android 4.4 or up | 3.8 | No |
| Voice Changer by e3games | Android 4.1 and up | 4.3 | Yes |
| Voicy: Celebrity Voice Changer | iOS 10 or later | 4.3 | Yes |
| Video Voice Changer – Fun Editor | iOS 8.0 or later | 4.4 | Yes |
| Video Voice Changer FX | Android 4.1 and up | 4.1 | Yes |
| Squeak Voice Changer | Android 4.3 and up | 3.9 | Yes |
| Voice Changer with Effects | Android 4.1 and up | 4.5 | Yes |
| Voice Changer | Android 4.1 and up | 4.4 | Yes |
| Voice FX | Android 4.0.3 and up | 3.8 | Yes |
| Voice Changer Plus | iOS 8.0 or later | 4.8 | Yes |
Conclusion
Everybody enjoys a good joke, and the apps we featured in this article enable you to have a lot of fun while experimenting with different voice modulation options. All of the voice effects these apps offer can change a voice automatically, but if you would like to alter the voices in your videos you must choose an app that supports this option. Which of the best voice changer apps for iPhone and Android devices are you going to choose? Leave a comment, and share your opinions with us.
Benjamin Arango
Benjamin Arango is a writer and a lover of all things video.
Follow @Benjamin Arango
How to Remove Noise From Audio Online
In most cases, the most typical request you’ll get from video makers is to eliminate the unpleasant noises like rumble or hum from the completed piece of video. When filming, it’s tough to get good audio since the dialogue is often muffled by ambient noise, such as the dreaded whir of an air conditioning unit or fans. When combining and filming sound effects or other design aspects for the video, background noise is often removed.
Fortunately, there are a few approaches that you can take to remove noise from audio Online. You can denoise your video or audio by adding some background music or using audio or video editing software to reduce noise. If you’re looking for a technique to get rid of background noise, this article will serve you well in your quest. Let’s get started!
In this article
01 What Is Audio Noise And Why Is It Harmful?
02 How to Remove Background Noise Online
03 Tips For Removing Background Noise From Audio BEFORE You Record
04 FAQs About Removing Audio Noise From Video Online
Part 1: What Is Audio Noise And Why Is It Harmful?
No definition exists for audio noise; however, it is often defined as background noises such as fans, people chatting, automobiles or trucks going by, buzzing from broken audio wiring, or other ambient sounds that should not be included in your film. Your viewers will be distracted from the crucial information provided by the individual speaking in your video if the audio is too noisy.
Compared to that, noisy audios tend to damage the experience you’re looking for. Consider this: if you’re listening to a voice recording of your manager at work and it’s noisy to a point, you’re unable to make sense of it, you would most probably end up missing out on crucial details.
When it comes to creating a decent video, clear audio goes a long way. But that’s not all there is to it. A clear audio track could be heard in almost all of the videos that received four or five stars for “how correctly did the film accomplish its purpose” and “how did you personally assess the video,” according to the submissions.
Part 2: How to Remove Background Noise Online
There are various ways to eliminate all the background noise from the audio. Below is a list of the best online background noise removers to help you do that.2. Veed.io
Website: https://www.veed.io/
VEED is one of the most super-simple online video editors that cleans up background interference with a single click of the mouse, making it an excellent choice for beginners. There is no need to re-record your audio. There is no need for pricey sound-blocking microphones.
You can quickly eliminate all undesirable background noise from your audio files by using VEED’s background noise remover. VEED can help you remove background noise from any audio file, including MP3, WMA, and more.
No matter what type of audio file you have - MP3, WMA, or more - and no matter what type of background noise you have - wind conditions, vehicular, static, white fan sound - VEED can assist you in wiping clean your audio in a couple of moments.
How to remove background noise from video audio with Veed online?
Step 1: Click on the Choose Audio option to upload your audio file.

Step 2: Click on the audio track to bring up the Settings menu, and then choose ‘Clean Audio.’ Background noise will be eliminated in a matter of seconds by itself.

Step 3: That’s all there is to it; you are finished. When you click on ‘Export,’ your new file will be rendered in seconds.
Pros
- Simple to use
- Offers multiple features (add background music, cut, trim, etc.)
- Three-step process
Cons
- Not too user-friendly
3. Audio Denoise
Website: https://audiodenoise.com/
The number second on our list is the Audiodenoise online noise removal tool. Similar to the first one, it’s time to use, supports multiple files, and most importantly, helps you get rid of the unwanted noise from your audio.
Other than that, the tool offers plenty of customization options, such as time soothing of noise reduction filter, model noise based on noise modulation tracking, analysis block size, etc. So, how can you get rid of the background noise? Follow the steps here!
How to remove background noise online with Audio Denoise?
Step 1: Click on the Choose File option to begin with. You can also select the video from the Demo files option.

Step 2: After uploading the file, press on the Process option to get rid of the unwanted noise from the audio.

Step 3: After the audio is done processing, click on the Download option to export your video to your PC.
Pros
- The straightforward noise reduction process
- Any file of your choice
- Plenty of options to customize audio
Cons
- Takes time to process the video
- Limited to 40MB
4. Audiotoolset
Website: https://audiotoolset.com/noise-reduction
The third one on our list is the Audio Toolset. With its help, this tool may make audio recordings with less background noise. You need to click a few times, and the audio file will be processed for you instantly.
Voice recordings may benefit from using this program, which is designed to remove undesirable noises while maintaining a high level of audio quality.
This program employs a generic noise-reduction method that should operate without any further adjustment for most recordings.
How to reduce background noise from video audio with Audio Tool Set?
Step 1: Click on the Browse Computer or Drag and Drop files to the website to begin the process.

Step 2: After your file has been uploaded, click on the Process option to reduce the noise.
Step 3: Listen to the audio carefully and click on the Download option to export the file to your PC.
Pros
- Excellent user-interface
- Straightforward process
- Great many audio editing features
Cons
- Takes time to process the video
- Limited to 50MB and MP3, WAV, FLAC and oGG format
5. Weet
Website: https://weet.co/remove-background-noise-from-video/
Weet is a video chat solution built for remote teams. It is available for free. Background noise or echoes may interfere with your live meetings, but with Weet asynchronous video, clean audio recording is achievable without sacrificing quality.
If you want to eliminate background noise from your recording, weet is now a tool that can help you accomplish precisely that.
How to remove background noise from video online with Weet?
Step 1: Click “Create Weet“ after you’ve logged in to get started.
Step 2: To access your recording preferences, click the Gear symbol in the lower-left corner of the screen.
Step 3: It’s as simple as clicking the “Activate Noise Cancellation“ switch! Once you begin recording your weet, their AI technology will automatically remove any background noise.

Pros
- Excellent features for professionals
- Straightforward process
- Al tool to eliminate noise from the audio
Cons
- Beginners may find it challenging to use
You may also like: How to reduce audio noise during recording
Part 3: Tips For Removing Background Noise From Audio BEFORE You Record
We all want to get rid of the noisy background from our audio. Follow these tips below to get clean and supreme audio quality:
Tip 1: Avoid Noisy Places
The easiest method to avoid having noisy audio in the first place is to avoid having noisy elements and surroundings in the first place. Recording in a peaceful area is essential for this to be accomplished.
A professional recording studio is not required to get excellent results, but you should choose the quietest room or place that you can locate.
After that, you should get acquainted with the normal ambient noises heard in that location. Is there any outside noise, such as heavy trucks or other traffic? What about the heating and air conditioning systems, for that matter? Is there a sound of the fan turning on and off?
Does it seem like you can hear your co-workers or people conversing in the adjacent rooms? Is there a buzzing sound coming from the fluorescent lighting? Those are just a few examples of the kind of sounds that might appear on your voice-over recording when you record it yourself.
Tip 2: Record A Test
After that, make a practice tape of your room. You do not need to talk. However, it would help if you used the same microphone you will be using for your voice-over recording.
Take 10-20 seconds of the ambient noise in the room and save it to your computer. This is referred to as recording the room tone.
Tip 3: Analyze the Test Recording
After that, put on your headphones and listen to your room tone recording. What sounds do you hear that you can quickly remove from your environment? Suppose you can hear the fan from your heating/cooling system running. You may turn it off while you are recording.
Alternatively, if you hear individuals conversing in the background, you might respectfully request that they transfer their discussion to a more appropriate location. If at all feasible, you should switch off any buzzing lights.
Your room tone recording will also assist you in reducing audio noise once you have completed your recording session. Your room tone recording may serve as a baseline for your audio program, which can then be used to eliminate noise.
Part 4: FAQs About Removing Audio Noise From Video Online
1.Can Background Noise Be Removed From Audio
Yes, the background can be removed from audio easily nowadays, whether it’s after you’ve done recording or before recording audio; there are plenty of online software and applications, both available for your PC and smartphones.
These can help you get rid of the unwanted noise from your audio—some of the best online websites that can help you achieve that have been reviewed above. Choose the one that meets your needs!
2. Is There Anything I Can Do To Prevent Noisy Audio Before I Record?
Prior to recording, it is essential to reduce any acoustic noise sources if at all feasible. During recording, airflow may cause havoc on microphone preamplifiers, resulting in artifacts that may be difficult to remove.
Be careful to utilize adequate windscreens on your microphones, mainly when recording outside. Sound sources such as wind noise, for example, may frequently be discovered and appropriately eliminated by giving them a cursory listen via headphones.
02 How to Remove Background Noise Online
03 Tips For Removing Background Noise From Audio BEFORE You Record
04 FAQs About Removing Audio Noise From Video Online
Part 1: What Is Audio Noise And Why Is It Harmful?
No definition exists for audio noise; however, it is often defined as background noises such as fans, people chatting, automobiles or trucks going by, buzzing from broken audio wiring, or other ambient sounds that should not be included in your film. Your viewers will be distracted from the crucial information provided by the individual speaking in your video if the audio is too noisy.
Compared to that, noisy audios tend to damage the experience you’re looking for. Consider this: if you’re listening to a voice recording of your manager at work and it’s noisy to a point, you’re unable to make sense of it, you would most probably end up missing out on crucial details.
When it comes to creating a decent video, clear audio goes a long way. But that’s not all there is to it. A clear audio track could be heard in almost all of the videos that received four or five stars for “how correctly did the film accomplish its purpose” and “how did you personally assess the video,” according to the submissions.
Part 2: How to Remove Background Noise Online
There are various ways to eliminate all the background noise from the audio. Below is a list of the best online background noise removers to help you do that.2. Veed.io
Website: https://www.veed.io/
VEED is one of the most super-simple online video editors that cleans up background interference with a single click of the mouse, making it an excellent choice for beginners. There is no need to re-record your audio. There is no need for pricey sound-blocking microphones.
You can quickly eliminate all undesirable background noise from your audio files by using VEED’s background noise remover. VEED can help you remove background noise from any audio file, including MP3, WMA, and more.
No matter what type of audio file you have - MP3, WMA, or more - and no matter what type of background noise you have - wind conditions, vehicular, static, white fan sound - VEED can assist you in wiping clean your audio in a couple of moments.
How to remove background noise from video audio with Veed online?
Step 1: Click on the Choose Audio option to upload your audio file.
Step 2: Click on the audio track to bring up the Settings menu, and then choose ‘Clean Audio.’ Background noise will be eliminated in a matter of seconds by itself.
Step 3: That’s all there is to it; you are finished. When you click on ‘Export,’ your new file will be rendered in seconds.
Pros
- Simple to use
- Offers multiple features (add background music, cut, trim, etc.)
- Three-step process
Cons
- Not too user-friendly
3. Audio Denoise
Website: https://audiodenoise.com/
The number second on our list is the Audiodenoise online noise removal tool. Similar to the first one, it’s time to use, supports multiple files, and most importantly, helps you get rid of the unwanted noise from your audio.
Other than that, the tool offers plenty of customization options, such as time soothing of noise reduction filter, model noise based on noise modulation tracking, analysis block size, etc. So, how can you get rid of the background noise? Follow the steps here!
How to remove background noise online with Audio Denoise?
Step 1: Click on the Choose File option to begin with. You can also select the video from the Demo files option.
Step 2: After uploading the file, press on the Process option to get rid of the unwanted noise from the audio.
Step 3: After the audio is done processing, click on the Download option to export your video to your PC.
Pros
- The straightforward noise reduction process
- Any file of your choice
- Plenty of options to customize audio
Cons
- Takes time to process the video
- Limited to 40MB
4. Audiotoolset
Website: https://audiotoolset.com/noise-reduction
The third one on our list is the Audio Toolset. With its help, this tool may make audio recordings with less background noise. You need to click a few times, and the audio file will be processed for you instantly.
Voice recordings may benefit from using this program, which is designed to remove undesirable noises while maintaining a high level of audio quality.
This program employs a generic noise-reduction method that should operate without any further adjustment for most recordings.
How to reduce background noise from video audio with Audio Tool Set?
Step 1: Click on the Browse Computer or Drag and Drop files to the website to begin the process.
Step 2: After your file has been uploaded, click on the Process option to reduce the noise.
Step 3: Listen to the audio carefully and click on the Download option to export the file to your PC.
Pros
- Excellent user-interface
- Straightforward process
- Great many audio editing features
Cons
- Takes time to process the video
- Limited to 50MB and MP3, WAV, FLAC and oGG format
5. Weet
Website: https://weet.co/remove-background-noise-from-video/
Weet is a video chat solution built for remote teams. It is available for free. Background noise or echoes may interfere with your live meetings, but with Weet asynchronous video, clean audio recording is achievable without sacrificing quality.
If you want to eliminate background noise from your recording, weet is now a tool that can help you accomplish precisely that.
How to remove background noise from video online with Weet?
Step 1: Click “Create Weet“ after you’ve logged in to get started.
Step 2: To access your recording preferences, click the Gear symbol in the lower-left corner of the screen.
Step 3: It’s as simple as clicking the “Activate Noise Cancellation“ switch! Once you begin recording your weet, their AI technology will automatically remove any background noise.
Pros
- Excellent features for professionals
- Straightforward process
- Al tool to eliminate noise from the audio
Cons
- Beginners may find it challenging to use
You may also like: How to reduce audio noise during recording
Part 3: Tips For Removing Background Noise From Audio BEFORE You Record
We all want to get rid of the noisy background from our audio. Follow these tips below to get clean and supreme audio quality:
Tip 1: Avoid Noisy Places
The easiest method to avoid having noisy audio in the first place is to avoid having noisy elements and surroundings in the first place. Recording in a peaceful area is essential for this to be accomplished.
A professional recording studio is not required to get excellent results, but you should choose the quietest room or place that you can locate.
After that, you should get acquainted with the normal ambient noises heard in that location. Is there any outside noise, such as heavy trucks or other traffic? What about the heating and air conditioning systems, for that matter? Is there a sound of the fan turning on and off?
Does it seem like you can hear your co-workers or people conversing in the adjacent rooms? Is there a buzzing sound coming from the fluorescent lighting? Those are just a few examples of the kind of sounds that might appear on your voice-over recording when you record it yourself.
Tip 2: Record A Test
After that, make a practice tape of your room. You do not need to talk. However, it would help if you used the same microphone you will be using for your voice-over recording.
Take 10-20 seconds of the ambient noise in the room and save it to your computer. This is referred to as recording the room tone.
Tip 3: Analyze the Test Recording
After that, put on your headphones and listen to your room tone recording. What sounds do you hear that you can quickly remove from your environment? Suppose you can hear the fan from your heating/cooling system running. You may turn it off while you are recording.
Alternatively, if you hear individuals conversing in the background, you might respectfully request that they transfer their discussion to a more appropriate location. If at all feasible, you should switch off any buzzing lights.
Your room tone recording will also assist you in reducing audio noise once you have completed your recording session. Your room tone recording may serve as a baseline for your audio program, which can then be used to eliminate noise.
Part 4: FAQs About Removing Audio Noise From Video Online
1.Can Background Noise Be Removed From Audio
Yes, the background can be removed from audio easily nowadays, whether it’s after you’ve done recording or before recording audio; there are plenty of online software and applications, both available for your PC and smartphones.
These can help you get rid of the unwanted noise from your audio—some of the best online websites that can help you achieve that have been reviewed above. Choose the one that meets your needs!
2. Is There Anything I Can Do To Prevent Noisy Audio Before I Record?
Prior to recording, it is essential to reduce any acoustic noise sources if at all feasible. During recording, airflow may cause havoc on microphone preamplifiers, resulting in artifacts that may be difficult to remove.
Be careful to utilize adequate windscreens on your microphones, mainly when recording outside. Sound sources such as wind noise, for example, may frequently be discovered and appropriately eliminated by giving them a cursory listen via headphones.
“Audio-Rich Experience on a Budget: Unveiling the Top Six Free Video-to-Audio Techniques “
If you have the footage in which only the sound has all the meat, you might want to remove the visuals from the clip and keep only the audio track to save some space on your storage media. Because the videos nowadays are usually in MP4 format, and the most commonly used audio type is MP3, it becomes imperative to learn how to convert MP4 to MP3.
It is also important to know which tools are best for such kind of conversion and what benefits and downsides they come with if installed on your PC.
That said, here, you will learn how to convert video to audio using six extremely popular and widely used programs.
| 1 - Filmora | 2 - VLC media player | 3 - Audacity |
|---|---|---|
| 4 - QuickTime | 5 - Media Converter | 6 - Video to MP3 Converter |
Watch a Video First to Take a Quick View of These Programs
For Win 7 or later (64-bit)
For macOS 10.14 or later
1 Filmora - [Windows, Mac, iPhone & Android]
A product by Wondershare that is one of the most versatile development organizations, Filmora , is available for Windows and Mac platforms. The tool is a full-fledged post-production program that many professionals use because it is lightweight and due to its simple UI and not-so-steep learning curve.
The instructions given below explain how to convert video to audio with Filmora:
Step 1: Import Source Media
Launch Wondershare Filmora (a Windows computer here used here), click anywhere inside the Media window present at the upper-left section, and select and import a source video file to the program.
For Win 7 or later (64-bit)
For macOS 10.14 or later

Step 2: Add Media to Timeline
Drag the imported footage to the Timeline at the bottom of the window. Optionally, right-click the media in the Timeline itself, and click Detach Audio to separate the audio track from the video. Trim off the unwanted sections from the clip if need be.

Step 3: Convert Video to Audio
Click EXPORT from the top-center of the window, go to the Video tab on the Export box, select MP3 from the bottom of the Format list in the left pane, choose other preferences by clicking the SETTINGS button from the right, and click EXPORT from the bottom-right corner.

Benefits of Using Filmora
Some of the advantages of using Filmora to convert video clips to audio are:
- Easy audio separation from the video
- Ability to export videos directly to audio
- Ability to adjust the audio and remove the background noise
- Ability to record voice and integrate it into the audio clip
Disadvantages: Doesn’t have many audio formats for exporting.
Supported Audio Formats: At the time of this writing, Filmora supports only MP3 audio format while exporting directly.
For Win 7 or later (64-bit)
For macOS 10.14 or later
2 VLC Media Player [Windows, Mac & Linux]
A well-known application that supports almost all media formats and is available for Windows, Mac, and Linux platforms, the VLC media player has its built-in Converter that can transcode your video clips to audio for free.
The steps given below explain how to convert video to audio with VLC media player:
Step 1: Import Source Video

Launch VLC media player, click Media from the menu bar at the top, and click Convert / Save from the menu. Make sure that the File tab is selected on the Open Media box, click Add from the right side of the File Selection field, and click Convert / Save from the bottom.

Step 2: Select Output Format and Preferences
On the Convert box, make sure that the Convert radio button is selected, choose an audio format from the Profile drop-down list, optionally click the Settings (Wrench) icon present next to the drop-down list itself, choose other output preferences for the audio and click Save to get back to the Convert box.
Step 3: Choose Output Folder and Convert

Click Browse from the Destination section to select an output folder, enter a name for the exported file in the Destination file field, and click Start to convert audio to video with VLC media player.
Benefits of Using VLC media player
Some advantages that VLC offers include:
- Doesn’t require any other application to be installed for conversion
- Makes the process quite simple and absolutely free
Disadvantages: Doesn’t have editing tools to manipulate the clips before converting.
Supported Audio Formats: VLC media player supports OGG (Vorbis), MP3, and FLAC format while exporting.
3 Audacity [Windows, Mac & Linux]
Audacity is yet another cross-platform tool that is specifically dedicated to audio formats and is also used by many professionals to produce industry-standard audio clips. Even though Audacity is an open-source and free program, some new users may find it challenging to understand the interface.
The steps are given below explain the process of converting video to audio with Audacity:
Step 1: Install Supported Tools
Assuming that Audacity is already installed on your PC, to import video files to the program, go to https://lame.buanzo.org/#lamewindl and download and install ffmpeg for Windows for Audacity if it is not already installed. You can do a quick online search for other platforms and see if your copy of Audacity needs the tools or plugins required to import the videos.
Step 2: Import Source Video
Go to file> Open from the menu bar and select and import the video that you want to convert to audio.
Step 3: Convert Video to Audio

Make the required manipulations to the audio, go to file> Export, and choose your preferred audio format from the list. Choose a destination folder and other output preferences on the Export Audio box, and click Save to convert video to audio with Audacity.
Benefits of Using Audacity
Some benefits that Audacity offers include:
- Granular editing and fine-tuning of audio tracks
- Wide range of output preferences
- Ability to produce industry-standard outputs
- Offers plethora of options and tools to add various effects to the sounds
Disadvantages: Some new users may find it challenging to understand the interface. Audacity also needs additional tools to be installed to support video files as inputs.
Supported Audio Formats: Audacity supports almost all major audio formats including MP3, OGG, WAV, etc.
4 QuickTime [Mac]
QuickTime is the default media player that comes along with macOS and is installed automatically. Being a proprietary of Apple Inc., QuickTime natively supports all the formats developed by the company, along with some other most popular file types such as MP4, MP3, etc.
To convert a video file to audio with QuickTime on Mac, you can follow the instructions given below:
Step 1: Import Source Video
Launch QuickTime on your Mac computer, go to file from the menu bar, click Open File, use the box that opens to locate and select the video that you want to convert, and click Open from the bottom-right corner.
Step 2: Convert to Audio

Click file again, go to Export this time, and then click audio Only from the sub menu that appears. On the next box, enter a name for the output file in the Export As field, choose a destination folder from the Where drop-down list, optionally click the drop-down button from the right side of the Where field to configure other preferences, and click Save to convert video to audio with QuickTime.
Benefits of Using QuickTime
Some advantages of using QuickTime to convert video to audio include:
- Mac users don’t need to install any third-party conversion tool or additional plugin
- Conversion process is easy and almost seamless
Disadvantages: Doesn’t give any option to choose an output format and doesn’t allow editing the clips either.
Supported Audio Formats: By default, QuickTime player converts videos files to M4A audio format.
5 Media Converter – video to mp3 [iPhone]
Among several iOS apps that have been developed for video to audio conversion, Media Converter – video to mp3 is one of those that has decent star ratings and user reviews. The app is around 66MB in size and can be obtained from the App Store.
The process on how to convert video to audio with Media Converter is explained below:
- Launch Media Converter
- Import the source video to the app
- Choose Extract Audio from the Conversion Type menu
- Select your preferred output audio format
- Begin the conversion process

Benefits of Using Media Converter
A couple of advantages of using Media Converter to convert video to audio are listed below:
- Eliminates the use of PC or laptop
- Can be obtained easily
- Can be used even while moving
Disadvantages: Doesn’t have the flexibility of granular editing as it is there when using a computer program.
Supported Audio Formats: The audio formats that Media Converter supports include MP3, M4A, OGG, WAV, FLAC, etc.
6 Video to MP3 Converter [Android]
With around 4.5-star rating on Play Store, Video to MP3 Converter is another app that can convert your video files to audio right on your Android smartphone. In addition, the app also allows basic video trimming that may come in handy while making the entire clip more informative by removing unwanted sections from it.

You can learn how to convert video to audio with Video to MP3 Converter by following the instructions given below:
- Launch Video to MP3 Converter
- Import the source video clip from your Android smart device’s storage
- Trim the footage to keep only the important part
- Set output preferences
- Extract the audio from the video
Benefits of Using Video to MP3 Converter
Some advantages of using Video to MP3 Converter include:
- It supports every popular video format such as MP4, 3GP, WMV, etc.
- Has simple UI
- Offers various audio bitrates to choose from while exporting
- Allows basic trimming
Disadvantages: Doesn’t have many editing options thus, no granular manipulations can be done to the media files while using the app.
Supported Audio Formats: Video to MP3 Converter supports MP3 formats at this writing.
Conclusion
Learning how to convert MP4 to MP3 is a simple process, and as long as you have a decent computer or an iOS or Android smartphone, you can extract the audio in the format of your choice from the video clips almost instantly. Furthermore, if you are a professional and want to prepare media clips for the clients or your channel, using advanced tools like Wondershare Filmora or Audacity would give you the best conversion experience.
For Win 7 or later (64-bit)
For macOS 10.14 or later
Watch a Video First to Take a Quick View of These Programs
For Win 7 or later (64-bit)
For macOS 10.14 or later
1 Filmora - [Windows, Mac, iPhone & Android]
A product by Wondershare that is one of the most versatile development organizations, Filmora , is available for Windows and Mac platforms. The tool is a full-fledged post-production program that many professionals use because it is lightweight and due to its simple UI and not-so-steep learning curve.
The instructions given below explain how to convert video to audio with Filmora:
Step 1: Import Source Media
Launch Wondershare Filmora (a Windows computer here used here), click anywhere inside the Media window present at the upper-left section, and select and import a source video file to the program.
For Win 7 or later (64-bit)
For macOS 10.14 or later
Step 2: Add Media to Timeline
Drag the imported footage to the Timeline at the bottom of the window. Optionally, right-click the media in the Timeline itself, and click Detach Audio to separate the audio track from the video. Trim off the unwanted sections from the clip if need be.
Step 3: Convert Video to Audio
Click EXPORT from the top-center of the window, go to the Video tab on the Export box, select MP3 from the bottom of the Format list in the left pane, choose other preferences by clicking the SETTINGS button from the right, and click EXPORT from the bottom-right corner.
Benefits of Using Filmora
Some of the advantages of using Filmora to convert video clips to audio are:
- Easy audio separation from the video
- Ability to export videos directly to audio
- Ability to adjust the audio and remove the background noise
- Ability to record voice and integrate it into the audio clip
Disadvantages: Doesn’t have many audio formats for exporting.
Supported Audio Formats: At the time of this writing, Filmora supports only MP3 audio format while exporting directly.
For Win 7 or later (64-bit)
For macOS 10.14 or later
2 VLC Media Player [Windows, Mac & Linux]
A well-known application that supports almost all media formats and is available for Windows, Mac, and Linux platforms, the VLC media player has its built-in Converter that can transcode your video clips to audio for free.
The steps given below explain how to convert video to audio with VLC media player:
Step 1: Import Source Video
Launch VLC media player, click Media from the menu bar at the top, and click Convert / Save from the menu. Make sure that the File tab is selected on the Open Media box, click Add from the right side of the File Selection field, and click Convert / Save from the bottom.
Step 2: Select Output Format and Preferences
On the Convert box, make sure that the Convert radio button is selected, choose an audio format from the Profile drop-down list, optionally click the Settings (Wrench) icon present next to the drop-down list itself, choose other output preferences for the audio and click Save to get back to the Convert box.
Step 3: Choose Output Folder and Convert
Click Browse from the Destination section to select an output folder, enter a name for the exported file in the Destination file field, and click Start to convert audio to video with VLC media player.
Benefits of Using VLC media player
Some advantages that VLC offers include:
- Doesn’t require any other application to be installed for conversion
- Makes the process quite simple and absolutely free
Disadvantages: Doesn’t have editing tools to manipulate the clips before converting.
Supported Audio Formats: VLC media player supports OGG (Vorbis), MP3, and FLAC format while exporting.
3 Audacity [Windows, Mac & Linux]
Audacity is yet another cross-platform tool that is specifically dedicated to audio formats and is also used by many professionals to produce industry-standard audio clips. Even though Audacity is an open-source and free program, some new users may find it challenging to understand the interface.
The steps are given below explain the process of converting video to audio with Audacity:
Step 1: Install Supported Tools
Assuming that Audacity is already installed on your PC, to import video files to the program, go to https://lame.buanzo.org/#lamewindl and download and install ffmpeg for Windows for Audacity if it is not already installed. You can do a quick online search for other platforms and see if your copy of Audacity needs the tools or plugins required to import the videos.
Step 2: Import Source Video
Go to file> Open from the menu bar and select and import the video that you want to convert to audio.
Step 3: Convert Video to Audio
Make the required manipulations to the audio, go to file> Export, and choose your preferred audio format from the list. Choose a destination folder and other output preferences on the Export Audio box, and click Save to convert video to audio with Audacity.
Benefits of Using Audacity
Some benefits that Audacity offers include:
- Granular editing and fine-tuning of audio tracks
- Wide range of output preferences
- Ability to produce industry-standard outputs
- Offers plethora of options and tools to add various effects to the sounds
Disadvantages: Some new users may find it challenging to understand the interface. Audacity also needs additional tools to be installed to support video files as inputs.
Supported Audio Formats: Audacity supports almost all major audio formats including MP3, OGG, WAV, etc.
4 QuickTime [Mac]
QuickTime is the default media player that comes along with macOS and is installed automatically. Being a proprietary of Apple Inc., QuickTime natively supports all the formats developed by the company, along with some other most popular file types such as MP4, MP3, etc.
To convert a video file to audio with QuickTime on Mac, you can follow the instructions given below:
Step 1: Import Source Video
Launch QuickTime on your Mac computer, go to file from the menu bar, click Open File, use the box that opens to locate and select the video that you want to convert, and click Open from the bottom-right corner.
Step 2: Convert to Audio
Click file again, go to Export this time, and then click audio Only from the sub menu that appears. On the next box, enter a name for the output file in the Export As field, choose a destination folder from the Where drop-down list, optionally click the drop-down button from the right side of the Where field to configure other preferences, and click Save to convert video to audio with QuickTime.
Benefits of Using QuickTime
Some advantages of using QuickTime to convert video to audio include:
- Mac users don’t need to install any third-party conversion tool or additional plugin
- Conversion process is easy and almost seamless
Disadvantages: Doesn’t give any option to choose an output format and doesn’t allow editing the clips either.
Supported Audio Formats: By default, QuickTime player converts videos files to M4A audio format.
5 Media Converter – video to mp3 [iPhone]
Among several iOS apps that have been developed for video to audio conversion, Media Converter – video to mp3 is one of those that has decent star ratings and user reviews. The app is around 66MB in size and can be obtained from the App Store.
The process on how to convert video to audio with Media Converter is explained below:
- Launch Media Converter
- Import the source video to the app
- Choose Extract Audio from the Conversion Type menu
- Select your preferred output audio format
- Begin the conversion process
Benefits of Using Media Converter
A couple of advantages of using Media Converter to convert video to audio are listed below:
- Eliminates the use of PC or laptop
- Can be obtained easily
- Can be used even while moving
Disadvantages: Doesn’t have the flexibility of granular editing as it is there when using a computer program.
Supported Audio Formats: The audio formats that Media Converter supports include MP3, M4A, OGG, WAV, FLAC, etc.
6 Video to MP3 Converter [Android]
With around 4.5-star rating on Play Store, Video to MP3 Converter is another app that can convert your video files to audio right on your Android smartphone. In addition, the app also allows basic video trimming that may come in handy while making the entire clip more informative by removing unwanted sections from it.
You can learn how to convert video to audio with Video to MP3 Converter by following the instructions given below:
- Launch Video to MP3 Converter
- Import the source video clip from your Android smart device’s storage
- Trim the footage to keep only the important part
- Set output preferences
- Extract the audio from the video
Benefits of Using Video to MP3 Converter
Some advantages of using Video to MP3 Converter include:
- It supports every popular video format such as MP4, 3GP, WMV, etc.
- Has simple UI
- Offers various audio bitrates to choose from while exporting
- Allows basic trimming
Disadvantages: Doesn’t have many editing options thus, no granular manipulations can be done to the media files while using the app.
Supported Audio Formats: Video to MP3 Converter supports MP3 formats at this writing.
Conclusion
Learning how to convert MP4 to MP3 is a simple process, and as long as you have a decent computer or an iOS or Android smartphone, you can extract the audio in the format of your choice from the video clips almost instantly. Furthermore, if you are a professional and want to prepare media clips for the clients or your channel, using advanced tools like Wondershare Filmora or Audacity would give you the best conversion experience.
For Win 7 or later (64-bit)
For macOS 10.14 or later
Also read:
- Audio Cleanup Tips for Silencing Unwanted Sound in Streaming Videos for 2024
- 6 Best Automatic Transcription Software for 2024
- New 2024 Approved Enhancing Audio Production Integrating and Leveraging Audacitys Autotune Feature
- Updated 2024 Approved All About the Wave Editor Essential Features, User Experiences, and Learning Modules
- Updated In 2024, Top 10 Audio Amplifiers Enhance Your Devices Sonic Experience (Android & iOS)
- New Navigating to the Pinnacle 5 Leading Audio Mixers for Mac Users for 2024
- Updated Unveiling the Finest 8 Android-Based Digital Audio Workstations of This Year for 2024
- Updated 2024 Approved The Ultimate Guide to Discerning Exceptional Sound Designers for Your Projects
- New 2024 Approved Essential Audio Enhancements for Podcasts Top Sources of Sound Effects
- Updated 2024 Approved The Pathway to Immaculate Audio Integration in Video Production
- New Best Linux Audio Editor Free & Paid for 2024
- Updated Harmonize Happily Bite-Sized Beats Converter, Karaoke Edition - No Cost Needed for 2024
- EchoShift Elite Revolutionary Sound Design and Pitch Adjustment App for 2024
- Exclusive Selection of Top 7 Noise Cancellers for Easy Voice Reduction for 2024
- New Top 10 Windows & Mac Compatible Music Arrangement Tools
- News Beats Unplugged Top 15 Background Music Selections
- 2024 Approved The Audio Architects Guide to Stripping Down Beats Online
- New 25 Best Real-Time Voice Changers Full Review
- New Discovering High-Quality Bell Toll Recordings
- Maximizing Your Library A Detailed Walkthrough of Downloading Music From Spotify
- Updated Discover the Highest-Rated MP3 Recorders for Both PC and Mac Environments for 2024
- Updated The Professionals Review of Adobe Audition Innovative Tools, Expert Tutorials & User-Centric Design for 2024
- Updated Top 10 Budget-Friendly Options Premium-Free Podcast Players for Modern Smartphones for 2024
- New 2024 Approved Achieving Optimal Sound Levels with Audacitys Volume Slider
- Updated 2024 Approved Mastering AutoTune A Comprehensive Guide to Using Plugins Within Audacity
- Updated Echoing Change The Complete Process of Substituting Auditory Elements in Filmmaking for 2024
- Updated Top-Rated Audio Editing Software for macOS Identifying the Ultimate MP3 Trimmer for 2024
- New 10 Popular Sound Recorder for PC for 2024
- New In 2024, The Process of Deleting Voice Components From MP4 Media
- In 2024, Ultimate Guide to Selecting Mobile Speech-to-Text Software
- Change Location on Yik Yak For your Vivo T2 Pro 5G to Enjoy More Fun | Dr.fone
- Top 15 Apps To Hack WiFi Password On Infinix GT 10 Pro
- In 2024, 3 Ways to Unlock Your iPhone 15 Pro Max for Free
- 3 Ways to Fake GPS Without Root On Vivo Y36 | Dr.fone
- Updated Blur Video Online Without Spending a Dime A Tutorial for 2024
- Fake Android Location without Rooting For Your Vivo G2 | Dr.fone
- What Is an AI Editor for 2024
- New 2024 Approved Preserve the Original Sound How to Convert Video to MP3 without Quality Loss
- A Step-by-Step Guide on Using ADB and Fastboot to Remove FRP Lock on your Infinix GT 10 Pro
- 7 Top Ways To Resolve Apple ID Not Active Issue For Apple iPhone 12 Pro Max
- Android Unlock Code Sim Unlock Your Realme GT 5 Pro Phone and Remove Locked Screen
- New In 2024, Budget Video Editing Top Picks
- 2024 Approved Effortless Editing Top 8 Lightweight Video Software Options
- Bricked Your Xiaomi Redmi Note 12 Pro+ 5G? Heres A Full Solution | Dr.fone
- 8 Unexpected Ways to Add Emoji to Photo Online for 2024
- In 2024, Create Stunning Loops Best Free GIF Software
- In 2024, Easy Ways to Manage Your Motorola Moto G23 Location Settings | Dr.fone
- Updated In 2024, The Ultimate 4K Video Collection Must-Watch Samples
- What Does Jailbreaking Apple iPhone 14 Pro Max i Do? Get Answers here
- Title: New In 2024, Premier Collection 11 Complimentary Mobile Audio Modification Tools for Both iOS and Android
- Author: David
- Created at : 2024-05-05 10:09:35
- Updated at : 2024-05-06 10:09:35
- Link: https://sound-tweaking.techidaily.com/new-in-2024-premier-collection-11-complimentary-mobile-audio-modification-tools-for-both-ios-and-android/
- License: This work is licensed under CC BY-NC-SA 4.0.
