
:max_bytes(150000):strip_icc():format(webp)/tablets-vs-laptops-832333-93961eb085ff44d99d3836a0d0fa486a.png)
New In 2024, Harmonious Soundscape Selection for Modern Matrimonial Cinematography
Harmonious Soundscape Selection for Modern Matrimonial Cinematography
When choosing classic background music for wedding videos, you need to be extra careful. You cannot choose regular songs to capture the emotions of the best moments of your life. The music should connect with your emotions, so whenever you watch the movie, you remember the time you got married. In this post, we will share some mind-blowing classical background music that will make your wedding special and memorable.

10 Best Classical Background Music for Wedding Videos in 2024
A wedding video contains a plethora of scenes and memories. If your video includes rehearsal dinner, photography session, and dinner, you should opt for music that blends with each set. Tears and smiles, every moment calls for a different classical background song. Here are some royalty-free classical background pieces that you can use for your wedding videos this year:
1. Rhythmic Piano
This is an incredible piano piece perfect for wedding videos. It contains beautiful piano with a calm and soothing melody. This classical background will evoke feelings and memories when you will watch your wedding videos in the future. You can use this music for highlights of the wedding in the introduction because it contains emotions for every wedding setting.
2. The Wedding Moment
Over the sky of hope is another masterpiece for wedding ceremony videos. It is bright and joyful classical background music with orchestral strings and bold grand piano. You can choose this song for the first dance at the wedding. The music will incredibly portray your love and emotion for your partner.
3. Happy Wedding Upbeat Background Sound
This classical background music has a clear message of love and affection. You can use this music for multiple scenes at the wedding. The funny elements in this masterpiece will perfectly blend with funny scenes at the wedding. Furthermore, you can use this music for scenes with the audience, enjoying the ceremony.
4. Piano and Strings Wedding
The emotional and mellow introduction of this classical background will beautifully blend with your wedding videos. This heartfelt and cinematic track has a bit of ambient touch that gives a joyful and loving feel. You can add this song when you and your life partners will walk down the aisle.

5. Old Time
Old Time is slow classical background music, which is perfectly designed for wedding ceremonies. It has a simple yet powerful composition that will make your loved ones cry with happiness.
6. Wedding Love Piano
You will enjoy this lovely background music aligned with your first dance as a wedded couple. This composition sounds breathtaking on the grand piano. This classical melody in your video is enough to make your family and friends cry tears of joy.
7. Piano Music Orchestra
You can add this classical background music in the ending to create touching moments filled with powerful feelings. When your wedding video will end with this music, your audience had to take some time to recover from their emotions.
8. The Season of Love
In this short romantic classical background music, the composer played different octaves to create romantic vibes. Thus, it will sound splendid with your wedding video. Although it is a short music piece, there are many versions . You can layer the versions one after another to play with the audience’s joy and feeling.

9. Mid Night Self Expression
This is a unique masterpiece that includes acoustic guitar, accordion, and other unique musical instruments. The song includes a folk melody that will leave your audience in joy and happiness. You can play this song in various wedding settings to add emotions to your video.
10. Wonderful Wedding
This lovely wedding classical background includes nice rhythms, melodies, and ballads that make it perfect for a summary. If you have a segment in your video with highlights of multiple settings, you can use this music for that part.
How to Create a Romantic Wedding Invitation?
If you design your wedding invitation, you can decide the element according to your preferences. Elements such as video clips, pictures, and music add emotions to your video. If even a single element is not perfect, your wedding invitation won’t look as good as you want. Therefore, you should take control and create a romantic wedding invitation on a user-friendly video editor, Wondershare Filmora . Here is the step-by-step guide to creating a romantic wedding invitation with classical background music:
For Win 7 or later (64-bit)
For macOS 10.12 or later
Step 1: Open Wondershare Filmora, create a new project and import your files to get started.

Step 2: Now drag video clips and photos on the timeline and arrange the sequences and clips.

Step 3: If the photo size doesn’t match the video size, you can change the ratio in the crop section. This changes the aspect ratio of the video.

Step 4: Set the ratio for all videos and images.
Step 5: Now open the titles tab and search weddings. You can choose from a myriad of wedding-style templates on Filmora.

Step 6: Once you choose the title, you can drag it on your timeline. The title tag will look incredible at the start and the ending. Thus, you have to choose two title tags.
Step 7: Double-click on the first title and click on the advanced buttons. This feature enables you to customize your tags add change color, text, and fonts.

Step 8: Make the same changes for the second title tag as well.
Step 9: After selecting the right title tag, you can include elements on your images or video clips.
Step 10: Go to the Effects tab and search wedding floral. A wide range of options will appear in the media section. Choose the tags that you like the most and drag them on a new track.
Step 11: Now it’s time to add the titles to introduce the bride and groom. Furthermore, this section will also include the wedding location and other details for the wedding.
Step 12: Move to the transition section add transition presets and search for the effects you like for your video. Choose the transition and drag between the clips.

Step 13: Your wedding invitation is almost ready. All you need to add is classical background music. For that, you can search the music from the audio tab or choose from the above-mentioned options. Also, you can import music from your computer to use in the video
Step 14: You can export the video from the tool and send your friends and family on Whastapp or post it on Facebook.
Closing Words
The above-mentioned classical background music will enhance the sentiments in your wedding videos. Music helps the audience to connect with your emotions. Therefore, you should choose the classical background music carefully according to each segment. It would be best to list the video sections on a piece of paper and write the song’s name in front of it. That way, you will get a complete overview of your video’s layout.
You can use Filmora video editor to create your wedding videos and invitation. Filmora is a user-friendly video editing tool with advanced features. The effects and templates simplify the editing task and you can create emotional wedding videos in minutes. Filmora video editor includes features such as an audio mixer, advanced text editing, audio equalizer, and video stabilizer.
For Win 7 or later (64-bit)
For macOS 10.12 or later
For Win 7 or later (64-bit)
For macOS 10.12 or later
Step 1: Open Wondershare Filmora, create a new project and import your files to get started.
Step 2: Now drag video clips and photos on the timeline and arrange the sequences and clips.
Step 3: If the photo size doesn’t match the video size, you can change the ratio in the crop section. This changes the aspect ratio of the video.
Step 4: Set the ratio for all videos and images.
Step 5: Now open the titles tab and search weddings. You can choose from a myriad of wedding-style templates on Filmora.
Step 6: Once you choose the title, you can drag it on your timeline. The title tag will look incredible at the start and the ending. Thus, you have to choose two title tags.
Step 7: Double-click on the first title and click on the advanced buttons. This feature enables you to customize your tags add change color, text, and fonts.
Step 8: Make the same changes for the second title tag as well.
Step 9: After selecting the right title tag, you can include elements on your images or video clips.
Step 10: Go to the Effects tab and search wedding floral. A wide range of options will appear in the media section. Choose the tags that you like the most and drag them on a new track.
Step 11: Now it’s time to add the titles to introduce the bride and groom. Furthermore, this section will also include the wedding location and other details for the wedding.
Step 12: Move to the transition section add transition presets and search for the effects you like for your video. Choose the transition and drag between the clips.
Step 13: Your wedding invitation is almost ready. All you need to add is classical background music. For that, you can search the music from the audio tab or choose from the above-mentioned options. Also, you can import music from your computer to use in the video
Step 14: You can export the video from the tool and send your friends and family on Whastapp or post it on Facebook.
Closing Words
The above-mentioned classical background music will enhance the sentiments in your wedding videos. Music helps the audience to connect with your emotions. Therefore, you should choose the classical background music carefully according to each segment. It would be best to list the video sections on a piece of paper and write the song’s name in front of it. That way, you will get a complete overview of your video’s layout.
You can use Filmora video editor to create your wedding videos and invitation. Filmora is a user-friendly video editing tool with advanced features. The effects and templates simplify the editing task and you can create emotional wedding videos in minutes. Filmora video editor includes features such as an audio mixer, advanced text editing, audio equalizer, and video stabilizer.
For Win 7 or later (64-bit)
For macOS 10.12 or later
Achieve Deeper Sound From Your Windows System – Three Easy and Free Audio Enhancement Tricks
3 Easy Ways to Booster/Increase Volume on Windows for Free

Shanoon Cox
Mar 27, 2024• Proven solutions
Most computers have attached speakers, which present adequate sound levels for listening to your favorite music on your screen. However, there are instances when it seems that the volume levels aren’t enough. I know how it feels when you play your favorite playlists and can’t listen to them at the pitch you want. There are many possibilities to increase volume on your windows without speakers.
There are many methods for raising the default sound levels on Windows. You can control and booster volume and the audio quality on your device sometimes through some of the built-in settings and most of the time with a third-party app that may increase it by 500%.
Here in this article is a discussion about how to help boost volume as desired on your computer.
- Method 1: Boost volume by Native Windows Volume Booster
- Method 2: Boost sound by Equalizer APO Application
- Method 3: Increase volume by Chrome Volume Booster Plugin
- Bonus Tip: Edit your audio with Wondershare Filmora
Method 1: Boost volume by Native Windows Volume Booster
Most users ignore sound and video settings within Windows without ensuring that the volume is set to a satisfactory level and the display quality is accurate. Windows has an equalizer, which you can use to improve the audio quality. The Windows 10 equalizer focuses on the critical techniques for modifying audio properties like balance and volume and can help you boost volume.
1. Click the Control Panel by typing Control at the Windows Run prompt to have the equalizer settings. Click Hardware and Sound under the Sound when the Control Panel appears. This will bring up a dialogue box with a list of all of your computer’s audio hardware.

2. The default setting for spatial Sound is to switch it off. You can, therefore, have some options for allowing spatial Sound based on your audio hardware and the software you’ve enabled. For example, in the picture below, there is a feature called Windows Sonic for Headphones.

3. Pick the Bass Boost (or any of your profiles) and hit the Settings key to make adjustments. This enables Windows to display a dialogue box to adjust the raised level for each Frequency individually.

4. To get to the Windows Video Playback settings, click the Settings, then Apps, then Video Playback, choose automatic processing to enhance video playback.

5. Some more settings will be accessed via this screen that helps to change the HD color settings if your PC allows it. A preview window enables you to see how your choices would affect the final result.

Method 2: Boost sound by Equalizer APO Application
Equalizer APO Application is an excellent graphic equalizer for Windows that can be used to boost volume. With VST plugin support and unlimited filters, this application is easy to use.
1. From the start, the menu clicks in the Equalizer APO or configuration Editor.

2. Apply the Equalizer at the given arrow part.

3. The arrow mentioned in the below picture can change booster sound. The sound wave will shift, and the maximum will come out; just split it with an equalizer, so it’s probably best to lower the boost to avoid cutting.

4. Better insert the limiter at the end of the Equalizer; this may avoid clipping. Hit the plus icon, then click plugins/VST plugin.

5. The VST container will be inserted at the end of the process.

6. Hit upon the file option.

7. Click the VST file when the VST preview window opens (extension .dll). VST 2 is the only format that is supported. Because there is no connection feature, you must use VST with the same number of items as Equalizer APO. Now VST can be loaded.

8. Now click on the “Open Panel“ tab.

9. The user interface is visible now. Kindly remember that, unlike DAW, the setting may not be applied until you hit the “OK“ or “Apply“ buttons. If “Apply automatically“ is selected, the settings will be displayed instantly, just as in DAW.

Method 3: Increase volume by Chrome Volume Booster Plugin
Another effective way to increase volume without any hassle is by using the Chrome extension. For this purpose, the Volume Master extension serves to boost volume without affecting audio quality. This extension can increase volume up to 600%. By using this, you can booster the volume of individual tabs. Plus, Volume Master is super easy to use.
With a simple slider, the usability and convenience of this extension are impressive. Through this, you can enhance, reduce, or increase the volume of a specific tab without affecting the default web browser or system volume settings.
There are three steps to increase volume by using the chrome booster volume plugin.
1. First, open Google Chrome, then move to Chrome Web Store. By searching the Volume Master here, you will be directed to the link which will open the extension page. Here hit the Add to Chrome button.

2. A dialogue box will appear. When requested, click the Add Extension button to confirm.

3. Click on the extension icon in the right top corner after adding the extension. Now set the volume how much you want it to be boosted as shown in the mentioned slider.

Bonus Tip: Edit your audio with Wondershare Filmora
Wondershare Filmora is a comprehensive all-in-one video editor. It can be used with ease by beginners and professionals alike. Filmora comes loaded with one-click editing features such as motion tracking, color match, silence detection, and much more.
With Filmora, you can add cinematic effects to your videos and enhance their audio quality or increase volume.
1. Download, install and launch Filmora. Click on File, and then tap on Import Media Files. Now, import your media and drag it to the timeline.

2. Right-click the video file on the timeline, select the Adjust Audio option.

3. You will get the advanced audio settings in Filmora. You can easily change the volume and pitch, fade in and out the audio, and select the equalizer mode for your file, etc.

3. Finally, click on Export, adjust the output parameters and save the file locally or share to social media.

Conclusion
Sound isn’t something you think about very much, but your Windows can also give you many ways to boost the volume to the highest capacity. This article covered how to boost sound within the windows via different platforms. I hope you can now experience a clear, loud sound and make use of all of your speakers when playing music, browsing the internet, or binge-watching Netflix or Prime Video.
Now, you can increase sound and enhance your listening experience without any hassle. You can also use Wondershare Filmora, a powerful video editor, to boost volume and edit your videos.
Shanoon Cox
Shanoon Cox is a writer and a lover of all things video.
Follow @Shanoon Cox
Shanoon Cox
Mar 27, 2024• Proven solutions
Most computers have attached speakers, which present adequate sound levels for listening to your favorite music on your screen. However, there are instances when it seems that the volume levels aren’t enough. I know how it feels when you play your favorite playlists and can’t listen to them at the pitch you want. There are many possibilities to increase volume on your windows without speakers.
There are many methods for raising the default sound levels on Windows. You can control and booster volume and the audio quality on your device sometimes through some of the built-in settings and most of the time with a third-party app that may increase it by 500%.
Here in this article is a discussion about how to help boost volume as desired on your computer.
- Method 1: Boost volume by Native Windows Volume Booster
- Method 2: Boost sound by Equalizer APO Application
- Method 3: Increase volume by Chrome Volume Booster Plugin
- Bonus Tip: Edit your audio with Wondershare Filmora
Method 1: Boost volume by Native Windows Volume Booster
Most users ignore sound and video settings within Windows without ensuring that the volume is set to a satisfactory level and the display quality is accurate. Windows has an equalizer, which you can use to improve the audio quality. The Windows 10 equalizer focuses on the critical techniques for modifying audio properties like balance and volume and can help you boost volume.
1. Click the Control Panel by typing Control at the Windows Run prompt to have the equalizer settings. Click Hardware and Sound under the Sound when the Control Panel appears. This will bring up a dialogue box with a list of all of your computer’s audio hardware.
2. The default setting for spatial Sound is to switch it off. You can, therefore, have some options for allowing spatial Sound based on your audio hardware and the software you’ve enabled. For example, in the picture below, there is a feature called Windows Sonic for Headphones.
3. Pick the Bass Boost (or any of your profiles) and hit the Settings key to make adjustments. This enables Windows to display a dialogue box to adjust the raised level for each Frequency individually.
4. To get to the Windows Video Playback settings, click the Settings, then Apps, then Video Playback, choose automatic processing to enhance video playback.
5. Some more settings will be accessed via this screen that helps to change the HD color settings if your PC allows it. A preview window enables you to see how your choices would affect the final result.
Method 2: Boost sound by Equalizer APO Application
Equalizer APO Application is an excellent graphic equalizer for Windows that can be used to boost volume. With VST plugin support and unlimited filters, this application is easy to use.
1. From the start, the menu clicks in the Equalizer APO or configuration Editor.
2. Apply the Equalizer at the given arrow part.
3. The arrow mentioned in the below picture can change booster sound. The sound wave will shift, and the maximum will come out; just split it with an equalizer, so it’s probably best to lower the boost to avoid cutting.
4. Better insert the limiter at the end of the Equalizer; this may avoid clipping. Hit the plus icon, then click plugins/VST plugin.
5. The VST container will be inserted at the end of the process.
6. Hit upon the file option.
7. Click the VST file when the VST preview window opens (extension .dll). VST 2 is the only format that is supported. Because there is no connection feature, you must use VST with the same number of items as Equalizer APO. Now VST can be loaded.
8. Now click on the “Open Panel“ tab.
9. The user interface is visible now. Kindly remember that, unlike DAW, the setting may not be applied until you hit the “OK“ or “Apply“ buttons. If “Apply automatically“ is selected, the settings will be displayed instantly, just as in DAW.
Method 3: Increase volume by Chrome Volume Booster Plugin
Another effective way to increase volume without any hassle is by using the Chrome extension. For this purpose, the Volume Master extension serves to boost volume without affecting audio quality. This extension can increase volume up to 600%. By using this, you can booster the volume of individual tabs. Plus, Volume Master is super easy to use.
With a simple slider, the usability and convenience of this extension are impressive. Through this, you can enhance, reduce, or increase the volume of a specific tab without affecting the default web browser or system volume settings.
There are three steps to increase volume by using the chrome booster volume plugin.
1. First, open Google Chrome, then move to Chrome Web Store. By searching the Volume Master here, you will be directed to the link which will open the extension page. Here hit the Add to Chrome button.
2. A dialogue box will appear. When requested, click the Add Extension button to confirm.
3. Click on the extension icon in the right top corner after adding the extension. Now set the volume how much you want it to be boosted as shown in the mentioned slider.
Bonus Tip: Edit your audio with Wondershare Filmora
Wondershare Filmora is a comprehensive all-in-one video editor. It can be used with ease by beginners and professionals alike. Filmora comes loaded with one-click editing features such as motion tracking, color match, silence detection, and much more.
With Filmora, you can add cinematic effects to your videos and enhance their audio quality or increase volume.
1. Download, install and launch Filmora. Click on File, and then tap on Import Media Files. Now, import your media and drag it to the timeline.
2. Right-click the video file on the timeline, select the Adjust Audio option.
3. You will get the advanced audio settings in Filmora. You can easily change the volume and pitch, fade in and out the audio, and select the equalizer mode for your file, etc.
3. Finally, click on Export, adjust the output parameters and save the file locally or share to social media.
Conclusion
Sound isn’t something you think about very much, but your Windows can also give you many ways to boost the volume to the highest capacity. This article covered how to boost sound within the windows via different platforms. I hope you can now experience a clear, loud sound and make use of all of your speakers when playing music, browsing the internet, or binge-watching Netflix or Prime Video.
Now, you can increase sound and enhance your listening experience without any hassle. You can also use Wondershare Filmora, a powerful video editor, to boost volume and edit your videos.
Shanoon Cox
Shanoon Cox is a writer and a lover of all things video.
Follow @Shanoon Cox
Ultimate Guide to the Leading 11 Free Voice Changing Applications on iOS & Android Platforms
Best Voice Changer Apps for iPhone and Android

Benjamin Arango
Mar 27, 2024• Proven solutions
Have you ever wondered what your voice would sound like if you were a cartoon character, a robot, or an older version of yourself? Changing how your voice sounds has never been easier, regardless of the Smartphone model you have, since voice changer apps can be used on both iPhone and Android devices.
Even though there is nothing wrong with modulating your voice to have fun with your friends, using voice changer apps to pull malicious pranks or bully strangers online is far from acceptable. Read on if you would like to find out more about the best voice changer apps for iPhone and Android devices and discover the one you enjoy using the most.
Best Voice Changer Apps for iPhone and Android
Creating a new ringtone, making a voice recording, or having fun with your friends are only a few reasons why so many people choose to try out voice changer apps. The vast majority of these apps feature well-equipped audio effects libraries that enable users to have fun with their friends and hear how they would sound if they were drunk or after inhaling helium. So, let’s take a look at some of the best voice changer apps on the market.


Changing video voice on Windows and Mac with Wondershare Filmora
Do you want to change the voice in video on Windows and Mac and don’t know which software can meet this requirement? Try Filmra video editor , which provides several ways to change voice over, such as changing the voice speed or changing the pitch. Download the trial version below and find out more possibility in video creation with Filmora.
1. Celebrity Voice Changer – Face
Price: Free, but offers in-app purchases
Compatibility: iOS 9.0 or later
User Rating: 4.0
In case you would like to sound like your favorite movie star of TV host, then Celebrity Voice Changer is one of the best choices you can make. Besides the standard set of options, the app also lets you request new voices since its machine learning technology can mimic virtually anyone’s voice. However, Celebrity Voice Changer is currently only available in English and it cannot modulate speech in other languages. In addition, you must make an in-app purchase in order to gain access to all of the app’s features or unlock the unlimited usage of the app.
Pros
- Automatic voice modulation
- Huge selection of voice filters
- The app generates video files that are better adjusted to the audience on social media than audio files
- Excellent impressions of celebrities
Cons
- Unreasonably expensive
- The app’s Deep Learning technology still has a lot of room for improvement
2. Snapchat
Price: Free, but offers in-app purchases
Compatibility: iOS 10.0 or later, Android 4.4 or up
User Rating: 3.8
With more than 203 million daily users, Snapchat is one of the largest messaging platforms on the market. Previously, we’ve shared how to change gender on Snapchat , beside that, the app lets its users capture short moments or the so-called Snaps and share them with friends. In addition to hundreds of video filters , Snapchat also features a broad spectrum of voice changing effects that make Snaps more entertaining. Even so, the audio recording options Snapchat offers are far from ideal, because the app doesn’t allow you to edit the files you create with it. Using Snapchat will drain your battery quickly, which is why you must pay attention to how frequently you use this app.
Pros
- The easy voice modulation process
- Excellent messaging options
- Grants you access to a large community of likeminded people
- Lenses and filters are updated on a daily basis
Cons
- Editing voice changes after you create a Snap is not possible
- Snapchat is not primarily a voice changer app
Check the detailed information about How to Change Voice on Snapchat with 2 Easy Methods >>
3. Voice Changer
Price: Free
Compatibility: Android 4.1 and up
User Rating: 4.3

Changing your voice with this app won’t take more than a few moments of your time. You just have to launch the app and hit the microphone button to record a message or a joke you would like to modulate. Once you’re happy with the audio recording you made, you can proceed to choose from more than twenty voice effects that will make you sound like a dwarf, a robot, or an alien. The app’s file-sharing capabilities enable you to post your audio recordings to any social media platform of your choosing or store your files and use them as many times as you want.
Pros
- Entertaining and easy to use
- The simple three-step voice modulation process
- Good selection of voice filters
- Excellent file sharing options
Cons
- The app displays ads
- No audio editing tools
4. Voicy: Celebrity Voice Changer
**Price:**Free, but offers in-app purchases
Compatibility: iOS 10 or later
User Rating: 4.3

Impersonating your favorite celebrity can be a fun way to prank your friends on social media. Voicy features a broad selection of celebrity voice impersonations you can use to make you sound like a famous actress or TV personality. The app utilizes a machine learning technology that can generate more than forty avatars and allows the users to experiment with different voice effects. The free version of the app offers only limited capabilities, so if you want to gain access to all of the Voicy’s features, you must choose a weekly, monthly or an annual subscription.
Pros
- Equipped with a powerful machine learning technology
- Offers a vast selection of voice avatars
- The quick voice modification process
- A great choice if you want to make a parody
Cons
- More expensive than the competition
- Support only the English language
5. Video Voice Changer – Fun Editor
Price: Free, but offers in-app purchases
Compatibility: iOS 8.0 or later
User Rating: 4.4

Changing the voices in the videos you record with your iPhones or iPads is a straightforward process that takes a minimum amount of effort. You can either use this iOS-based app to capture videos you’re going to dub or import them from the albums in which they are stored. The Video Voice Changer app is a great option if you want to dub videos directly from your phone because it enables you to change the voices in your videos and make them sound like mice, bears or ghosts. There are over thirty voice effects to choose from, so you can easily pick the one that best fits the video you’re editing.
Pros
- Equipped with video recording tools
- Excellent dubbing features
- A rich selection of voice effects
- Allows users to share their creations on Facebook, Instagram, and other social media platforms
Cons
- You must make an in-app purchase to unlock all of the app’s features
- No audio mixing options
6. Video Voice Changer FX
**Price:**Free, but offers in-app purchases
Compatibility: Android 4.1 and up
User Rating: 4.1

This is a simple app, anyone can use to change the voices in a video. Simply upload a video file from an SD card in your phone and choose an audio effect you want to apply. The app’s collection of funny voices includes options like echo, squirrel, space ship or chipmunk. As soon as you select the voice effect you want to add to a video, the app will start generating a new video that will be saved to your phone. Sharing the videos you edit with Video Voice Changer FX to social media directly from the app is not an option.
Pros
- Fun and easy to use
- Great price to performance ratio
- Changing a voice requires just a few taps
- Allows users to switch between effects while the video is playing
Cons
- No audio or video recording capability
- Doesn’t support social media sharing
7. Squeak Voice Changer
**Price:**Free, but offers in-app purchases
Compatibility: Android 4.3 and up
User Rating: 3.9

Every joke you want to share with your online friends is going to be a little funnier if you record it with Squeak Voice Changer. You just have to tap on the Record button and choose one of the available effects. Each voice changing effect this app offers is represented by a character so you should select Jamie the Jolly if you want to make your voice sound like you’re at a party or Bruce the Sentimental Bot if you want your voice to sound artificial. All the recordings you make with Squeak Voice Changer can be easily shared on social media.
Pros
- Equipped with audio recording options
- Cute and memorable characters that represent voice effects
- Inexpensive and fun to use
- Functional app design
Cons
- Poor selection of voice effects
- The AI only recognizes the English language
8. Voice Changer with Effects
**Price:**Free
Compatibility: Android 4.1 and up
User Rating: 4.5
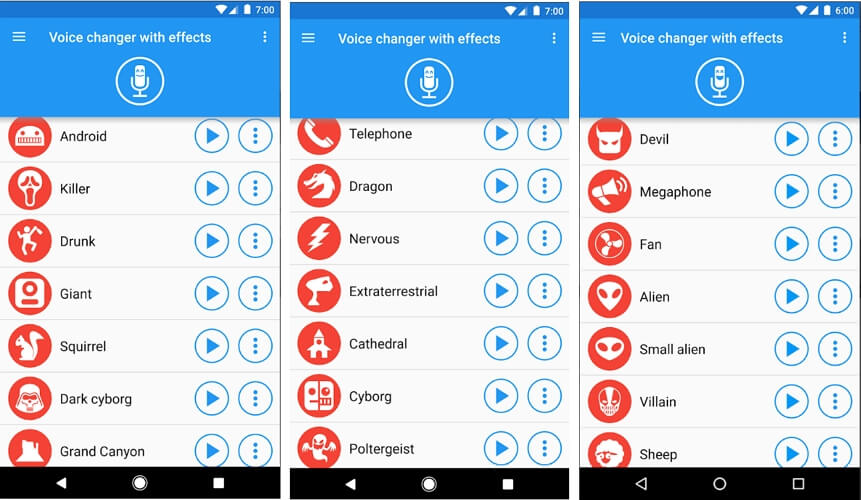
This Android-based app is designed to make fun and easy since voice modulation features enable you to play voice recording backward or change your voice to sound robotic or even alien. Besides recording your voice, the app also lets you modulate pre-recorded sounds and save them to your phone or use them as ringtones or notification sounds. Furthermore, the app lets you add sounds to images and share them to Facebook. The Voice Changer with Effects enables you to share all audio files you process with it to any of the most popular social media platforms.
Pros
- The app has over 50,000,000 installs
- Equipped with a text to voice feature
- Setting a new ringtone with this app is easy
- Supports editing of pre-recorded audio files
Cons
- Contains ads
- No audio or video editing options
9. Voice Changer
**Price:**Free
Compatibility: Android 4.1 and up
User Rating: 4.4

If you are looking for an Android app that lets you modulate your voice quickly and effortlessly, then Voice Changer may be one of the best options you can find on the market. You can record your voice by simply tapping on the microphone and speaking into your phone’s speaker and then apply one of the audio effects this app offers. Optionally, you can import an audio file you already recorded into the app and then apply Martian, Foreigner, Giant or Child effects to your voice recording. The best part is that you can apply each effect to the audio files you’re editing as many times as you want.
Pros
- Loads of funny effects
- Simple audio recording setup
- Intuitive and modernly designed interface
- Enables users to share audio files via Bluetooth or social media platforms
Cons
- No video editing tools
- The quality of output audio files can vary
10. Voice FX
**Price:**Free, but offers in-app purchases
Compatibility: Android 4.0.3 and up
User Rating: 3.8

Modulating voices in all types of audio files is a straightforward and fun process that can be completed in just a few taps. During the audio recording session, you can apply all voice effects to the sound you are recording and stream it live to your web browsers or media players you’re using. Voice FX changes your voice in real time, which enables you to preview your results before deciding if you want to save them. All files you export from this app will be saved in the MP3 format so you can use them as ringtones on your Android device.
Pros
- Allows users to modulate pre-recorded audio files
- Voice effects are applied in real time
- Offers live streaming features
- Exports files in the MP3 format
Cons
- Prone to glitches
- A limited selection of voice effects
11. Voice Changer Plus
**Price:**Free, but offers in-app purchases
Compatibility: iOS 8.0 or later
User Rating: 4.8
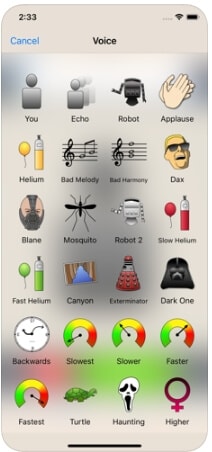
iPhone and iPad owners in need of a voice changer app that grants them complete creative freedom over the modulation of the voices they record, should consider using the Voice Changer Plus. The app features more than fifty voice effects and it provides support for voiceover recordings. Moreover, you can edit all your audio files even after you saved them, enabling you to find new ways to improve your recordings over time. Voice Changer Plus is also equipped with trim controls, so you can remove all parts of your audio files you don’t want to share with your friends on social media.
Pros
- Offers more voice effects than most of its competitors
- Provides voiceover recording options
- Users can trim their audio files
- All audio recordings can be edited after the voice modulation
Cons
- In-app purchase is required in order to unlock all of the app’s features
- Modulating audio in video files is not an option
Below is a quick comparison table among these voice changer apps, hope it will be helpful.
| App | Supported OS | User Rating | Voice Templates |
|---|---|---|---|
| Celebrity Voice Changer - Face | iOS 9.0 or later | 4.0 | Yes |
| Snapchat | iOS 10.0 or later, Android 4.4 or up | 3.8 | No |
| Voice Changer by e3games | Android 4.1 and up | 4.3 | Yes |
| Voicy: Celebrity Voice Changer | iOS 10 or later | 4.3 | Yes |
| Video Voice Changer – Fun Editor | iOS 8.0 or later | 4.4 | Yes |
| Video Voice Changer FX | Android 4.1 and up | 4.1 | Yes |
| Squeak Voice Changer | Android 4.3 and up | 3.9 | Yes |
| Voice Changer with Effects | Android 4.1 and up | 4.5 | Yes |
| Voice Changer | Android 4.1 and up | 4.4 | Yes |
| Voice FX | Android 4.0.3 and up | 3.8 | Yes |
| Voice Changer Plus | iOS 8.0 or later | 4.8 | Yes |
Conclusion
Everybody enjoys a good joke, and the apps we featured in this article enable you to have a lot of fun while experimenting with different voice modulation options. All of the voice effects these apps offer can change a voice automatically, but if you would like to alter the voices in your videos you must choose an app that supports this option. Which of the best voice changer apps for iPhone and Android devices are you going to choose? Leave a comment, and share your opinions with us.
Benjamin Arango
Benjamin Arango is a writer and a lover of all things video.
Follow @Benjamin Arango
Benjamin Arango
Mar 27, 2024• Proven solutions
Have you ever wondered what your voice would sound like if you were a cartoon character, a robot, or an older version of yourself? Changing how your voice sounds has never been easier, regardless of the Smartphone model you have, since voice changer apps can be used on both iPhone and Android devices.
Even though there is nothing wrong with modulating your voice to have fun with your friends, using voice changer apps to pull malicious pranks or bully strangers online is far from acceptable. Read on if you would like to find out more about the best voice changer apps for iPhone and Android devices and discover the one you enjoy using the most.
Best Voice Changer Apps for iPhone and Android
Creating a new ringtone, making a voice recording, or having fun with your friends are only a few reasons why so many people choose to try out voice changer apps. The vast majority of these apps feature well-equipped audio effects libraries that enable users to have fun with their friends and hear how they would sound if they were drunk or after inhaling helium. So, let’s take a look at some of the best voice changer apps on the market.
Changing video voice on Windows and Mac with Wondershare Filmora
Do you want to change the voice in video on Windows and Mac and don’t know which software can meet this requirement? Try Filmra video editor , which provides several ways to change voice over, such as changing the voice speed or changing the pitch. Download the trial version below and find out more possibility in video creation with Filmora.
1. Celebrity Voice Changer – Face
Price: Free, but offers in-app purchases
Compatibility: iOS 9.0 or later
User Rating: 4.0
In case you would like to sound like your favorite movie star of TV host, then Celebrity Voice Changer is one of the best choices you can make. Besides the standard set of options, the app also lets you request new voices since its machine learning technology can mimic virtually anyone’s voice. However, Celebrity Voice Changer is currently only available in English and it cannot modulate speech in other languages. In addition, you must make an in-app purchase in order to gain access to all of the app’s features or unlock the unlimited usage of the app.
Pros
- Automatic voice modulation
- Huge selection of voice filters
- The app generates video files that are better adjusted to the audience on social media than audio files
- Excellent impressions of celebrities
Cons
- Unreasonably expensive
- The app’s Deep Learning technology still has a lot of room for improvement
2. Snapchat
Price: Free, but offers in-app purchases
Compatibility: iOS 10.0 or later, Android 4.4 or up
User Rating: 3.8
With more than 203 million daily users, Snapchat is one of the largest messaging platforms on the market. Previously, we’ve shared how to change gender on Snapchat , beside that, the app lets its users capture short moments or the so-called Snaps and share them with friends. In addition to hundreds of video filters , Snapchat also features a broad spectrum of voice changing effects that make Snaps more entertaining. Even so, the audio recording options Snapchat offers are far from ideal, because the app doesn’t allow you to edit the files you create with it. Using Snapchat will drain your battery quickly, which is why you must pay attention to how frequently you use this app.
Pros
- The easy voice modulation process
- Excellent messaging options
- Grants you access to a large community of likeminded people
- Lenses and filters are updated on a daily basis
Cons
- Editing voice changes after you create a Snap is not possible
- Snapchat is not primarily a voice changer app
Check the detailed information about How to Change Voice on Snapchat with 2 Easy Methods >>
3. Voice Changer
Price: Free
Compatibility: Android 4.1 and up
User Rating: 4.3
Changing your voice with this app won’t take more than a few moments of your time. You just have to launch the app and hit the microphone button to record a message or a joke you would like to modulate. Once you’re happy with the audio recording you made, you can proceed to choose from more than twenty voice effects that will make you sound like a dwarf, a robot, or an alien. The app’s file-sharing capabilities enable you to post your audio recordings to any social media platform of your choosing or store your files and use them as many times as you want.
Pros
- Entertaining and easy to use
- The simple three-step voice modulation process
- Good selection of voice filters
- Excellent file sharing options
Cons
- The app displays ads
- No audio editing tools
4. Voicy: Celebrity Voice Changer
**Price:**Free, but offers in-app purchases
Compatibility: iOS 10 or later
User Rating: 4.3
Impersonating your favorite celebrity can be a fun way to prank your friends on social media. Voicy features a broad selection of celebrity voice impersonations you can use to make you sound like a famous actress or TV personality. The app utilizes a machine learning technology that can generate more than forty avatars and allows the users to experiment with different voice effects. The free version of the app offers only limited capabilities, so if you want to gain access to all of the Voicy’s features, you must choose a weekly, monthly or an annual subscription.
Pros
- Equipped with a powerful machine learning technology
- Offers a vast selection of voice avatars
- The quick voice modification process
- A great choice if you want to make a parody
Cons
- More expensive than the competition
- Support only the English language
5. Video Voice Changer – Fun Editor
Price: Free, but offers in-app purchases
Compatibility: iOS 8.0 or later
User Rating: 4.4
Changing the voices in the videos you record with your iPhones or iPads is a straightforward process that takes a minimum amount of effort. You can either use this iOS-based app to capture videos you’re going to dub or import them from the albums in which they are stored. The Video Voice Changer app is a great option if you want to dub videos directly from your phone because it enables you to change the voices in your videos and make them sound like mice, bears or ghosts. There are over thirty voice effects to choose from, so you can easily pick the one that best fits the video you’re editing.
Pros
- Equipped with video recording tools
- Excellent dubbing features
- A rich selection of voice effects
- Allows users to share their creations on Facebook, Instagram, and other social media platforms
Cons
- You must make an in-app purchase to unlock all of the app’s features
- No audio mixing options
6. Video Voice Changer FX
**Price:**Free, but offers in-app purchases
Compatibility: Android 4.1 and up
User Rating: 4.1
This is a simple app, anyone can use to change the voices in a video. Simply upload a video file from an SD card in your phone and choose an audio effect you want to apply. The app’s collection of funny voices includes options like echo, squirrel, space ship or chipmunk. As soon as you select the voice effect you want to add to a video, the app will start generating a new video that will be saved to your phone. Sharing the videos you edit with Video Voice Changer FX to social media directly from the app is not an option.
Pros
- Fun and easy to use
- Great price to performance ratio
- Changing a voice requires just a few taps
- Allows users to switch between effects while the video is playing
Cons
- No audio or video recording capability
- Doesn’t support social media sharing
7. Squeak Voice Changer
**Price:**Free, but offers in-app purchases
Compatibility: Android 4.3 and up
User Rating: 3.9
Every joke you want to share with your online friends is going to be a little funnier if you record it with Squeak Voice Changer. You just have to tap on the Record button and choose one of the available effects. Each voice changing effect this app offers is represented by a character so you should select Jamie the Jolly if you want to make your voice sound like you’re at a party or Bruce the Sentimental Bot if you want your voice to sound artificial. All the recordings you make with Squeak Voice Changer can be easily shared on social media.
Pros
- Equipped with audio recording options
- Cute and memorable characters that represent voice effects
- Inexpensive and fun to use
- Functional app design
Cons
- Poor selection of voice effects
- The AI only recognizes the English language
8. Voice Changer with Effects
**Price:**Free
Compatibility: Android 4.1 and up
User Rating: 4.5
This Android-based app is designed to make fun and easy since voice modulation features enable you to play voice recording backward or change your voice to sound robotic or even alien. Besides recording your voice, the app also lets you modulate pre-recorded sounds and save them to your phone or use them as ringtones or notification sounds. Furthermore, the app lets you add sounds to images and share them to Facebook. The Voice Changer with Effects enables you to share all audio files you process with it to any of the most popular social media platforms.
Pros
- The app has over 50,000,000 installs
- Equipped with a text to voice feature
- Setting a new ringtone with this app is easy
- Supports editing of pre-recorded audio files
Cons
- Contains ads
- No audio or video editing options
9. Voice Changer
**Price:**Free
Compatibility: Android 4.1 and up
User Rating: 4.4
If you are looking for an Android app that lets you modulate your voice quickly and effortlessly, then Voice Changer may be one of the best options you can find on the market. You can record your voice by simply tapping on the microphone and speaking into your phone’s speaker and then apply one of the audio effects this app offers. Optionally, you can import an audio file you already recorded into the app and then apply Martian, Foreigner, Giant or Child effects to your voice recording. The best part is that you can apply each effect to the audio files you’re editing as many times as you want.
Pros
- Loads of funny effects
- Simple audio recording setup
- Intuitive and modernly designed interface
- Enables users to share audio files via Bluetooth or social media platforms
Cons
- No video editing tools
- The quality of output audio files can vary
10. Voice FX
**Price:**Free, but offers in-app purchases
Compatibility: Android 4.0.3 and up
User Rating: 3.8
Modulating voices in all types of audio files is a straightforward and fun process that can be completed in just a few taps. During the audio recording session, you can apply all voice effects to the sound you are recording and stream it live to your web browsers or media players you’re using. Voice FX changes your voice in real time, which enables you to preview your results before deciding if you want to save them. All files you export from this app will be saved in the MP3 format so you can use them as ringtones on your Android device.
Pros
- Allows users to modulate pre-recorded audio files
- Voice effects are applied in real time
- Offers live streaming features
- Exports files in the MP3 format
Cons
- Prone to glitches
- A limited selection of voice effects
11. Voice Changer Plus
**Price:**Free, but offers in-app purchases
Compatibility: iOS 8.0 or later
User Rating: 4.8
iPhone and iPad owners in need of a voice changer app that grants them complete creative freedom over the modulation of the voices they record, should consider using the Voice Changer Plus. The app features more than fifty voice effects and it provides support for voiceover recordings. Moreover, you can edit all your audio files even after you saved them, enabling you to find new ways to improve your recordings over time. Voice Changer Plus is also equipped with trim controls, so you can remove all parts of your audio files you don’t want to share with your friends on social media.
Pros
- Offers more voice effects than most of its competitors
- Provides voiceover recording options
- Users can trim their audio files
- All audio recordings can be edited after the voice modulation
Cons
- In-app purchase is required in order to unlock all of the app’s features
- Modulating audio in video files is not an option
Below is a quick comparison table among these voice changer apps, hope it will be helpful.
| App | Supported OS | User Rating | Voice Templates |
|---|---|---|---|
| Celebrity Voice Changer - Face | iOS 9.0 or later | 4.0 | Yes |
| Snapchat | iOS 10.0 or later, Android 4.4 or up | 3.8 | No |
| Voice Changer by e3games | Android 4.1 and up | 4.3 | Yes |
| Voicy: Celebrity Voice Changer | iOS 10 or later | 4.3 | Yes |
| Video Voice Changer – Fun Editor | iOS 8.0 or later | 4.4 | Yes |
| Video Voice Changer FX | Android 4.1 and up | 4.1 | Yes |
| Squeak Voice Changer | Android 4.3 and up | 3.9 | Yes |
| Voice Changer with Effects | Android 4.1 and up | 4.5 | Yes |
| Voice Changer | Android 4.1 and up | 4.4 | Yes |
| Voice FX | Android 4.0.3 and up | 3.8 | Yes |
| Voice Changer Plus | iOS 8.0 or later | 4.8 | Yes |
Conclusion
Everybody enjoys a good joke, and the apps we featured in this article enable you to have a lot of fun while experimenting with different voice modulation options. All of the voice effects these apps offer can change a voice automatically, but if you would like to alter the voices in your videos you must choose an app that supports this option. Which of the best voice changer apps for iPhone and Android devices are you going to choose? Leave a comment, and share your opinions with us.
Benjamin Arango
Benjamin Arango is a writer and a lover of all things video.
Follow @Benjamin Arango
Also read:
- New Cutting-Edge Techniques for Streaming Audio Recording and Preservation for 2024
- 2024 Approved 2023 Compilation of Top Free Music Software Produce, Edit & Record with Zero Cost Windows and macOS
- In 2024, Stay Safe While Video Chatting Tips and Top 10 Sites
- Updated Isolate Handclapping Vibration Symphony
- In 2024, Aural Canvas Weaving Soundtracks Into Video Tapestries with Filmora Software
- From Silence to Symphony A Practical Approach to Changing Video Audio (Part 1)
- New Unlocking the Secrets to Finding Your Ideal Mac MP3 Information Editor
- Expert Online Sound Calibration Services for 2024
- New 5 Best Zoom Sound Enhancers Personalize Your Speech for a Chuckle-Worthy Experience!
- Updated In 2024, Unveiling an Assortment of Authentic Dog Noise Recordings
- The Premier Buyers Manual Selecting the Most Outstanding Cost-Free Speech Recording Software for 2024
- New In 2024, Exploring PCs Best Sound Capture Software A Selection of Top 10
- Updated Mastering the Art of Embedding Melodies in Windows GIFs for 2024
- New In 2024, 10 Best Music Editing Apps for iPhone and Android
- Updated The Audio Editors Handbook 6 Methodical Steps for Clearing Vocals Using Adobe Audition for 2024
- New Charting the Top Melodic Havens S Downloadable BGM Scores for 2024
- New In 2024, Cambridge Audio CXU Review
- New Five Best MP3 Voice Recorder You Should Download Now for 2024
- Listen and Download A Guide to Contemporary DJ Music for 2024
- In 2024, Echoes to Silence Advanced Noise Reduction Tactics Using Audacity
- New Vital Details About Accessing YouTubes Sound Library for 2024
- Updated In 2024, Precision in Perception Techniques for Correcting Warped Audio Cuts
- New Premiere Pros Guide to Decoupling Sound Elements in Post-Production for 2024
- New Viral Cellphone Alert Songs You Cant Ignore for 2024
- New In 2024, Hunt for Chuckling Sonic Elements
- New Capturing Sound with Precision Your Complete Guide to Audio Recording in Windows 10
- The Pinnacle of Live Audio Adaptation - Top Tools
- 2024 Approved The Premier Roundup of Win-Compatible DAWs Evaluating Free and Paid Software Options
- Import Music Track Into iMovie Project
- New Pro Audio Refinement on Windows A Compendium of Leading Tools for Quieter Recording Environments for 2024
- Updated In 2024, Synch Soundscape to Compiled Visuals in WINDOWS
- Mastering the Use of Atmospheric Audio to Enhance Narrative in Films
- In 2024, Chic Ambiance Soundtrack for Online Video Creations
- Updated In 2024, Choosing Your Perfect Match Leading Mac-Based Audio Tagging Software
- Updated In-Depth Analysis of the Wave Editor Signature Capabilities, Evaluations, and Practical Lessons
- Updated Finding the Best Dog Noise Samples for Audio Creators for 2024
- Boost Your Logic Pro X Projects with These Indispensable Plugin Choices for 2024
- How to Acquire Authentic Rumbles, Sighs, and Gaseous Effects Audio Files
- Updated In 2024, The Best Sound Equalizer Settings
- New In 2024, Unveiling the Most Accessible and Affordable Browser-Based DAW Tools
- Elegant Music Palette for Online Vlog Production for 2024
- New In 2024, The Editors Path to Perfection Techniques for Removing Ambient Noise From Your Project
- Updated Step-by-Step Integrating Tunes Into KineMaster for 2024
- Methods of Extracting Audio From Video Footage in Premiere Pro for 2024
- 2024 Approved Vocalizing Text Pioneering Audio to Written Content Conversion
- Best 10 Mock Location Apps Worth Trying On Apple iPhone 7 Plus | Dr.fone
- Ultimate Guide from iPhone 8 Plus iCloud Activation Lock Bypass
- Unleash Your Creativity Top-Rated Stop Motion Apps for Mobile
- CatchEmAll Celebrate National Pokémon Day with Virtual Location On Tecno Spark 20 Pro+ | Dr.fone
- How to bypass Nokia C12 Plus’s lock screen pattern, PIN or password
- How to Fix Android.Process.Media Has Stopped on Samsung Galaxy S24 | Dr.fone
- In 2024, Fixing Foneazy MockGo Not Working On Samsung Galaxy Z Fold 5 | Dr.fone
- New 2024 Approved 10 Top Vloggers on YouTube
- In 2024, A Quick Guide to Lenovo ThinkPhone FRP Bypass Instantly
- New In 2024, No Fuss, No Muss 5 Simple Online Tone Generators Free
- Why These 10+ Top Text Motion Templates Are Worth Your Attention
- Title: New In 2024, Harmonious Soundscape Selection for Modern Matrimonial Cinematography
- Author: David
- Created at : 2024-05-05 10:02:01
- Updated at : 2024-05-06 10:02:01
- Link: https://sound-tweaking.techidaily.com/new-in-2024-harmonious-soundscape-selection-for-modern-matrimonial-cinematography/
- License: This work is licensed under CC BY-NC-SA 4.0.
