
:max_bytes(150000):strip_icc():format(webp)/tiktok-messages-889fef4cdfac41babb84770288f32cf2.jpg)
New In 2024, Become an Expert at Uncomplicated Podcasting A Stepwise Manual to Success 2023 Guidebook
Become an Expert at Uncomplicated Podcasting: A Stepwise Manual to Success [2023 Guidebook]
How to Record a Podcast Effortlessly: a Step-by-Step Guide

Benjamin Arango
Mar 27, 2024• Proven solutions
If you are looking for a guide on how to record a podcast, you are on the right platform. If you are still looking on whether to start a podcast or not, this is the right time to discover a less competitive yet high potential niche.
Start developing new skills before anyone else could and be pro within no time. A podcast creation is the journey of many stages, including selecting the topic, name, podcast cover art, equipment, intro/outro audio, recording/editing equipment, and the promotion strategy. Thus, you must select the type of content beforehand to start recording the podcast effortlessly.
On the other hand, don’t get too complicated, especially when you are a beginner. This post is going to be an ultimate guide on how to record a podcast effortlessly. Without further introspection, let’s get started with the initial preparations.
- Part 1:How to Prepare for Recording a Podcast?
- Part 2:How to Record a Podcast on PC?
- Part 3:How to Record a Podcast on the iPhone?
- Part 4:How to Record a Podcast Remotely?
How to Prepare for Recording a Podcast?
To know how to record a podcast remotely, you must note the initial steps of preparation. And that is going to include content selection to choosing the right recording equipment.
Plan the content
The very first step is to plan the content of the podcast. Also, make sure that the topic or niche you will select must be up to your knowledge. It should be a topic for which you can discuss 100+ episodes. Invest the right amount of time in planning the content of the podcast.
Choose co-host (optional)
You can pick up a co-host if you want. A Co-Host will further help you get the conversation going smoothly and quickly. It will also look engaging to the listeners. Overall, it is better to pick up a co-host to change your decision, later on, to continue the conversation individually.
Select the format, style, and length of the podcast
After planning the content, you can select the length, style, and format of the podcast. Even if you want to go for a long-duration podcast, make it easy and straightforward to understand to avoid distracting the audience’s attention. You can then choose among the most popular podcast formats, namely the Interview Shows, Educational Shows, Conversational Podcasts, Solo-Casts, True Stories podcasts, or Podcast Theatre narrating fictional stories.
Consider Podcast Recording Equipment
Don’t think of investing in a fancy podcast recording studio, especially when you are starting. Professionals even say that the outdoors is useful when you are confident to speak in public. It will also offer a preview of the background hustle, which further looks attractive and engaging to the listener.
You can even start from a phone with a good microphone setup. It’s better to invest in a good-quality microphone and have your little format ready all by itself. Try looking for an audio mixer if you have gone a bit advanced in podcast recording.
Recording Software
The last decision before recording is the selection of recording software. As a beginner, we’d like to recommend Audacity, a free tool when working on audio podcasts. Or, you must check out Wondershare Filmora X to beautify your video podcasts.
How to Record a Podcast on PC?
Wondershare Filmora X is the best option if you want to know how to record a PC podcast. It consists of some great features newly launched to make podcast creation super easy for beginners. So, let’s reveal the ultimate steps to do so!
Step 1: Create a New Project

After launching the new Wondershare Filmora X, hit Create New Project and import an image or any free stock video file. For reference, we are importing an image.
Step 2: Start Recording
Add or drag this media file into the timeline and start recording by clicking the Record button. Select Record Voiceover from the options.

Step 3: Set microphone
Set the Microphone device and hit the big Red Circle to confirm voiceover recording.

Step 4: Continue Recording
Continue Recording up to where you want it to record the podcast. Press the Ok button to proceed.

Step 5: Export audio
Hit the Export button to download your project.
All in all, it’s pretty easy to create a podcast with Wondershare Filmora X using the Record Voiceover feature after setting the Microphone device.
How to Record a Podcast on the iPhone?
Garage Band is the ideal option if you want to know how to record a podcast on your iPhone. It is the best DAW to be used on a Macbook or iMac version. Given below are steps on how to record a podcast with Garage Band.
Step 1: Create a Template
Select custom recording template after choosing the ‘Empty Project.’ You can select the + icon to create templates for multiple tracks. At last, save the recording template to your desired location of the hard drive.

Source: prismic.io
Step 2: Start recording
Select from either a single track or multi-track recording in Garage Band. However, the single-track recording setup for a solo host is at default. To set a multi-track recording, go to Track> Configure Track Header and tick the box Record Enable to have it in each Track.

Source: prismic.io
Step 3: Edit
Now, you can trim, split regions, and automate the podcast audio. Go to Mix> Show Automation to apply volume automation. The Split Regions at Playhead tool is another essential editing feature in the Garage Band. It will split the selected region into individual regions to move and trim etc. You can also use royalty-free music tracks of Garage Band while editing the podcast.

Source: prismic.io
Step 4: Audio Mixing
First of all, arrange all the clips to use its inbuilt audio mixing feature. Then, you can set EQ and Compression, etc., for sound mixing. To mix your tracks effectively, use the podcast’s original audio level as a baseline and then arranged for things like sound effects and music, etc.

Source: prismic.io
Step 5: Export
The last step is to click Share> Export Song to Disc> Export after naming your file and selecting the destination.
How to Record a Podcast Remotely?
You should also know how to record a podcast remotely, precisely when in the interview format. Record a zoom call and make an awesome podcast out of it as follows.
Step 1: Set a new Zoom Meeting and send a Meeting ID or Invite Link to your guests.
Step 2: Allow the participants to record the meeting and turn on the Original Sound.
Step 3: Start recording and tell your participants to do the same.
Step 4: End the meeting.
Step 5: Zoom will automatically save the recordings on both your and your participants’ system.
Conclusion
So, that was all about how to record a podcast effortlessly. We have discussed step by step guides on recording a podcast on PC, remotely, and on iPhone devices. Even a child can determine the easiest of all three methods mentioned above, i.e., recording a podcast on PC via voiceover recording. It is the most convenient method, specifically when you are a beginner.
Benjamin Arango
Benjamin Arango is a writer and a lover of all things video.
Follow @Benjamin Arango
Benjamin Arango
Mar 27, 2024• Proven solutions
If you are looking for a guide on how to record a podcast, you are on the right platform. If you are still looking on whether to start a podcast or not, this is the right time to discover a less competitive yet high potential niche.
Start developing new skills before anyone else could and be pro within no time. A podcast creation is the journey of many stages, including selecting the topic, name, podcast cover art, equipment, intro/outro audio, recording/editing equipment, and the promotion strategy. Thus, you must select the type of content beforehand to start recording the podcast effortlessly.
On the other hand, don’t get too complicated, especially when you are a beginner. This post is going to be an ultimate guide on how to record a podcast effortlessly. Without further introspection, let’s get started with the initial preparations.
- Part 1:How to Prepare for Recording a Podcast?
- Part 2:How to Record a Podcast on PC?
- Part 3:How to Record a Podcast on the iPhone?
- Part 4:How to Record a Podcast Remotely?
How to Prepare for Recording a Podcast?
To know how to record a podcast remotely, you must note the initial steps of preparation. And that is going to include content selection to choosing the right recording equipment.
Plan the content
The very first step is to plan the content of the podcast. Also, make sure that the topic or niche you will select must be up to your knowledge. It should be a topic for which you can discuss 100+ episodes. Invest the right amount of time in planning the content of the podcast.
Choose co-host (optional)
You can pick up a co-host if you want. A Co-Host will further help you get the conversation going smoothly and quickly. It will also look engaging to the listeners. Overall, it is better to pick up a co-host to change your decision, later on, to continue the conversation individually.
Select the format, style, and length of the podcast
After planning the content, you can select the length, style, and format of the podcast. Even if you want to go for a long-duration podcast, make it easy and straightforward to understand to avoid distracting the audience’s attention. You can then choose among the most popular podcast formats, namely the Interview Shows, Educational Shows, Conversational Podcasts, Solo-Casts, True Stories podcasts, or Podcast Theatre narrating fictional stories.
Consider Podcast Recording Equipment
Don’t think of investing in a fancy podcast recording studio, especially when you are starting. Professionals even say that the outdoors is useful when you are confident to speak in public. It will also offer a preview of the background hustle, which further looks attractive and engaging to the listener.
You can even start from a phone with a good microphone setup. It’s better to invest in a good-quality microphone and have your little format ready all by itself. Try looking for an audio mixer if you have gone a bit advanced in podcast recording.
Recording Software
The last decision before recording is the selection of recording software. As a beginner, we’d like to recommend Audacity, a free tool when working on audio podcasts. Or, you must check out Wondershare Filmora X to beautify your video podcasts.
How to Record a Podcast on PC?
Wondershare Filmora X is the best option if you want to know how to record a PC podcast. It consists of some great features newly launched to make podcast creation super easy for beginners. So, let’s reveal the ultimate steps to do so!
Step 1: Create a New Project
After launching the new Wondershare Filmora X, hit Create New Project and import an image or any free stock video file. For reference, we are importing an image.
Step 2: Start Recording
Add or drag this media file into the timeline and start recording by clicking the Record button. Select Record Voiceover from the options.
Step 3: Set microphone
Set the Microphone device and hit the big Red Circle to confirm voiceover recording.
Step 4: Continue Recording
Continue Recording up to where you want it to record the podcast. Press the Ok button to proceed.
Step 5: Export audio
Hit the Export button to download your project.
All in all, it’s pretty easy to create a podcast with Wondershare Filmora X using the Record Voiceover feature after setting the Microphone device.
How to Record a Podcast on the iPhone?
Garage Band is the ideal option if you want to know how to record a podcast on your iPhone. It is the best DAW to be used on a Macbook or iMac version. Given below are steps on how to record a podcast with Garage Band.
Step 1: Create a Template
Select custom recording template after choosing the ‘Empty Project.’ You can select the + icon to create templates for multiple tracks. At last, save the recording template to your desired location of the hard drive.
Source: prismic.io
Step 2: Start recording
Select from either a single track or multi-track recording in Garage Band. However, the single-track recording setup for a solo host is at default. To set a multi-track recording, go to Track> Configure Track Header and tick the box Record Enable to have it in each Track.
Source: prismic.io
Step 3: Edit
Now, you can trim, split regions, and automate the podcast audio. Go to Mix> Show Automation to apply volume automation. The Split Regions at Playhead tool is another essential editing feature in the Garage Band. It will split the selected region into individual regions to move and trim etc. You can also use royalty-free music tracks of Garage Band while editing the podcast.
Source: prismic.io
Step 4: Audio Mixing
First of all, arrange all the clips to use its inbuilt audio mixing feature. Then, you can set EQ and Compression, etc., for sound mixing. To mix your tracks effectively, use the podcast’s original audio level as a baseline and then arranged for things like sound effects and music, etc.
Source: prismic.io
Step 5: Export
The last step is to click Share> Export Song to Disc> Export after naming your file and selecting the destination.
How to Record a Podcast Remotely?
You should also know how to record a podcast remotely, precisely when in the interview format. Record a zoom call and make an awesome podcast out of it as follows.
Step 1: Set a new Zoom Meeting and send a Meeting ID or Invite Link to your guests.
Step 2: Allow the participants to record the meeting and turn on the Original Sound.
Step 3: Start recording and tell your participants to do the same.
Step 4: End the meeting.
Step 5: Zoom will automatically save the recordings on both your and your participants’ system.
Conclusion
So, that was all about how to record a podcast effortlessly. We have discussed step by step guides on recording a podcast on PC, remotely, and on iPhone devices. Even a child can determine the easiest of all three methods mentioned above, i.e., recording a podcast on PC via voiceover recording. It is the most convenient method, specifically when you are a beginner.
Benjamin Arango
Benjamin Arango is a writer and a lover of all things video.
Follow @Benjamin Arango
The Ultimate Checklist for Virtual Vigilance: Safeguarding During Online Interactions
Top 10 Video Chat Sites to Meet Funny Strangers

Ollie Mattison
Mar 27, 2024• Proven solutions
Having a conversation with a stranger online can be surprisingly enjoyable. The last generation taught us how meaningful human connections are. There are many video chat sites where you can meet interesting people. Many of them have chat rooms for you to meet someone. The number of fascinating people you can meet at random is astounding, whether you’re seeking a special someone or just looking for friends.


The good news is that there are plenty of sites where you can video chat with random people and meet new strangers. There is a random chat room, video chat room, and text chat room to meet and talk to new people. Getting to know strangers online can be a bit intimidating, but these platforms make it easy. There is also often no charge for talking with others on these platforms. What type of site is the best for you depends on what features you want and what you hope to accomplish.
You don’t need to worry if you aren’t sure where, to begin with, video chatting. We can help you no matter your level of experience with random chat. We are here to pick and choose which offers the best features with so many websites out there. If you’re looking for simple, safe, and easy-to-use platforms to make new friends and maybe even find love, we’ve got some of the best options for you, such as Fruzo, Tinychat, ChatRandom, etc.
You might be interested in:
How To Keep Yourself Safe During Online Video Chats?
We should talk about how to use video chatting safely before going into a detailed discussion about each website. It’s one thing to chat with your family and friends. However, if you find yourself speaking with strangers at random, you should exercise a bit more caution. The following tips should be kept in mind.
- You shouldn’t give strangers your personal information.
- Your videos shouldn’t feature too much of your home.
- Keep sensitive information, such as house numbers and mail, off of the screen.
- Make sure to only use sites with reputable security and safety measures.
- Don’t hesitate to report anything suspicious or unbecoming.
Our Picks
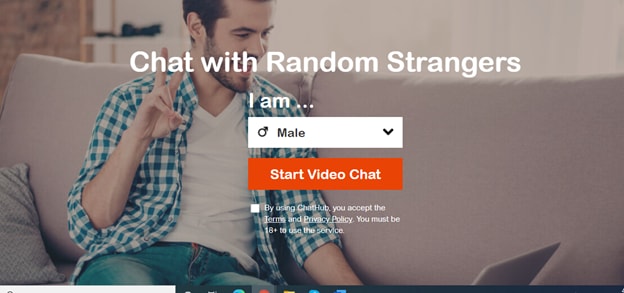
- Omegle - World’s No 1 Video Chatting Website.
- Fruzo - Best For Online Video Chatting and Dating
- Tinychat - Best for Video Chat Rooms and Group Chats.
- ChatRandom - Best For Annonymous Video Chatting.
- ChatRad - Best site for meeting random people online.
- EmeraldChat - Best for both Text and Video Chats.
- Chat Hub - Best for meeting a unique stranger every time.
- Shagle - Best if you want to chat with strangers in different languages.
- FaceFlow - Best for video conferencing and Instant Messaging.
- iMeetzu - Best for making new friends and public relations.
![]()
A cross-platform for making videos anywhere for all creators

Why your video editing isn’t good enough? How about some creative inspo?
- 100 Million+ Users
- 150+ Countries and Regions
- 4 Million+ Social Media Followers
- 5 Million+ Stock Media for Use
* Secure Download

1.Omegle

The global video chat site Omegle is frequently used by people across the world to chat with random strangers. Chatting with strangers online is what this website is all about. In 2010, Omegle introduced its video chat feature a year after it was launched as a text-only chat platform. You are paired with another user randomly from another country on Omegle. The website does not have any age restrictions as it is open to anyone aged 18 and over. Video chatting is also closely monitored to keep the other users safe and to avoid any harmful material. Using a screen recorder, you can also record Omegle chat.
Features:
  * Free To Use
  * It only takes a few seconds to match you with a stranger
  * Strict video chatting monitoring to avoid unethical content
  * Allows you to record your video chat
2. Fruzo
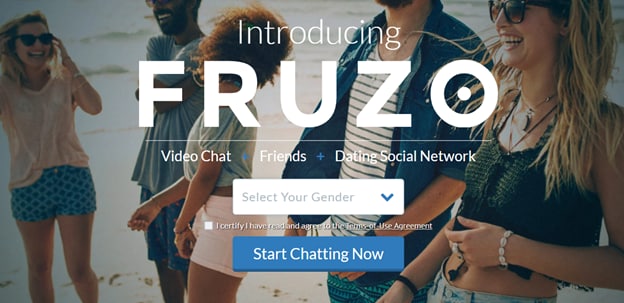
Fruzo is more than a place for free online video calls. This is an online dating site that allows users to connect with people through Facebook. Users can either create new profiles or connect with existing profiles using Facebook. Besides finding matches, you may also connect with people, follow people, discuss topics, and make new friends through this platform. Users have the option of finding connections by location, gender, age, or keywords. It is also possible to upload photos or browse unlimited images. Because it can be downloaded on your smartphone, you can access it from just about anywhere.
Features:
  * Search filters to find a relevant match
  * Allows you to upload photos and browse photos of others
  * The mobile app is also available
3. Tinychat

With TinyChat, you can chat with anyone using voice or video over the internet. A quarter of a billion minutes of airtime are logged by users every day, the company claims. If you’re unable to find a chat room you want, you can create one. You’ll find thousands of them, including some started by people in your area. You can stream up to 12 video feeds at once from TinyChat, which uses an API for streaming live video of shows hosted on the service, without paying a dime. Using mics, videos, or instant messaging, people can communicate online.
Features:
  * Allows group video chats
  * Easy to start your own chat room or join a public room
  * Free to use and multiple chatting options are available
4. ChatRandom
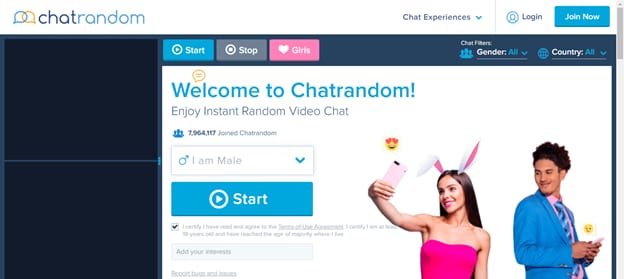
People do all kinds of things at ChatRandom since it is chaotic, crowded, and people-filled. Irrespective of whether you wanted something fun or anything else, ChatRandom has it all. Despite it being much less popular than it once was, this stranger chat website continues to thrive in the eyes of many. The community is decent, with a wide range of different types of people. The UI has been improved over the years, the matchmaking algorithm is better, and it is designed to cater to both male and female users
Features:
  * Register for free
  * Talk to members around the world
  * No registration is required for chat rooms
  * Online chatter numbers in the thousands
  * A mobile application is available
  * Users with an anonymous identity
5. ChatRad
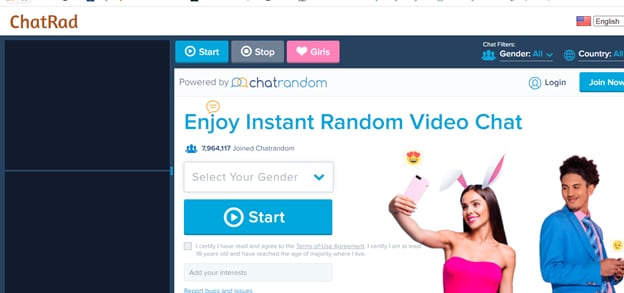
ChatRad is another video chat site that is free. You can chat with strangers from around the world on this random chat site. Before you can start video chatting, you only need to give the site access to your webcam. Furthermore, it allows you to restrict your conversation to only a specific partner you select. Unlike many other sites that are open for everyone, ChatRad has some terms, including that you have to be at least 18 years of age to use the service. Additionally, you can protect your privacy by remaining anonymous. Even if your webcam isn’t working, you can still start a video chat.
Features:
  * There is an option that allows users to stop the camera at any time
  * While viewing different cam chat users, every user has the option of setting a default message
  * If you are a free chat user, you have the ability to change the gender anytime
  * Even if you don't have a camera or microphone, you can still join a chat
6. EmeraldChat
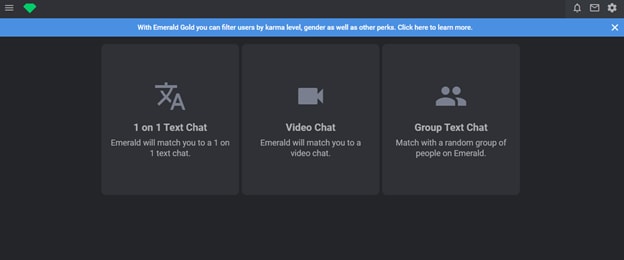
There is an elegant website for elegant people called EmeraldChat. Most people who use this site are trying to find some new friends, and there are surprisingly many women on the site, which is not the case with most other video chat services. The website boasts one of the most beautiful user interfaces on the market, which only adds to its appeal. Consider giving EmeraldChat a shot if you’re looking for a cool and clean chat room.
Features:
  * Allows both text and video chats
  * Group chatting options are available
  * No registration is required
  * Allows you to register an account and delete it at any time you want
  * Photo and media sharing options are available
7. Chat Hub
Starting a conversation with another user is simple. You can start online by just entering your gender, accepting the service terms, and following the steps! To prevent language barriers, you can also use a language filter. A user is never matched up with someone they’ve already met through a special filter, ensuring each match is different. The ChatHub interfaces are excellent for both video chats and text chats. Since you don’t need a profile, you can try without risk.
Additionally, ChatHub is concerned with the safety of its users. Conversations are kept private using peer-to-peer connections. You do not have to enter any personal information on this site.
Features:
  * No Registration Required
  * Language Filter To Prevent Language Barrier
  * You can choose to match with a unique stranger every time
  * The connection is private for additional security
8.Shagle
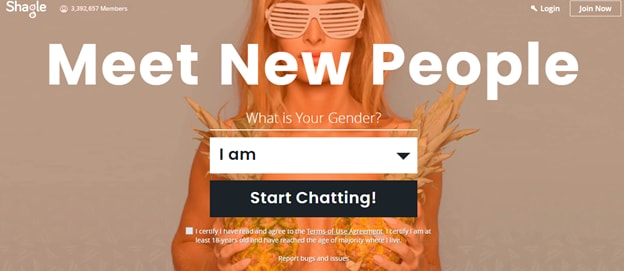
You need only a webcam to begin chatting with their more than 3 million members. It is now possible to talk with people from over 70 different countries thanks to translation tools so that you can converse with anyone. With Shagle, you can mask your identity while chatting, making it easier for shy people to communicate. Those who are hesitant or new to webcam chatting with strangers may find it easier to use that option.
Although you can use it for free to chat with people from 70 countries, you can upgrade to the premium version anytime and enjoy talking with people from over 200 countries with many other valuable features that come with the premium version only.
Features:
  * Best for first-timers
  * Translation tools are available to overcome the language barrier
  * The face masking option comes in very handy whether you want to hide your identity or have fun
  * You can chat with people from over 200 countries, but you will need to upgrade to the premium version
9.FaceFlow
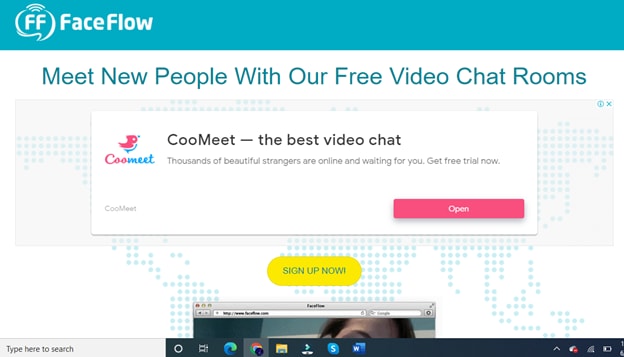
By allowing users to participate in three-way video chats simultaneously, these guys are taking social networking to a whole new level.
“FaceFlow” lets you communicate with your friends by video. However, you can also speak with strangers. It is now possible for users to create a searchable profile and upload YouTube videos and pictures. This site is more than just another webcam chat service - it is more comparable to Skype’s excellent communication service. One-on-one video chat is available, as well as text messaging. FaceFlow has also introduced a multiplayer game called Flappy that looks challenging.
Features:
  * Create video conferences or create your own
  * Participate in online chat rooms
  * Instant message sending and receiving
  * You can upload private photos and share them with others
  * Meet random strangers for private conversations
10.iMeetzu

iMeetzu lets you chat with random people live through video chats, and it has text chat rooms. This feature makes it similar to Omegle, but it goes a bit further. Once you pass the randomness, you are invited to join a free online dating or friend-finding service. Over a thousand new members join this social networking site every day, making it one of the fastest-growing sites of its kind. There is no better way to practice face-to-face communication before you get back into the dating pool. Whether you’re looking for a date or want to have fun with some random strangers, this site is one of the best choices for you.
Features:
- There is no charge for using this site’s features
- In addition to meeting new friends, you also build relationships with iMeetzu
- There is a global availability of this platform
- A new account can be created in fewer than five minutes
Conclusion
These are some of the best video chat sites you can find online. Some are new, and some have been in the market for over a decade. Every site has its unique features. Most of them are free, but some have premium versions to pay for a premium account and additional features.
Extra Info! Record & Edit Your Random Video Chat with Filmora
Ever thought of recording a funny random video chat and sharing it with your friends? Try Filmora! Filmora supports recording PC screens and allows you to edit your recorded videos. If you want to protect the privacy of the strangers you met on the above-listed video chat sites, you can easily add stickers or other elements to their faces. There is more you can do with Filmora. Check out the video below!
Ollie Mattison
Ollie Mattison is a writer and a lover of all things video.
Follow @Ollie Mattison
Ollie Mattison
Mar 27, 2024• Proven solutions
Having a conversation with a stranger online can be surprisingly enjoyable. The last generation taught us how meaningful human connections are. There are many video chat sites where you can meet interesting people. Many of them have chat rooms for you to meet someone. The number of fascinating people you can meet at random is astounding, whether you’re seeking a special someone or just looking for friends.
The good news is that there are plenty of sites where you can video chat with random people and meet new strangers. There is a random chat room, video chat room, and text chat room to meet and talk to new people. Getting to know strangers online can be a bit intimidating, but these platforms make it easy. There is also often no charge for talking with others on these platforms. What type of site is the best for you depends on what features you want and what you hope to accomplish.
You don’t need to worry if you aren’t sure where, to begin with, video chatting. We can help you no matter your level of experience with random chat. We are here to pick and choose which offers the best features with so many websites out there. If you’re looking for simple, safe, and easy-to-use platforms to make new friends and maybe even find love, we’ve got some of the best options for you, such as Fruzo, Tinychat, ChatRandom, etc.
You might be interested in:
How To Keep Yourself Safe During Online Video Chats?
We should talk about how to use video chatting safely before going into a detailed discussion about each website. It’s one thing to chat with your family and friends. However, if you find yourself speaking with strangers at random, you should exercise a bit more caution. The following tips should be kept in mind.
- You shouldn’t give strangers your personal information.
- Your videos shouldn’t feature too much of your home.
- Keep sensitive information, such as house numbers and mail, off of the screen.
- Make sure to only use sites with reputable security and safety measures.
- Don’t hesitate to report anything suspicious or unbecoming.
Our Picks
- Omegle - World’s No 1 Video Chatting Website.
- Fruzo - Best For Online Video Chatting and Dating
- Tinychat - Best for Video Chat Rooms and Group Chats.
- ChatRandom - Best For Annonymous Video Chatting.
- ChatRad - Best site for meeting random people online.
- EmeraldChat - Best for both Text and Video Chats.
- Chat Hub - Best for meeting a unique stranger every time.
- Shagle - Best if you want to chat with strangers in different languages.
- FaceFlow - Best for video conferencing and Instant Messaging.
- iMeetzu - Best for making new friends and public relations.
![]()
A cross-platform for making videos anywhere for all creators
Why your video editing isn’t good enough? How about some creative inspo?
- 100 Million+ Users
- 150+ Countries and Regions
- 4 Million+ Social Media Followers
- 5 Million+ Stock Media for Use
* Secure Download
1.Omegle
The global video chat site Omegle is frequently used by people across the world to chat with random strangers. Chatting with strangers online is what this website is all about. In 2010, Omegle introduced its video chat feature a year after it was launched as a text-only chat platform. You are paired with another user randomly from another country on Omegle. The website does not have any age restrictions as it is open to anyone aged 18 and over. Video chatting is also closely monitored to keep the other users safe and to avoid any harmful material. Using a screen recorder, you can also record Omegle chat.
Features:
  * Free To Use
  * It only takes a few seconds to match you with a stranger
  * Strict video chatting monitoring to avoid unethical content
  * Allows you to record your video chat
2. Fruzo
Fruzo is more than a place for free online video calls. This is an online dating site that allows users to connect with people through Facebook. Users can either create new profiles or connect with existing profiles using Facebook. Besides finding matches, you may also connect with people, follow people, discuss topics, and make new friends through this platform. Users have the option of finding connections by location, gender, age, or keywords. It is also possible to upload photos or browse unlimited images. Because it can be downloaded on your smartphone, you can access it from just about anywhere.
Features:
  * Search filters to find a relevant match
  * Allows you to upload photos and browse photos of others
  * The mobile app is also available
3. Tinychat
With TinyChat, you can chat with anyone using voice or video over the internet. A quarter of a billion minutes of airtime are logged by users every day, the company claims. If you’re unable to find a chat room you want, you can create one. You’ll find thousands of them, including some started by people in your area. You can stream up to 12 video feeds at once from TinyChat, which uses an API for streaming live video of shows hosted on the service, without paying a dime. Using mics, videos, or instant messaging, people can communicate online.
Features:
  * Allows group video chats
  * Easy to start your own chat room or join a public room
  * Free to use and multiple chatting options are available
4. ChatRandom
People do all kinds of things at ChatRandom since it is chaotic, crowded, and people-filled. Irrespective of whether you wanted something fun or anything else, ChatRandom has it all. Despite it being much less popular than it once was, this stranger chat website continues to thrive in the eyes of many. The community is decent, with a wide range of different types of people. The UI has been improved over the years, the matchmaking algorithm is better, and it is designed to cater to both male and female users
Features:
  * Register for free
  * Talk to members around the world
  * No registration is required for chat rooms
  * Online chatter numbers in the thousands
  * A mobile application is available
  * Users with an anonymous identity
5. ChatRad
ChatRad is another video chat site that is free. You can chat with strangers from around the world on this random chat site. Before you can start video chatting, you only need to give the site access to your webcam. Furthermore, it allows you to restrict your conversation to only a specific partner you select. Unlike many other sites that are open for everyone, ChatRad has some terms, including that you have to be at least 18 years of age to use the service. Additionally, you can protect your privacy by remaining anonymous. Even if your webcam isn’t working, you can still start a video chat.
Features:
  * There is an option that allows users to stop the camera at any time
  * While viewing different cam chat users, every user has the option of setting a default message
  * If you are a free chat user, you have the ability to change the gender anytime
  * Even if you don't have a camera or microphone, you can still join a chat
6. EmeraldChat
There is an elegant website for elegant people called EmeraldChat. Most people who use this site are trying to find some new friends, and there are surprisingly many women on the site, which is not the case with most other video chat services. The website boasts one of the most beautiful user interfaces on the market, which only adds to its appeal. Consider giving EmeraldChat a shot if you’re looking for a cool and clean chat room.
Features:
  * Allows both text and video chats
  * Group chatting options are available
  * No registration is required
  * Allows you to register an account and delete it at any time you want
  * Photo and media sharing options are available
7. Chat Hub
Starting a conversation with another user is simple. You can start online by just entering your gender, accepting the service terms, and following the steps! To prevent language barriers, you can also use a language filter. A user is never matched up with someone they’ve already met through a special filter, ensuring each match is different. The ChatHub interfaces are excellent for both video chats and text chats. Since you don’t need a profile, you can try without risk.
Additionally, ChatHub is concerned with the safety of its users. Conversations are kept private using peer-to-peer connections. You do not have to enter any personal information on this site.
Features:
  * No Registration Required
  * Language Filter To Prevent Language Barrier
  * You can choose to match with a unique stranger every time
  * The connection is private for additional security
8.Shagle
You need only a webcam to begin chatting with their more than 3 million members. It is now possible to talk with people from over 70 different countries thanks to translation tools so that you can converse with anyone. With Shagle, you can mask your identity while chatting, making it easier for shy people to communicate. Those who are hesitant or new to webcam chatting with strangers may find it easier to use that option.
Although you can use it for free to chat with people from 70 countries, you can upgrade to the premium version anytime and enjoy talking with people from over 200 countries with many other valuable features that come with the premium version only.
Features:
  * Best for first-timers
  * Translation tools are available to overcome the language barrier
  * The face masking option comes in very handy whether you want to hide your identity or have fun
  * You can chat with people from over 200 countries, but you will need to upgrade to the premium version
9.FaceFlow
By allowing users to participate in three-way video chats simultaneously, these guys are taking social networking to a whole new level.
“FaceFlow” lets you communicate with your friends by video. However, you can also speak with strangers. It is now possible for users to create a searchable profile and upload YouTube videos and pictures. This site is more than just another webcam chat service - it is more comparable to Skype’s excellent communication service. One-on-one video chat is available, as well as text messaging. FaceFlow has also introduced a multiplayer game called Flappy that looks challenging.
Features:
  * Create video conferences or create your own
  * Participate in online chat rooms
  * Instant message sending and receiving
  * You can upload private photos and share them with others
  * Meet random strangers for private conversations
10.iMeetzu
iMeetzu lets you chat with random people live through video chats, and it has text chat rooms. This feature makes it similar to Omegle, but it goes a bit further. Once you pass the randomness, you are invited to join a free online dating or friend-finding service. Over a thousand new members join this social networking site every day, making it one of the fastest-growing sites of its kind. There is no better way to practice face-to-face communication before you get back into the dating pool. Whether you’re looking for a date or want to have fun with some random strangers, this site is one of the best choices for you.
Features:
- There is no charge for using this site’s features
- In addition to meeting new friends, you also build relationships with iMeetzu
- There is a global availability of this platform
- A new account can be created in fewer than five minutes
Conclusion
These are some of the best video chat sites you can find online. Some are new, and some have been in the market for over a decade. Every site has its unique features. Most of them are free, but some have premium versions to pay for a premium account and additional features.
Extra Info! Record & Edit Your Random Video Chat with Filmora
Ever thought of recording a funny random video chat and sharing it with your friends? Try Filmora! Filmora supports recording PC screens and allows you to edit your recorded videos. If you want to protect the privacy of the strangers you met on the above-listed video chat sites, you can easily add stickers or other elements to their faces. There is more you can do with Filmora. Check out the video below!
Ollie Mattison
Ollie Mattison is a writer and a lover of all things video.
Follow @Ollie Mattison
“Exploring REAPER’s Landscape: A Detailed Overview of Its Core Functionalities”
DAW stands for Digital Audio Workstation. It is where you can record, edit, mix or even master your music. You always need good DAW software to help you with the job to produce music or live recording musicians.
A good DAW software must have a multi-track audio recording , virtual instruments, MIDI sequencer, excellent mixing capabilities, and plug-in processor hosting. The software is found for all major operating systems such as Linux , Windows, and Mac. If you want to learn more about DAW, then stay with us. The article will discuss in detail REAPER Recording Software.
In this article
01 What Is REAPER Recording Software?
02 How to Download and Install REAPER Software?
03 Tutorial for Using REAPER Recording Software
Part 1. What Is REAPER Recording Software?
Recording software like REAPER records computer audio is used to produce music, edit it, transform, and customize your music. With REAPER Recording Software , you can record multi-layer audio and MIDI in various formats. REAPER has the easiest interface that allows you to drag and drop to import, split, move and do many other tasks.

This is just one feature of REAPER that sounds very interesting. In this section, we will talk about more of its features.
1. Record and Edit
You can easily record the audio and (MIDI) Musical Instrumental Digital Interface with REAPER recording software. It lets you edit and customize everything. You can record and edit things limitlessly. When it comes to recording, it’s not at all difficult for REAPER software to record various instruments or vocals.
2. Mixing
Initially, the mixer might seem inflexible, but in reality, REAPER has a lot to offer you. It has great automated capabilities for instrument and effect parameters. It doesn’t matter if you are working because you can still bounce or freeze tracks while working.
The mixer is very flexible. With REAPERs mixer, you just have to drag and drop your recordings so that you can create tracks, and also, you can customize the arrangements by moving the portions.
3. Interface
While looking at the interface, you might question yourself about how to use its interface. Some people love to learn about new things, such as the REAPER Recording Software. Whereas, some people seem least interested because the half-empty interface is not intuitive to them.
Whereas, the best thing about its interface is that you can customize it. REAPER allows you to add different wallpapers and layouts to your software interface.
4. Strong Stability
REAPER Recording Software has very strong stability. This is one of its strongest features as compared to other competitors. The RAM is rarely affected by the load time and the used resources. Moreover, the software offers a wide range of languages. You can select your desired language to run the software.
Part 2. How to Download and Install REAPER Software?
REAPER is a Digital Audio Workstation. The perfect platform where you can manipulate and transform your audio. With REAPER Record Computer audio, you can work efficiently in a resource-friendly studio with saving your time. Stay tuned if you plan to learn more about its pricing and requirements.

Pricing of REAPER Software
A reaper is a brilliant software. It has a 60-day trial period. REAPER costs $60 in total to register. It has complete MIDI sequencing. You can also get a discounted license if REAPER is the best private option for you or has commercial usage. You can set the equal license key on every computer for someone with multiple computers.
System Requirements
The recording software has uncountable features. REAPER software facilitates its users at every level by giving the best audio manipulating platform. The best thing about REAPER Recording Software is its compatibility with different operating systems. Let us add more to your knowledge on this.
Windows
REAPER software is available for Windows 7, 8, 10, XP, and Vista. The version of REAPER for Windows is 6.42. This is for Windows 64-bit whereas, a download package is also available for Windows 32-bit.
macOS
For macOS 64-bit, REAPER has a 6.42 version. This version is compatible with macOS 10.5 – 10.14. Whereas, for macOS 10.15+, the available version of REAPER is 6.42 with a 15MB file size.
Linux
REAPER Recording Software is also compatible with Linux x86_64. The REAPER version is 6.42 with an 11 MB file size. This version can also work on AMD64 64-bit.
Downloading and Installing REAPER
Now that REAPER Record Computer Audio has impressed you a lot. You must be thinking about how to download it. If this is on your mind, then we got you. Allow us to share its steps that will guide you to download the software easily.
Step 1: To install REAPER software, first of all, visit its official website. Then locate and head over to its download section.
Step 2: Click on ‘Download REAPER from the download section.’ For Windows users, they can download the Windows installation package. At the same time, Linux and macOS users can select their installation packages.
Step 3: Lastly, after you have downloaded your systems compatible installation package, you simply have to run it and then install it according to your respective operating system.
Part 3. Tutorial for Using REAPER Recording Software
After its attractive features and detailed downloading procedure, it is finally the time to talk about its works. This section of the article will explain to you more about REAPER Recording Software as we are now going to present a tutorial on how to use the software.
Understand the Layout
Understanding and knowing the layout of your software before you start working on it is essential. The crucial components of REAPER software include the Timeline, Arrangement Window, Track Panel, Toolbar, and lastly, Transport.

The Arrangement window holds all the added items. The items are played from left to right order, similar to their timeline arrangement. You can also zoom in and out. Then comes the transport toolbar, which holds the functions to stop, rewind, play, fast forward, adjust the timeline speed, etc. The toolbar holds all the toggle buttons. You can also customize your toolbar.
New Track Creation
For creating a new track on REAPER, go to the Track menu and hit Insert New Track. A track is like another layer to your audio. Multiple layers and tracks make your work complex yet interesting as you can play all the different tracks at the same time. By double-clicking in the Track Control Panel, you can set a name for the added track.

Audio Hardware Settings for Audio Recording
It is best suggested always to check your audio hardware settings before you start to record, edit or mix with REAPER Recording Software. Your primary focus should be on the recording device’s devices should be set as Input Device, whereas the listening device should be set as the Output Device.
For this, you have to select Preferences from the Options menu. A window will appear in front of you, the REAPER Preference window. You have to select the correct Input and Output devices from the dropdown menu from this window.

Arm your Track
Arming your track is very important. For this, head over to the Track Control Panel, and next to your track name, hit the red circle. If you have various tracks, you should solo this track and mute the other tracks.
As soon as the track is armed, a Gain Meter will activate on the side. From this, you can check if you have properly set the microphone or not. This could be tested by tapping on the microphone.

Record
After all, the hardware settings are done, and your track is armed, it’s time to start the recording. For that, just tap on the Record button in the Transport toolbar. A yellow line in the timeline will indicate the end of the recording.

To end the recording, tap on the Stop button from the Transport Toolbar. Lastly, REAPER Recording Software will ask you to save the file. In case you don’t want it, you can also delete it.
Create and Manipulate Clips
Things like manipulation get a lot easier if you split the clips in REAPER. From the items menu, you have to select the option of Split Item on Cursor. This divides your clip into two clips on each side of the cursor. You can also remove the clips by going to the Items Menu. From there, you just have to hit the Remove Item option, or else, simply press the Delete key on your keyboard.

Removing clips will create a gap in the arrangement window that can be filled by dragging forward the remaining clip.
Volume Adjustments – Normalize
By double-clicking on the item or by selecting ‘Item Properties’ from a right-click, you can normalize the item. A new window will appear as Media Item Properties, from where you have to locate the Volume Settings and then select the option of Normalize.
If your item is already loud, then nothing will happen, but if it is not, then the slider will change from 0.00 dB showing an increase in the volume. Lastly, hit the ‘Apply’ or ‘OK’ button to imply the changes.
Fade in/out
With the Media Properties, you can also adjust a Fade in and a Fade out. For this, you simply have to set an end time for the Fade in, whereas a start time is entered for Fade out. Hit the ‘Ok’ or ‘Apply’ button to apply the changes.
From the Arrangement window, fades can be adjusted. For adjusting the fades, hover with your mouse over the red line. You will see a newly shaped cursor. Just drag on the timeline to play and adjust the Fade with this new cursor.

Automate Changes
With REAPER, you can also automate changes in track parameters. We will guide about automation from Track Envelopes. From Track Control Panel, hit the Trim option. A new Envelopes window will open at this point from where you have to check the Volume box.
A new Volume Track will open up. Here, you have to set new Envelope points. That could be done by holding the shift key, right-clicking on the point, and then selecting Create New Point. A green circle will indicate the new point.
By dragging the Envelope point, you can also adjust the volume. Dragging it towards the top will increase the volume, whereas dragging it towards the bottom will eventually decrease.

Finalize the Audio – Render
After all the above steps have been completed to set the order and adjust your desired volume, the last step comes to render your project file. For that, move to the File menu and select the ‘Render’ option. A window will be opened as ‘Render to File.’ Now, from the dropdown menu, select your desired Output Format.
Lastly, hit the Render 1 File button, and then REAPER will export your project. You can immediately listen to it by selecting the ‘Launch File’ option.

Concluding Thoughts
This article is everything you need to learn about REAPER Recording Software. The article that started from an introduction on DAW took you on a roller coaster ride. Everything about REAPER software has been shared.
We hope that this article helps you in all possible ways. The attractive features impress you, and its pricing and system specifications increase your knowledge. Along with that, the shared tutorial will guide you thoroughly on how to use it.
02 How to Download and Install REAPER Software?
03 Tutorial for Using REAPER Recording Software
Part 1. What Is REAPER Recording Software?
Recording software like REAPER records computer audio is used to produce music, edit it, transform, and customize your music. With REAPER Recording Software , you can record multi-layer audio and MIDI in various formats. REAPER has the easiest interface that allows you to drag and drop to import, split, move and do many other tasks.
This is just one feature of REAPER that sounds very interesting. In this section, we will talk about more of its features.
1. Record and Edit
You can easily record the audio and (MIDI) Musical Instrumental Digital Interface with REAPER recording software. It lets you edit and customize everything. You can record and edit things limitlessly. When it comes to recording, it’s not at all difficult for REAPER software to record various instruments or vocals.
2. Mixing
Initially, the mixer might seem inflexible, but in reality, REAPER has a lot to offer you. It has great automated capabilities for instrument and effect parameters. It doesn’t matter if you are working because you can still bounce or freeze tracks while working.
The mixer is very flexible. With REAPERs mixer, you just have to drag and drop your recordings so that you can create tracks, and also, you can customize the arrangements by moving the portions.
3. Interface
While looking at the interface, you might question yourself about how to use its interface. Some people love to learn about new things, such as the REAPER Recording Software. Whereas, some people seem least interested because the half-empty interface is not intuitive to them.
Whereas, the best thing about its interface is that you can customize it. REAPER allows you to add different wallpapers and layouts to your software interface.
4. Strong Stability
REAPER Recording Software has very strong stability. This is one of its strongest features as compared to other competitors. The RAM is rarely affected by the load time and the used resources. Moreover, the software offers a wide range of languages. You can select your desired language to run the software.
Part 2. How to Download and Install REAPER Software?
REAPER is a Digital Audio Workstation. The perfect platform where you can manipulate and transform your audio. With REAPER Record Computer audio, you can work efficiently in a resource-friendly studio with saving your time. Stay tuned if you plan to learn more about its pricing and requirements.
Pricing of REAPER Software
A reaper is a brilliant software. It has a 60-day trial period. REAPER costs $60 in total to register. It has complete MIDI sequencing. You can also get a discounted license if REAPER is the best private option for you or has commercial usage. You can set the equal license key on every computer for someone with multiple computers.
System Requirements
The recording software has uncountable features. REAPER software facilitates its users at every level by giving the best audio manipulating platform. The best thing about REAPER Recording Software is its compatibility with different operating systems. Let us add more to your knowledge on this.
Windows
REAPER software is available for Windows 7, 8, 10, XP, and Vista. The version of REAPER for Windows is 6.42. This is for Windows 64-bit whereas, a download package is also available for Windows 32-bit.
macOS
For macOS 64-bit, REAPER has a 6.42 version. This version is compatible with macOS 10.5 – 10.14. Whereas, for macOS 10.15+, the available version of REAPER is 6.42 with a 15MB file size.
Linux
REAPER Recording Software is also compatible with Linux x86_64. The REAPER version is 6.42 with an 11 MB file size. This version can also work on AMD64 64-bit.
Downloading and Installing REAPER
Now that REAPER Record Computer Audio has impressed you a lot. You must be thinking about how to download it. If this is on your mind, then we got you. Allow us to share its steps that will guide you to download the software easily.
Step 1: To install REAPER software, first of all, visit its official website. Then locate and head over to its download section.
Step 2: Click on ‘Download REAPER from the download section.’ For Windows users, they can download the Windows installation package. At the same time, Linux and macOS users can select their installation packages.
Step 3: Lastly, after you have downloaded your systems compatible installation package, you simply have to run it and then install it according to your respective operating system.
Part 3. Tutorial for Using REAPER Recording Software
After its attractive features and detailed downloading procedure, it is finally the time to talk about its works. This section of the article will explain to you more about REAPER Recording Software as we are now going to present a tutorial on how to use the software.
Understand the Layout
Understanding and knowing the layout of your software before you start working on it is essential. The crucial components of REAPER software include the Timeline, Arrangement Window, Track Panel, Toolbar, and lastly, Transport.
The Arrangement window holds all the added items. The items are played from left to right order, similar to their timeline arrangement. You can also zoom in and out. Then comes the transport toolbar, which holds the functions to stop, rewind, play, fast forward, adjust the timeline speed, etc. The toolbar holds all the toggle buttons. You can also customize your toolbar.
New Track Creation
For creating a new track on REAPER, go to the Track menu and hit Insert New Track. A track is like another layer to your audio. Multiple layers and tracks make your work complex yet interesting as you can play all the different tracks at the same time. By double-clicking in the Track Control Panel, you can set a name for the added track.
Audio Hardware Settings for Audio Recording
It is best suggested always to check your audio hardware settings before you start to record, edit or mix with REAPER Recording Software. Your primary focus should be on the recording device’s devices should be set as Input Device, whereas the listening device should be set as the Output Device.
For this, you have to select Preferences from the Options menu. A window will appear in front of you, the REAPER Preference window. You have to select the correct Input and Output devices from the dropdown menu from this window.
Arm your Track
Arming your track is very important. For this, head over to the Track Control Panel, and next to your track name, hit the red circle. If you have various tracks, you should solo this track and mute the other tracks.
As soon as the track is armed, a Gain Meter will activate on the side. From this, you can check if you have properly set the microphone or not. This could be tested by tapping on the microphone.
Record
After all, the hardware settings are done, and your track is armed, it’s time to start the recording. For that, just tap on the Record button in the Transport toolbar. A yellow line in the timeline will indicate the end of the recording.
To end the recording, tap on the Stop button from the Transport Toolbar. Lastly, REAPER Recording Software will ask you to save the file. In case you don’t want it, you can also delete it.
Create and Manipulate Clips
Things like manipulation get a lot easier if you split the clips in REAPER. From the items menu, you have to select the option of Split Item on Cursor. This divides your clip into two clips on each side of the cursor. You can also remove the clips by going to the Items Menu. From there, you just have to hit the Remove Item option, or else, simply press the Delete key on your keyboard.
Removing clips will create a gap in the arrangement window that can be filled by dragging forward the remaining clip.
Volume Adjustments – Normalize
By double-clicking on the item or by selecting ‘Item Properties’ from a right-click, you can normalize the item. A new window will appear as Media Item Properties, from where you have to locate the Volume Settings and then select the option of Normalize.
If your item is already loud, then nothing will happen, but if it is not, then the slider will change from 0.00 dB showing an increase in the volume. Lastly, hit the ‘Apply’ or ‘OK’ button to imply the changes.
Fade in/out
With the Media Properties, you can also adjust a Fade in and a Fade out. For this, you simply have to set an end time for the Fade in, whereas a start time is entered for Fade out. Hit the ‘Ok’ or ‘Apply’ button to apply the changes.
From the Arrangement window, fades can be adjusted. For adjusting the fades, hover with your mouse over the red line. You will see a newly shaped cursor. Just drag on the timeline to play and adjust the Fade with this new cursor.
Automate Changes
With REAPER, you can also automate changes in track parameters. We will guide about automation from Track Envelopes. From Track Control Panel, hit the Trim option. A new Envelopes window will open at this point from where you have to check the Volume box.
A new Volume Track will open up. Here, you have to set new Envelope points. That could be done by holding the shift key, right-clicking on the point, and then selecting Create New Point. A green circle will indicate the new point.
By dragging the Envelope point, you can also adjust the volume. Dragging it towards the top will increase the volume, whereas dragging it towards the bottom will eventually decrease.
Finalize the Audio – Render
After all the above steps have been completed to set the order and adjust your desired volume, the last step comes to render your project file. For that, move to the File menu and select the ‘Render’ option. A window will be opened as ‘Render to File.’ Now, from the dropdown menu, select your desired Output Format.
Lastly, hit the Render 1 File button, and then REAPER will export your project. You can immediately listen to it by selecting the ‘Launch File’ option.
Concluding Thoughts
This article is everything you need to learn about REAPER Recording Software. The article that started from an introduction on DAW took you on a roller coaster ride. Everything about REAPER software has been shared.
We hope that this article helps you in all possible ways. The attractive features impress you, and its pricing and system specifications increase your knowledge. Along with that, the shared tutorial will guide you thoroughly on how to use it.
Also read:
- 2024 Approved Navigating the Best FREE Browser-Based DAW Platforms for Enhanced Audio Creation - 2023 Edition
- How to Make Your Voice Deeper With Filmora, In 2024
- Comprehensive List of Trending Pop Tracks for Cinematic Videos (2024 Selection)
- Cutting Edge Sound Management The Top 5 Android Audio Editors Every Professional Should Own for 2024
- Updated Audio-Visual Fusion Excellence Discovering the Best Mixers S Industry Leaders for 2024
- In 2024, Decibel Diplomacy A Detailed Exploration of Audio Normalization in Media
- Updated In 2024, Full Disclosure on Nero AudioManipulation Kit Features
- New Must-Know Facts Regarding YouTubes Music Repository
- 2024 Approved Sonic Selection Series Finding the Perfect Soundtrack for Any Visual Storytelling
- Updated Essential Audio Frequency Templates The Top 8 Selection for Video Editors
- New Premier Selection of Romantic Chamber Pieces for Nuptial Cinematography, 2024 Edition
- Updated Harmonizing Soundscape and Aesthetics Showcasing Audio Signals in Visual Forms & Animating Them for Cinematic Vision in Adobe Audition Pro Master.
- 2024 Approved Efficient Techniques for Transferring Audacity Tracks Into MP3 Files
- Mastering the Use of Atmospheric Audio to Enhance Narrative in Films
- Updated The Ultimate Guide Top 7 No-Cost Vocal Transformation Apps
- Discovering the Finest No-Cost Auditory Effects Vaults for 2024
- In 2024, The Audio Artists Toolkit for Podcast Production 11 Pioneering Soundscape Retreats
- Innovations in Mobile Sound Design Top 7 Non-Audacity Apps for Android Enthusiasts
- Decoding Audio Into Text A Comprehensive Look at Three Modern Online Techniques for 2024
- New Excellent Selection The Best No-Cost Music Visualization Tools for Modern Smartphones (iOS & Android)
- New Linux Audio Cutting-Edge Software Roundup Free & Paid Options
- Bridal Ballad Blues Classical Compositions for the Wedding Documentary for 2024
- New Voicing Efficiency A Comprehensive Review of the Top 6 Auto-Transcribing Software Systems for 2024
- Updated In 2024, Elite Sound Polishing Programme Perfect Your Digital Storytelling
- Updated How to Add Music to Final Cut Pro, In 2024
- Updated Seek Out Cheerful Sonic Enhancements for 2024
- New In 2024, Shielding the Sound Comprehensive Guide to Dismissing Wind Turbulence in Recordings
- In 2024, Step-by-Step Guide Saving Desktop Noises via Audacity
- 2024 Approved Expert Tips on Creating Seamless Sound Diminution
- New 2024 Approved Premier Digital Aids to Refine and Clean Up Sounds
- In 2024, AVS Sound Engineer Insights Comprehensive Overview of Tools, Advantages, and Substitutes
- 2024 Approved YouTubes Vocal and Instrumental Compilation Catalog
- 2024 Approved Voice Alteration Devices A Guide to Introductions, Assessments, and Substitutes
- New The Audio Experts Manual to Identifying Superior Sound Formats
- Complete Insight Into the Wave Editor Vital Elements, Expert Opinions, and Instructional Videos
- New Mastering the Art of Saving Your Google Voice Communication on Android & Windows PCs for 2024
- Updated In 2024, Adobe Audio Editor Adobe Audition Features, Reviews & Tutorial
- Updated S Ultimate Guide to Time-Lapse Video Editing Software for 2024
- How to Share/Fake Location on WhatsApp for Realme 11 5G | Dr.fone
- How To Change Your Apple ID Password On your iPhone 15 Pro Max | Dr.fone
- Hard Resetting an Nokia C22 Device Made Easy | Dr.fone
- In 2024, How to Change Location On Facebook Dating for your Vivo Y78t | Dr.fone
- Updated 2024 Approved The Ultimate List of Online Audio Visualization Software
- Updated The Ultimate Final Cut Pro Saving Cheat Sheet
- New 2024 Approved Discover the Top Reaction Video Creation Platforms
- Updated Mavericks MP4 Video Editor A Comprehensive Guide
- New Guide How To Check iCloud Activation Lock Status From Your iPhone SE (2020)
- In 2024, How to Change Lock Screen Wallpaper on Oppo F25 Pro 5G
- Updated In 2024, Top-Rated iPhone Apps Expert Reviews and Rankings
- Planning to Use a Pokemon Go Joystick on Apple iPhone 13 Pro Max? | Dr.fone
- New In 2024, Unleash Your Creativity A Beginners Guide to Stop Motion Animation on Instagram
- How to Screen Mirroring Vivo Y36i? | Dr.fone
- Updated Unlocking Twitter Video Size and Aspect Ratio Secrets
- Title: New In 2024, Become an Expert at Uncomplicated Podcasting A Stepwise Manual to Success 2023 Guidebook
- Author: David
- Created at : 2024-05-05 09:52:04
- Updated at : 2024-05-06 09:52:04
- Link: https://sound-tweaking.techidaily.com/new-in-2024-become-an-expert-at-uncomplicated-podcasting-a-stepwise-manual-to-success-2023-guidebook/
- License: This work is licensed under CC BY-NC-SA 4.0.
