
:max_bytes(150000):strip_icc():format(webp)/ArtificialIntelligence-Chatbot-6921166a1d9e447eb0251f52694d919a.jpg)
New Embark on a Complimentary Audacity Adventure Capturing Every Note for 2024
Embark on a Complimentary Audacity Adventure: Capturing Every Note
Natural audio recording software, such as Voice Memos for Macs or Sound Recorder for Windows PCs, is included with every machine. These applications enable users to record audio using either the desktop’s internal or an external microphone, and they generally have basic audio editing features.
However, when you’re looking for a higher-quality recording program, Audacity is the way to go. Audacity is a free audio editor with a lot of cutting-edge features. More significantly, recording using Audacity is as simple as clicking a button.
In this Audacity Record Computer Audio guide, we will show you all the methods of recording internal audio on your computer and Mac.
In this article
01 Record Audio On Audacity with a Microphone
02 Record Sounds Playing on Your Computer Using Audacity on Win
03 Record Sounds Playing on Your Computer Using Audacity on Mac
04 Set up Audacity to Record as Schedule
Part 1: How to Record Audio On Audacity with a Microphone On Windows and Mac Computers?
For both Windows and Mac, the procedures for recording audio from a microphone are the same if you’re utilizing your desktop’s built-in mic or an external microphone. Here’s your step-by-step guide to audacity record using a microphone:
Step 1: Launch Audacity and get to know the Device Toolbar, situated underneath the playback controls. You may modify the Audio Host and the Recording and Playback Devices—all of which are required for Audacity recording.

Step 2: To begin, select Tracks under the Add New tab, Stereo Track, or Mono Track to create a new track.

Step 3: Select Recording Device from the options list. Select your microphone from the dropdown menu and hit the Record option.

Step 4: A soundwave emerges along the track as you talk into the speaker. The Recording Level may be found at the top of the display. To pause or stop the recording, click Stop or Pause until you select Record anew.

Step 5: With the mouse over any recording area, click the Delete button to cut out any portion of it quickly. Click Ctrl + A, then Delete to erase whatever you’ve just saved. Alternatively, press the X button to delete the track completely.

Part 2: How to Record Sounds Playing on Your Computer Using Audacity On Windows?
Unlike Mac, Windows makes it simple to capture audio from a movie or media file running on your desktop. There seem to be two primary methods for accomplishing audacity record desktop audio in this way:
1. Use MME as the Audio Host
Step 1: To use MME as your audio host, go to Tracks in the Add New tab in Stereo Track and create a new file.

Step 2: Change the Audio Host (to the left of Recording Device) to MME—this is the standard setting, so you might not have to change anything.

Step 3: Choose desired option from the Recording Device dropdown menu. Based on your configuration, this might be referred to as Wave Out or Loopback. When you’re uncertain, try it out.

Step 4: To record your audio source, click Record, then play it back.
2. Use WASAPI as the Audio Host
WASAPI provides higher-resolution digital recordings. If capturing audio from an external monitor, it’s also a good idea to utilize it.
Step 1: Convert the Audio Host from MME to Windows WASAPI after creating a fresh Stereo Track.

Step 2: Switch the Recording Device to Speaker (loopback). To display the entire label, you might have to slide the toolbar’s knobs outwards. Begin recording by pressing the red dot and then listen to the audio source. Audacity will capture the audio even if your PC is muted.
Part 3: How to Record Sounds Playing on Your Computer Using Audacity on Mac?
Unfortunately, there’s no ready-made method to record computer audio using Audacity on a Mac. Some alternative ways to use Audacity to record from Mac including using a loopback cable, or download and using a third-party software. You can try some Audacity alternatives to record the computer audio on Mac.
For Win 7 or later (64-bit)
For macOS 10.12 or later
If you have installed Filmora already, you can use it to record the sound playing on your Mac with some tricks.
Step 1: Luanch Filmora, and then click the Record button and select Record PC Screen.

Step 2: Set up the recording settings based on the need. Since we’re going to record the playing audio from the Mac computer, select Microphone and System Audio On and click the Red button to start.

Step 3: Now you have a screen captured video with sound included. Since we need th audio only, we can attache the audio from the video first and then do some editing such as adding fade in and fade out effect, or remove unwanted audio clip.

Part 4: How to Set up Audacity to Record as Schedule?
A streaming video recorder or cassette can be used to arrange a recording. All of those are identical to Time Recordings in that they are used to schedule recording. The Timer record configuration dialog box may be used to set the beginning and finish of the recording. This is how you do it:
Step 1: By definition, the recording’s Start Date and Time are set to the present time. It will begin recording on the present day and hour by default when you don’t alter it. There is no default setting for the End Date and Time. You must either choose a date and time to determine the end time.

Step 2: There is a Checkbox to Save the work immediately. By Ticking the option, you may choose the path or Folder where the file will be saved when the recording is finished.

Conclusion
Well, there you have it – your complete Audacity Record Computer Audio guide. One thing is for certain that Audacity allows some great ways of recording audio from internal and external components of your Windows and Mac. However, if your Audacity is having issues, we would highly recommend opting for another software, such as Wondershare Filmora.
Wondershare Filmora is the finest thing that has come out in recent years for recording audio from a desktop. It is intended not just for pros but also for any enthusiast videographer who desires to create a high-quality movie for their family and friends. Download it today to make your movie a delightful journey with high-quality audio recording.
02 Record Sounds Playing on Your Computer Using Audacity on Win
03 Record Sounds Playing on Your Computer Using Audacity on Mac
04 Set up Audacity to Record as Schedule
Part 1: How to Record Audio On Audacity with a Microphone On Windows and Mac Computers?
For both Windows and Mac, the procedures for recording audio from a microphone are the same if you’re utilizing your desktop’s built-in mic or an external microphone. Here’s your step-by-step guide to audacity record using a microphone:
Step 1: Launch Audacity and get to know the Device Toolbar, situated underneath the playback controls. You may modify the Audio Host and the Recording and Playback Devices—all of which are required for Audacity recording.
Step 2: To begin, select Tracks under the Add New tab, Stereo Track, or Mono Track to create a new track.
Step 3: Select Recording Device from the options list. Select your microphone from the dropdown menu and hit the Record option.
Step 4: A soundwave emerges along the track as you talk into the speaker. The Recording Level may be found at the top of the display. To pause or stop the recording, click Stop or Pause until you select Record anew.
Step 5: With the mouse over any recording area, click the Delete button to cut out any portion of it quickly. Click Ctrl + A, then Delete to erase whatever you’ve just saved. Alternatively, press the X button to delete the track completely.
Part 2: How to Record Sounds Playing on Your Computer Using Audacity On Windows?
Unlike Mac, Windows makes it simple to capture audio from a movie or media file running on your desktop. There seem to be two primary methods for accomplishing audacity record desktop audio in this way:
1. Use MME as the Audio Host
Step 1: To use MME as your audio host, go to Tracks in the Add New tab in Stereo Track and create a new file.
Step 2: Change the Audio Host (to the left of Recording Device) to MME—this is the standard setting, so you might not have to change anything.
Step 3: Choose desired option from the Recording Device dropdown menu. Based on your configuration, this might be referred to as Wave Out or Loopback. When you’re uncertain, try it out.
Step 4: To record your audio source, click Record, then play it back.
2. Use WASAPI as the Audio Host
WASAPI provides higher-resolution digital recordings. If capturing audio from an external monitor, it’s also a good idea to utilize it.
Step 1: Convert the Audio Host from MME to Windows WASAPI after creating a fresh Stereo Track.
Step 2: Switch the Recording Device to Speaker (loopback). To display the entire label, you might have to slide the toolbar’s knobs outwards. Begin recording by pressing the red dot and then listen to the audio source. Audacity will capture the audio even if your PC is muted.
Part 3: How to Record Sounds Playing on Your Computer Using Audacity on Mac?
Unfortunately, there’s no ready-made method to record computer audio using Audacity on a Mac. Some alternative ways to use Audacity to record from Mac including using a loopback cable, or download and using a third-party software. You can try some Audacity alternatives to record the computer audio on Mac.
For Win 7 or later (64-bit)
For macOS 10.12 or later
If you have installed Filmora already, you can use it to record the sound playing on your Mac with some tricks.
Step 1: Luanch Filmora, and then click the Record button and select Record PC Screen.
Step 2: Set up the recording settings based on the need. Since we’re going to record the playing audio from the Mac computer, select Microphone and System Audio On and click the Red button to start.
Step 3: Now you have a screen captured video with sound included. Since we need th audio only, we can attache the audio from the video first and then do some editing such as adding fade in and fade out effect, or remove unwanted audio clip.
Part 4: How to Set up Audacity to Record as Schedule?
A streaming video recorder or cassette can be used to arrange a recording. All of those are identical to Time Recordings in that they are used to schedule recording. The Timer record configuration dialog box may be used to set the beginning and finish of the recording. This is how you do it:
Step 1: By definition, the recording’s Start Date and Time are set to the present time. It will begin recording on the present day and hour by default when you don’t alter it. There is no default setting for the End Date and Time. You must either choose a date and time to determine the end time.
Step 2: There is a Checkbox to Save the work immediately. By Ticking the option, you may choose the path or Folder where the file will be saved when the recording is finished.
Conclusion
Well, there you have it – your complete Audacity Record Computer Audio guide. One thing is for certain that Audacity allows some great ways of recording audio from internal and external components of your Windows and Mac. However, if your Audacity is having issues, we would highly recommend opting for another software, such as Wondershare Filmora.
Wondershare Filmora is the finest thing that has come out in recent years for recording audio from a desktop. It is intended not just for pros but also for any enthusiast videographer who desires to create a high-quality movie for their family and friends. Download it today to make your movie a delightful journey with high-quality audio recording.
“5 Top Audio Tools to Master Recording Your Voice with Ease”
Top 10 Audio Recording Software to Capture Your Voice Easily

Shanoon Cox
Mar 27, 2024• Proven solutions
Whether professional or for amateur purposes, the audio recording software programs are very important. These programs allow manipulating the audio so that it matches the need for a specific project.
The best audio recording software has a variety of tools embedded to polish the audio recorded, in which this article we are going to review the best of them for you.
What is Audio Recording Software?
As the name suggests, the audio recording software is used to record audio using a unique technology. This allows the users to capture their own or the voice they want and transfer it wherever they want. The software also adds effects to the voice and makes it professional to use wherever the user wants to.
What Does a Sound Recorder Use for?
There are several uses of audio recording software program. Some are listed as under:
- In the music field, this software is of great use. It can be used for multitrack recording. The mixing of the sound is then done using the same or different tools.
- The audio recorded can be edited with ease. This includes enhancing and adding effects to it with perfection.
- With microphone use, the recording software can be integrated to make sure that the voice of the user is also recorded if required.
- Some audio recording software programs also come with screen recording, and therefore, these foster multitasking.
List of Top 10 Audio Recording Software Programs
The audio recording software for PC that would make your life easy is mentioned as under.
1.Wondershare DemoCreator
This is by far the best and the most used software program when it comes to audio recording. It is highly reliable and comes with a GUI. The user interface is easy to understand, and so are the functionalities.
With the best and the most advanced controls recording audio has never been this easy. It also acts as Mac audio recording software, and therefore it is highly recommended for all platforms. The frequent updates make this program even easier to use.
Features
- The interface of the program is very easy to use and stress-free.
- The high definition audio can be recorded with ease.
- The program supports 50+ formats to import audio, video, and other files to the system.
- There are highly advanced options for professional audio recording.
- The program can record endless video and audio as far as there is space on your disk.
Pros
- It is one of the programs that support professional audio editing.
- The program is very easy to use as it has a graphical interface.
Cons
- The program is flash software-based, which can slow down the system.
- It does not offer highly advanced audio editing at all.
Supported Platforms
The program can be used with both Windows and Mac.
Go ahead to download and have a try now!
2.WavePad
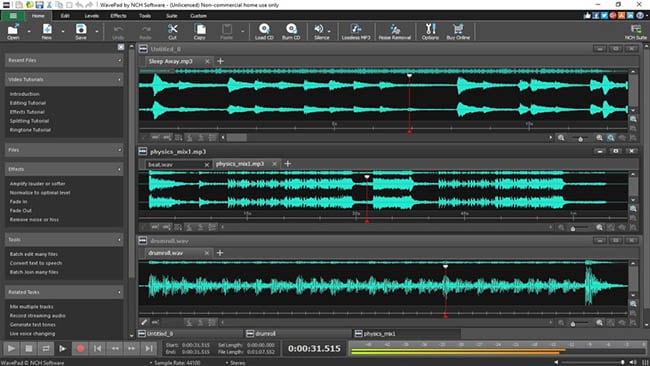
It is one of the best and most used programs to make sure that the audio is recorded with perfection. This program is compatible with most of the audio formats, and therefore it is highly recommended. The overall rating of the program is high as it is used by professionals and, therefore, highly rated as well.
Features
- It has several audio enhancing capabilities, which include amplification and effect addition.
- The audio can be edited, trimmed, and cropped with this program.
- The professional-quality sound recording is used by this program to enhance the capabilities.
Pros
- The best part of this program is its quality of end product that is very high.
- It is a wave editor that gives the users more control over the end product.
Cons
- The mp3 editor of this program does not offer top quality work.
- The program cannot work with multiple files efficiently.
Supported Platforms
It can be installed over Mac, Windows, Android, and iOS.
3.Ocenaudio

As a cross-platform program, this one has a lot to offer. The interface is a bit technical, but overall the use of the program is easy once the hands-on is done. The program is also highly intuitive and allows the users to overcome the day to day audio recording and editing tasks.
Features
- The Ocen Framework is also integrated with this platform to enhance its capabilities.
- The program also records screen if required by the users.
- It is one of the programs that have been rated on other high-end platforms.
Pros
- The program uses auto trim and voice recording controls.
- The sound spectral analysis of the program is highly advanced.
Cons
- The program cannot directly load the file from a CD.
- The program cannot be opened in multiple screens, so the work rate is slow.
Supported Platforms
It is compatible with Mac, Windows, and Linux.
4.Adobe Audition

It can be rightfully regarded as one of the best and the most advanced programs. Backed by years of Adobe experience, it is a program that will get the user a step forward. It is highly recommended to all those users that are looking for a professional level of audio recording.
Features
- It includes multitrack, wave editing, and audio restoration tools to give the best results.
- The essential sound panel has been integrated with the program to get the best oomph effect to the audio.
- The music clips can be integrated within the audio recording to make it sound professional.
Pros
- The platform can be used to create awesome podcasts.
- The audio break can be repaired with perfection.
Cons
- It is expensive, so all the users cannot afford it at all.
- The interface is high tech in nature and requires time to learn.
Supported Platforms
It is supported by Windows and Mac.
5.Audacity

It is free software that is used to record audio professionally. This high-performance program makes sure that the audio which is recorded is also shared with different platforms. The built-in panel is upgraded, and therefore it is highly advance.
Features
- It is ad-free and therefore provides hassle-free work.
- The audio editing and recording have never been as easy as it is with audacity.
- Multitrack editing is also possible with this program.
Pros
- The VST plugin support is provided by the program.
- It is a portable program that can be used for pitch correction.
Cons
- The noise reduction tool of this program needs an upgrade.
- The record to tape feature is currently unavailable.
Supported Platforms
It is supported by Mac, Linux, Windows, and BSD.
6.Wavosaur

It is one of the free programs that can be regarded as better than many paid ones. It is all because the qualities of the program are matchless. The processing of files is done with WAV and Mp3 files filter, which makes the process very much easier.
Features
- The program has multiple document interfaces for multiple file handling.
- The editing features such as cut, copy, paste, and edit can be performed in a single window.
- The waveform representation of the program is accurate and highly advanced.
Pros
- The program offers bit depth convert, pitch shift, and DC offset removal.
- The VST effects can be added to the entire batch of sound files.
Cons
- The audio routing and the multichannel support of the program are not efficient.
- The software sampler extraction is a bit slow when it comes to this program.
Supported Platforms
The program can only be installed on Windows.
7.MixPad
The audio processing and mixing have been made very easy with this platform. The program has an interface that is sleek in design and allows the processing of the audio info with care. The program also supports cloud storage, which means that the entire user’s hard work remains safe and secures all the time.
Features
- The program can mix the unlimited number of tracks all at the same time.
- Depending upon the requirement, the multiple or a single track can be processed at the same time.
- The program supports almost every sound format, so any type of sound can be imported with perfection.
Pros
- The audio effects such as EQ, compression, and reverb can be added with perfection.
- The latency rate is very low, and the program also offers ASIO support for accurate processing.
Cons
- The program only offers the export of the sound that is up to 32 bits.
- The sample rates of up to 96 kHz are only supported, which is less than most of the other mixers.
Supported Platforms
The program can be installed on Mac, Windows, Android, iPad, and Kindle Fire.
8.Sound Forge

If a user wants to completely control the audio editing process, then this software is for them. It is highly advanced and makes sure that the work that is done is highly précised. From Red Book CD creation to sound design and mixing, this program provides the users with complete control and authority over the process.
Features
- The multichannel WAV recording and processing is now possible with the new version of the program.
- The VST plugin support is provided by this program with perfection.
- The VST effects can be chained in a virtual rack.
Pros
- The simple digitization and restoration of the audio have been made simple by this program.
- The one-click solutions allow the users to process the audio tracks easily.
Cons
- The program only offers 32 bits of power, which is very low.
- The multiple VST GUI is not supported by this program.
Supported Platforms
The Sound Forge can be installed on Mac and Windows.
9.Spek

The best part of the software is that it is free and allows the users to overcome the problems which the other audio recorders present. The interface is easy to learn, and therefore the overall usage is easy. The lossless quality is something for which the software is known for. It also supports the FFMPEG library.
Features
- The signal processing is ultra-fast as it uses several threads to process audio.
- The drag and drop support of the program is highly efficient, and the program supports common audio formats.
- The program can be accessed in 19 different languages.
Pros
- The spectral density rulers allow the auto fitting of time.
- The spectral density range of the program is also adjustable.
Cons
- The codec names are, and the audio signal parameters cannot be seen.
- The program is licensed under GPLv3, which is now obsolete.
Supported Platforms
The program is compatible with Windows, Linux, and Mac.
10.Audio Highjack

The program, as the name suggests, makes it possible for the users to completely delve deep into the process of audio editing. The interface, as well as the controls, is very easy to understand and use. For novice users, this program is highly recommended as it makes audio editing a fun-filled activity.
Features
- It provides detailed statistics and min, the max value per channel.
- The processed audio can be listened in real-time to get an idea about the end product.
- The waveform generator and frequency impulse train are embedded within the program.
Pros
- The lame encoder support has been embedded within the recorder to export mp3 files.
- The editor’s look is skin able, which can be changed as per the user choice.
Cons
- The processing options are less as compared to the other recorders.
- The audio files cannot be exported as text, so the program cannot be used with PSpice.
Supported Platforms
The program is only available for Mac.
A Roundup of the Best Audio Recording Software Programs
| No. | Tools | Rating | Supported Formats | Price | Processing Power |
|---|---|---|---|---|---|
| 1 | DemoCreator | 4.5 | .mp3, .m4a, .wav, .wma, .ogg, .flac, .aif, .aiff | $29.99 | 64-bit |
| 2 | WavePad | 4.4 | vox, gsm, WMA, real audio, au, aif, FLAC, and Ogg | $69.95 | 64-bit |
| 3 | Ocenaudio | 4.0 | vox, gsm, WMA, wav, .wma, .ogg, and .flac | Free | 32-bit |
| 4 | Adobe Audition | 4.5 | AIF, AIFF, AIFC | $74.99 | 64-bit |
| 5 | Audacity | 3.9 | mp3, wav, AIFF, au, and ogg | Free | 32-bit |
| 6 | Wavosaur | 3.5 | VST plugins, ASIO driver, multichannel wav files, real-time effect processing. | Free | 32-bit |
| 7 | MixPad | 3.2 | wav, mp3, vox, and gsm | $129 | 32-bit |
| 8 | Sound Forge | 4.0 | SWF, RealMedia 9, WMA, AVI , AIFF, AIF, and SND | Free | 32-bit |
| 9 | Spek | 4.4 | vox, gsm, WMA, Wav, WMA, real audio, au, aif, FLAC, and Ogg | Free | 64-bit |
| 10 | Audio Highjack | 4.2 | .mp3, .m4a, .wav, .wma, aif, FLAC, and Ogg | Free | 64-bit |
Conclusion
With the overall specs and ratings by the users, the Wondershare DemoCreator is the best software that should be used for audio recording.
The program is highly compatible with major operating systems, and therefore it is highly recommended. The overall mechanism is easy, and the program also supports multiple formats.
It is highly technical and is constantly upgraded to make sure that it remains in line with modern technologies. It is a one-stop-shop for all the audio recording needs of the users and therefore highly viable.
With this program, the audio that has been worked on can be shared on most popular social media platforms like YouTube and Facebook.


Shanoon Cox
Shanoon Cox is a writer and a lover of all things video.
Follow @Shanoon Cox
Shanoon Cox
Mar 27, 2024• Proven solutions
Whether professional or for amateur purposes, the audio recording software programs are very important. These programs allow manipulating the audio so that it matches the need for a specific project.
The best audio recording software has a variety of tools embedded to polish the audio recorded, in which this article we are going to review the best of them for you.
What is Audio Recording Software?
As the name suggests, the audio recording software is used to record audio using a unique technology. This allows the users to capture their own or the voice they want and transfer it wherever they want. The software also adds effects to the voice and makes it professional to use wherever the user wants to.
What Does a Sound Recorder Use for?
There are several uses of audio recording software program. Some are listed as under:
- In the music field, this software is of great use. It can be used for multitrack recording. The mixing of the sound is then done using the same or different tools.
- The audio recorded can be edited with ease. This includes enhancing and adding effects to it with perfection.
- With microphone use, the recording software can be integrated to make sure that the voice of the user is also recorded if required.
- Some audio recording software programs also come with screen recording, and therefore, these foster multitasking.
List of Top 10 Audio Recording Software Programs
The audio recording software for PC that would make your life easy is mentioned as under.
1.Wondershare DemoCreator
This is by far the best and the most used software program when it comes to audio recording. It is highly reliable and comes with a GUI. The user interface is easy to understand, and so are the functionalities.
With the best and the most advanced controls recording audio has never been this easy. It also acts as Mac audio recording software, and therefore it is highly recommended for all platforms. The frequent updates make this program even easier to use.
Features
- The interface of the program is very easy to use and stress-free.
- The high definition audio can be recorded with ease.
- The program supports 50+ formats to import audio, video, and other files to the system.
- There are highly advanced options for professional audio recording.
- The program can record endless video and audio as far as there is space on your disk.
Pros
- It is one of the programs that support professional audio editing.
- The program is very easy to use as it has a graphical interface.
Cons
- The program is flash software-based, which can slow down the system.
- It does not offer highly advanced audio editing at all.
Supported Platforms
The program can be used with both Windows and Mac.
Go ahead to download and have a try now!
2.WavePad
It is one of the best and most used programs to make sure that the audio is recorded with perfection. This program is compatible with most of the audio formats, and therefore it is highly recommended. The overall rating of the program is high as it is used by professionals and, therefore, highly rated as well.
Features
- It has several audio enhancing capabilities, which include amplification and effect addition.
- The audio can be edited, trimmed, and cropped with this program.
- The professional-quality sound recording is used by this program to enhance the capabilities.
Pros
- The best part of this program is its quality of end product that is very high.
- It is a wave editor that gives the users more control over the end product.
Cons
- The mp3 editor of this program does not offer top quality work.
- The program cannot work with multiple files efficiently.
Supported Platforms
It can be installed over Mac, Windows, Android, and iOS.
3.Ocenaudio
As a cross-platform program, this one has a lot to offer. The interface is a bit technical, but overall the use of the program is easy once the hands-on is done. The program is also highly intuitive and allows the users to overcome the day to day audio recording and editing tasks.
Features
- The Ocen Framework is also integrated with this platform to enhance its capabilities.
- The program also records screen if required by the users.
- It is one of the programs that have been rated on other high-end platforms.
Pros
- The program uses auto trim and voice recording controls.
- The sound spectral analysis of the program is highly advanced.
Cons
- The program cannot directly load the file from a CD.
- The program cannot be opened in multiple screens, so the work rate is slow.
Supported Platforms
It is compatible with Mac, Windows, and Linux.
4.Adobe Audition
It can be rightfully regarded as one of the best and the most advanced programs. Backed by years of Adobe experience, it is a program that will get the user a step forward. It is highly recommended to all those users that are looking for a professional level of audio recording.
Features
- It includes multitrack, wave editing, and audio restoration tools to give the best results.
- The essential sound panel has been integrated with the program to get the best oomph effect to the audio.
- The music clips can be integrated within the audio recording to make it sound professional.
Pros
- The platform can be used to create awesome podcasts.
- The audio break can be repaired with perfection.
Cons
- It is expensive, so all the users cannot afford it at all.
- The interface is high tech in nature and requires time to learn.
Supported Platforms
It is supported by Windows and Mac.
5.Audacity
It is free software that is used to record audio professionally. This high-performance program makes sure that the audio which is recorded is also shared with different platforms. The built-in panel is upgraded, and therefore it is highly advance.
Features
- It is ad-free and therefore provides hassle-free work.
- The audio editing and recording have never been as easy as it is with audacity.
- Multitrack editing is also possible with this program.
Pros
- The VST plugin support is provided by the program.
- It is a portable program that can be used for pitch correction.
Cons
- The noise reduction tool of this program needs an upgrade.
- The record to tape feature is currently unavailable.
Supported Platforms
It is supported by Mac, Linux, Windows, and BSD.
6.Wavosaur
It is one of the free programs that can be regarded as better than many paid ones. It is all because the qualities of the program are matchless. The processing of files is done with WAV and Mp3 files filter, which makes the process very much easier.
Features
- The program has multiple document interfaces for multiple file handling.
- The editing features such as cut, copy, paste, and edit can be performed in a single window.
- The waveform representation of the program is accurate and highly advanced.
Pros
- The program offers bit depth convert, pitch shift, and DC offset removal.
- The VST effects can be added to the entire batch of sound files.
Cons
- The audio routing and the multichannel support of the program are not efficient.
- The software sampler extraction is a bit slow when it comes to this program.
Supported Platforms
The program can only be installed on Windows.
7.MixPad
The audio processing and mixing have been made very easy with this platform. The program has an interface that is sleek in design and allows the processing of the audio info with care. The program also supports cloud storage, which means that the entire user’s hard work remains safe and secures all the time.
Features
- The program can mix the unlimited number of tracks all at the same time.
- Depending upon the requirement, the multiple or a single track can be processed at the same time.
- The program supports almost every sound format, so any type of sound can be imported with perfection.
Pros
- The audio effects such as EQ, compression, and reverb can be added with perfection.
- The latency rate is very low, and the program also offers ASIO support for accurate processing.
Cons
- The program only offers the export of the sound that is up to 32 bits.
- The sample rates of up to 96 kHz are only supported, which is less than most of the other mixers.
Supported Platforms
The program can be installed on Mac, Windows, Android, iPad, and Kindle Fire.
8.Sound Forge
If a user wants to completely control the audio editing process, then this software is for them. It is highly advanced and makes sure that the work that is done is highly précised. From Red Book CD creation to sound design and mixing, this program provides the users with complete control and authority over the process.
Features
- The multichannel WAV recording and processing is now possible with the new version of the program.
- The VST plugin support is provided by this program with perfection.
- The VST effects can be chained in a virtual rack.
Pros
- The simple digitization and restoration of the audio have been made simple by this program.
- The one-click solutions allow the users to process the audio tracks easily.
Cons
- The program only offers 32 bits of power, which is very low.
- The multiple VST GUI is not supported by this program.
Supported Platforms
The Sound Forge can be installed on Mac and Windows.
9.Spek
The best part of the software is that it is free and allows the users to overcome the problems which the other audio recorders present. The interface is easy to learn, and therefore the overall usage is easy. The lossless quality is something for which the software is known for. It also supports the FFMPEG library.
Features
- The signal processing is ultra-fast as it uses several threads to process audio.
- The drag and drop support of the program is highly efficient, and the program supports common audio formats.
- The program can be accessed in 19 different languages.
Pros
- The spectral density rulers allow the auto fitting of time.
- The spectral density range of the program is also adjustable.
Cons
- The codec names are, and the audio signal parameters cannot be seen.
- The program is licensed under GPLv3, which is now obsolete.
Supported Platforms
The program is compatible with Windows, Linux, and Mac.
10.Audio Highjack
The program, as the name suggests, makes it possible for the users to completely delve deep into the process of audio editing. The interface, as well as the controls, is very easy to understand and use. For novice users, this program is highly recommended as it makes audio editing a fun-filled activity.
Features
- It provides detailed statistics and min, the max value per channel.
- The processed audio can be listened in real-time to get an idea about the end product.
- The waveform generator and frequency impulse train are embedded within the program.
Pros
- The lame encoder support has been embedded within the recorder to export mp3 files.
- The editor’s look is skin able, which can be changed as per the user choice.
Cons
- The processing options are less as compared to the other recorders.
- The audio files cannot be exported as text, so the program cannot be used with PSpice.
Supported Platforms
The program is only available for Mac.
A Roundup of the Best Audio Recording Software Programs
| No. | Tools | Rating | Supported Formats | Price | Processing Power |
|---|---|---|---|---|---|
| 1 | DemoCreator | 4.5 | .mp3, .m4a, .wav, .wma, .ogg, .flac, .aif, .aiff | $29.99 | 64-bit |
| 2 | WavePad | 4.4 | vox, gsm, WMA, real audio, au, aif, FLAC, and Ogg | $69.95 | 64-bit |
| 3 | Ocenaudio | 4.0 | vox, gsm, WMA, wav, .wma, .ogg, and .flac | Free | 32-bit |
| 4 | Adobe Audition | 4.5 | AIF, AIFF, AIFC | $74.99 | 64-bit |
| 5 | Audacity | 3.9 | mp3, wav, AIFF, au, and ogg | Free | 32-bit |
| 6 | Wavosaur | 3.5 | VST plugins, ASIO driver, multichannel wav files, real-time effect processing. | Free | 32-bit |
| 7 | MixPad | 3.2 | wav, mp3, vox, and gsm | $129 | 32-bit |
| 8 | Sound Forge | 4.0 | SWF, RealMedia 9, WMA, AVI , AIFF, AIF, and SND | Free | 32-bit |
| 9 | Spek | 4.4 | vox, gsm, WMA, Wav, WMA, real audio, au, aif, FLAC, and Ogg | Free | 64-bit |
| 10 | Audio Highjack | 4.2 | .mp3, .m4a, .wav, .wma, aif, FLAC, and Ogg | Free | 64-bit |
Conclusion
With the overall specs and ratings by the users, the Wondershare DemoCreator is the best software that should be used for audio recording.
The program is highly compatible with major operating systems, and therefore it is highly recommended. The overall mechanism is easy, and the program also supports multiple formats.
It is highly technical and is constantly upgraded to make sure that it remains in line with modern technologies. It is a one-stop-shop for all the audio recording needs of the users and therefore highly viable.
With this program, the audio that has been worked on can be shared on most popular social media platforms like YouTube and Facebook.
Shanoon Cox
Shanoon Cox is a writer and a lover of all things video.
Follow @Shanoon Cox
The Alluring Beauty of Cutting-Edge Sound Editing Tools: Evaluating Pros, Cons, and Competitive Landscapes
Audio editors are generally referred to as Digital Audio Workstation, DAW. They provide you with digital tools to edit, record, and also produce audio files. Most audio editors are used to create podcasts and mix different audio files.
Internet is full of different audio editors, but the case in the study is about Beautiful Audio Editor. To know more about this editor and to learn about its steps, read the article below.
In this article
01 What Is Beautiful Audio Editor?
02 Beautiful Audio Editor: Key Features, Pros & Cons
03 How to Use Beautiful Audio Editor?
04 Best Alternatives for Beautiful Audio Editor
Part 1. What Is Beautiful Audio Editor?
For an online editor, Beautiful Audio Editor is the best choice, and this is because the editor is feature-rich. This editor works well on both Chrome and Firefox browsers. Beautiful Audio Editor is great for the fact that it offers excellent options of frequency effects. Importantly, the audio editor allows you to save the files on Google Drive.

Do you know the best part of Beautiful Audio Editor? The editor supports multi-track editing and allows you to adjust and manage every track level. With this editor, try and move from complete silence to 6 decibels higher than the actual level. Do you know what wonders this can do? For smooth fade-ins and fade-outs, this is very helpful.
Part 2. Beautiful Audio Editor: Key Features, Pros & Cons
With Beautiful Audio Editor, you can edit amazing audio files, make stunning mixes and crazy podcasts. This online, easy-to-use editor has a lot of features to offer. Do you know what they are? Let’s increase your knowledge and share some key features of Beautiful Audio Editor:
· Editing Features
This is a multi-track audio editor that supports adjusting every level of each track. With Beautiful Audio Editor, try to alter volume and pan. Along with this, options like Move, Split, Duplicate and Delete sections of the audio file are also offered.
· Recording
Do you think Beautiful Audio Editor is just an editor? You are wrong if you think so. This is because the editor is not only great for editing but try and record with this fantastic tool. You can record through your microphone and get high-quality recordings.
· Effects
Beautiful Audio Editor provides a wide range of effects that can modify and transform your audio file. For instance, you get effects like Gain, Dynamic Compression, Reverb, Low/High pass filters. Along with all this, you can also speed up or slow down the audio.
· Customized Effects
Which audio editor offers customized effects? Beautiful Audio Editor does! With Volume Envelopes, you can create custom Fade Ins and Fade Outs. Moreover, the editor also provides features like dragging the effects, zooming, etc.
2.1. Pros & Cons of Beautiful Audio Editor
Do you have any idea about the benefits that you get from Beautiful Audio Editor? If you don’t, let’s enlighten you with this editor’s pros and cons.
Benefits
- You can export files both in 16-bit WAV and also in 128-bit MP3 format from Beautiful AudioEditor.
- This audio editor is free to use. You don’t even have to register for editing audio, just open Chrome or Firefox and start the work.
- Your edited audio files are saved both online and offline. You can either save files on Google Drive or else save local files.
- Beautiful Audio Editorenables you to create audio envelopes. Moreover, you can apply dozens of audio effects while editing.
Drawback
- A significant drawback of this editor is that it crashes if the project is over 300MB or 45mins. This is not reliable for high stake projects.
Part 3. How to Use Beautiful Audio Editor?
Have you ever used this editor before? As we mentioned in the introduction, we would introduce the steps to use Beautiful Audio Editor, so here we are. Are you ready to learn about its step-by-step guidelines? Let’s get started!
Step 1: To start the editing, open the online editor. A timeline screen will appear in front of you; head to the ‘File’ tab and click on it from the top menu bar. From the sub-menu, select the ‘Import local sound file’ option to import the file from your device.

Step 2: For splitting the audio, drag the play head to the point from where you want to split. Next to the toolbar, click on the ‘Split’ icon. This will split the audio into 2 parts, and you can split as much as you want to. By using the ‘Remove’ icon from the toolbar, you can also remove the extra audio part.

Step 3: For adding Fade to your audio, move to the line under the timeline. Now, select a start and an endpoint on the line and drag it downwards for Fade Out. In comparison, push it upwards for Fade In.

Step 4: For adjusting the Volume or the Gain, move to the bottom left corner. You will see a ‘Gain’ option, hit on it to open its tab on the right side of the screen, and then adjust the ‘Gain’ by moving the slider.

Step 5: You can also rename your file by double-clicking on it. Lastly, to save the file, tap on the ‘File’ tab and select the ‘Save project to a local file for later load’ option. After this, download the file to your preferred location.

Part 4. Best Alternatives for Beautiful Audio Editor
We have something for you if Beautiful Audio Editor has failed to impress you. The following section of this article will share the best alternatives with its readers. Let’s begin!
1. TwistedWave
Do you know how amazing this alternative is? TwistedWave is an online, easy-to-use audio editor. The interface of this editor is very clean and simple to understand. Moreover, you get a long list of effects from TwistedWave, for instance, Reverse, Graphic EQ, Fade in and Fade out, Amplify, Normalize, and others.
The best part about this audio editor is that you can easily send files to SoundCloud and also Google Drive. Likewise, you can upload files from both Google Drive and SoundCloud.

2. Bear Audio Editor
Moving on to discuss Bear Audio Editor, which can trim, cut, and also convert music files. Interestingly, you can avail all these amazing features online and free, without even downloading any software. This editor offers you options like Fade In and Out, Mute, Pitch and Volume Adjustment, etc.
You can also combine different music files, ringtones, etc., to make your perfect mix. Bear Audio Editor supports MP3, OGG, and WAV input formats. Whereas OGG, WMA, WAV, MP3, and M4R are output-supported formats.

3. Sodaphonic
Do you want to edit a file from Dropbox? Try Sodaphonic audio editor. You can not only open files from Dropbox but also import them from Google Drive. This online editor offers diverse options that include Louder, Quieter, Silence, Normalize, Bleep it, Reverse, and much more than this.
Other than this, you get different editing options, including Delete, Trim, Cut, Copy, etc. This editor also allows access to a microphone for recording.

Last Words
Beautiful Audio Editor, like its name, is beautiful and equally amazing to use. The online editor offers a lot of features, and interestingly, it’s free. The article discussed great details about Beautiful Audio Editor along with its guideline. What if we share another audio editor? Try Wondershare Filmora Audio Editor, the easy-to-use, drag-and-drop software.
You can modify your audio files to the next level with Filmora . Its advanced audio editing features are unmatched, like Audio Equalizer, Audio Denoise, Detach Audio from Video, and so much more. You can also add Voiceovers, replace original audio from video, add background music, etc.
Wondershare Filmora
Get started easily with Filmora’s powerful performance, intuitive interface, and countless effects!
Try It Free Try It Free Try It Free Learn More >

02 Beautiful Audio Editor: Key Features, Pros & Cons
03 How to Use Beautiful Audio Editor?
04 Best Alternatives for Beautiful Audio Editor
Part 1. What Is Beautiful Audio Editor?
For an online editor, Beautiful Audio Editor is the best choice, and this is because the editor is feature-rich. This editor works well on both Chrome and Firefox browsers. Beautiful Audio Editor is great for the fact that it offers excellent options of frequency effects. Importantly, the audio editor allows you to save the files on Google Drive.
Do you know the best part of Beautiful Audio Editor? The editor supports multi-track editing and allows you to adjust and manage every track level. With this editor, try and move from complete silence to 6 decibels higher than the actual level. Do you know what wonders this can do? For smooth fade-ins and fade-outs, this is very helpful.
Part 2. Beautiful Audio Editor: Key Features, Pros & Cons
With Beautiful Audio Editor, you can edit amazing audio files, make stunning mixes and crazy podcasts. This online, easy-to-use editor has a lot of features to offer. Do you know what they are? Let’s increase your knowledge and share some key features of Beautiful Audio Editor:
· Editing Features
This is a multi-track audio editor that supports adjusting every level of each track. With Beautiful Audio Editor, try to alter volume and pan. Along with this, options like Move, Split, Duplicate and Delete sections of the audio file are also offered.
· Recording
Do you think Beautiful Audio Editor is just an editor? You are wrong if you think so. This is because the editor is not only great for editing but try and record with this fantastic tool. You can record through your microphone and get high-quality recordings.
· Effects
Beautiful Audio Editor provides a wide range of effects that can modify and transform your audio file. For instance, you get effects like Gain, Dynamic Compression, Reverb, Low/High pass filters. Along with all this, you can also speed up or slow down the audio.
· Customized Effects
Which audio editor offers customized effects? Beautiful Audio Editor does! With Volume Envelopes, you can create custom Fade Ins and Fade Outs. Moreover, the editor also provides features like dragging the effects, zooming, etc.
2.1. Pros & Cons of Beautiful Audio Editor
Do you have any idea about the benefits that you get from Beautiful Audio Editor? If you don’t, let’s enlighten you with this editor’s pros and cons.
Benefits
- You can export files both in 16-bit WAV and also in 128-bit MP3 format from Beautiful AudioEditor.
- This audio editor is free to use. You don’t even have to register for editing audio, just open Chrome or Firefox and start the work.
- Your edited audio files are saved both online and offline. You can either save files on Google Drive or else save local files.
- Beautiful Audio Editorenables you to create audio envelopes. Moreover, you can apply dozens of audio effects while editing.
Drawback
- A significant drawback of this editor is that it crashes if the project is over 300MB or 45mins. This is not reliable for high stake projects.
Part 3. How to Use Beautiful Audio Editor?
Have you ever used this editor before? As we mentioned in the introduction, we would introduce the steps to use Beautiful Audio Editor, so here we are. Are you ready to learn about its step-by-step guidelines? Let’s get started!
Step 1: To start the editing, open the online editor. A timeline screen will appear in front of you; head to the ‘File’ tab and click on it from the top menu bar. From the sub-menu, select the ‘Import local sound file’ option to import the file from your device.
Step 2: For splitting the audio, drag the play head to the point from where you want to split. Next to the toolbar, click on the ‘Split’ icon. This will split the audio into 2 parts, and you can split as much as you want to. By using the ‘Remove’ icon from the toolbar, you can also remove the extra audio part.
Step 3: For adding Fade to your audio, move to the line under the timeline. Now, select a start and an endpoint on the line and drag it downwards for Fade Out. In comparison, push it upwards for Fade In.
Step 4: For adjusting the Volume or the Gain, move to the bottom left corner. You will see a ‘Gain’ option, hit on it to open its tab on the right side of the screen, and then adjust the ‘Gain’ by moving the slider.
Step 5: You can also rename your file by double-clicking on it. Lastly, to save the file, tap on the ‘File’ tab and select the ‘Save project to a local file for later load’ option. After this, download the file to your preferred location.
Part 4. Best Alternatives for Beautiful Audio Editor
We have something for you if Beautiful Audio Editor has failed to impress you. The following section of this article will share the best alternatives with its readers. Let’s begin!
1. TwistedWave
Do you know how amazing this alternative is? TwistedWave is an online, easy-to-use audio editor. The interface of this editor is very clean and simple to understand. Moreover, you get a long list of effects from TwistedWave, for instance, Reverse, Graphic EQ, Fade in and Fade out, Amplify, Normalize, and others.
The best part about this audio editor is that you can easily send files to SoundCloud and also Google Drive. Likewise, you can upload files from both Google Drive and SoundCloud.
2. Bear Audio Editor
Moving on to discuss Bear Audio Editor, which can trim, cut, and also convert music files. Interestingly, you can avail all these amazing features online and free, without even downloading any software. This editor offers you options like Fade In and Out, Mute, Pitch and Volume Adjustment, etc.
You can also combine different music files, ringtones, etc., to make your perfect mix. Bear Audio Editor supports MP3, OGG, and WAV input formats. Whereas OGG, WMA, WAV, MP3, and M4R are output-supported formats.
3. Sodaphonic
Do you want to edit a file from Dropbox? Try Sodaphonic audio editor. You can not only open files from Dropbox but also import them from Google Drive. This online editor offers diverse options that include Louder, Quieter, Silence, Normalize, Bleep it, Reverse, and much more than this.
Other than this, you get different editing options, including Delete, Trim, Cut, Copy, etc. This editor also allows access to a microphone for recording.
Last Words
Beautiful Audio Editor, like its name, is beautiful and equally amazing to use. The online editor offers a lot of features, and interestingly, it’s free. The article discussed great details about Beautiful Audio Editor along with its guideline. What if we share another audio editor? Try Wondershare Filmora Audio Editor, the easy-to-use, drag-and-drop software.
You can modify your audio files to the next level with Filmora . Its advanced audio editing features are unmatched, like Audio Equalizer, Audio Denoise, Detach Audio from Video, and so much more. You can also add Voiceovers, replace original audio from video, add background music, etc.
Wondershare Filmora
Get started easily with Filmora’s powerful performance, intuitive interface, and countless effects!
Try It Free Try It Free Try It Free Learn More >
Also read:
- New 2024 Approved Procuring Premium Sound Extras The Best 8 Free Websites
- The Ultimate Ranking Best 5 Car Audio Mixer Apps That Work with macOS for 2024
- 2024 Approved Mastering Audio with Sound Forge An Assessment Review
- Echo Eradication Professional Strategies for Silencing Unwanted Acoustic Features
- Updated In 2024, Essential List of the Best Audio Capture Tools for Songs
- Updated Stepping Through Sound Decline A Step-by-Step Approach to Audio Fade Outs for 2024
- New 2024 Approved Enrich Your Music The Ultimate Photo-Audio Integration Guide Sonic Visualization
- Updated In 2024, Techniques for Silencing Background Music in Videos
- In 2024, Harmonious Horizon Exploring the Top 8 Websites Where Your Sound Effect Quest Meets Free Resources (Current Year Focus)
- Updated 2024 Approved Expert Tips for Achieving Pristine Sound by Neutralizing Background Mic Noises
- 2024 Approved Premier Mixers Transforming Your Home Streaming Setup
- Updated Navigating the Landscape of Audio Creators Standards and Selection Criteria for 2024
- 2024 Approved From Airwaves to Hard Drives A Comprehensive Manual for Computer-Based Podcast Archiving
- A Symphony for the Ears Ranking the Top 8 Filmmaking Sonic Experiences
- Updated The Hottest Apps for Personalizing Your Speaking AI Experience This Year
- Digital Tranquility The Ultimate List of Soothing Web Sites for a Peaceful Moment for 2024
- Updated The Essential List of Top 10 Gratis Audio Capture Software Tailored for Modern Podcasters
- New Beyond FaceTime on Android Top 10 Virtual Communication Applications for 2024
- New Guide to Removing Melodic Elements Focusing on Basslines for Media Projects
- New 2024 Approved 10 Best Speech to Text Software/Converters for Windows
- New Navigating to the Pinnacle 5 Leading Audio Mixers for Mac Users for 2024
- New 2024 Approved Seeking High-Pitched Wind Chime Audio Replica
- New In 2024, Ideal Soundtrack Choices Selecting Songs to Elevate Your Montage Masterpiece
- New Intuitive Vocal Modification Mechanisms An Insight Into Operational Aspects, Standards, and Workarounds for 2024
- Updated 2024 Approved Recommendations for Music Video Editors
- 2024 Approved Experts Choice 10 Superior MP3 Recorder Applications for Windows & Apple Devices
- Updated 2024 Approved The Ultimate Backward Beat Playlist
- Updated 2024 Approved The Virtuosos Choice A Ranked List of Available BGM Score Archives
- The Art and Technique of Incorporating Dramatic Soundtracks Into Movies
- How to Add Music/ Audio to a GIF on Mac, In 2024
- New Mellow Newsroom Soundtracks, 15Th Edition for 2024
- Journey to Uncover Joyous Soundscapes
- New In 2024, Simplifying Sound Production A Step-by-Step Guide to Silencing Vocals with Adobe Audition
- Updated 10 Best Voice Changing Software That You Should Know for 2024
- Updated 2024 Approved A Comprehensive Compilation of Top 10 Affordable Browser-Based DAWs
- New 2024 Approved Essential MP3 Transcription Solutions A Compilation
- Updated 2024 Approved 15 Must-Have Tech Gadgets and Digital Platforms to Transform Your Videos With Impactful Music Integration A Side-by-Side Analysis
- Updated 2024 Approved Top 8 Free Soundscape Resources for Audio Enhancement
- Updated In 2024, A Step-by-Step Exploration of Jazz Basics
- New Professional Guide to De-Sing Your Videos
- How to Erase an Apple iPhone 15 without Apple ID?
- Top 7 Skype Hacker to Hack Any Skype Account On your Nubia Red Magic 8S Pro+ | Dr.fone
- 3 Solutions to Find Your Infinix Hot 40i Current Location of a Mobile Number | Dr.fone
- How to Transfer Videos from Xiaomi Redmi Note 12R to iPad | Dr.fone
- New What Is the Best Free Stop Motion Animation Software? Check This Article if You Are Curious About the Answer. We Will Recommend 8 Editors for Windows and Mac for 2024
- Updated In 2024, Game On! Best Free Video Editing Software
- In 2024, Best Anti Tracker Software For Xiaomi Redmi 13C 5G | Dr.fone
- New Top Notch Video Editors for Mac VSDC Alternatives
- In 2024, Ultimate Guide to Catch the Regional-Located Pokemon For Vivo S17 Pro | Dr.fone
- App Wont Open on Your Vivo V27e? Here Are All Fixes | Dr.fone
- How to Translate TikTok Videos? All You Want to Know
- A Guide Tecno Spark 20 Pro+ Wireless and Wired Screen Mirroring | Dr.fone
- Create Stunning WhatsApp Videos Top Free and Paid Makers
- Practical Ways to Resize Video in Handbrake for 2024
- New 2024 Approved Stop Motion in the Cloud A Comprehensive Guide to Tools and Best Practices
- How to Transfer Data from Gionee F3 Pro to Any iOS Devices | Dr.fone
- How to Factory Reset Xiaomi 14 Ultra without Losing Data | Dr.fone
- Can I use iTools gpx file to catch the rare Pokemon On Poco X5 Pro | Dr.fone
- 2024 Approved Video Dimension Adjustment Made Easy and Fast
- How to Quickly Fix Bluetooth Not Working on Motorola Moto G73 5G | Dr.fone
- How to Make a Video with My Phone for 2024
- In 2024, How To Unlock Any Nubia Red Magic 9 Pro Phone Password Using Emergency Call
- How To Stream Anything From Xiaomi 13 Ultra to Apple TV | Dr.fone
- Fixes for Apps Keep Crashing on Lava Yuva 2 Pro | Dr.fone
- How Do You Get Sun Stone Evolutions in Pokémon For Honor Magic 6? | Dr.fone
- What is Geo-Blocking and How to Bypass it On Tecno Pop 8? | Dr.fone
- 3 Effective Ways to Unlock iCloud Account Without Password From iPhone 14 Pro Max
- Here are Some of the Best Pokemon Discord Servers to Join On Infinix Note 30 VIP Racing Edition | Dr.fone
- In 2024, How to use Pokemon Go Joystick on Nubia Red Magic 8S Pro? | Dr.fone
- In 2024, The 6 Best SIM Unlock Services That Actually Work On Your Nokia G42 5G Device
- New 2024 Approved The Fast Lane Best GIF Speed Changer Tools for All Devices
- Title: New Embark on a Complimentary Audacity Adventure Capturing Every Note for 2024
- Author: David
- Created at : 2024-05-05 09:57:46
- Updated at : 2024-05-06 09:57:46
- Link: https://sound-tweaking.techidaily.com/new-embark-on-a-complimentary-audacity-adventure-capturing-every-note-for-2024/
- License: This work is licensed under CC BY-NC-SA 4.0.
