
:max_bytes(150000):strip_icc():format(webp)/samsungtvhomepage-58f0d708245a4140bb4bbad8ea0cfc26.jpg)
New 2024 Approved Top 10 FREE Speech-to-Text Apps for Android & iOS,
“Top 10 FREE Speech-to-Text Apps for Android & iOS, Updated 2023”
10+ Free Online Audio to Text Converters

Shanoon Cox
Mar 27, 2024• Proven solutions
An audio-to-text converter is a tool that can convert audio files to texts or even record any audio and produce the text of it simultaneously. Audio files are one of the most used methods of storing information. From online classes and long lectures to big business meetings and product information, audio is being shared a lot across the world.
But accessing information from a long audio file can be difficult and time-consuming, which is why there is a need to convert audio to text. Information in the form of text can easily be fully or partly accessed and edited whenever needed. And texts can also easily be shared with whomever you want.
So let’s have a look at some of the best audio-to-text converters that might be of use to you.


10+ Free Online Audio to Text Converters
There is number of audio text converters available in the online market that can help you while studying, researching, or even in your business. Some of these recorders can convert any audio file to texts while some others can record and convert to text at the same time. Here we will talk about the top 11 free applications that can be used to convert audio to text.
| 1 - Filmora | 2 - Audext | 3 - Sonix.ai |
|---|---|---|
| 4 - Virtualspeech.com | 5 - Speechnotes | 6 - SpeechTexter |
| 7 - Textfromtospeech.com | 8 - Dictation.io | 9 - Voice Note |
| 10 - Voice Notebook | 11 - NaturalReaders |
1. Wondershare Filmora
Filmora’s Speech To Text (STT) function allows you to transcript audio/voice to subtitles/text in one click. it can save your plenty of time on transcribing subtitles and boost your editing efficiency by applying speech-to-text.
What you need to do is download the software and subsribe for its plan.
Features
- Built-in function to transcribe subtitles and captions for your video
- High accuracy in generating text, allows you to edit text by yourself
- Supports up to 26 languages of transcription to engage more users all around the world
- Offers various tools for editing your videos and audio
2. Audext
Audext is a free online application that can help you to save a lot of time while transcribing any audio to text. The transcription to text is done with the use of an advanced AI and hence produces faster and more accurate results.
Audext is used by people from different sectors like education, marketing, media, consulting, healthcare, etc. for their work purposes.

Features
- An inbuilt editor for editing the text while transcribing
- Identifies the speaker easily
- Supports a variety of audio and video formats like MP3, WAV, MP4, etc.
- Offers an option of easy upload and export of files
Pricing
- Free
- Transcription costs for one hour are $12
- Or with the subscription $5
3. Sonix.ai
Sonix is a fast and accurate application that can be used to convert audio to text for any purpose. This application offers a 30-minute free transcription after which an affordable amount may be charged.
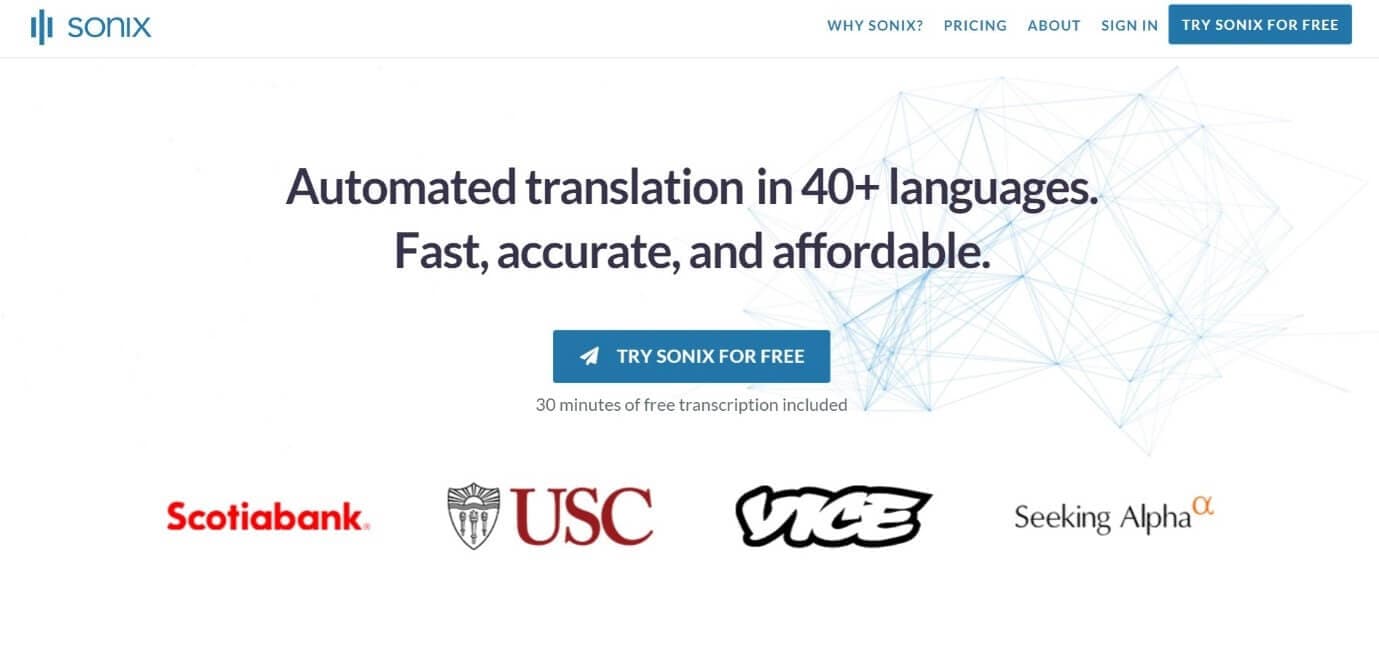
Features
- Automatic transcription of files and accessibility of these files from any device
- Advanced translation of these devices into 30 different languages
- Addition of subtitles into any video for easy understanding
- A Sonix media player that allows to share and publish files easily
Pricing
- Free
- Standard subscription - $10 per hour
- Premium subscription - $5 per hour, and an addition of $22 per month
4. Virtualspeech.com
Virtualspeech is an online tool that can transcribe audio to text free. It is a very simple application that allows fats conversion of audio files to texts. After conversion, the file will be emailed to the user from where it can be downloaded and saved.
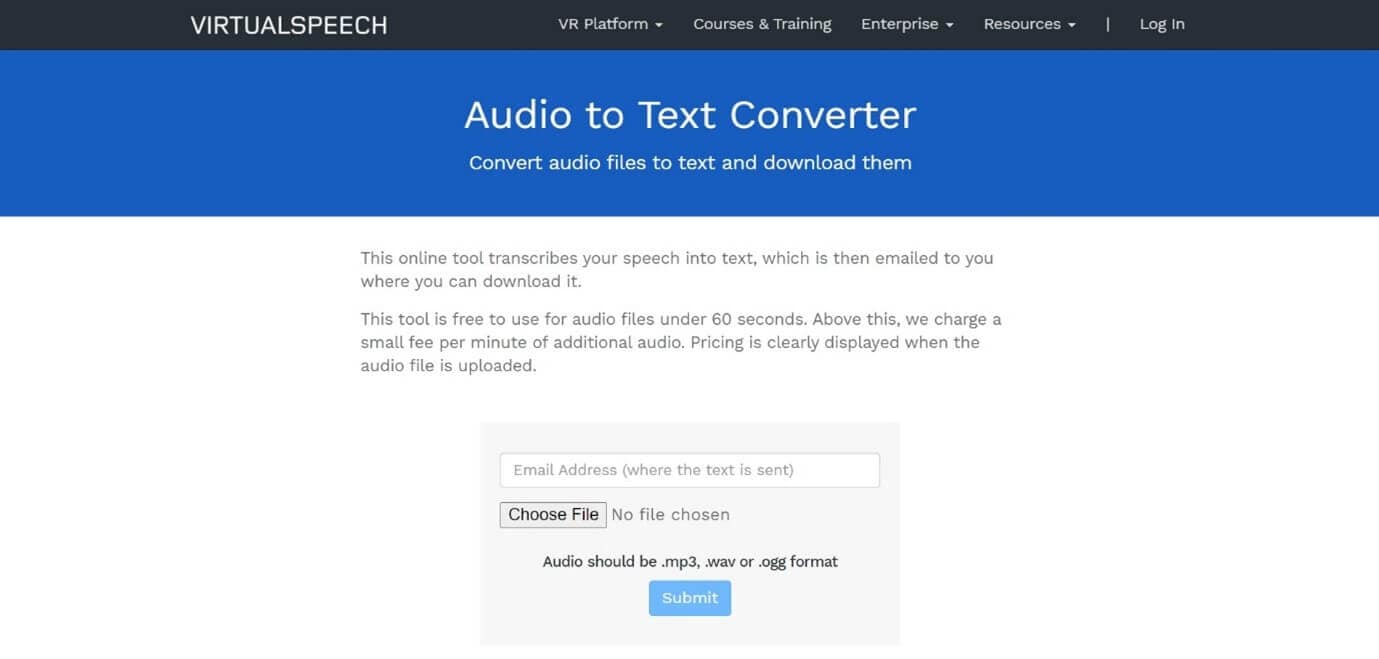
Features
- Free conversion of any audio files under 1 minute.
- Conversion of audio files of formats Mp3, Wav, or Ogg.
- Provides security as the no files are stored on the server and the site is secured with a b SSL
- Speech to text converter within the site
Pricing
- $0.50 per minute after the free minute

Filmora Audio to Text Converter
Filmora - Audio to Text Converter
• Enables you to convert video speech to text in one click
• Extremely accurate in video speech recognition
• Cross-platform supported - (Windows, Mac, iOS, Android)
Transcribe Audio to Text Free Transcribe Audio to Text Free Transcribe Audio to Text Free Learn More >
5. Speechnotes
Speechnotes is a powerful online notepad that can easily convert audio to text. This tool has implemented an efficient and clean design that makes conversion and editing very easy.
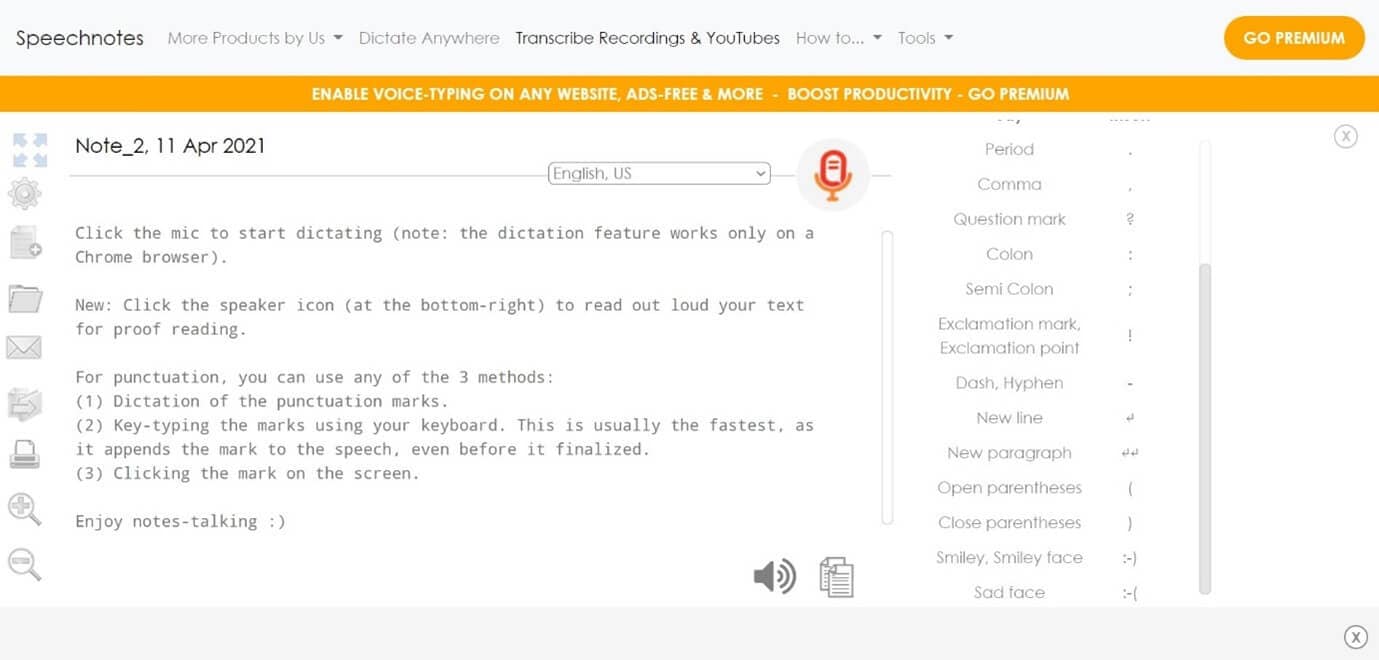
Features
- Best results with an advanced speech recognition technology
- Built-in tools that allow easy editing and correction of the converted text
- Fast working on any web browser and no installation apps required
- Autosave feature that ensures that your data is not lost
- Export to Google Drive option for easy accessibility from any device
Pricing
- Free
- Premium version with the addition of some extra features
6. SpeechTexter
SpeechTexter is a multilingual application that can help you transcribe any type of book, document, blog posts, etc. by using your audio. This tool has a custom dictionary that allows adding short commands for adding frequently used data like phone numbers, punctuation marks, addresses, etc.
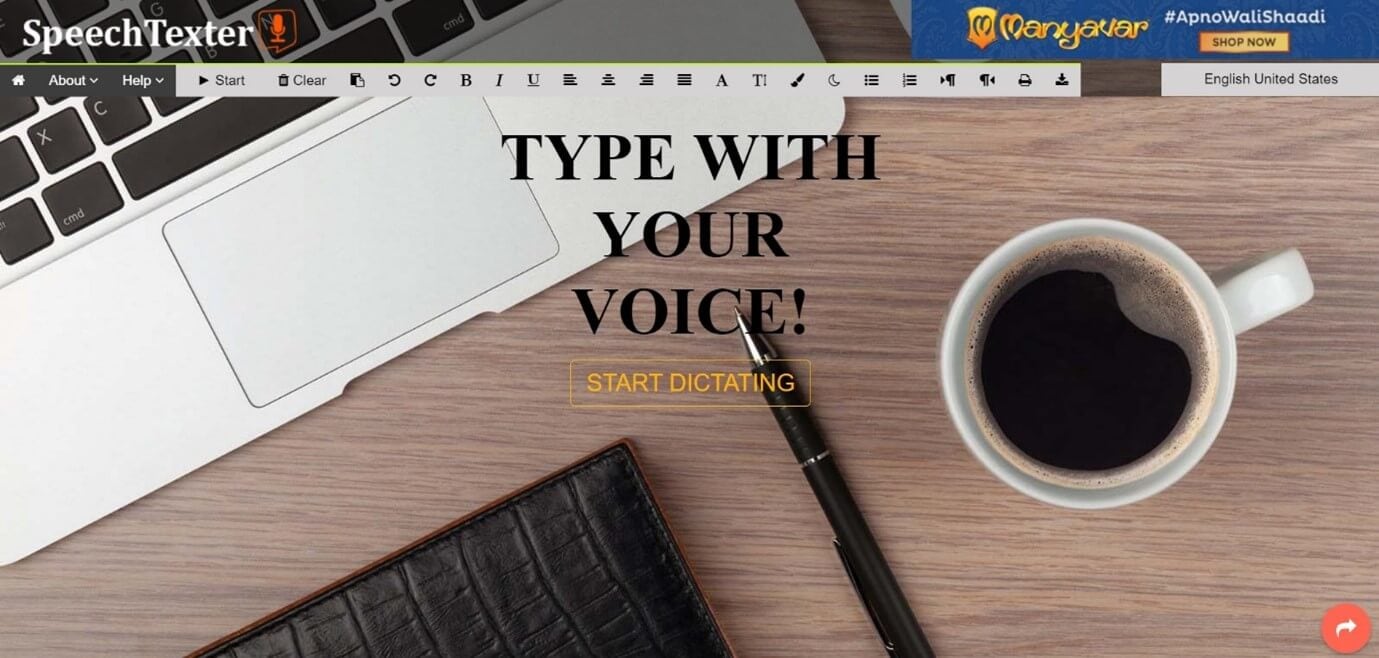
Features
- Offers accuracy rate of 90 to 95% percent
- Can be used to increase your fluency in English
- Offers powerful real-time speech recognition
- Easy creation of emails, text notes, blog posts, etc.
- A custom dictionary that can be customized according to the individual use
- Supports more than 60 languages
- Available on both chrome browser and android
Pricing
- Free
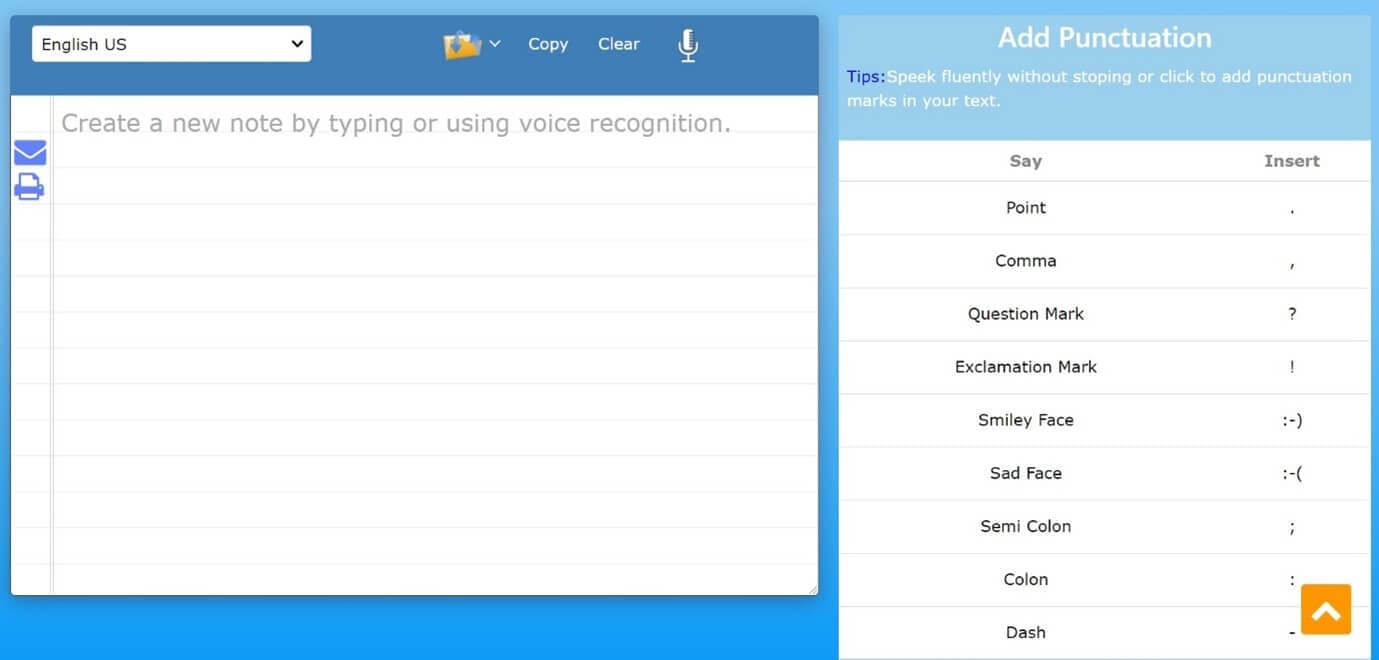
7. Textfromtospeech.com
Textfromtospeech is a free online tool that allows you to easily convert audio to text without the need for registration downloading or installation. It has a very simple interface that can record and convert your speech into text with a single click.
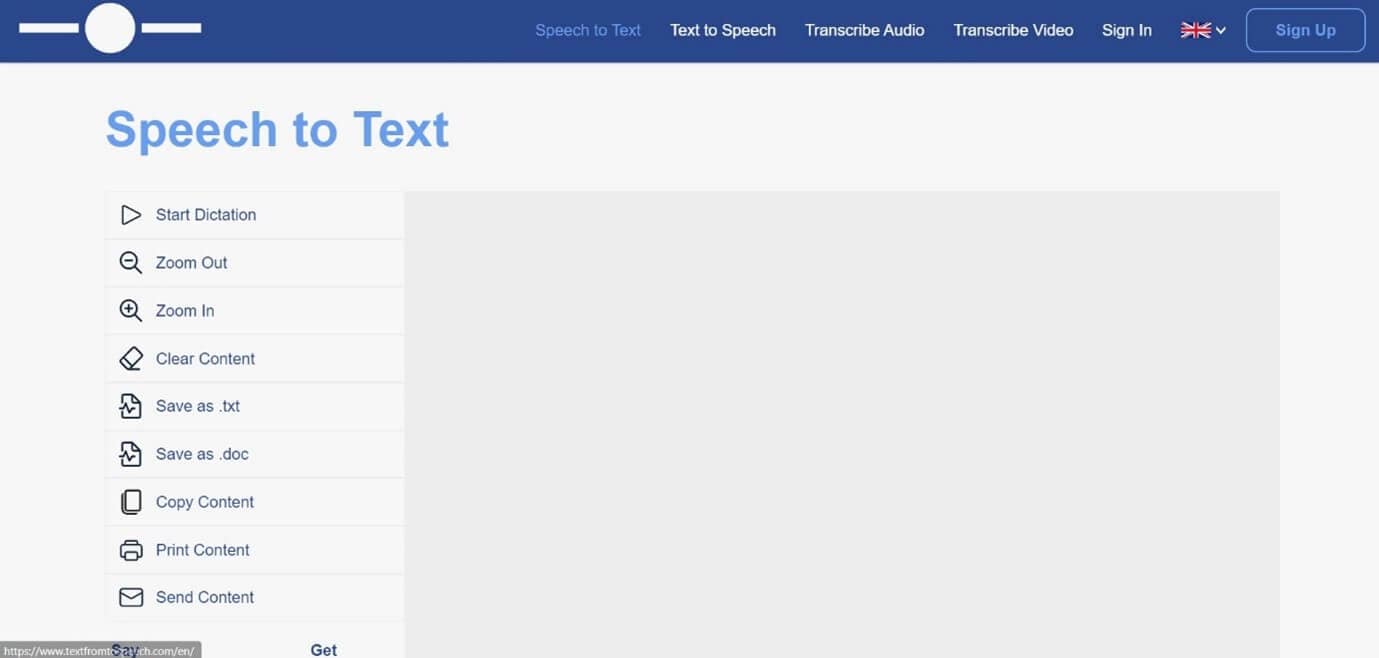
Features
- Free and online text recognition and transcription
- Supports many languages
- Pause and record option while converting large files
- Can use voice commands for insertion of symbols like “comma”, “full stop”, etc.
- Smart capitalization
- Easy saving, copying, and sharing of the dictated text
- Available on mobile devices, tablet, and computer
Pricing
- Free
![]()
A cross-platform for making videos anywhere for all creators

Why your video editing isn’t good enough? How about some creative inspo?
- 100 Million+ Users
- 150+ Countries and Regions
- 4 Million+ Social Media Followers
- 5 Million+ Stock Media for Use
* Secure Download

8. Dictation.io
Dictation is a free and simple tool that offers fast conversion of audio to text. Its interface is like that of a very simple notepad and allows the conversion of audio to text for a number of languages including English, Español, Français, Italiano, Português, and more.

Features
- Advanced speech recognition
- Easy editing within the notes
- Easy sharing to mail, tweets, etc.
- No storing of any data and hence offers the necessary security
Pricing
- Free
9. Voice Note
Voice Note is an online speech recognition tool that can automatically record and type anything including speech, interview, etc. This tool can convert any audio file into text format which can easily be opened in Microsoft Word.
Features
- No saving of data in any servers
- Customizable options for audio and text
- A number of languages to choose from while converting audio to text
- Easy copying and exporting options
- Direct Print option from the site
Price
- Free
10. Voice Notebook
Voice Notebook is a speech recognition app that can also convert audio files to text. This application is compatible with a wide range of devices like Mac, Windows, Linux OS, Android, and iOS.
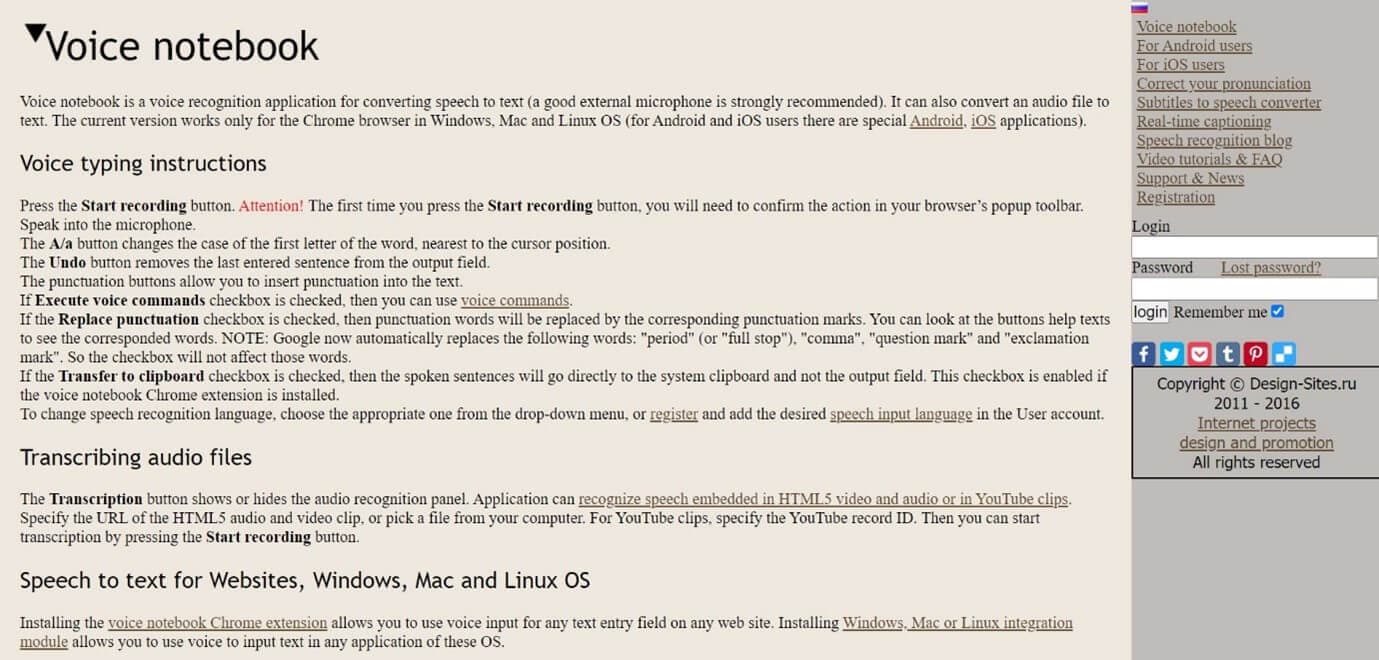
Features
- Voice commands are available when you transcribe audio to text
- Has the ability to recognize any speech embedded in YouTube clips or HTML5 audio or video
- Simple interface and easy editing of text
- An option to download into TXT format is available
Price
- Free
11. NaturalReaders
Natural Readers is a professional program that can convert any text into spoken words. This program offers a lot of features like adjusting the speed of audio, conversion into mp3, selection of voice, etc.
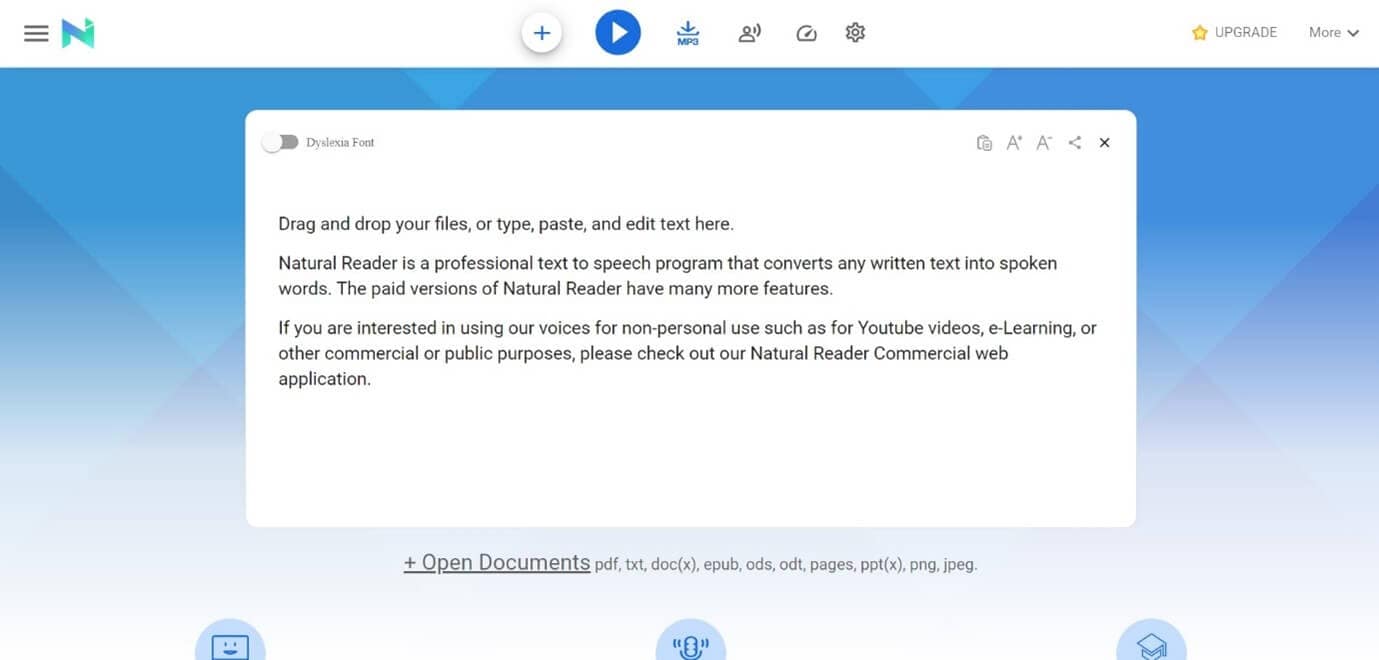
Features
- A font option available for dyslexic people
- Supports formats like pdf, txt, docs, epub, ods, ppt, png, jpeg
- App versions of this online tool are available both for android and apple devices
Pricing
- Free
- Premium plan - $9.99 per month, $59.88 per year
- Plus plan - $19.00 per month, $110.00 per year
Filmora Audio to Text Converter
Filmora - Audio to Text Converter
• Enables you to convert video speech to text in one click
• Extremely accurate in video speech recognition
• Cross-platform supported - (Windows, Mac, iOS, Android)
Transcribe Audio to Text Free Transcribe Audio to Text Free Transcribe Audio to Text Free Learn More >
Conclusion
We have listed above the top 11 tools that can be used to convert audio to text on any device using a browser. Converting audio to text allows you to easily access the required information, edit it, or even share it fully or partially with anyone you wish,
The applications we have listed are free and some of them might charge for the extra features they provide. So no matter what your profession is if you are looking for an app to convert audio to text or record and produce the text of the recordings, choose any one of the listed above applications.
We hope our suggestions help you reduce effort and save time. Please leave your valuable feedback in the comment box below, thank you.
Transform Long Videos into Short Ones Instantly
Turn long videos into viral clips. Effortlessly transform lengthy videos into engaging, shareable clips.

Shanoon Cox
Shanoon Cox is a writer and a lover of all things video.
Follow @Shanoon Cox
Shanoon Cox
Mar 27, 2024• Proven solutions
An audio-to-text converter is a tool that can convert audio files to texts or even record any audio and produce the text of it simultaneously. Audio files are one of the most used methods of storing information. From online classes and long lectures to big business meetings and product information, audio is being shared a lot across the world.
But accessing information from a long audio file can be difficult and time-consuming, which is why there is a need to convert audio to text. Information in the form of text can easily be fully or partly accessed and edited whenever needed. And texts can also easily be shared with whomever you want.
So let’s have a look at some of the best audio-to-text converters that might be of use to you.
10+ Free Online Audio to Text Converters
There is number of audio text converters available in the online market that can help you while studying, researching, or even in your business. Some of these recorders can convert any audio file to texts while some others can record and convert to text at the same time. Here we will talk about the top 11 free applications that can be used to convert audio to text.
| 1 - Filmora | 2 - Audext | 3 - Sonix.ai |
|---|---|---|
| 4 - Virtualspeech.com | 5 - Speechnotes | 6 - SpeechTexter |
| 7 - Textfromtospeech.com | 8 - Dictation.io | 9 - Voice Note |
| 10 - Voice Notebook | 11 - NaturalReaders |
1. Wondershare Filmora
Filmora’s Speech To Text (STT) function allows you to transcript audio/voice to subtitles/text in one click. it can save your plenty of time on transcribing subtitles and boost your editing efficiency by applying speech-to-text.
What you need to do is download the software and subsribe for its plan.
Features
- Built-in function to transcribe subtitles and captions for your video
- High accuracy in generating text, allows you to edit text by yourself
- Supports up to 26 languages of transcription to engage more users all around the world
- Offers various tools for editing your videos and audio
2. Audext
Audext is a free online application that can help you to save a lot of time while transcribing any audio to text. The transcription to text is done with the use of an advanced AI and hence produces faster and more accurate results.
Audext is used by people from different sectors like education, marketing, media, consulting, healthcare, etc. for their work purposes.
Features
- An inbuilt editor for editing the text while transcribing
- Identifies the speaker easily
- Supports a variety of audio and video formats like MP3, WAV, MP4, etc.
- Offers an option of easy upload and export of files
Pricing
- Free
- Transcription costs for one hour are $12
- Or with the subscription $5
3. Sonix.ai
Sonix is a fast and accurate application that can be used to convert audio to text for any purpose. This application offers a 30-minute free transcription after which an affordable amount may be charged.
Features
- Automatic transcription of files and accessibility of these files from any device
- Advanced translation of these devices into 30 different languages
- Addition of subtitles into any video for easy understanding
- A Sonix media player that allows to share and publish files easily
Pricing
- Free
- Standard subscription - $10 per hour
- Premium subscription - $5 per hour, and an addition of $22 per month
4. Virtualspeech.com
Virtualspeech is an online tool that can transcribe audio to text free. It is a very simple application that allows fats conversion of audio files to texts. After conversion, the file will be emailed to the user from where it can be downloaded and saved.
Features
- Free conversion of any audio files under 1 minute.
- Conversion of audio files of formats Mp3, Wav, or Ogg.
- Provides security as the no files are stored on the server and the site is secured with a b SSL
- Speech to text converter within the site
Pricing
- $0.50 per minute after the free minute
Filmora Audio to Text Converter
Filmora - Audio to Text Converter
• Enables you to convert video speech to text in one click
• Extremely accurate in video speech recognition
• Cross-platform supported - (Windows, Mac, iOS, Android)
Transcribe Audio to Text Free Transcribe Audio to Text Free Transcribe Audio to Text Free Learn More >
5. Speechnotes
Speechnotes is a powerful online notepad that can easily convert audio to text. This tool has implemented an efficient and clean design that makes conversion and editing very easy.
Features
- Best results with an advanced speech recognition technology
- Built-in tools that allow easy editing and correction of the converted text
- Fast working on any web browser and no installation apps required
- Autosave feature that ensures that your data is not lost
- Export to Google Drive option for easy accessibility from any device
Pricing
- Free
- Premium version with the addition of some extra features
6. SpeechTexter
SpeechTexter is a multilingual application that can help you transcribe any type of book, document, blog posts, etc. by using your audio. This tool has a custom dictionary that allows adding short commands for adding frequently used data like phone numbers, punctuation marks, addresses, etc.
Features
- Offers accuracy rate of 90 to 95% percent
- Can be used to increase your fluency in English
- Offers powerful real-time speech recognition
- Easy creation of emails, text notes, blog posts, etc.
- A custom dictionary that can be customized according to the individual use
- Supports more than 60 languages
- Available on both chrome browser and android
Pricing
- Free
7. Textfromtospeech.com
Textfromtospeech is a free online tool that allows you to easily convert audio to text without the need for registration downloading or installation. It has a very simple interface that can record and convert your speech into text with a single click.
Features
- Free and online text recognition and transcription
- Supports many languages
- Pause and record option while converting large files
- Can use voice commands for insertion of symbols like “comma”, “full stop”, etc.
- Smart capitalization
- Easy saving, copying, and sharing of the dictated text
- Available on mobile devices, tablet, and computer
Pricing
- Free
![]()
A cross-platform for making videos anywhere for all creators
Why your video editing isn’t good enough? How about some creative inspo?
- 100 Million+ Users
- 150+ Countries and Regions
- 4 Million+ Social Media Followers
- 5 Million+ Stock Media for Use
* Secure Download
8. Dictation.io
Dictation is a free and simple tool that offers fast conversion of audio to text. Its interface is like that of a very simple notepad and allows the conversion of audio to text for a number of languages including English, Español, Français, Italiano, Português, and more.
Features
- Advanced speech recognition
- Easy editing within the notes
- Easy sharing to mail, tweets, etc.
- No storing of any data and hence offers the necessary security
Pricing
- Free
9. Voice Note
Voice Note is an online speech recognition tool that can automatically record and type anything including speech, interview, etc. This tool can convert any audio file into text format which can easily be opened in Microsoft Word.
Features
- No saving of data in any servers
- Customizable options for audio and text
- A number of languages to choose from while converting audio to text
- Easy copying and exporting options
- Direct Print option from the site
Price
- Free
10. Voice Notebook
Voice Notebook is a speech recognition app that can also convert audio files to text. This application is compatible with a wide range of devices like Mac, Windows, Linux OS, Android, and iOS.
Features
- Voice commands are available when you transcribe audio to text
- Has the ability to recognize any speech embedded in YouTube clips or HTML5 audio or video
- Simple interface and easy editing of text
- An option to download into TXT format is available
Price
- Free
11. NaturalReaders
Natural Readers is a professional program that can convert any text into spoken words. This program offers a lot of features like adjusting the speed of audio, conversion into mp3, selection of voice, etc.
Features
- A font option available for dyslexic people
- Supports formats like pdf, txt, docs, epub, ods, ppt, png, jpeg
- App versions of this online tool are available both for android and apple devices
Pricing
- Free
- Premium plan - $9.99 per month, $59.88 per year
- Plus plan - $19.00 per month, $110.00 per year
Filmora Audio to Text Converter
Filmora - Audio to Text Converter
• Enables you to convert video speech to text in one click
• Extremely accurate in video speech recognition
• Cross-platform supported - (Windows, Mac, iOS, Android)
Transcribe Audio to Text Free Transcribe Audio to Text Free Transcribe Audio to Text Free Learn More >
Conclusion
We have listed above the top 11 tools that can be used to convert audio to text on any device using a browser. Converting audio to text allows you to easily access the required information, edit it, or even share it fully or partially with anyone you wish,
The applications we have listed are free and some of them might charge for the extra features they provide. So no matter what your profession is if you are looking for an app to convert audio to text or record and produce the text of the recordings, choose any one of the listed above applications.
We hope our suggestions help you reduce effort and save time. Please leave your valuable feedback in the comment box below, thank you.
Transform Long Videos into Short Ones Instantly
Turn long videos into viral clips. Effortlessly transform lengthy videos into engaging, shareable clips.
Shanoon Cox
Shanoon Cox is a writer and a lover of all things video.
Follow @Shanoon Cox
Sculpting the Visual Narrative: A Composer’s Approach to Transition Craftsmanship
How to Add Video and Audio Transition Between Scenes/Clips

Liza Brown
Mar 27, 2024• Proven solutions
Transition effects appear when one slide/clip replaces another one. It helps make the presentation, slideshow or movie good looking and impressive. Transition effects are widely used in and video editing software, such as Windows Movie Maker, iMovie, DVD Slideshow Builder, etc. You can also use transition sound effects to make amazing videos.
This article will show you how to add transitions (including video and audio transitions) between scenes and clips in Wondershare Filmora . Tips and tricks for transitions are also included.
How to Add Transitions Between clips
Part 1: Add video transitions
1. Download Wondershare Filmora
Wondershare Filmora is an easy-to-use while powerful video editing tool that is available both on Windows and Mac. Download it from the button below to get started.
Download Mac Version ](https://tools.techidaily.com/wondershare/filmora/download/ )
2. Import video/photos to the project
Before adding video/photo files to the Timeline, you need to import them first into the project. There are mainly 2 ways to import video/photo files: “Import” button on primary windows, or dragging and dropping files from Windows File Explorer to the User’s Album. Wondershare Filmora supports all popular video/audio/photo formats, including but not limited to AVI, MP4, MOV, MPEG, MPG, FLV, M4V, WMV, TS, MOD, TOD, VOB, MP3, WMA, M4A, JPG, PNG, BMP, and GIF. Then drag and drop the media files from the Media album to the video track on timline for editing

3. Add transitions between video and photo files
All clips will be played one by one without a gap. But no transition effects will be applied by default. To add transitions, switch to Transition tab and drag any transition to the joint of two clips from almost 200 transitions (when the white box appears, release your mouse). Now, you could also add transition at the end or start of a clip.

You can also change the transition mode among Overlap, Prefix, and Postfix by double-clicking on the transition on timeline

Tips and Tricks for Transition Effects
1. If you want to set the transition duration, it’s better to enlarge the Timeline view through the Zoom in tool or slider above the Timeline. Next, double click the transition thumbnail to open the setting panel and input the time. Click “Apply to All” if you want all transition effects to have the same duration.
2. To delete a transition, highlight it and click the Delete button in the toolbar above Timeline, or press Delete key on the keyboard.
3. If you especially love a transition, you can add it to Favorite by right clicking transition in the list and selecting “Add to Favorites” from the menu.
4Export video with transitions
When you are happy with your video and transition effects, click “Create” to save the video with transitions. You can save video in all popular formats on the computer by clicking “Format” and choosing a format from the list. If you want to play your video on iPod, iPhone, iPad, click “Device” and select a thumbnail of the device. It’s also available to upload your videos to YouTube to share with your friends. To play video on TV, you can burn it to DVD with your DVD burner.

In the end, if you have problems with adding transitions, please click here to get in touch with supporters.
Part 3: Add audio transitions
Filmora also allows you to add transitions between audio files. Using the fade-in and fade-out feature to make your audio process smoontly. With the complete new waveform and audio keyframing. Check this video to see the details about video transition in Filmora.
Download Mac Version ](https://tools.techidaily.com/wondershare/filmora/download/ )
Liza Brown
Liza Brown is a writer and a lover of all things video.
Follow @Liza Brown
Liza Brown
Mar 27, 2024• Proven solutions
Transition effects appear when one slide/clip replaces another one. It helps make the presentation, slideshow or movie good looking and impressive. Transition effects are widely used in and video editing software, such as Windows Movie Maker, iMovie, DVD Slideshow Builder, etc. You can also use transition sound effects to make amazing videos.
This article will show you how to add transitions (including video and audio transitions) between scenes and clips in Wondershare Filmora . Tips and tricks for transitions are also included.
How to Add Transitions Between clips
Part 1: Add video transitions
1. Download Wondershare Filmora
Wondershare Filmora is an easy-to-use while powerful video editing tool that is available both on Windows and Mac. Download it from the button below to get started.
Download Mac Version ](https://tools.techidaily.com/wondershare/filmora/download/ )
2. Import video/photos to the project
Before adding video/photo files to the Timeline, you need to import them first into the project. There are mainly 2 ways to import video/photo files: “Import” button on primary windows, or dragging and dropping files from Windows File Explorer to the User’s Album. Wondershare Filmora supports all popular video/audio/photo formats, including but not limited to AVI, MP4, MOV, MPEG, MPG, FLV, M4V, WMV, TS, MOD, TOD, VOB, MP3, WMA, M4A, JPG, PNG, BMP, and GIF. Then drag and drop the media files from the Media album to the video track on timline for editing
3. Add transitions between video and photo files
All clips will be played one by one without a gap. But no transition effects will be applied by default. To add transitions, switch to Transition tab and drag any transition to the joint of two clips from almost 200 transitions (when the white box appears, release your mouse). Now, you could also add transition at the end or start of a clip.
You can also change the transition mode among Overlap, Prefix, and Postfix by double-clicking on the transition on timeline
Tips and Tricks for Transition Effects
1. If you want to set the transition duration, it’s better to enlarge the Timeline view through the Zoom in tool or slider above the Timeline. Next, double click the transition thumbnail to open the setting panel and input the time. Click “Apply to All” if you want all transition effects to have the same duration.
2. To delete a transition, highlight it and click the Delete button in the toolbar above Timeline, or press Delete key on the keyboard.
3. If you especially love a transition, you can add it to Favorite by right clicking transition in the list and selecting “Add to Favorites” from the menu.
4Export video with transitions
When you are happy with your video and transition effects, click “Create” to save the video with transitions. You can save video in all popular formats on the computer by clicking “Format” and choosing a format from the list. If you want to play your video on iPod, iPhone, iPad, click “Device” and select a thumbnail of the device. It’s also available to upload your videos to YouTube to share with your friends. To play video on TV, you can burn it to DVD with your DVD burner.
In the end, if you have problems with adding transitions, please click here to get in touch with supporters.
Part 3: Add audio transitions
Filmora also allows you to add transitions between audio files. Using the fade-in and fade-out feature to make your audio process smoontly. With the complete new waveform and audio keyframing. Check this video to see the details about video transition in Filmora.
Download Mac Version ](https://tools.techidaily.com/wondershare/filmora/download/ )
Liza Brown
Liza Brown is a writer and a lover of all things video.
Follow @Liza Brown
The Hasty Guide to Altering Playback Rate in Sound Files
If you have a music file, and you notice that it is a bit slow or fast, making the entire ambiance kind of dull or overly exciting respectively, you can change audio speed to get the track right as per your mood. However, when you make any such adjustments, some unwanted effects can be experienced, such as format limitations while exporting, changes in the pitch of the sound, etc.
That said, here, you will learn how to change audio speed with the least adverse effects using some of the most popular and highly recommended tools.
How to Change Audio Speed in Filmora
Being a lightweight and less resource-intensive post-production tool, Filmora is admired by several professionals across the globe and is many times preferred over other editing programs like Adobe Premiere Pro and Final Cut Pro X. Easy-to-understand UI and large-sized, clearly visible options and buttons are what make Filmora extremely popular among those who are new to the industry and don’t have a computer with a powerful processor, gigantic memory, and enormous GPU.
For Win 7 or later (64-bit)
For macOS 10.12 or later
You can follow the steps given below to learn how to change audio speed with Wondershare Filmora:
Step 1: Import Audio and Add to Filmora Timeline
Launch Filmora on your Windows or Mac computer, make sure that the Media icon is selected from the standard toolbar at the top, click the + icon in the Media (also referred to as Library here) window (on Mac) or anywhere in the Media window itself (on Windows) from the upper-left corner of the interface, and import the audio file that you want to manage the playback speed of. Next, drag the media file from the Library to the timeline.

Step 2: Increase or Decrease Audio Speed
Ensure that the audio track is selected in the timeline. Click the Speedometer icon from the timeline toolbar at the upper section, hover mouse to the Slow option from the menu, and click your preferred value form the submenu to reduce the sound speed. Likewise, hover the mouse to the Fast option, and choose a value from the submenu to increase it.

Note: Usually, the audio pitch wouldn’t change as long as you pick the values anywhere between 0.5x and 5x. However, if you select any option beyond this range, you may experience variations in the pitch according the value you selected.
Step 3: Set Custom Speed or Reverse the Audio
Click the Speedometer icon from above the timeline, and click Custom Speed from the menu. Use the slider to slow down (move to the left) or speed up (move to the right) the audio on the Custom Speed box. Alternatively, you can manually enter your preferred value in the available field for granular control. In addition, you can also check the Reverse Speed box to reverse the audio if need be.

Step 4: Export the Output
Click EXPORT from the top-center area of the interface, go to the Local tab on the Export box that opens next, select your preferred audio format from the Format list in the left, make necessary customizations from the right pane, and click EXPORT from the bottom-right corner of the box to export the audio with the modified speed.

How to Change the Speed of Audio with Video in Filmora
The process to change audio speed that also has a video is identical to what is explained in the previous section. The only additional step required in this case is separating the audio track from that of video.
You can learn how to get this done by following the instructions given below:
Step 1: Import File to Media Window and then Add to Timeline
Use the method explained in Step 1 of the previous section to import a file to Filmora, drag the media to the timeline, and click MATCH TO MEDIA when the Project Setting box appears and prompts for confirmation. Note: Except for the Project Setting box, the rest of the process for adding audio and video files to the timeline is the same.
Step 2: Separate Audio from Video
Select and then right-click the video track with audio in the timeline, and click Detach Audio from the context menu.

Step 3: Adjust the Audio Speed
After the audio is detached, you can select the audio track and follow the method explained in the previous section to adjust its speed as needed. As for the video, you can use the trimming and cropping options to adjust its duration and size and export the entire project as explained in Step 4 of the previous section. Note: To export the project as video, all you need to do is, choose a video format like MP4 or something similar to that when on the Export box.
How to Change Audio Speed without Changing Pitch in Audacity for Free
One of the most downloaded, used, and admired applications, Audacity, is an open-source and free audio editing software available for Windows, Mac, and Linux computers in both x32 and x64 variants. The software has all the professionals’ tools for basic to advanced sound editing to produce industry-standard outputs.
You can follow the steps given below to learn how to change audio speed with Audacity without changing the pitch of the sound:
- Launch Audacity
- Click File
- Go to Import > Audio

- Import the audio you want to speed up or slow down
- Press Ctrl + A on the keyboard to select the whole audio track
- Go to the Effect menu
- Click Change Tempo

- In the Percent Change field, enter a value with or without minus (-) to reduce or increase the tempo of the audio respectively.

- Click OK
- Go to file> Export
- Select your preferred option from the submenu to export the modified audio as needed
Note: Changing the tempo usually doesn’t change the pitch of the audio up to some extent. However, you can expect some variations in the pitch if the new tempo value is too high or too low.
Conclusion
You may want to slow down or speed up audio if the existing one is not up to the mark, and you wish to manage the ambiance with the help of the music track either while playing a video or when merely a soundtrack is to be played during some event. In either case, the best tool for all your needs is Wondershare Filmora, and if you are looking for a program dedicated to audio only, Audacity is something worth trying.
Versatile Video Editor - Wondershare Filmora
An easy yet powerful editor
Numerous effects to choose from
Detailed tutorials provided by the official channel
For Win 7 or later (64-bit)
For macOS 10.12 or later
You can follow the steps given below to learn how to change audio speed with Wondershare Filmora:
Step 1: Import Audio and Add to Filmora Timeline
Launch Filmora on your Windows or Mac computer, make sure that the Media icon is selected from the standard toolbar at the top, click the + icon in the Media (also referred to as Library here) window (on Mac) or anywhere in the Media window itself (on Windows) from the upper-left corner of the interface, and import the audio file that you want to manage the playback speed of. Next, drag the media file from the Library to the timeline.
Step 2: Increase or Decrease Audio Speed
Ensure that the audio track is selected in the timeline. Click the Speedometer icon from the timeline toolbar at the upper section, hover mouse to the Slow option from the menu, and click your preferred value form the submenu to reduce the sound speed. Likewise, hover the mouse to the Fast option, and choose a value from the submenu to increase it.
Note: Usually, the audio pitch wouldn’t change as long as you pick the values anywhere between 0.5x and 5x. However, if you select any option beyond this range, you may experience variations in the pitch according the value you selected.
Step 3: Set Custom Speed or Reverse the Audio
Click the Speedometer icon from above the timeline, and click Custom Speed from the menu. Use the slider to slow down (move to the left) or speed up (move to the right) the audio on the Custom Speed box. Alternatively, you can manually enter your preferred value in the available field for granular control. In addition, you can also check the Reverse Speed box to reverse the audio if need be.
Step 4: Export the Output
Click EXPORT from the top-center area of the interface, go to the Local tab on the Export box that opens next, select your preferred audio format from the Format list in the left, make necessary customizations from the right pane, and click EXPORT from the bottom-right corner of the box to export the audio with the modified speed.
How to Change the Speed of Audio with Video in Filmora
The process to change audio speed that also has a video is identical to what is explained in the previous section. The only additional step required in this case is separating the audio track from that of video.
You can learn how to get this done by following the instructions given below:
Step 1: Import File to Media Window and then Add to Timeline
Use the method explained in Step 1 of the previous section to import a file to Filmora, drag the media to the timeline, and click MATCH TO MEDIA when the Project Setting box appears and prompts for confirmation. Note: Except for the Project Setting box, the rest of the process for adding audio and video files to the timeline is the same.
Step 2: Separate Audio from Video
Select and then right-click the video track with audio in the timeline, and click Detach Audio from the context menu.
Step 3: Adjust the Audio Speed
After the audio is detached, you can select the audio track and follow the method explained in the previous section to adjust its speed as needed. As for the video, you can use the trimming and cropping options to adjust its duration and size and export the entire project as explained in Step 4 of the previous section. Note: To export the project as video, all you need to do is, choose a video format like MP4 or something similar to that when on the Export box.
How to Change Audio Speed without Changing Pitch in Audacity for Free
One of the most downloaded, used, and admired applications, Audacity, is an open-source and free audio editing software available for Windows, Mac, and Linux computers in both x32 and x64 variants. The software has all the professionals’ tools for basic to advanced sound editing to produce industry-standard outputs.
You can follow the steps given below to learn how to change audio speed with Audacity without changing the pitch of the sound:
- Launch Audacity
- Click File
- Go to Import > Audio
- Import the audio you want to speed up or slow down
- Press Ctrl + A on the keyboard to select the whole audio track
- Go to the Effect menu
- Click Change Tempo
- In the Percent Change field, enter a value with or without minus (-) to reduce or increase the tempo of the audio respectively.
- Click OK
- Go to file> Export
- Select your preferred option from the submenu to export the modified audio as needed
Note: Changing the tempo usually doesn’t change the pitch of the audio up to some extent. However, you can expect some variations in the pitch if the new tempo value is too high or too low.
Conclusion
You may want to slow down or speed up audio if the existing one is not up to the mark, and you wish to manage the ambiance with the help of the music track either while playing a video or when merely a soundtrack is to be played during some event. In either case, the best tool for all your needs is Wondershare Filmora, and if you are looking for a program dedicated to audio only, Audacity is something worth trying.
Versatile Video Editor - Wondershare Filmora
An easy yet powerful editor
Numerous effects to choose from
Detailed tutorials provided by the official channel
Also read:
- Updated Reconstructing Clarity in Warped Audio A Step-by-Step Guide
- New 2024 Approved Leading Range Expanders A Comprehensive Review of Voice Modification Software
- Updated 3 Top-Ranked Online Tools for Enhancing Audio Clarity for 2024
- Updated Securing Your Google Voice Chats Phone & Desktop Recording Techniques Explained
- Updated Beats & Bits Creating Seamless Synchronization Between Soundtracks and Visuals in the 2023 Edition of FCPX for 2024
- New 2024 Approved Beginners Journey Into Freeware Audio Capture with Audacity
- Updated In 2024, Musical Memories Apply Free Melodies to Digital Images
- In 2024, Ideal Soundtracks The 15 Ultimate Music Selections for Diverse Film Projects
- Updated In 2024, 10 Budget-Friendly Tools for Effortless Audio to Text Transformation
- 2024 Approved Best Voice Changer Apps for iPhone and Android
- Updated 2024 Approved Proven Winners The Best 7 Audio Transitions You Can Download at Zero Price
- Updated Step-by-Step AutoTune Implementation for Audio Editors on Audacity for 2024
- Updated Cutting Through the Clutter Innovative AI Strategies for Signal Purification for 2024
- Streamlining Your Podcast Journey The Easy-to-Follow Path to Professional Audio for 2024
- New In 2024, Best Sound Mixer for Windows 10
- Curated List of Top 10 Song Tracks for Enhancing Visual Narratives
- Updated Unveiling the Top 6 Gratis Digital Audio Modification Software for 2024
- New In 2024, Enhancing Film Quality with Simplified Audio Layer Control in Premiere Pro 2023
- New 2024 Approved Essential Auditory Enhancers Eliminating Ambient Sounds Effectively
- New Explore the Finest 6 Mobile Applications for Instantaneous Voice Change
- Unlock Full Audio Range Deactivating Ducking Functionality in iOS
- Updated Clearing Up Your Digital Airwaves The Ultimate Guide to Online Audio Sanitization
- Updated In 2024, Winning Audio Editing Software Round-Up for Windows and Mac Users
- New Link and Paste Song File Within iMovie Narrative for 2024
- Enhancing Audio Clarity with iMovies Noise-Reduction Techniques
- 2024 Approved Tasteful Audio Enhancer for Video-Based Platforms
- New 2024 Approved AVS Audio Editor Product Details, Key Features, Reviews & Alternatives
- New Unveiling the Top 5 MP3 Converters and Mixers Optimized for macOS
- Updated 2024 Approved Convenient Language Alteration Software Examination of Functionality and Alternate Choices
- New In 2024, Find Clapping Sound Effect
- Updated Echoing Together Fusing Audio Elements to Enhance Video Experience
- Updated Cutting the Chatter A Guide to Isolating and Removing Vocals in Music Productions Using Audacity for 2024
- New The Ultimate Guide to Affordable Video Making Combining Visuals and Sound
- In 2024, How Do I SIM Unlock My iPhone 6?
- How does the stardust trade cost In pokemon go On Oppo Reno 11F 5G? | Dr.fone
- How To Unbrick a Dead Nokia G22 | Dr.fone
- How To Reset iPhone 12 Pro Max? | Dr.fone
- Full Guide to Bypass Honor X9a FRP
- Does Xiaomi Redmi Note 13 5G support MKV video files?
- New Voice to Text Mastering the Art of Accurate Transcription
- How to Bypass iCloud Lock from iPhone 15
- 4 Most-Known Ways to Find Someone on Tinder For Honor 80 Pro Straight Screen Edition by Name | Dr.fone
- In 2024, Video Formatting Made Easy Change Shape, Size, and Aspect Ratio
- In 2024, Easy Video Editing How to Freeze Frames Like a Pro in Minutes
- In 2024, How to Watch Hulu Outside US On Realme C51 | Dr.fone
- Spoofing Life360 How to Do it on Vivo V29? | Dr.fone
- New In 2024, Have You Seen the Facebook Cartoon App Everyones Using Recently
- Discover the Process of Slowing Down Time-Lapse Videos on Your iPhone for 2024
- In 2024, How to Unlock Apple iPhone SE with IMEI Code?
- Top 5 Car Locator Apps for Vivo Y200 | Dr.fone
- Pro Tips for Smoother Video Stabilizing Footage in Adobe Premiere Pro for 2024
- Recover your pictures after Oppo Reno 10 Pro+ 5G has been deleted.
- Sim Unlock Samsung Galaxy S23 Tactical Edition Phones without Code 2 Ways to Remove Android Sim Lock
- In 2024, Top 15 Augmented Reality Games Like Pokémon GO To Play On Oppo F25 Pro 5G | Dr.fone
- Fake Android Location without Rooting For Your Nubia Z50 Ultra | Dr.fone
- New In 2024, Boost Your Editing Speed 40 Expert-Level Keyboard Shortcuts for FCPX
- Title: New 2024 Approved Top 10 FREE Speech-to-Text Apps for Android & iOS,
- Author: David
- Created at : 2024-05-05 10:19:02
- Updated at : 2024-05-06 10:19:02
- Link: https://sound-tweaking.techidaily.com/new-2024-approved-top-10-free-speech-to-text-apps-for-android-and-ios/
- License: This work is licensed under CC BY-NC-SA 4.0.
