
:max_bytes(150000):strip_icc():format(webp)/handstypingonkeyboardCROPPED-6b13200ac0d24ef58817343cc4975ebd.jpg)
Navigating Spatial Audio Management A Guide to Efficient Ducking in Video Production for 2024
Navigating Spatial Audio Management: A Guide to Efficient Ducking in Video Production
What is Audio Ducking and How to Use it in Filmora: A Beginner-friendly Guide

Benjamin Arango
Mar 27, 2024• Proven solutions
If you are a content creator, you might already know the importance of having the right audio component in a video. For attaining a perfect balance between voiceovers and the background audio, the concept of “ducking” is implemented. I have come up with this post to help you know more about audio ducking and its importance. I will also include a detailed guide for implementing audio ducking on a video in a stepwise manner. Let’s begin!

- Part 1: What Is Audio Ducking?
- Part 2: When to Use Audio Ducking?
- Part 3: How to Use the Audio Ducking Feature in Filmora?
Audio Ducking: What Is It All About?
In nutshell, it is a process that “ducks” or lowers the background volume when a voiceover appears. For instance, let’s consider that we already have a background score in our video playing. When we would add a narrator’s voice or apply a voiceover, it would create a lot of confusion. Therefore, we implement the audio ducking process to lower the background audio and amplify the voiceover instead.
In most cases, it is achieved through a side-chain compression technique. A control channel is set up that enables the compression of one sound (the background) while amplifying another (the voiceover).


When Do You Need to Implement Audio Ducking?
Since the concept of audio ducking is pretty useful, it can be implemented in different ways during the video editing process. While you can apply the process to any video, here are some of the major instances where it is used.
Travel Vlogs
If you are a travel vlogger, you might already know how tough it can be to make yourself heard in a video. When there are too many background noises, your voice can be diminished. This is exactly where you can apply audio ducking to decrease the background noise and focus on your voice.
Make-up Tutorials
While creating make-up video tutorials, most of us use a background track to keep our viewers engaged. At the same time, you need to let them know about the process by speaking clearly. If you use audio ducking, then you can easily attain a perfect balance between both sounds.
Other Instances
Ideally, if you are creating any other tutorial video for your audience, then audio ducking can be useful. From making video game tutorials to coming up with video lectures on a crucial topic, the concept would come in handy time and time again.
How to Use the Audio Ducking Feature in Filmora?
To implement audio ducking in your videos, you can use a reliable editing tool like Wondershare Filmora . It is a user-friendly and powerful video editing application that lets you “duck” the background sound and easily amplify voiceovers.
- Without undergoing any complicated process, you can implement audio ducking and even scale it (from 1 to 100) to attain the right balance in your videos.
- Filmora also offers tons of powerful audio features for video editing. It has a dedicated audio mixer that would let you split, detach, split, or mute the audio.
- The application can also be used to add voiceovers to your video on its native interface. You can also use its inbuilt operations like noise remover, fade in/fade out, equalizer, etc. to make the needed changes.
- Besides audio ducking, you can also access tons of advanced editing features in Filmora like motion tracking, color grading, keyframing, and so much more.
- The application also offers a wide range of filters, presets, effects, stickers, and royalty-free music that you can easily use in your videos.
To learn how to implement audio ducking in your videos using Filmora, you can go through these basic steps:
Step 1. Import Your Videos on Filmora
To begin with, you have to install Wondershare Filmora on your computer and launch it. Now, go to the “Import” feature from the top, choose to add files, and browse and load your videos. After adding the video, you can drag it to the timeline below to start editing.

Step 2. Import An Audio or Record Voiceovers
Let’s suppose that your video already has an audio track in the background, and now you wish to add another audio component. Most of the people would like to record their voices in the video. For this, you can click on the voiceover (mic) icon at the bottom of the preview panel. This will open a dedicated window so that you can start recording your voice for the video.

Apart from that, you can also go to the “Import” feature to add any other audio component to the project. Besides that, Wondershare Filmora also has a wide range of royalty-free audio files that you can easily add to your projects.

Step 3. Apply Audio Ducking to Your Video
After adding the second audio component, you can view it under the video timeline on Filmora. Now, you need to select the audio track you wish to amplify (like your voiceover) and not the track that already has a prominent volume.

Once you have selected the audio you wish to amplify, right-click to get its context menu. Just select the “Adjust Audio” feature from all the available options.

This will launch a dedicated window on the screen with various audio options to apply. Go to the “Ducking” option here and enable the “Lower the volume of other clips” feature. You can also use a slider here to adjust how much you wish to lower the volume of other clips in the project.

That’s it! Once you have selected the value, click on the “OK” button. You can now preview the results on Filmora and check that the volume of other audio components has been ducked. You can later go to the “Export” option and save the project in the format of your choice.

After reading this post, I’m sure that you will know more about audio ducking and how we can implement it. Since many content creators encounter issues while working on their videos, audio ducking would certainly be a helpful feature. With an application like Wondershare Filmora, you can easily implement audio ducking on multiple files and further edit your videos like a pro!
Benjamin Arango
Benjamin Arango is a writer and a lover of all things video.
Follow @Benjamin Arango
Benjamin Arango
Mar 27, 2024• Proven solutions
If you are a content creator, you might already know the importance of having the right audio component in a video. For attaining a perfect balance between voiceovers and the background audio, the concept of “ducking” is implemented. I have come up with this post to help you know more about audio ducking and its importance. I will also include a detailed guide for implementing audio ducking on a video in a stepwise manner. Let’s begin!
- Part 1: What Is Audio Ducking?
- Part 2: When to Use Audio Ducking?
- Part 3: How to Use the Audio Ducking Feature in Filmora?
Audio Ducking: What Is It All About?
In nutshell, it is a process that “ducks” or lowers the background volume when a voiceover appears. For instance, let’s consider that we already have a background score in our video playing. When we would add a narrator’s voice or apply a voiceover, it would create a lot of confusion. Therefore, we implement the audio ducking process to lower the background audio and amplify the voiceover instead.
In most cases, it is achieved through a side-chain compression technique. A control channel is set up that enables the compression of one sound (the background) while amplifying another (the voiceover).
When Do You Need to Implement Audio Ducking?
Since the concept of audio ducking is pretty useful, it can be implemented in different ways during the video editing process. While you can apply the process to any video, here are some of the major instances where it is used.
Travel Vlogs
If you are a travel vlogger, you might already know how tough it can be to make yourself heard in a video. When there are too many background noises, your voice can be diminished. This is exactly where you can apply audio ducking to decrease the background noise and focus on your voice.
Make-up Tutorials
While creating make-up video tutorials, most of us use a background track to keep our viewers engaged. At the same time, you need to let them know about the process by speaking clearly. If you use audio ducking, then you can easily attain a perfect balance between both sounds.
Other Instances
Ideally, if you are creating any other tutorial video for your audience, then audio ducking can be useful. From making video game tutorials to coming up with video lectures on a crucial topic, the concept would come in handy time and time again.
How to Use the Audio Ducking Feature in Filmora?
To implement audio ducking in your videos, you can use a reliable editing tool like Wondershare Filmora . It is a user-friendly and powerful video editing application that lets you “duck” the background sound and easily amplify voiceovers.
- Without undergoing any complicated process, you can implement audio ducking and even scale it (from 1 to 100) to attain the right balance in your videos.
- Filmora also offers tons of powerful audio features for video editing. It has a dedicated audio mixer that would let you split, detach, split, or mute the audio.
- The application can also be used to add voiceovers to your video on its native interface. You can also use its inbuilt operations like noise remover, fade in/fade out, equalizer, etc. to make the needed changes.
- Besides audio ducking, you can also access tons of advanced editing features in Filmora like motion tracking, color grading, keyframing, and so much more.
- The application also offers a wide range of filters, presets, effects, stickers, and royalty-free music that you can easily use in your videos.
To learn how to implement audio ducking in your videos using Filmora, you can go through these basic steps:
Step 1. Import Your Videos on Filmora
To begin with, you have to install Wondershare Filmora on your computer and launch it. Now, go to the “Import” feature from the top, choose to add files, and browse and load your videos. After adding the video, you can drag it to the timeline below to start editing.
Step 2. Import An Audio or Record Voiceovers
Let’s suppose that your video already has an audio track in the background, and now you wish to add another audio component. Most of the people would like to record their voices in the video. For this, you can click on the voiceover (mic) icon at the bottom of the preview panel. This will open a dedicated window so that you can start recording your voice for the video.
Apart from that, you can also go to the “Import” feature to add any other audio component to the project. Besides that, Wondershare Filmora also has a wide range of royalty-free audio files that you can easily add to your projects.
Step 3. Apply Audio Ducking to Your Video
After adding the second audio component, you can view it under the video timeline on Filmora. Now, you need to select the audio track you wish to amplify (like your voiceover) and not the track that already has a prominent volume.
Once you have selected the audio you wish to amplify, right-click to get its context menu. Just select the “Adjust Audio” feature from all the available options.
This will launch a dedicated window on the screen with various audio options to apply. Go to the “Ducking” option here and enable the “Lower the volume of other clips” feature. You can also use a slider here to adjust how much you wish to lower the volume of other clips in the project.
That’s it! Once you have selected the value, click on the “OK” button. You can now preview the results on Filmora and check that the volume of other audio components has been ducked. You can later go to the “Export” option and save the project in the format of your choice.
After reading this post, I’m sure that you will know more about audio ducking and how we can implement it. Since many content creators encounter issues while working on their videos, audio ducking would certainly be a helpful feature. With an application like Wondershare Filmora, you can easily implement audio ducking on multiple files and further edit your videos like a pro!
Benjamin Arango
Benjamin Arango is a writer and a lover of all things video.
Follow @Benjamin Arango
“Streamline Your Soundscape: Online Strategies to Suppress Unwanted Noise in Videos”
The primary sound in the video has to be clear. The presence of background noise can affect the user experience multifold. Don’t you agree? Background noise is known as irrelevant noise from the environment. Most content creators record in open space for better light. However, it leads to ambient noise.
Therefore, it becomes crucial to deal with background noise. The article highlights the top three websites for this purpose. These online tools remove background noise online. We shall discuss their key features as well. It will help creative professionals make sane decisions. Right? Wondershare Filmora will also be previewed as audio and video editors.
So, what are we waiting for? Time to start!
In this article
01 3 Recommended Sites to Remove Background Noise Online Free
02 How to Remove Background Noise from Video on Windows and Mac
Part 1: 3 Recommended Sites to Remove Background Noise Online Free
Video recording through devices usually leaves you with background noises that must be removed from the video for perfect results. In other cases, before adding recorded audio across a video, you might have come across some background noise that needs to be treated effectively before finalizing the video for publishing. Under such circumstances, a background noise removal tool comes in handy.
To remove noise from video online free, we have sketched out three websites that offer the potential option of removing background noise. The platforms remove noise from video online in seconds. Let us have a look at what each of them brings to the table! Shall we?
Veed.io

The first source to remove background noise from video online is Veed.io. The tool got famous due to its extreme workability in audio and media. The content publishers and streamers use Veed.io to clean their audios and videos from annoying noises. The “Clean Audio” function works based on the length of the video.
If your file is larger, it might take a couple of minutes. Willing to know more? You can have a look at the features below:
- The interface is interactive enough for entry-level beginners.
- The media file can be uploaded from a device, Dropbox, or you can record it.
- Moreover, you can insert a YouTube link to clean the audio.
AudioToolSet

Next on the list, we have AudioToolSet. AudioToolSet is a great platform to remove noise from audio online free. You can drag and drop the targeted media file or browse your system. The supported file formats for AudioToolSet include MP3, WAV, FLAC, OGG. Also known as Noise Reducer, this online tool is famous as an MP3 noise removal online free.
Are you satisfied with Audio Tool Set? Let us know more!
- The maximum file size is 50MB for your media files.
- The dark mode can be used based on your workability.
- AudioToolSet is designed to clean audio recordings, and no tweaking is needed with the settings.
Audiodenoise.com

Audiodenoise.com removes background noise from audio online free. The online tool takes the concerns of podcasters, vloggers, and creators seriously. Additionally, the noise reduction feature can be tested through the demo files. Isn’t that a dream?
Audiodenoise.com has a noise model type to choose from. It includes Adapted distribution, Spectral subtraction, and Autoregressive model. The user is free to play with noise reduction and analysis block size. The values can be set according to preference.
Following are some key features of Audiodenoise.com:
- The user can set the temporal soothing of the input by adjusting the playhead.
- You can alter the noise modulation tracking based on how slow and fast you need.
- One is free to preview the output before downloading it.
Part 2: How to Remove Background Noise from Video on Windows and Mac
There is no shortage of video and audio editors in the market. Wouldn’t you agree? It is the very reason the users can get confused about their choice. It is essential to have a hands-on tool that promises advanced features with high-quality output.
Wondershare Filmora is recommended as it understands the user’s needs. Being compatible with Windows and Mac, Filmora can be relied upon for different functions. For instance, Filmora is great for audio denoise. It assists you in eliminating unwanted noise from the recorded content.
Essentially, the audio denoise function has a slider. It is based on Weak, Mid, and Strong that permits you to set the level for noise reduction. You can also trim audio clips, add a voice-over, and adjust the audio volume. The audio equalizer, audio mixer, and audio ducking are among the most exceptional tools of the lot.
Apart from audio editing, Filmora specializes in video editing . From video trimming to rotating and splitting video to cropping, Filmora offers a balanced editor for everyone. You are free to join video clips and create freeze frames. There is nothing Filmora ceases to excel in. Don’t you think? Do not hesitate to preview render and change the video playback speed.
Do you wish to remove background noise from the video? Are you looking for proper guidance to do so? Worry no more, as we are in the picture! The steps below are for Filmora to eliminate background noise from the video effortlessly.
For Win 7 or later (64-bit)
For macOS 10.12 or later
Step 1: Launching Wondershare Filmora
First, double-click on Wondershare Filmora’s icon to open it. Click on “New Project” as the interface pops up. Now, it is time to import the media. Click on “File” from the top panel. After that, select “Import Media” and then “Import Media Files.”

Step 2: Browsing the Media File
Browse the targeted video from your system. The video will be shown in the Media Library. Now, drag it to the timeline of the editor. The program displays a dialogue box regarding the frame rate of the media. You can either keep the project settings or match them to media settings.

Step 3: Using the “Audio Denoise” Function
Moving on, right-click on the video located in the timeline. Click on “Show Properties” from the menus that appear. The properties would appear for video, audio, color, and animation. Head to “Audio” and enable the “Audio Denoise” feature.

Step 4: Selecting the Range
Choose the range for noise reduction. Filmora presents Weak, Mid, and Strong. Choose as you desire and hit “OK.” The background noise will be eliminated effectively.

Step 5: Exporting the Video
Click on “Export” to save the final video. Input the file name and output location. You can also pick the quality you need. Hit “Export,” and you are done!

Wrapping Up
A raw video doesn’t have a visual or sensory impact. Don’t you agree? It is crucial to perform necessary edits to make it viable. The removal of background noise is important for a creative creator. Hence, the article featured three workable ways to remove background noise audio online. Wondershare Filmora was also introduced as the perfect audio and video editor in the business.
Versatile Video Editor - Wondershare Filmora
An easy yet powerful editor
Numerous effects to choose from
Detailed tutorials provided by the official channel
02 How to Remove Background Noise from Video on Windows and Mac
Part 1: 3 Recommended Sites to Remove Background Noise Online Free
Video recording through devices usually leaves you with background noises that must be removed from the video for perfect results. In other cases, before adding recorded audio across a video, you might have come across some background noise that needs to be treated effectively before finalizing the video for publishing. Under such circumstances, a background noise removal tool comes in handy.
To remove noise from video online free, we have sketched out three websites that offer the potential option of removing background noise. The platforms remove noise from video online in seconds. Let us have a look at what each of them brings to the table! Shall we?
Veed.io
The first source to remove background noise from video online is Veed.io. The tool got famous due to its extreme workability in audio and media. The content publishers and streamers use Veed.io to clean their audios and videos from annoying noises. The “Clean Audio” function works based on the length of the video.
If your file is larger, it might take a couple of minutes. Willing to know more? You can have a look at the features below:
- The interface is interactive enough for entry-level beginners.
- The media file can be uploaded from a device, Dropbox, or you can record it.
- Moreover, you can insert a YouTube link to clean the audio.
AudioToolSet
Next on the list, we have AudioToolSet. AudioToolSet is a great platform to remove noise from audio online free. You can drag and drop the targeted media file or browse your system. The supported file formats for AudioToolSet include MP3, WAV, FLAC, OGG. Also known as Noise Reducer, this online tool is famous as an MP3 noise removal online free.
Are you satisfied with Audio Tool Set? Let us know more!
- The maximum file size is 50MB for your media files.
- The dark mode can be used based on your workability.
- AudioToolSet is designed to clean audio recordings, and no tweaking is needed with the settings.
Audiodenoise.com
Audiodenoise.com removes background noise from audio online free. The online tool takes the concerns of podcasters, vloggers, and creators seriously. Additionally, the noise reduction feature can be tested through the demo files. Isn’t that a dream?
Audiodenoise.com has a noise model type to choose from. It includes Adapted distribution, Spectral subtraction, and Autoregressive model. The user is free to play with noise reduction and analysis block size. The values can be set according to preference.
Following are some key features of Audiodenoise.com:
- The user can set the temporal soothing of the input by adjusting the playhead.
- You can alter the noise modulation tracking based on how slow and fast you need.
- One is free to preview the output before downloading it.
Part 2: How to Remove Background Noise from Video on Windows and Mac
There is no shortage of video and audio editors in the market. Wouldn’t you agree? It is the very reason the users can get confused about their choice. It is essential to have a hands-on tool that promises advanced features with high-quality output.
Wondershare Filmora is recommended as it understands the user’s needs. Being compatible with Windows and Mac, Filmora can be relied upon for different functions. For instance, Filmora is great for audio denoise. It assists you in eliminating unwanted noise from the recorded content.
Essentially, the audio denoise function has a slider. It is based on Weak, Mid, and Strong that permits you to set the level for noise reduction. You can also trim audio clips, add a voice-over, and adjust the audio volume. The audio equalizer, audio mixer, and audio ducking are among the most exceptional tools of the lot.
Apart from audio editing, Filmora specializes in video editing . From video trimming to rotating and splitting video to cropping, Filmora offers a balanced editor for everyone. You are free to join video clips and create freeze frames. There is nothing Filmora ceases to excel in. Don’t you think? Do not hesitate to preview render and change the video playback speed.
Do you wish to remove background noise from the video? Are you looking for proper guidance to do so? Worry no more, as we are in the picture! The steps below are for Filmora to eliminate background noise from the video effortlessly.
For Win 7 or later (64-bit)
For macOS 10.12 or later
Step 1: Launching Wondershare Filmora
First, double-click on Wondershare Filmora’s icon to open it. Click on “New Project” as the interface pops up. Now, it is time to import the media. Click on “File” from the top panel. After that, select “Import Media” and then “Import Media Files.”
Step 2: Browsing the Media File
Browse the targeted video from your system. The video will be shown in the Media Library. Now, drag it to the timeline of the editor. The program displays a dialogue box regarding the frame rate of the media. You can either keep the project settings or match them to media settings.
Step 3: Using the “Audio Denoise” Function
Moving on, right-click on the video located in the timeline. Click on “Show Properties” from the menus that appear. The properties would appear for video, audio, color, and animation. Head to “Audio” and enable the “Audio Denoise” feature.
Step 4: Selecting the Range
Choose the range for noise reduction. Filmora presents Weak, Mid, and Strong. Choose as you desire and hit “OK.” The background noise will be eliminated effectively.
Step 5: Exporting the Video
Click on “Export” to save the final video. Input the file name and output location. You can also pick the quality you need. Hit “Export,” and you are done!
Wrapping Up
A raw video doesn’t have a visual or sensory impact. Don’t you agree? It is crucial to perform necessary edits to make it viable. The removal of background noise is important for a creative creator. Hence, the article featured three workable ways to remove background noise audio online. Wondershare Filmora was also introduced as the perfect audio and video editor in the business.
Versatile Video Editor - Wondershare Filmora
An easy yet powerful editor
Numerous effects to choose from
Detailed tutorials provided by the official channel
“13 Must-Have Gratis Audio Recording Programs for Windows/Mac Users - The Current Selection “
13 Free Music Production Software for Windows/Mac/Online
Benjamin Arango
Mar 27, 2024• Proven solutions
13 Free Music Production Software for Windows/Mac/Online
Technology advances have spread through all fields of human activity, including music recording and development. The invention of music development tools has made it simpler for people engaged in the creation of music in one form or another.
Numerous applications for music development are on the market, and some are meant for musicians, and others are for educators and teachers. There is also a need to direct prospective customers to the right free music production software.
A comprehensive analysis of some of the best music development tools has been conducted to help you make the correct decision while you’re ready to purchase the app. This comprehensive Music Production Software Guide will provide solutions to many of your unanswered questions relating to the purchase of music production software.
- Part 1: Free Music Production Software for Windows
- Part 2: Free Music Production Software for Mac
- Part 3: Free Music Production Software Online
Part 1: Free Music Production Software for Windows
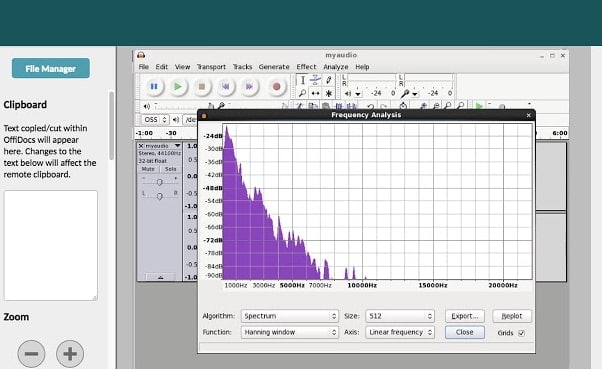
1. Audacity
The system for music development is not complete without an audio editor. Audacity is the best free music creation software available on the market. Audacity is open-source and extensive and provides a wide range of tools and effects for performing all audio editing and recording activities. It is created by a community of volunteers and provides regular notifications almost every month. It’s lightweight, safe, and intuitive enough to be used by novice music makers.
Pros
- It is open-source
- It can load VST plugins
Cons
- Only 32-bit plugins are allowed
- Limited features
2. Ardour
Ardour is a highly integrated program of music production that allows users to record and edit on Mac, Linux, and Windows operating systems. Ardour Music Production Software was created by integrating the efforts of the world’s skilled team, such as recording technicians, programmers, and musicians. Such experienced technicians make their concerted and thorough efforts to build the program. Ardour is one of the few applications in music production that respects honesty. The accessibility of this program allows app developers to concentrate on functionality that matters to consumers rather than to construct compelling apps for advertising purposes. This is a system that should be celebrated for its user-focused functionality.
Pros
- It has excellent user-friendliness
- It is available on Mac, Linux, and Windows
Cons
- It lacks a few integral features
- It is difficult to operate for people new to audio editing

3. Tracktion T7
The people at Tracktion seem to have reached a reasonably canny business model by launching older DAW versions for free and without anything removed.
The convention appears to make it possible to access the edition without charge of two iterations before the new one. You will not be provided with all new functionality, but you will receive an update every time the company updates its flagship DAW, which it does nearly every year.
The growing section is adjustable to match the workflow, and the bottom panel adjusts so that any parameters anywhere on the screen can be seen.
Pros
- It features an unlimited number of audio and MIDI tracks
- It is able to host multiple plugin formats
Cons
- It doesn’t provide all the features at once
- It does not support many plugins
4. LMMS
LMMS is a fully free music production software for windows for music development. It is an open-source and also a project platform for the community. LMMS is a cross-platform device app. It makes it easier to manufacture beats, particularly when many music production professionals have to manufacture quality music with their computers.
Thanks to the powerful sample, beat and melody design, mixing and synthetic sound processes, and many other features, the LMMS music production software provides high-quality audio output. The product also features playback tools, plugins, and samples to produce powerful, high-quality sound.
Pros
- It is compatible with Linux, Windows, and Mac
- Hydrogen project files and MIDI can be imported easily for editing
Cons
- It eats a lot of memory and requires a high-end device to support it
- Some users complained that understanding its working is difficult

5. Cakewalk
This is an exciting app for music production to purchase. It is a fantastic tech to invest in music production. Cakewalk Sonar Artist Software is one of Cakewalk Sonar Artist ‘s great productions. Cakewalk is known for an excellent GUI, an excellent mixing console, an excellent commercial radio system, and limitless MIDI tracks.
A good device to use as part of your instruments for the development of music is the Cakewalk Sonar Artist Music Production program. It stands out as a program packed with excellent features amongst its counterparts. And the app is unmatched in the area of apps.
Pros
- You can share music compilation directly to social media
- You can easily add effects to your tracks
Cons
- It is priced, very high
- One window interface makes it hectic

6. Music Maker by Magix
This app is a special program for sound engineers, skilled musicians, and accomplished music producers, developed by US Magix Entertainment. It offers an excellent forum for creative music development in music production professionals.
In reality, the software for music production is excellent software for the Music Maker by Magix. In the field of music post-production and music mastering, mixing and arrangement, recording, and more, the software achieved remarkable breakthroughs. Thanks to the successful combination of a technical device and highly flexible workflow, the Music Maker by Magix has achieved this groundbreaking success.
With creative algorithm and superb plugin effects, the Music Maker by Magix program enables music manufacturers to develop their ideas in line with the highest quality in this industry.
Pros
- It is great for EDM producers
Cons
- It is not suitable for newbies
- The GUI feels a bit cluttered
Part 2: Free Music Production Software for Mac
7. Garageband
This is a music development studio app that is designed to function on Mac. It is a great free music production software for Mac. This software has a full sound collection, which includes virtual instruments, voice, and guitar preset.
GarageBand is a well-known app for music development and is an excellent tool for music beginners. Many people have chosen GarageBand because it does not match the ease and ease of use for recording purposes in particular.
The user-friendly interface makes you easy to create music with a more unobstructed view of what you’re recording. Apps from GarageBand captured the attention of others because of their ease-to-use and user-friendliness.
Pros
- The software offers some nicely packaged preset for vocal and guitar recording
- Productive workflow
Cons
- It has limited plugins
- It is only supported for Mac platforms

8. Ableton Live
The Ableton Live 10 Suite is a dynamic and comprehensive program for the creation and performance of musical recordings.
An essential feature of this software is that it allows you to work on your time-based workflow without affecting the live session. This means that the software gives you a rare chance to get involved with the workflow without stopping live performance.
The Multitrack Recording Technology of Ableton Live10 Suite allows music producers to adjust the speed and pacing of any audio during the recording. To make these adjustments, you don’t have to pause the recording. This is one of the striking characteristics which makes this product a good option for all.
Pros
- Adjusting the speed and pace of audio is a delight
- Sophisticated MIDI/audio routing capabilities
Cons
- It has a traditional design
- Not enough updates to fix the buggy features

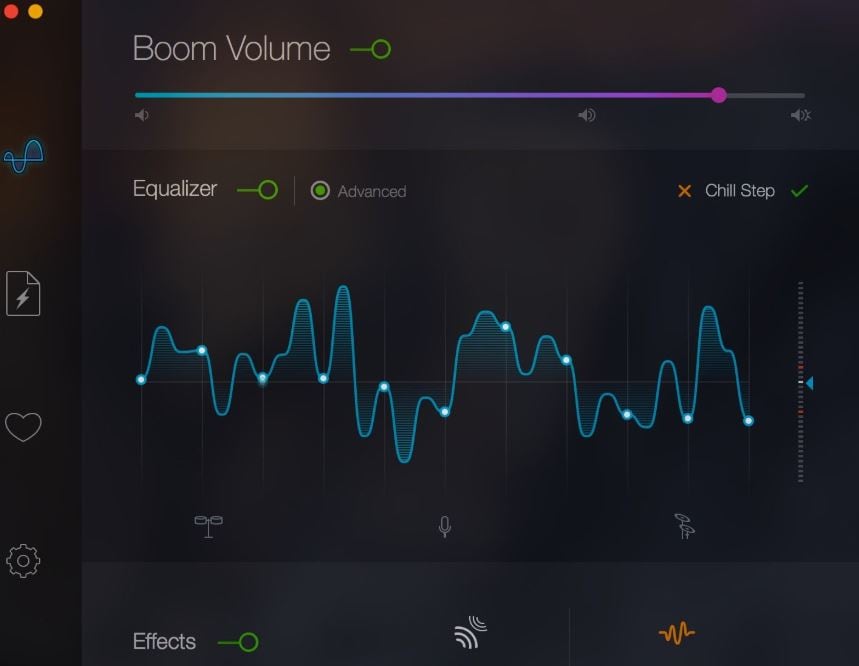
9. Boom 3D
Boom 3D for Mac & Windows is an award-winning pro sound improvement software designed to play your media content on any and all of your devices, phones, or streaming services with amazing 3D effects. No costly headphones or sound boosters will be needed to make your music feel like it! Designed in a new immersive 3D surround sound technology, Boom 3D redefines how people listen to music, watch films, or play games with some headphones on their devices. 3D sound provides the option to check the LFE (subwoofer), and the audio intensity of each Virtual 3D Surround audio system speaker.
Pros
- It comes with loads of content
- Audio quality can be enhanced
Cons
- The design is not suitable for everybody
- It does not have a Linux version
10. Mixxx
For beginners, Mixxx is just another great device. This is also one of the best free music production software downloads for your music. This software supports all Mac, Windows, and Linux platforms.
The application provides you with a DJ-mixing environment and supports all standard formats such as Mp3 and many other formats.
Pros
- It is a great app for beginners
- Supported by Mac, Windows, and Linux
Cons
- It doesn’t support many plugins
- GUI isn’t that great

Part 3: Free Music Production Software Online
11. Soundation
Soundation is a platform that provides free music production software online only capabilities. The free version and three paid versions are offered. You can use this to build your tracks unless you have the resources to do so if you need a web-based music maker and editor.
If you pay, even after you have made your music, you can always cancel. Remember first to save them to your hard drive. If you need paid characteristics, pay for the monthly plan again through PayPal, and you have to use it for a month.
Pros
- Great SSL-modelled mixer
- You can use its devices as a plugin
Cons
- It works only online

12. Audiotool
Audiotool is a popular app for music production hosted online and can be used without installation from inside your browser. It uses a cloud-based network to store all your music and files wherever you are. It is also confirmed that you will share music and tracks directly with YouTube, SoundCloud, and Facebook on its own publishing site. They have premium releases from Loopmasters and some fantastic online VSTs, for example, Heisenberg, Machiniste, Bassline, and Beatbox 8 & 9.
Pros
- No installation needed
- You can directly share it to your social media
Cons
- It works only online
- No upgrades

13. Soundtrap
Soundtrap is not only an online music studio but a training site for students and instructors. The STEAM Curriculum is an online learning resource that helps students to follow music and podcasts, incorporated into the Web app. As we mentioned earlier, in addition to the online Web App, you can also use it on different devices, share it with other users, and work in innovative projects for your music.
The interface is simple, easy to use, and easy to understand. It is simply an instrument for innovation; you don’t have to learn how to apply VST or any other technical elements to music creation. You can also record your MIDI instruments directly from your machine or device’s mic.
Pros
- It provides a great platform for teachers to teach their students
- It is very easy to use
Cons
- It only has a limited number of plugins
- It cannot be used professionally

Conclusion
If you make music on a computer, the most important resource in your artistic arsenal is your DAW; in your home recording system, you ‘re probably going to have the MIDI keyboard, audio interface, studio monitor speakers, and maybe a microphone or two. But your program is at the core of it all. Not everyone can afford expensive DAWs, but one must not worry as free music production software are present to aid us.
It is important to have a DAW with which you are pleased and, perhaps more importantly, a DAW, which allows you to turn your ideas into music as quickly and painlessly as possible. So make sure you choose the best one for you according to your needs. Hopefully, this guide will aid you!

Benjamin Arango
Benjamin Arango is a writer and a lover of all things video.
Follow @Benjamin Arango
Benjamin Arango
Mar 27, 2024• Proven solutions
13 Free Music Production Software for Windows/Mac/Online
Technology advances have spread through all fields of human activity, including music recording and development. The invention of music development tools has made it simpler for people engaged in the creation of music in one form or another.
Numerous applications for music development are on the market, and some are meant for musicians, and others are for educators and teachers. There is also a need to direct prospective customers to the right free music production software.
A comprehensive analysis of some of the best music development tools has been conducted to help you make the correct decision while you’re ready to purchase the app. This comprehensive Music Production Software Guide will provide solutions to many of your unanswered questions relating to the purchase of music production software.
- Part 1: Free Music Production Software for Windows
- Part 2: Free Music Production Software for Mac
- Part 3: Free Music Production Software Online
Part 1: Free Music Production Software for Windows
1. Audacity
The system for music development is not complete without an audio editor. Audacity is the best free music creation software available on the market. Audacity is open-source and extensive and provides a wide range of tools and effects for performing all audio editing and recording activities. It is created by a community of volunteers and provides regular notifications almost every month. It’s lightweight, safe, and intuitive enough to be used by novice music makers.
Pros
- It is open-source
- It can load VST plugins
Cons
- Only 32-bit plugins are allowed
- Limited features
2. Ardour
Ardour is a highly integrated program of music production that allows users to record and edit on Mac, Linux, and Windows operating systems. Ardour Music Production Software was created by integrating the efforts of the world’s skilled team, such as recording technicians, programmers, and musicians. Such experienced technicians make their concerted and thorough efforts to build the program. Ardour is one of the few applications in music production that respects honesty. The accessibility of this program allows app developers to concentrate on functionality that matters to consumers rather than to construct compelling apps for advertising purposes. This is a system that should be celebrated for its user-focused functionality.
Pros
- It has excellent user-friendliness
- It is available on Mac, Linux, and Windows
Cons
- It lacks a few integral features
- It is difficult to operate for people new to audio editing
3. Tracktion T7
The people at Tracktion seem to have reached a reasonably canny business model by launching older DAW versions for free and without anything removed.
The convention appears to make it possible to access the edition without charge of two iterations before the new one. You will not be provided with all new functionality, but you will receive an update every time the company updates its flagship DAW, which it does nearly every year.
The growing section is adjustable to match the workflow, and the bottom panel adjusts so that any parameters anywhere on the screen can be seen.
Pros
- It features an unlimited number of audio and MIDI tracks
- It is able to host multiple plugin formats
Cons
- It doesn’t provide all the features at once
- It does not support many plugins
4. LMMS
LMMS is a fully free music production software for windows for music development. It is an open-source and also a project platform for the community. LMMS is a cross-platform device app. It makes it easier to manufacture beats, particularly when many music production professionals have to manufacture quality music with their computers.
Thanks to the powerful sample, beat and melody design, mixing and synthetic sound processes, and many other features, the LMMS music production software provides high-quality audio output. The product also features playback tools, plugins, and samples to produce powerful, high-quality sound.
Pros
- It is compatible with Linux, Windows, and Mac
- Hydrogen project files and MIDI can be imported easily for editing
Cons
- It eats a lot of memory and requires a high-end device to support it
- Some users complained that understanding its working is difficult
5. Cakewalk
This is an exciting app for music production to purchase. It is a fantastic tech to invest in music production. Cakewalk Sonar Artist Software is one of Cakewalk Sonar Artist ‘s great productions. Cakewalk is known for an excellent GUI, an excellent mixing console, an excellent commercial radio system, and limitless MIDI tracks.
A good device to use as part of your instruments for the development of music is the Cakewalk Sonar Artist Music Production program. It stands out as a program packed with excellent features amongst its counterparts. And the app is unmatched in the area of apps.
Pros
- You can share music compilation directly to social media
- You can easily add effects to your tracks
Cons
- It is priced, very high
- One window interface makes it hectic
6. Music Maker by Magix
This app is a special program for sound engineers, skilled musicians, and accomplished music producers, developed by US Magix Entertainment. It offers an excellent forum for creative music development in music production professionals.
In reality, the software for music production is excellent software for the Music Maker by Magix. In the field of music post-production and music mastering, mixing and arrangement, recording, and more, the software achieved remarkable breakthroughs. Thanks to the successful combination of a technical device and highly flexible workflow, the Music Maker by Magix has achieved this groundbreaking success.
With creative algorithm and superb plugin effects, the Music Maker by Magix program enables music manufacturers to develop their ideas in line with the highest quality in this industry.
Pros
- It is great for EDM producers
Cons
- It is not suitable for newbies
- The GUI feels a bit cluttered
Part 2: Free Music Production Software for Mac
7. Garageband
This is a music development studio app that is designed to function on Mac. It is a great free music production software for Mac. This software has a full sound collection, which includes virtual instruments, voice, and guitar preset.
GarageBand is a well-known app for music development and is an excellent tool for music beginners. Many people have chosen GarageBand because it does not match the ease and ease of use for recording purposes in particular.
The user-friendly interface makes you easy to create music with a more unobstructed view of what you’re recording. Apps from GarageBand captured the attention of others because of their ease-to-use and user-friendliness.
Pros
- The software offers some nicely packaged preset for vocal and guitar recording
- Productive workflow
Cons
- It has limited plugins
- It is only supported for Mac platforms
8. Ableton Live
The Ableton Live 10 Suite is a dynamic and comprehensive program for the creation and performance of musical recordings.
An essential feature of this software is that it allows you to work on your time-based workflow without affecting the live session. This means that the software gives you a rare chance to get involved with the workflow without stopping live performance.
The Multitrack Recording Technology of Ableton Live10 Suite allows music producers to adjust the speed and pacing of any audio during the recording. To make these adjustments, you don’t have to pause the recording. This is one of the striking characteristics which makes this product a good option for all.
Pros
- Adjusting the speed and pace of audio is a delight
- Sophisticated MIDI/audio routing capabilities
Cons
- It has a traditional design
- Not enough updates to fix the buggy features
9. Boom 3D
Boom 3D for Mac & Windows is an award-winning pro sound improvement software designed to play your media content on any and all of your devices, phones, or streaming services with amazing 3D effects. No costly headphones or sound boosters will be needed to make your music feel like it! Designed in a new immersive 3D surround sound technology, Boom 3D redefines how people listen to music, watch films, or play games with some headphones on their devices. 3D sound provides the option to check the LFE (subwoofer), and the audio intensity of each Virtual 3D Surround audio system speaker.
Pros
- It comes with loads of content
- Audio quality can be enhanced
Cons
- The design is not suitable for everybody
- It does not have a Linux version
10. Mixxx
For beginners, Mixxx is just another great device. This is also one of the best free music production software downloads for your music. This software supports all Mac, Windows, and Linux platforms.
The application provides you with a DJ-mixing environment and supports all standard formats such as Mp3 and many other formats.
Pros
- It is a great app for beginners
- Supported by Mac, Windows, and Linux
Cons
- It doesn’t support many plugins
- GUI isn’t that great
Part 3: Free Music Production Software Online
11. Soundation
Soundation is a platform that provides free music production software online only capabilities. The free version and three paid versions are offered. You can use this to build your tracks unless you have the resources to do so if you need a web-based music maker and editor.
If you pay, even after you have made your music, you can always cancel. Remember first to save them to your hard drive. If you need paid characteristics, pay for the monthly plan again through PayPal, and you have to use it for a month.
Pros
- Great SSL-modelled mixer
- You can use its devices as a plugin
Cons
- It works only online
12. Audiotool
Audiotool is a popular app for music production hosted online and can be used without installation from inside your browser. It uses a cloud-based network to store all your music and files wherever you are. It is also confirmed that you will share music and tracks directly with YouTube, SoundCloud, and Facebook on its own publishing site. They have premium releases from Loopmasters and some fantastic online VSTs, for example, Heisenberg, Machiniste, Bassline, and Beatbox 8 & 9.
Pros
- No installation needed
- You can directly share it to your social media
Cons
- It works only online
- No upgrades
13. Soundtrap
Soundtrap is not only an online music studio but a training site for students and instructors. The STEAM Curriculum is an online learning resource that helps students to follow music and podcasts, incorporated into the Web app. As we mentioned earlier, in addition to the online Web App, you can also use it on different devices, share it with other users, and work in innovative projects for your music.
The interface is simple, easy to use, and easy to understand. It is simply an instrument for innovation; you don’t have to learn how to apply VST or any other technical elements to music creation. You can also record your MIDI instruments directly from your machine or device’s mic.
Pros
- It provides a great platform for teachers to teach their students
- It is very easy to use
Cons
- It only has a limited number of plugins
- It cannot be used professionally
Conclusion
If you make music on a computer, the most important resource in your artistic arsenal is your DAW; in your home recording system, you ‘re probably going to have the MIDI keyboard, audio interface, studio monitor speakers, and maybe a microphone or two. But your program is at the core of it all. Not everyone can afford expensive DAWs, but one must not worry as free music production software are present to aid us.
It is important to have a DAW with which you are pleased and, perhaps more importantly, a DAW, which allows you to turn your ideas into music as quickly and painlessly as possible. So make sure you choose the best one for you according to your needs. Hopefully, this guide will aid you!
Benjamin Arango
Benjamin Arango is a writer and a lover of all things video.
Follow @Benjamin Arango
Also read:
- Your First Guide to iPhone Audio Transformation Voice Changer Plus Explained
- New 2024 Approved Captivating Sound Design Essentials Review of Premier Audio Editors, Pros & Cons
- The Ultimate Compilation of Free Sound Amplitude Balancers
- New In 2024, Troubleshooting Sound Quality Strategies for Easing Audio Deformation
- In 2024, The Engineers Dream Set-Up Unveiling the Five Cutting-Edge Audio Ducking Programs
- New In 2024, Enhance Your Phone Conversations with These Top 6 Audio Upgrade Apps (For Android and iOS)
- 2024 Approved Scouting for Professional Recordings of Wolves Howling Sessions
- Updated Inverted Soundscapes The Premier Backwards Music Videos
- New Cataloging Extensive Canine Acoustic Effects Online for 2024
- Peer-to-Peer Dialogue Hubs A Review of Reliable, User-Friendly & Amusing Applications
- New In 2024, Tutorial Walkthrough Getting the Most Out of Your Experience with Adobe Audition
- Updated In 2024, Amplifying the Listener Experience Where to Obtain Professional Podcast Sound Effects
- New Unveiling the Essence of Sound Pairing Waveforms with Dynamic Animations for Adobe Premiere Pro Creatives
- Updated In 2024, The Editors Guide to Beat Matching Seamless Integration of Music and Motion in FCPX
- Elevating Your Listenership Experience The Highest-Rated 7 Audio Converters for Online Broadcasts for 2024
- New In 2024, Silencing the Chatter Essential Methods for Muting TikTok Audio
- Updated Cutting Out Clutter Strategies to Refine Audible Landscapes with Web-Based Audio Processors
- Updated 2024 Approved Mastering PC Speaker Capture with Audacity A Step-by-Step Guide
- New Serene Chorus Compilation for Your Anniversary Celebration Recording 2 Written as an Instruction, Not the Solution. Here Is the Corrected Version with Instructions and Their Corresponding Solutions
- Transform Your Media Experience A Compilation of Premium Online & Offline Conversion Apps (Free)
- New 2024 Approved 10 Secure Online Forums Dedicated to Meeting Fellow Netizens
- In 2024, Add Music to Video Online for Free 6 Ways
- The Ultimate Guide Disabling Audio for Windows 10 Films Without Extras for 2024
- New The Comprehensive Selection Guide to No-Cost, High-Performance Voice Logging Tools for 2024
- 2024 Approved Infuse Harmonies Into Motion Picture Sequences Using Media Encrypter
- New 2024 Approved Eliminating Audible Hum Techniques for Silence in Recorded Sounds
- New In 2024, Where to Find Custom Game Audio Packages
- New 10 Charming Voice Alteration Methods to Lighten Up Telephone Dialogues
- Maximize Audio Clarity Top Tools and Methods to Remove Microphonic Disturbances
- Show Audio Waveform and Add Waveform Animation in Final Cut ProTuto for 2024
- Updated The Ultimate Guide to Audio-Based Text Extraction Techniques
- New In 2024, Haunting Harmonics Procuring Disturbing Sound Effects for Creatives
- 2024 Approved The Ultimate Guide to Celebrity Voice Transformation A Review of Top Sound Enhancers, Tools & Techniques
- New In 2024, All About Anime Dubbing - Definition, Process, Cases & Tips
- In 2024, Top 10 Gaming Voice Modification Tools Rankings and Analysis
- Updated 2024 Approved Perfecting Your Home Studios Auditory Experience (A 2023 Guide)
- 2024 Approved The Ultimate Guide to Choosing a Top 10 Windows & macOS Digital Audio Workstation
- 2024 Approved Beyond Audacity The Definitive Guide to the Top 10 Multitrack Recording Applications
- Updated 2024 Approved Unlock the Power of Seamless Movement with These 7 Trendy Transition Audio Files (No Cost)
- Updated In 2024, Auditory Accents for Your GIFs A Comprehensive Guide for Apple Computers
- In 2024, Audio Sanitization Made Simple A Guide to Voice-Less Video Enhancement
- In 2024, The Novices Blueprint for Efficient Audio Track Mixing in Adobe Premiere Pro
- Locating Hilarious Audio Effects Online for 2024
- Updated From Recording to Broadcast Creating Professional Podcasts in Audacity
- New Add Song to iMovie
- Updated 2024 Approved Symphony of Screens The Best Music Pairings for Every Type of Video Content
- Updated In 2024, The Puzzle of Production Piecing Together Roles for an Immersive Filming Experience
- Updated In 2024, Voice Purging Protocols The Six Key Steps to a Vocally Cleansed Audio Track via Adobe Audition
- In 2024, Full Tutorial to Bypass Your Xiaomi Civi 3 Disney 100th Anniversary Edition Face Lock?
- Updated 2024 Approved VN Video Editor App Review Pros and Cons
- Updated In 2024, How to Use Emojis on Windows 10 and Windows 11?
- A Comprehensive Guide to iCloud Unlock On Apple iPhone 15 Online
- In 2024, Full Guide to Fix iToolab AnyGO Not Working On Honor X9a | Dr.fone
- How To Transfer Data From iPhone XS To Other iPhone devices? | Dr.fone
- Cannot play MKV files on Motorola G54 5G
- How to Simulate GPS Movement in AR games On Itel P40? | Dr.fone
- Updated Get in Sync The Best Lip Sync Video Editing Apps for Mobile for 2024
- Updated 2024 Approved Ready to Animate Game Character From Scratch?
- How to Unlock Nubia Red Magic 9 Pro Pattern Lock if Forgotten? 6 Ways
- Updated A Closer Look at VN Video Editor Pro Pros, Cons, and Everything in Between for 2024
- In 2024, Lock Your Poco M6 Pro 5G Phone in Style The Top 5 Gesture Lock Screen Apps
- How To Reset the Security Questions of Your Apple ID From Your iPhone 6s
- In 2024, Latest way to get Shiny Meltan Box in Pokémon Go Mystery Box On Honor 70 Lite 5G | Dr.fone
- In 2024, How to Stream Apple iPhone 15 to Computer? | Dr.fone
- In 2024, How to Fake GPS on Android without Mock Location For your Vivo Y200 | Dr.fone
- Play Store Stuck on Downloading Of Motorola Moto G23? 7 Ways to Resolve | Dr.fone
- 2024 Approved Online Calculate and Change Video Aspect Ratio
- In 2024, How To Remove or Bypass Knox Enrollment Service On Xiaomi Redmi Note 13 Pro+ 5G
- How to Remove iPhone 13 Pro Max SIM Lock?
- In 2024, Which Pokémon can Evolve with a Moon Stone For Apple iPhone SE (2020)? | Dr.fone
- In 2024, 8 Safe and Effective Methods to Unlock Your Apple iPhone 6 Without a Passcode
- 2024 Approved Ultimate Guide on How to Plan and Storyboard a Music Video
- New In 2024, Finest Text-to-Speech Male Voice Tools for Natural Output
- Updated 2024 Approved Effortless Video Editing The Most User-Friendly Software Options
- Things You Should Know When Unlocking Total Wireless Of Apple iPhone 14 Plus | Dr.fone
- 2024 Approved Top-Rated Free Video Editing Software for 4K Footage
- In 2024, Proven Ways in How To Hide Location on Life360 For Honor X7b | Dr.fone
- In 2024, What Does Jailbreaking iPhone SE i Do? Get Answers here
- Updated Maximize Your Reach A Guide to Optimizing Social Media Aspect Ratios
- In 2024, How To Track IMEI Number Of Xiaomi Redmi Note 12 Pro+ 5G Through Google Earth?
- Updated The Best Things in Life Are Free Top 10 FCPX Plugins at No Cost for 2024
- What to do if your iPhone XR has bad ESN or blacklisted IMEI?
- In 2024, How to Mirror Your Samsung Galaxy F04 Screen to PC with Chromecast | Dr.fone
- Updated 2024 Approved This Article Will Show You How to Clone Yourslef in Videos with Filmora
- Unlock Your Vivo V29 Pro Phone with Ease The 3 Best Lock Screen Removal Tools
- Easy Fixes How To Recover Forgotten iCloud Password From your iPhone 12
- Mask Tracking with Adobe Premiere Pro A Detailed Guide for 2024
- In 2024, How To Remove Flashlight From Apple iPhone 8 Plus Lock Screen
- Step Into the Future Converting Videos for Virtual Reality for 2024
- Title: Navigating Spatial Audio Management A Guide to Efficient Ducking in Video Production for 2024
- Author: David
- Created at : 2024-05-20 05:45:49
- Updated at : 2024-05-21 05:45:49
- Link: https://sound-tweaking.techidaily.com/navigating-spatial-audio-management-a-guide-to-efficient-ducking-in-video-production-for-2024/
- License: This work is licensed under CC BY-NC-SA 4.0.
