
:max_bytes(150000):strip_icc():format(webp)/dormroomentfeatured-5b5e9dd3c9e77c004f28632e.jpg)
Mastering Sound Silence Essential Techniques for Noise Reduction with Offline and Online Solutions for 2024
Mastering Sound Silence: Essential Techniques for Noise Reduction with Offline and Online Solutions
Videos are like a hook that keeps us engaged for a good long time. Similarly, they are a great medium of information and entertainment. Good video content help us learn better and to memorize the information in it. However, this can be a problem when videos have issues like annoying background noises. Even distortion or jittery sound can turn a good-quality video into a poor source.
Nevertheless, there is a solution to almost every problem. There are tools that can help to remove distortion and background noises from a video. Such tools will help you reduce audio noise in the background or any distortion in your media file. You can download such software that will help you denoise your media content. In this way, your content will sound crispier and sharper with better audio quality.
Part 1: What Are The Benefits of Audio Denoising in Videos?
There are tools that will help you reduce noise from audio without any hassle. Such tools are very useful when it comes to removing distortion from your audio files. You can also denoise your files, but first, learn some of the benefits of audio denoising.
1. Clear Sound Quality
Audio denoising help to clear any unwanted noise, hiss, or any other background voice. This feature helps to improve the overall listening experience of the user. Once all the distortion is removed, the audio of your project will sound better and more polished.
2. Optimized Communication
Having clear and clean audio is important in videos for effective communication. Moreover, it makes sure that viewers can easily understand the dialogue or message. Better sound quality also improves the overall communication within the project or a video.
3. Professional and Factual
When there’s background noise or disturbances in the audio, the content appears to be faulty. It also can make the video less professional and not as trustworthy. If we remove the background noise, it helps the video to look more meaningful and professional.
4. Enhanced Audience Involvement
Clean sound keeps people interested and helps them stay attentive to the story. Moreover, people tend to be hooked more to the information in the video. It helps viewers to stay engaged, follow what’s happening, and enjoy watching the video.
5. Availability and Diversity
Reducing background noise makes the speech clearer and easier to follow. Additionally, when subtitles or captions are available, then it makes the video more captivating. This makes the videos more accessible to more people with diverse backgrounds.
6. Adjustable Editing Opportunities
Removing unwanted noise from the audio while editing a video gives us more flexibility. By doing so, you can work on your project later. Clean audio allows us to make accurate changes to the sound, like adjusting the volume or adding effects. Additionally, it makes your audio file better than before.
7. Uniformity and Uninterrupted Flow
By eliminating noise, each video part will have a similar sound profile. Meanwhile, this will create a smooth and uninterrupted audio experience for the viewers. Consistent audio quality is important in providing a seamless and unified viewing experience.
8. Audio Reconstruction
Eliminating such noises from audio is very helpful for fixing older or damaged recordings. It enhances the quality and makes it easier to understand audio. You can even reconstruct your old audio files and keep them safe. This will also help you to improve the quality of your old audio files.
Part 2: Wondershare Filmora: How To Denoise Audio Properly?
Wondershare Filmora is a comprehensive video editing software that features many effective video management tools . From video editing to denoise audio editing, everything is possible in Filmora. For those who are new to this tool, Filmora makes it very easy to manage such videos. To know how you can using Wondershare Filmora, look below into the steps:
Reduce Video/Audio Noise For Win 7 or later(64-bit)
Reduce Video/Audio Noise For macOS 10.14 or later


Step 1Add Audio with Noise on Filmora
On opening Filmora on your computer, continue to select the “New Project” button from the home screen. As this opens a window, continue to the “Import” options to add in the video or audio that needs editing. Drag and drop it to the timeline to continue with free audio noise removal.

Step 2Adjust Audio Settings
As the media is imported successfully, right-click to open a list of options. Select “Adjust Audio” from the drop-down menu to open the audio settings on the screen.

Step 3Successfully Denoise Audio
In the “Denoise” section, you can activate options such as “AI Speech Enhancement,” “Wind Removal,” and “Normal Denoise.” Also, you can set the sliders of “DeReverb,” “Hum Removal,” and “Hiss Removal.” After correcting the audio, click the “Export” button for opening the window to save the final product.

Part 3: Online Solutions: Reduce Audio Noise With The Right Tools
Your noise distortion or annoying background sounds is no more a hassle. These top 3 free audio noise removal online tools will help you with your problem. In this section, the steps of how to use these audio deniosers are also provided.
1. Media.io
Media.io is one of the most comprehensive video enhancers and editors out there. It can improve the quality of your images and also can edit your videos in a breeze. Besides this, it is also a great online audio noise reducer. You can import your audio files and simply let the tool eliminate all the distortion from your file.
Step 1: Access the online tool by going to its website. As you continue next, select the “Remove Noise Now” button to lead to a new window. Then, drag and drop your audio file from your system.

Step 2: Next, in the “Noise Reducer,” select the type of noise you want to remove from your audio file. You can select any of the provided options for removing the type of noise present in your content. Once selected, select the “Reduce noise now” button to initiate the process.

Step 3: Continue to preview your audio file under the “Result Preview” option. Proceed to download the file once completed by pressing “Download.”

2. Veed.io
This online video editor provides a diversity of features to its users with qualitative assurance. Not only can you edit videos, but Veed.io provides the feasibility of editing audio. If you have recorded content with background noise, it can be easily removed using Veed.io . To know how this noise cancelling online tool works, follow the steps as follows:
Step 1: On opening the browser screen and navigating to the official link of Veed.io, click the “Clean your audio now” button.

Step 2: You will be led to a new window where you can add the distorted video or audio. Open importing it successfully on Veed.io, continue to the “Settings” section from the left, and look for the “Audio” settings.

Step 3: To remove background noise from the audio, click the “Clean Audio” button and access “Done” from the top-right corner. Continue to export the video successfully from Veed.io background noise remover.

3. Kapwing
Another impressive online video editor, Kapwing , provides its users with the option of removing noise from audio. With a clean and simple interface, it is not difficult to reduce audio noise through Kapwing. For an understanding of how this audio noise reduction online free tool works, follow the steps below explaining the operations of Kapwing:
Step 1: As you access the online webpage of Kapwing, click the “Upload video or audio” button to continue further.

Step 2: As you tap the “Upload” button on the new window and add your video, a new editing section opens on the right panel.

Step 3: Look for the “Clean Audio” button in the “AI Tools” section on the right to remove the audio noise from the added media. Once it is done, click the “Export Project” button on the top to download the edited video successfully.

Conclusion
To conclude, videos are a great source of entertainment and information for almost everyone. So, why go for a video with too much distortion and jitters? Wondershare Filmora has added an excellent feature to denoise your video or audio files . This tool has a feature to reduce or remove background noises or distortion from your videos. With this feature, your video files will have a more clear and sharp audio sound.
Reduce Video/Audio Noise For Win 7 or later(64-bit)
Reduce Video/Audio Noise For macOS 10.14 or later
Reduce Video/Audio Noise For macOS 10.14 or later
Step 1Add Audio with Noise on Filmora
On opening Filmora on your computer, continue to select the “New Project” button from the home screen. As this opens a window, continue to the “Import” options to add in the video or audio that needs editing. Drag and drop it to the timeline to continue with free audio noise removal.
Step 2Adjust Audio Settings
As the media is imported successfully, right-click to open a list of options. Select “Adjust Audio” from the drop-down menu to open the audio settings on the screen.
Step 3Successfully Denoise Audio
In the “Denoise” section, you can activate options such as “AI Speech Enhancement,” “Wind Removal,” and “Normal Denoise.” Also, you can set the sliders of “DeReverb,” “Hum Removal,” and “Hiss Removal.” After correcting the audio, click the “Export” button for opening the window to save the final product.
Part 3: Online Solutions: Reduce Audio Noise With The Right Tools
Your noise distortion or annoying background sounds is no more a hassle. These top 3 free audio noise removal online tools will help you with your problem. In this section, the steps of how to use these audio deniosers are also provided.
1. Media.io
Media.io is one of the most comprehensive video enhancers and editors out there. It can improve the quality of your images and also can edit your videos in a breeze. Besides this, it is also a great online audio noise reducer. You can import your audio files and simply let the tool eliminate all the distortion from your file.
Step 1: Access the online tool by going to its website. As you continue next, select the “Remove Noise Now” button to lead to a new window. Then, drag and drop your audio file from your system.
Step 2: Next, in the “Noise Reducer,” select the type of noise you want to remove from your audio file. You can select any of the provided options for removing the type of noise present in your content. Once selected, select the “Reduce noise now” button to initiate the process.
Step 3: Continue to preview your audio file under the “Result Preview” option. Proceed to download the file once completed by pressing “Download.”
2. Veed.io
This online video editor provides a diversity of features to its users with qualitative assurance. Not only can you edit videos, but Veed.io provides the feasibility of editing audio. If you have recorded content with background noise, it can be easily removed using Veed.io . To know how this noise cancelling online tool works, follow the steps as follows:
Step 1: On opening the browser screen and navigating to the official link of Veed.io, click the “Clean your audio now” button.
Step 2: You will be led to a new window where you can add the distorted video or audio. Open importing it successfully on Veed.io, continue to the “Settings” section from the left, and look for the “Audio” settings.
Step 3: To remove background noise from the audio, click the “Clean Audio” button and access “Done” from the top-right corner. Continue to export the video successfully from Veed.io background noise remover.
3. Kapwing
Another impressive online video editor, Kapwing , provides its users with the option of removing noise from audio. With a clean and simple interface, it is not difficult to reduce audio noise through Kapwing. For an understanding of how this audio noise reduction online free tool works, follow the steps below explaining the operations of Kapwing:
Step 1: As you access the online webpage of Kapwing, click the “Upload video or audio” button to continue further.
Step 2: As you tap the “Upload” button on the new window and add your video, a new editing section opens on the right panel.
Step 3: Look for the “Clean Audio” button in the “AI Tools” section on the right to remove the audio noise from the added media. Once it is done, click the “Export Project” button on the top to download the edited video successfully.
Conclusion
To conclude, videos are a great source of entertainment and information for almost everyone. So, why go for a video with too much distortion and jitters? Wondershare Filmora has added an excellent feature to denoise your video or audio files . This tool has a feature to reduce or remove background noises or distortion from your videos. With this feature, your video files will have a more clear and sharp audio sound.
Reduce Video/Audio Noise For Win 7 or later(64-bit)
Reduce Video/Audio Noise For macOS 10.14 or later
“Exploring REAPER’s Landscape: A Detailed Overview of Its Core Functionalities”
DAW stands for Digital Audio Workstation. It is where you can record, edit, mix or even master your music. You always need good DAW software to help you with the job to produce music or live recording musicians.
A good DAW software must have a multi-track audio recording , virtual instruments, MIDI sequencer, excellent mixing capabilities, and plug-in processor hosting. The software is found for all major operating systems such as Linux , Windows, and Mac. If you want to learn more about DAW, then stay with us. The article will discuss in detail REAPER Recording Software.
In this article
01 What Is REAPER Recording Software?
02 How to Download and Install REAPER Software?
03 Tutorial for Using REAPER Recording Software
Part 1. What Is REAPER Recording Software?
Recording software like REAPER records computer audio is used to produce music, edit it, transform, and customize your music. With REAPER Recording Software , you can record multi-layer audio and MIDI in various formats. REAPER has the easiest interface that allows you to drag and drop to import, split, move and do many other tasks.

This is just one feature of REAPER that sounds very interesting. In this section, we will talk about more of its features.
1. Record and Edit
You can easily record the audio and (MIDI) Musical Instrumental Digital Interface with REAPER recording software. It lets you edit and customize everything. You can record and edit things limitlessly. When it comes to recording, it’s not at all difficult for REAPER software to record various instruments or vocals.
2. Mixing
Initially, the mixer might seem inflexible, but in reality, REAPER has a lot to offer you. It has great automated capabilities for instrument and effect parameters. It doesn’t matter if you are working because you can still bounce or freeze tracks while working.
The mixer is very flexible. With REAPERs mixer, you just have to drag and drop your recordings so that you can create tracks, and also, you can customize the arrangements by moving the portions.
3. Interface
While looking at the interface, you might question yourself about how to use its interface. Some people love to learn about new things, such as the REAPER Recording Software. Whereas, some people seem least interested because the half-empty interface is not intuitive to them.
Whereas, the best thing about its interface is that you can customize it. REAPER allows you to add different wallpapers and layouts to your software interface.
4. Strong Stability
REAPER Recording Software has very strong stability. This is one of its strongest features as compared to other competitors. The RAM is rarely affected by the load time and the used resources. Moreover, the software offers a wide range of languages. You can select your desired language to run the software.
Part 2. How to Download and Install REAPER Software?
REAPER is a Digital Audio Workstation. The perfect platform where you can manipulate and transform your audio. With REAPER Record Computer audio, you can work efficiently in a resource-friendly studio with saving your time. Stay tuned if you plan to learn more about its pricing and requirements.

Pricing of REAPER Software
A reaper is a brilliant software. It has a 60-day trial period. REAPER costs $60 in total to register. It has complete MIDI sequencing. You can also get a discounted license if REAPER is the best private option for you or has commercial usage. You can set the equal license key on every computer for someone with multiple computers.
System Requirements
The recording software has uncountable features. REAPER software facilitates its users at every level by giving the best audio manipulating platform. The best thing about REAPER Recording Software is its compatibility with different operating systems. Let us add more to your knowledge on this.
Windows
REAPER software is available for Windows 7, 8, 10, XP, and Vista. The version of REAPER for Windows is 6.42. This is for Windows 64-bit whereas, a download package is also available for Windows 32-bit.
macOS
For macOS 64-bit, REAPER has a 6.42 version. This version is compatible with macOS 10.5 – 10.14. Whereas, for macOS 10.15+, the available version of REAPER is 6.42 with a 15MB file size.
Linux
REAPER Recording Software is also compatible with Linux x86_64. The REAPER version is 6.42 with an 11 MB file size. This version can also work on AMD64 64-bit.
Downloading and Installing REAPER
Now that REAPER Record Computer Audio has impressed you a lot. You must be thinking about how to download it. If this is on your mind, then we got you. Allow us to share its steps that will guide you to download the software easily.
Step 1: To install REAPER software, first of all, visit its official website. Then locate and head over to its download section.
Step 2: Click on ‘Download REAPER from the download section.’ For Windows users, they can download the Windows installation package. At the same time, Linux and macOS users can select their installation packages.
Step 3: Lastly, after you have downloaded your systems compatible installation package, you simply have to run it and then install it according to your respective operating system.
Part 3. Tutorial for Using REAPER Recording Software
After its attractive features and detailed downloading procedure, it is finally the time to talk about its works. This section of the article will explain to you more about REAPER Recording Software as we are now going to present a tutorial on how to use the software.
Understand the Layout
Understanding and knowing the layout of your software before you start working on it is essential. The crucial components of REAPER software include the Timeline, Arrangement Window, Track Panel, Toolbar, and lastly, Transport.

The Arrangement window holds all the added items. The items are played from left to right order, similar to their timeline arrangement. You can also zoom in and out. Then comes the transport toolbar, which holds the functions to stop, rewind, play, fast forward, adjust the timeline speed, etc. The toolbar holds all the toggle buttons. You can also customize your toolbar.
New Track Creation
For creating a new track on REAPER, go to the Track menu and hit Insert New Track. A track is like another layer to your audio. Multiple layers and tracks make your work complex yet interesting as you can play all the different tracks at the same time. By double-clicking in the Track Control Panel, you can set a name for the added track.

Audio Hardware Settings for Audio Recording
It is best suggested always to check your audio hardware settings before you start to record, edit or mix with REAPER Recording Software. Your primary focus should be on the recording device’s devices should be set as Input Device, whereas the listening device should be set as the Output Device.
For this, you have to select Preferences from the Options menu. A window will appear in front of you, the REAPER Preference window. You have to select the correct Input and Output devices from the dropdown menu from this window.

Arm your Track
Arming your track is very important. For this, head over to the Track Control Panel, and next to your track name, hit the red circle. If you have various tracks, you should solo this track and mute the other tracks.
As soon as the track is armed, a Gain Meter will activate on the side. From this, you can check if you have properly set the microphone or not. This could be tested by tapping on the microphone.

Record
After all, the hardware settings are done, and your track is armed, it’s time to start the recording. For that, just tap on the Record button in the Transport toolbar. A yellow line in the timeline will indicate the end of the recording.

To end the recording, tap on the Stop button from the Transport Toolbar. Lastly, REAPER Recording Software will ask you to save the file. In case you don’t want it, you can also delete it.
Create and Manipulate Clips
Things like manipulation get a lot easier if you split the clips in REAPER. From the items menu, you have to select the option of Split Item on Cursor. This divides your clip into two clips on each side of the cursor. You can also remove the clips by going to the Items Menu. From there, you just have to hit the Remove Item option, or else, simply press the Delete key on your keyboard.

Removing clips will create a gap in the arrangement window that can be filled by dragging forward the remaining clip.
Volume Adjustments – Normalize
By double-clicking on the item or by selecting ‘Item Properties’ from a right-click, you can normalize the item. A new window will appear as Media Item Properties, from where you have to locate the Volume Settings and then select the option of Normalize.
If your item is already loud, then nothing will happen, but if it is not, then the slider will change from 0.00 dB showing an increase in the volume. Lastly, hit the ‘Apply’ or ‘OK’ button to imply the changes.
Fade in/out
With the Media Properties, you can also adjust a Fade in and a Fade out. For this, you simply have to set an end time for the Fade in, whereas a start time is entered for Fade out. Hit the ‘Ok’ or ‘Apply’ button to apply the changes.
From the Arrangement window, fades can be adjusted. For adjusting the fades, hover with your mouse over the red line. You will see a newly shaped cursor. Just drag on the timeline to play and adjust the Fade with this new cursor.

Automate Changes
With REAPER, you can also automate changes in track parameters. We will guide about automation from Track Envelopes. From Track Control Panel, hit the Trim option. A new Envelopes window will open at this point from where you have to check the Volume box.
A new Volume Track will open up. Here, you have to set new Envelope points. That could be done by holding the shift key, right-clicking on the point, and then selecting Create New Point. A green circle will indicate the new point.
By dragging the Envelope point, you can also adjust the volume. Dragging it towards the top will increase the volume, whereas dragging it towards the bottom will eventually decrease.

Finalize the Audio – Render
After all the above steps have been completed to set the order and adjust your desired volume, the last step comes to render your project file. For that, move to the File menu and select the ‘Render’ option. A window will be opened as ‘Render to File.’ Now, from the dropdown menu, select your desired Output Format.
Lastly, hit the Render 1 File button, and then REAPER will export your project. You can immediately listen to it by selecting the ‘Launch File’ option.

Concluding Thoughts
This article is everything you need to learn about REAPER Recording Software. The article that started from an introduction on DAW took you on a roller coaster ride. Everything about REAPER software has been shared.
We hope that this article helps you in all possible ways. The attractive features impress you, and its pricing and system specifications increase your knowledge. Along with that, the shared tutorial will guide you thoroughly on how to use it.
02 How to Download and Install REAPER Software?
03 Tutorial for Using REAPER Recording Software
Part 1. What Is REAPER Recording Software?
Recording software like REAPER records computer audio is used to produce music, edit it, transform, and customize your music. With REAPER Recording Software , you can record multi-layer audio and MIDI in various formats. REAPER has the easiest interface that allows you to drag and drop to import, split, move and do many other tasks.
This is just one feature of REAPER that sounds very interesting. In this section, we will talk about more of its features.
1. Record and Edit
You can easily record the audio and (MIDI) Musical Instrumental Digital Interface with REAPER recording software. It lets you edit and customize everything. You can record and edit things limitlessly. When it comes to recording, it’s not at all difficult for REAPER software to record various instruments or vocals.
2. Mixing
Initially, the mixer might seem inflexible, but in reality, REAPER has a lot to offer you. It has great automated capabilities for instrument and effect parameters. It doesn’t matter if you are working because you can still bounce or freeze tracks while working.
The mixer is very flexible. With REAPERs mixer, you just have to drag and drop your recordings so that you can create tracks, and also, you can customize the arrangements by moving the portions.
3. Interface
While looking at the interface, you might question yourself about how to use its interface. Some people love to learn about new things, such as the REAPER Recording Software. Whereas, some people seem least interested because the half-empty interface is not intuitive to them.
Whereas, the best thing about its interface is that you can customize it. REAPER allows you to add different wallpapers and layouts to your software interface.
4. Strong Stability
REAPER Recording Software has very strong stability. This is one of its strongest features as compared to other competitors. The RAM is rarely affected by the load time and the used resources. Moreover, the software offers a wide range of languages. You can select your desired language to run the software.
Part 2. How to Download and Install REAPER Software?
REAPER is a Digital Audio Workstation. The perfect platform where you can manipulate and transform your audio. With REAPER Record Computer audio, you can work efficiently in a resource-friendly studio with saving your time. Stay tuned if you plan to learn more about its pricing and requirements.
Pricing of REAPER Software
A reaper is a brilliant software. It has a 60-day trial period. REAPER costs $60 in total to register. It has complete MIDI sequencing. You can also get a discounted license if REAPER is the best private option for you or has commercial usage. You can set the equal license key on every computer for someone with multiple computers.
System Requirements
The recording software has uncountable features. REAPER software facilitates its users at every level by giving the best audio manipulating platform. The best thing about REAPER Recording Software is its compatibility with different operating systems. Let us add more to your knowledge on this.
Windows
REAPER software is available for Windows 7, 8, 10, XP, and Vista. The version of REAPER for Windows is 6.42. This is for Windows 64-bit whereas, a download package is also available for Windows 32-bit.
macOS
For macOS 64-bit, REAPER has a 6.42 version. This version is compatible with macOS 10.5 – 10.14. Whereas, for macOS 10.15+, the available version of REAPER is 6.42 with a 15MB file size.
Linux
REAPER Recording Software is also compatible with Linux x86_64. The REAPER version is 6.42 with an 11 MB file size. This version can also work on AMD64 64-bit.
Downloading and Installing REAPER
Now that REAPER Record Computer Audio has impressed you a lot. You must be thinking about how to download it. If this is on your mind, then we got you. Allow us to share its steps that will guide you to download the software easily.
Step 1: To install REAPER software, first of all, visit its official website. Then locate and head over to its download section.
Step 2: Click on ‘Download REAPER from the download section.’ For Windows users, they can download the Windows installation package. At the same time, Linux and macOS users can select their installation packages.
Step 3: Lastly, after you have downloaded your systems compatible installation package, you simply have to run it and then install it according to your respective operating system.
Part 3. Tutorial for Using REAPER Recording Software
After its attractive features and detailed downloading procedure, it is finally the time to talk about its works. This section of the article will explain to you more about REAPER Recording Software as we are now going to present a tutorial on how to use the software.
Understand the Layout
Understanding and knowing the layout of your software before you start working on it is essential. The crucial components of REAPER software include the Timeline, Arrangement Window, Track Panel, Toolbar, and lastly, Transport.
The Arrangement window holds all the added items. The items are played from left to right order, similar to their timeline arrangement. You can also zoom in and out. Then comes the transport toolbar, which holds the functions to stop, rewind, play, fast forward, adjust the timeline speed, etc. The toolbar holds all the toggle buttons. You can also customize your toolbar.
New Track Creation
For creating a new track on REAPER, go to the Track menu and hit Insert New Track. A track is like another layer to your audio. Multiple layers and tracks make your work complex yet interesting as you can play all the different tracks at the same time. By double-clicking in the Track Control Panel, you can set a name for the added track.
Audio Hardware Settings for Audio Recording
It is best suggested always to check your audio hardware settings before you start to record, edit or mix with REAPER Recording Software. Your primary focus should be on the recording device’s devices should be set as Input Device, whereas the listening device should be set as the Output Device.
For this, you have to select Preferences from the Options menu. A window will appear in front of you, the REAPER Preference window. You have to select the correct Input and Output devices from the dropdown menu from this window.
Arm your Track
Arming your track is very important. For this, head over to the Track Control Panel, and next to your track name, hit the red circle. If you have various tracks, you should solo this track and mute the other tracks.
As soon as the track is armed, a Gain Meter will activate on the side. From this, you can check if you have properly set the microphone or not. This could be tested by tapping on the microphone.
Record
After all, the hardware settings are done, and your track is armed, it’s time to start the recording. For that, just tap on the Record button in the Transport toolbar. A yellow line in the timeline will indicate the end of the recording.
To end the recording, tap on the Stop button from the Transport Toolbar. Lastly, REAPER Recording Software will ask you to save the file. In case you don’t want it, you can also delete it.
Create and Manipulate Clips
Things like manipulation get a lot easier if you split the clips in REAPER. From the items menu, you have to select the option of Split Item on Cursor. This divides your clip into two clips on each side of the cursor. You can also remove the clips by going to the Items Menu. From there, you just have to hit the Remove Item option, or else, simply press the Delete key on your keyboard.
Removing clips will create a gap in the arrangement window that can be filled by dragging forward the remaining clip.
Volume Adjustments – Normalize
By double-clicking on the item or by selecting ‘Item Properties’ from a right-click, you can normalize the item. A new window will appear as Media Item Properties, from where you have to locate the Volume Settings and then select the option of Normalize.
If your item is already loud, then nothing will happen, but if it is not, then the slider will change from 0.00 dB showing an increase in the volume. Lastly, hit the ‘Apply’ or ‘OK’ button to imply the changes.
Fade in/out
With the Media Properties, you can also adjust a Fade in and a Fade out. For this, you simply have to set an end time for the Fade in, whereas a start time is entered for Fade out. Hit the ‘Ok’ or ‘Apply’ button to apply the changes.
From the Arrangement window, fades can be adjusted. For adjusting the fades, hover with your mouse over the red line. You will see a newly shaped cursor. Just drag on the timeline to play and adjust the Fade with this new cursor.
Automate Changes
With REAPER, you can also automate changes in track parameters. We will guide about automation from Track Envelopes. From Track Control Panel, hit the Trim option. A new Envelopes window will open at this point from where you have to check the Volume box.
A new Volume Track will open up. Here, you have to set new Envelope points. That could be done by holding the shift key, right-clicking on the point, and then selecting Create New Point. A green circle will indicate the new point.
By dragging the Envelope point, you can also adjust the volume. Dragging it towards the top will increase the volume, whereas dragging it towards the bottom will eventually decrease.
Finalize the Audio – Render
After all the above steps have been completed to set the order and adjust your desired volume, the last step comes to render your project file. For that, move to the File menu and select the ‘Render’ option. A window will be opened as ‘Render to File.’ Now, from the dropdown menu, select your desired Output Format.
Lastly, hit the Render 1 File button, and then REAPER will export your project. You can immediately listen to it by selecting the ‘Launch File’ option.
Concluding Thoughts
This article is everything you need to learn about REAPER Recording Software. The article that started from an introduction on DAW took you on a roller coaster ride. Everything about REAPER software has been shared.
We hope that this article helps you in all possible ways. The attractive features impress you, and its pricing and system specifications increase your knowledge. Along with that, the shared tutorial will guide you thoroughly on how to use it.
Harmony of the Wild: Selecting the Very Best iOS & Android Nature Audio Apps
Best Nature Sounds Apps for iOS and Android

Benjamin Arango
Apr 26, 2024• Proven solutions
In today’s challenging times, when stress and anxiety has become inevitable for a majority of population, there is a constant search for solutions that will enable people to live a peaceful and pleasant life. Here, the technology comes to their rescue with nature sound effects app.
These applications provide multiple sounds related to the Nature. The users just need to download any of these programs, and select the desired tone according to their choice. Such mobile software also offer numerous relaxing audios that assist in achieving a deeper level of concentration during the meditation.
10 Best Nature Sounds Apps
1. YouTube
YouTube is also one of the important apps for nature sounds where one can get almost any kind of relaxing sounds related to the Nature.
Binaural beats videos, where two different frequencies of sounds are combined to create a new frequency tone are getting highly popular among people. These are believed to help in lowering stress, anxiety and depression and increase concentration, attention, and efficiency of an individual.
It can also be helpful in attaining mental peace and serenity. The app even contains peaceful meditation sounds that ease the ability to focus and remain relaxed during the whole process. It is highly a user-friendly app and is absolutely free to download on the Android Smartphones.
2. Atmosphere: Relaxing Sounds
Compatible with Android 5.0 or up , and iOS 10.0 or later

Atmosphere is one of the best apps for nature sounds. It is custom-made to help people relieve stress and relax their mind.
The key feature of this application is that it allows users to import their personalized audios and mix them with various default acoustics available within the app itself.
The soothing sounds available here are divided into 8 different environments such as Beach, City, Park, Countryside, Home, Underwater, Forest and Oriental. Users can also mix and match the sounds between environments to produce a tailored theme.
3. Rainy Mood
Compatible with both iOS and Android OS 5.0 and up

Rainy Mood provides the most genuine rain, thunderstorm, and lightening sounds available online.
It not only relieves tension and anxiety but also helps users suffering from insomnia.
This app even contains natural white noise facility that helps in getting rid of any unwanted sounds around us.
The various rain sounds are available here in different environments such as heavy rain, tropical rain, umbrella, rain on tent, rain on porch etc. The best thing about this app is that it can work in offline mode, i.e. without any Internet connection. This eventually results in less power consumption.
4. Animal Sounds
Compatible with Android 4.1 and up
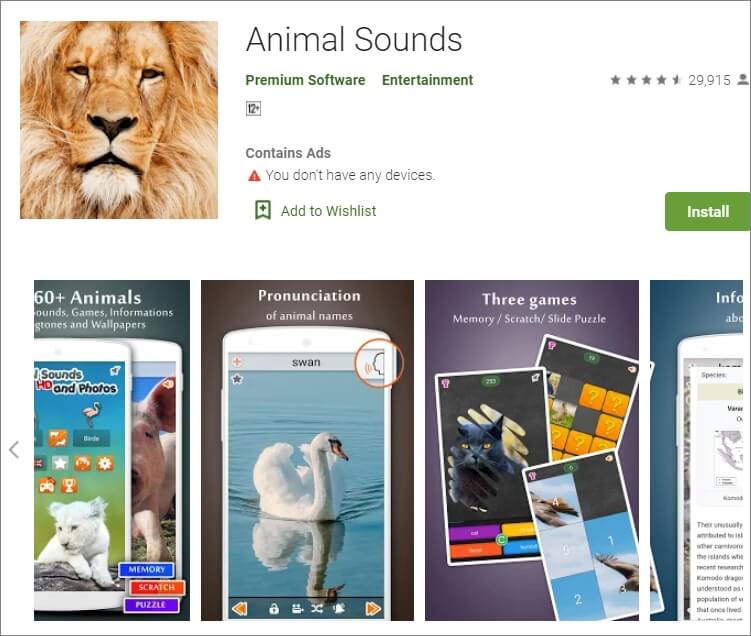
Animal Sounds is a one-stop destination for all animal lovers. The program provides the most detailed information about animals, and also contains hundreds of animal sounds and photographs from all over the globe.
The quality of audios and pictures is remarkably high and clear. The sounds here are categorized under pet animals, mammals, farm animals, bird sounds, wild animals, reptiles and amphibians.
The application also provides the facility of customized ringtones and wallpapers to its users.
5. Sleep Sounds
Compatible with Android 4.4 or later
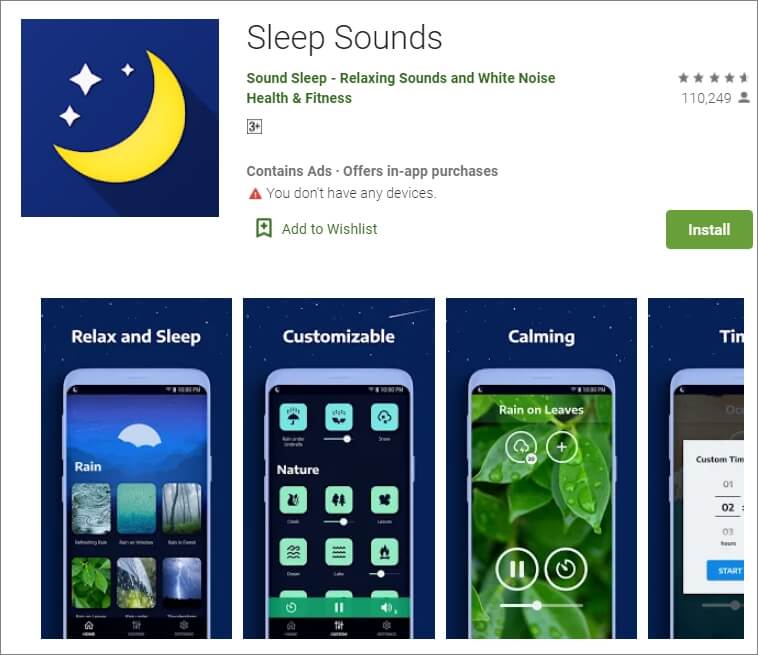
Sleep Sounds is one of the top trending apps nowadays owing to the increasing problems of insomnia and irregular sleep patterns among people. It is very helpful for an uninterrupted quality sleep.
The calm and soft music gradually tranquilizes the mind and the user eases into a good sleep. Its interface is user-friendly with beautiful images in the background.
The sounds here are categorized under rain, nature, relax, transport, noise, and white noise classes. This app also works without an Internet connection.
6.Calm
Compatible with Android and iOS 10.0 and watchOS 6.0 or later
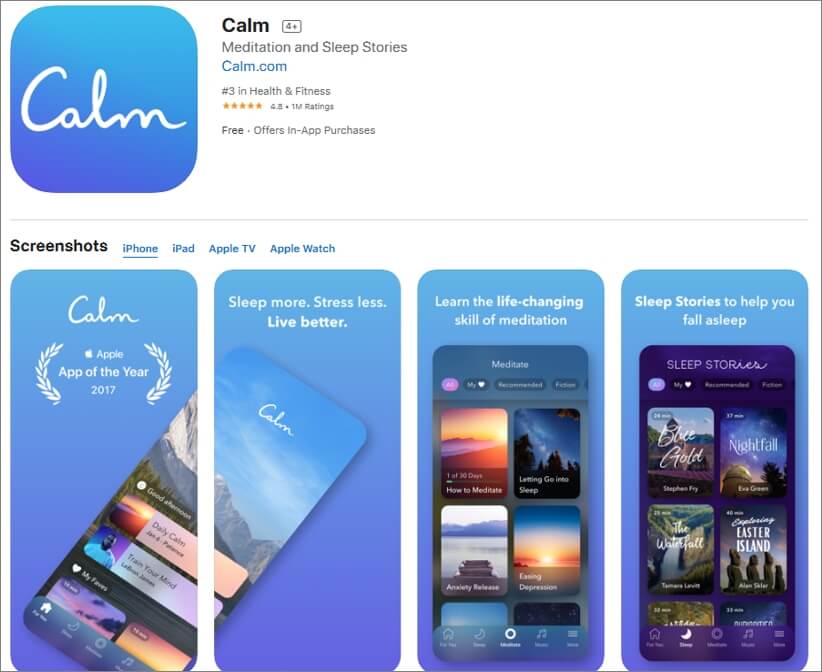
Calm is best suitable for the people who practice meditation on a daily basis. It is available for free and can be used by the beginners as well as experienced users.
The main features include guided meditation programs, breathing sessions, adult bed-time stories, masterclasses by the international coaches, etc.
Here, one can choose a personalized guide for meditation from several topics such as relationships, self-esteem, breaking habits, forgiveness, mindfulness, etc. Users can even track their daily progress on the basis of time spent by them on the app.
7. Ambience – Nature sounds: sleep and meditation
Compatible with Android 4.2 and up .
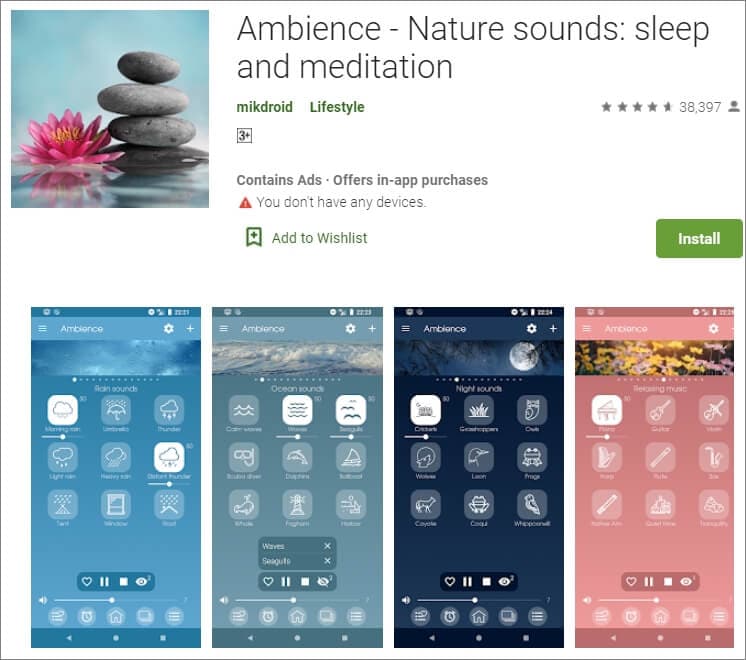
Ambience is another one of the most popular apps for nature sounds providing peace and serenity to its users through relaxing and soothing tones.
It has a very simple and clean user interface which makes it a highly demanding program. The main features include the facility of mixing maximum 10 sounds at the same time. Along with various preset mixtures of audios that are available here, users can also save their customized combinations for future use.
8. Naturespace: Sleep Relax Focus
Compatible with Android 4.0 or up and iOS 9.0 or later
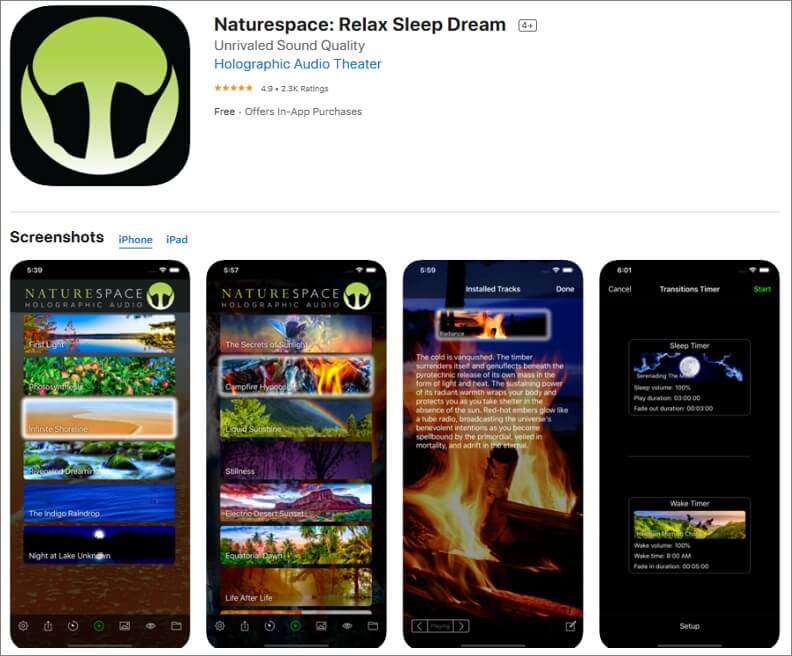
Naturespace is a unique app containing real time 3D recordings of natural places such as forests, deserts, mountains, etc. The equipment used in the program for recording the sounds are of extremely high quality, and as a result, the listening experience is out of this world.
The clarity of the sound surpasses almost every other application available in this genre of nature sound apps. It also provides the facility of sleep and wake timer to its users. The simple user interface along with earbud optimisation facility makes the software highly efficient and popular among people.
9. SimplyNoise – Free White Noise
Compatible with iOS 8.0 or later and Android
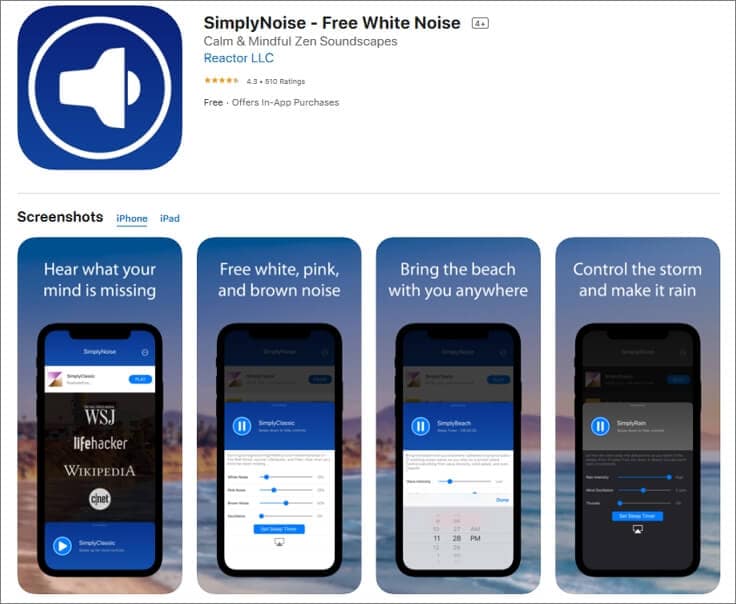
Simply Noise is one of the most basic apps for nature sounds as it provides only one acoustic without any background noises. As there are no such complexities involved, it can also be used by people who are not tech-savvy.
The categorization of sounds is done here as white noise, pink noise, and brown noise. Users can select any of these according to their requirement.
This app is best suitable for people who are unable to concentrate on a particular thing, or suffer from sleeping disorder. Sleep-timer option is also available here.
10. aSleep
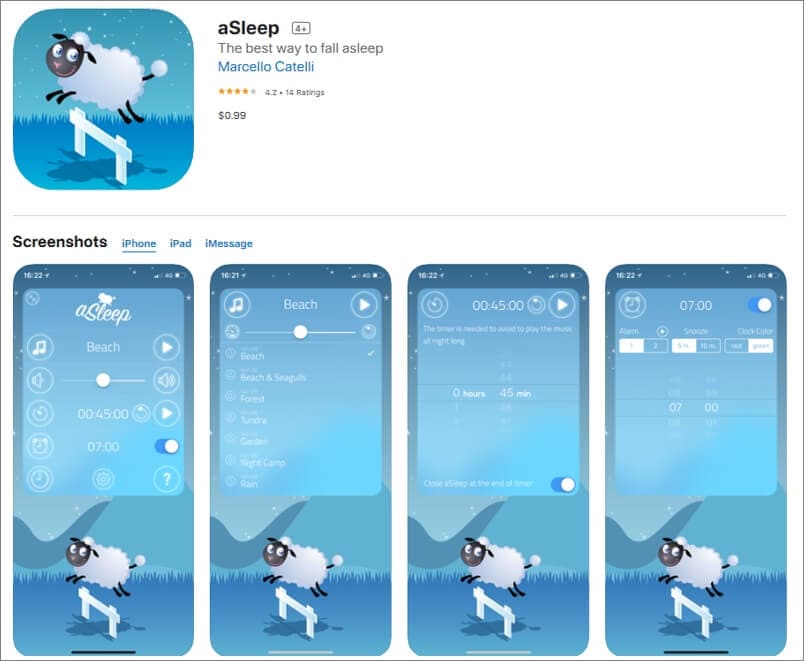
Available for iOS devices like iPhone and iPad, aSleep offers around 64 realistic stereo nature sounds to help you relax your mind and fall asleep almost instantaneously. With the built-in Timer feature, the music can be programmed to stop automatically after a certain amount of time to save your device’s battery.
Furthermore, the also works as an alarm clock that wakes you up with nature sounds at your predefined hour. The application is also good for kids as it can be used to play lullabies to help them get a tight sleep at night. And the program does all this without collecting any data from your iDevice.
What Is the Best Rain Sound App?
Among various rain sound applications available online, Rainy Mood is the most popular one that enjoys high star rating. When it comes to rain sounds, there is no match to it. It mainly includes 4 rain scenes namely Classic, Ocean, Countryside and Cafe. These genres can be customized according to different tastes and preferences.
What Are the Different Sounds of Nature?
The nature is made up of 5 basic elements which include Air, Water, Fire, Earth and Space. These components constitute various natural acoustics. Some examples are music of the rain, thunderstorm or a waterfall, wind blows, sounds of leaves and water streams, chirping of birds or grasshoppers, stridulation of insects like crickets, etc. All these sounds are beautifully incorporated in nature sound effects app.
In case that you want to add some nature sound to your video clip, you can try Wondershare Filmora, which features an audio library containing different nature sound effects as well. Download the free trial version of Filmora and have a try.


Besides adding sound to video, you can also add some elemental 2D visual effects to videos to make it cooler.
Benjamin Arango
Benjamin Arango is a writer and a lover of all things video.
Follow @Benjamin Arango
Benjamin Arango
Apr 26, 2024• Proven solutions
In today’s challenging times, when stress and anxiety has become inevitable for a majority of population, there is a constant search for solutions that will enable people to live a peaceful and pleasant life. Here, the technology comes to their rescue with nature sound effects app.
These applications provide multiple sounds related to the Nature. The users just need to download any of these programs, and select the desired tone according to their choice. Such mobile software also offer numerous relaxing audios that assist in achieving a deeper level of concentration during the meditation.
10 Best Nature Sounds Apps
1. YouTube
YouTube is also one of the important apps for nature sounds where one can get almost any kind of relaxing sounds related to the Nature.
Binaural beats videos, where two different frequencies of sounds are combined to create a new frequency tone are getting highly popular among people. These are believed to help in lowering stress, anxiety and depression and increase concentration, attention, and efficiency of an individual.
It can also be helpful in attaining mental peace and serenity. The app even contains peaceful meditation sounds that ease the ability to focus and remain relaxed during the whole process. It is highly a user-friendly app and is absolutely free to download on the Android Smartphones.
2. Atmosphere: Relaxing Sounds
Compatible with Android 5.0 or up , and iOS 10.0 or later
Atmosphere is one of the best apps for nature sounds. It is custom-made to help people relieve stress and relax their mind.
The key feature of this application is that it allows users to import their personalized audios and mix them with various default acoustics available within the app itself.
The soothing sounds available here are divided into 8 different environments such as Beach, City, Park, Countryside, Home, Underwater, Forest and Oriental. Users can also mix and match the sounds between environments to produce a tailored theme.
3. Rainy Mood
Compatible with both iOS and Android OS 5.0 and up
Rainy Mood provides the most genuine rain, thunderstorm, and lightening sounds available online.
It not only relieves tension and anxiety but also helps users suffering from insomnia.
This app even contains natural white noise facility that helps in getting rid of any unwanted sounds around us.
The various rain sounds are available here in different environments such as heavy rain, tropical rain, umbrella, rain on tent, rain on porch etc. The best thing about this app is that it can work in offline mode, i.e. without any Internet connection. This eventually results in less power consumption.
4. Animal Sounds
Compatible with Android 4.1 and up
Animal Sounds is a one-stop destination for all animal lovers. The program provides the most detailed information about animals, and also contains hundreds of animal sounds and photographs from all over the globe.
The quality of audios and pictures is remarkably high and clear. The sounds here are categorized under pet animals, mammals, farm animals, bird sounds, wild animals, reptiles and amphibians.
The application also provides the facility of customized ringtones and wallpapers to its users.
5. Sleep Sounds
Compatible with Android 4.4 or later
Sleep Sounds is one of the top trending apps nowadays owing to the increasing problems of insomnia and irregular sleep patterns among people. It is very helpful for an uninterrupted quality sleep.
The calm and soft music gradually tranquilizes the mind and the user eases into a good sleep. Its interface is user-friendly with beautiful images in the background.
The sounds here are categorized under rain, nature, relax, transport, noise, and white noise classes. This app also works without an Internet connection.
6.Calm
Compatible with Android and iOS 10.0 and watchOS 6.0 or later
Calm is best suitable for the people who practice meditation on a daily basis. It is available for free and can be used by the beginners as well as experienced users.
The main features include guided meditation programs, breathing sessions, adult bed-time stories, masterclasses by the international coaches, etc.
Here, one can choose a personalized guide for meditation from several topics such as relationships, self-esteem, breaking habits, forgiveness, mindfulness, etc. Users can even track their daily progress on the basis of time spent by them on the app.
7. Ambience – Nature sounds: sleep and meditation
Compatible with Android 4.2 and up .
Ambience is another one of the most popular apps for nature sounds providing peace and serenity to its users through relaxing and soothing tones.
It has a very simple and clean user interface which makes it a highly demanding program. The main features include the facility of mixing maximum 10 sounds at the same time. Along with various preset mixtures of audios that are available here, users can also save their customized combinations for future use.
8. Naturespace: Sleep Relax Focus
Compatible with Android 4.0 or up and iOS 9.0 or later
Naturespace is a unique app containing real time 3D recordings of natural places such as forests, deserts, mountains, etc. The equipment used in the program for recording the sounds are of extremely high quality, and as a result, the listening experience is out of this world.
The clarity of the sound surpasses almost every other application available in this genre of nature sound apps. It also provides the facility of sleep and wake timer to its users. The simple user interface along with earbud optimisation facility makes the software highly efficient and popular among people.
9. SimplyNoise – Free White Noise
Compatible with iOS 8.0 or later and Android
Simply Noise is one of the most basic apps for nature sounds as it provides only one acoustic without any background noises. As there are no such complexities involved, it can also be used by people who are not tech-savvy.
The categorization of sounds is done here as white noise, pink noise, and brown noise. Users can select any of these according to their requirement.
This app is best suitable for people who are unable to concentrate on a particular thing, or suffer from sleeping disorder. Sleep-timer option is also available here.
10. aSleep
Available for iOS devices like iPhone and iPad, aSleep offers around 64 realistic stereo nature sounds to help you relax your mind and fall asleep almost instantaneously. With the built-in Timer feature, the music can be programmed to stop automatically after a certain amount of time to save your device’s battery.
Furthermore, the also works as an alarm clock that wakes you up with nature sounds at your predefined hour. The application is also good for kids as it can be used to play lullabies to help them get a tight sleep at night. And the program does all this without collecting any data from your iDevice.
What Is the Best Rain Sound App?
Among various rain sound applications available online, Rainy Mood is the most popular one that enjoys high star rating. When it comes to rain sounds, there is no match to it. It mainly includes 4 rain scenes namely Classic, Ocean, Countryside and Cafe. These genres can be customized according to different tastes and preferences.
What Are the Different Sounds of Nature?
The nature is made up of 5 basic elements which include Air, Water, Fire, Earth and Space. These components constitute various natural acoustics. Some examples are music of the rain, thunderstorm or a waterfall, wind blows, sounds of leaves and water streams, chirping of birds or grasshoppers, stridulation of insects like crickets, etc. All these sounds are beautifully incorporated in nature sound effects app.
In case that you want to add some nature sound to your video clip, you can try Wondershare Filmora, which features an audio library containing different nature sound effects as well. Download the free trial version of Filmora and have a try.
Besides adding sound to video, you can also add some elemental 2D visual effects to videos to make it cooler.
Benjamin Arango
Benjamin Arango is a writer and a lover of all things video.
Follow @Benjamin Arango
Also read:
- Clap Quest Unearthing Enthusiastic Reactions for 2024
- Updated In 2024, Audacity and You A Step-by-Step Approach for Creating Exceptional Podcasts
- Intuitive Acoustic Sifting Gadgets for First-Timers and Seasoned Artists
- Updated In 2024, Best Software Utilities for Altering Audio Frequencies
- New Revolutionize Your Online Gaming with Morphvox – A Voice Changers Handbook for 2024
- New 2024 Approved Rhythm Reconnaissance Leading Song Recognition Apps You Must Have on Your Android Gadget
- Updated 2024 Approved Mastering Silence in Audio A Step-by-Step Guide for Removing Voices From Videos
- EchoTech Pro Review Series Unveiling the Specs, Standout Aspects, and Comparable Solutions in Sound Engineering for 2024
- Your Comprehensive Guide to Top BGM Download Sites
- In 2024, Unlocking the Full Potential of Sound with Adobe Audition Features, Tips & Techniques
- New 2024 Approved The Ultimate Guide to 8 Invaluable Sound Effects From the Gaming Realm
- In 2024, Installation & Uninstallation of Audacity on Chrome OS Explained Simply
- New In 2024, Your First Guide to iPhone Audio Transformation Voice Changer Plus Explained
- New Unlocking a World of Gratis Aural Enhancements Online for 2024
- Updated 2024 Approved What Is Clubhouse All About? All You Need to Know About Clubhouse
- Updated Exploring the Sound Emission From Button Activation
- Amplify Animated Photo with Acoustic Elements via Win 10/11
- 2024 Approved The Users Guide to Personalizing Siris Speech Patterns in iOS Ecosystem
- Finding Authentic Clap Sound Implementations for Projects for 2024
- Updated Mastering Podcasting A Look at the Premier Hosting Services
- New Clap Quest Unearthing Enthusiastic Reactions for 2024
- Updated In 2024, The Ultimate Voice Eradication Suite Handpicking the Top 7 Tools for Online & Offline Use
- New 2024 Approved Online Anomalies Sound Bank - Legal, Free Access
- New Seek Out Cheerful Sonic Enhancements
- Updated Everything That You Need to Know About Video Montages- Ideas, Techniqu
- How To Change Your Apple ID Password On your Apple iPhone 13 Pro Max | Dr.fone
- Top 15 Augmented Reality Games Like Pokémon GO To Play On Huawei P60 | Dr.fone
- How to Use Pokémon Emerald Master Ball Cheat On Gionee F3 Pro | Dr.fone
- How to Screen Mirroring Vivo X Flip? | Dr.fone
- In 2024, 3 Solutions to Find Your Vivo T2 5G Current Location of a Mobile Number | Dr.fone
- Convert Dailymotion Videos for Free - No Download Required
- How can I get more stardust in pokemon go On Tecno Phantom V Flip? | Dr.fone
- How To Simulate GPS Movement With Location Spoofer On Apple iPhone 8? | Dr.fone
- In 2024, Hassle-Free Ways to Remove FRP Lock on Oppo A59 5Gwith/without a PC
- Text To Speech | Wondershare Virbo Online
- In 2024, 2 Ways to Transfer Text Messages from Oppo Find X6 to iPhone 15/14/13/12/11/X/8/ | Dr.fone
- 3 Easy Ways to Factory Reset a Locked Apple iPhone 11 Pro Without iTunes | Dr.fone
- In 2024, 5 Techniques to Transfer Data from Oppo Find X7 to iPhone 15/14/13/12 | Dr.fone
- Title: Mastering Sound Silence Essential Techniques for Noise Reduction with Offline and Online Solutions for 2024
- Author: David
- Created at : 2024-05-20 05:45:47
- Updated at : 2024-05-21 05:45:47
- Link: https://sound-tweaking.techidaily.com/mastering-sound-silence-essential-techniques-for-noise-reduction-with-offline-and-online-solutions-for-2024/
- License: This work is licensed under CC BY-NC-SA 4.0.
