
:max_bytes(150000):strip_icc():format(webp)/GettyImages-962954554-5c338fc146e0fb0001346aec.jpg)
In 2024, Precision Audio Leveling in Three Simple Steps
“Precision Audio Leveling in Three Simple Steps “
Normalizing Audio in 3 Quick Ways-Audio Normalization

Richard Bennett
Mar 27, 2024• Proven solutions
To normalize audio is to apply a constant amount of gain to a recording to bring the amplitude to a target or norm. Or simply put, normalizing any audio file with a normalizer software searches the file for a peak volume to set a defined maximum and then brings up the rest of the audio to the same maximum level.
Audio normalization is a good practice to get your audio levels right for a better-balanced video, especially imperative for dialogue clips that stand out on YouTube and other platforms. However, out of many different reasons, getting the best audio results from old-fashioned AD/DA converters or matching a group of audios on the same volume levels are still the most common.
Nevertheless, it’s not always easy to find an efficient audio normalization tool and – most importantly – to master the process. But no worries because we have you covered. So, dive in to learn some of the best tools and how you can use them to create masterfully balanced soundtracks.
- Method 1: Normalize Audio Online
- Method 2: Normalize Audio with Wondershare Filmora’s Auto Normalization
- Method 3: Normalize Audio with Audacity
Method 1: Normalize Audio Online
Video2edit online video tool is a one-stop solution for all your audio and video editing needs. The versatile online tool offers a suite of editing features, from extracting audio to converting different formats to normalizing audio. With a drag and drop interface, it allows you to enhance the audio quality of your video and share it to YouTube, Facebook, or other social platforms.
Not to mention, it lets you convert your video files to various popular formats such as MP4, AVI, MOV, 3GP, and WEBM. One of the significant advantages of the tool is the convenience. Without any download or subscription fee hassles, you can normalize audio tracks in a few clicks using Video2edit.com. Here’s how you can use the free tool to get good-quality audio results.
Step 1: Launch the Video2edit Normalize audio tool
Begin by launching the online Video2edit.com on your browser. Then, on the main interface, select the Normalize audio tool from the variety of editing tools.

Step 2: Drop or upload your file
Now, drag and drop your video or audio file or tap the Choose file option to import the file from your local device.

Step 3: Normalize audio
From the Covert video to dropdown, choose the video format you want to convert your file to. Then, click on the Start button to start normalizing your file.

Step 4: Download the converted file
Once the conversion is completed, hit Download in front of the converted file to save it to your computer.

Method 2: Normalize Audio with Wondershare Filmora’s Auto Normalization
Yet another advanced audio normalization software is the Wondershare Filmora . Whether you are looking for basic editing tools or some advanced features, Filmora has it all. The powerful editor uses artificial intelligence editing that provides a smart way to improve your audio quality. The essence of this well-known software is the Auto Normalization feature that allows users to modify the volume of multiple recording clips to standard European audio programs at 23.0 LUFS – with just ONE CLICK.
And for the best part, the normalization process is pretty straightforward and lossless with Wondershare Filmora. Below is a quick step-by-step guide to using this intuitive audio enhancer tool.


Step 1: Download and install the Wondershare Filmora
To get started, download, and install the Wondershare Filmora on your PC. Then launch the program to enter the main interface.

Step 2: Import your audio/video file
From the main menu, go to Import media, then click on Import media files and select to upload your files in the media box. Once uploaded, drag and drop the media clips onto the timeline.

Step 3: Open the audio editing panel
Next, right-click on the audio or video clip on the timeline and then tap Adjust audio, or you can simply double-click it to enter the audio editing panel.

Step 4: Enable auto audio normalization
On the audio editing panel, scroll down and enable the Auto normalization feature. Wondershare Filmora will analyze and normalize the audio file automatically.

Step 5: Export the normalized file
After the normalization process is completed, preview your video or audio to check the auto normalization. If you are not satisfied with the output, hit Reset and try again. Finally, tap on the Export option, give your file a name, and again hit Export to save the high-quality output.

Method 3: Normalize Audio with Audacity
Audacity is a popular audio editor that works wonders for professional music producers. This free, open-source platform has taken audio editing to newer levels with a wide range of advanced features; there is a spectrogram view mode for visualizing and selecting frequencies. In addition, there is extensive support for various plug-ins.
Besides audio normalization, the creative platform can record, mix, add filters, and equalize multiple soundtracks. Moreover, when normalizing with Audacity, you don’t have to worry about losing audio quality, thanks to its 16-bit, 24-bit, and 32-bit support.
To take advantage of this excellent audio normalizer, just follow these quick steps and set your audio tone.
Step 1: Open Audacity on your computer
First, download the Audacity software on your computer, and then open the program.

Step 2: Import your audio files
Go to the File tab on the top menu bar and tap on Open. Then select audio files you want to normalize to import, or simply drag and drop the files on the main screen.

Step 3: Customize audio normalization settings
Now, select the added audio clip and go to Effect on the top menu bar. From the dropdown, choose Normalize and type your desired volume level into the dB.

Step 4: Normalize audio
After editing the normalization settings, click the OK button to start normalizing.

Step 5: Save the audio file
Once finished, select Export under the File tab, and choose how you want to save the file.

FAQs about Normalizing Audio
Here we sorted out some frequently asked questions about audio normalization, which can help you learn more about audio normalization.
1. What dB should I normalize audio to?
Well, that entirely depends on your audio use, and there is no exact number for normalizing an audio clip. However, for safety, the trick is to stay from the maximum volume level of 0 dB. For overall mix levels, most video editors recommend normalizing audio between -10 dB to -20 dB. Likewise, in the case of a dialogue clip, the recommended audio levels are -12 dB to -15 dB. Still some other suggestions are
- Music: -18 dB to -22 dB
- Soundeffects: -10 dB to -20 dB
2. What is the difference between audio normalization and compression?
Audio normalization only and purely changes the volume of a sound by applying a constant amount of gain with a goal to make the loudest peak reach 0 Db. And while normalizing also matches multiple audios to the same volume, it still does not affect the sound dynamics, unlike compression.
On the flip side, audio compression chops off the audio peaks in your recording to get a fuller, louder sound without reaching the clipping limit. In compression, you are changing a proportion of the audio over time in varying amounts.
3. Will the audio normalization process affect the sound quality?
Fortunately, no. Audio normalization, when appropriately done with the help of efficient audio editors, never affects the audio quality. When normalizing an audio clip, the digital bit having the highest level below 0 dB is identified, and all the other bits of the audio are amplified to the same level. This translates to no change in the relative difference between every bit, while the noise level also does not change. So, yes, the only thing affected is the output level and not the quality of the track.
Summing up
Audio normalization is an emerging trend as a good idea to manage high-quality audio levels. This feature can indeed benefit the final steps of mastering music production. However, you need to be careful when deciding where and when to normalize audio or avoid it for better results.
So, are you ready to level up your audio game? The above-mentioned audio editing tools are top-notch normalizers that will do the work for you. Also, don’t forget to try Wondershare Filmora’s distinctive auto normalization feature to produce studio-quality audio.
Richard Bennett
Richard Bennett is a writer and a lover of all things video.
Follow @Richard Bennett
Richard Bennett
Mar 27, 2024• Proven solutions
To normalize audio is to apply a constant amount of gain to a recording to bring the amplitude to a target or norm. Or simply put, normalizing any audio file with a normalizer software searches the file for a peak volume to set a defined maximum and then brings up the rest of the audio to the same maximum level.
Audio normalization is a good practice to get your audio levels right for a better-balanced video, especially imperative for dialogue clips that stand out on YouTube and other platforms. However, out of many different reasons, getting the best audio results from old-fashioned AD/DA converters or matching a group of audios on the same volume levels are still the most common.
Nevertheless, it’s not always easy to find an efficient audio normalization tool and – most importantly – to master the process. But no worries because we have you covered. So, dive in to learn some of the best tools and how you can use them to create masterfully balanced soundtracks.
- Method 1: Normalize Audio Online
- Method 2: Normalize Audio with Wondershare Filmora’s Auto Normalization
- Method 3: Normalize Audio with Audacity
Method 1: Normalize Audio Online
Video2edit online video tool is a one-stop solution for all your audio and video editing needs. The versatile online tool offers a suite of editing features, from extracting audio to converting different formats to normalizing audio. With a drag and drop interface, it allows you to enhance the audio quality of your video and share it to YouTube, Facebook, or other social platforms.
Not to mention, it lets you convert your video files to various popular formats such as MP4, AVI, MOV, 3GP, and WEBM. One of the significant advantages of the tool is the convenience. Without any download or subscription fee hassles, you can normalize audio tracks in a few clicks using Video2edit.com. Here’s how you can use the free tool to get good-quality audio results.
Step 1: Launch the Video2edit Normalize audio tool
Begin by launching the online Video2edit.com on your browser. Then, on the main interface, select the Normalize audio tool from the variety of editing tools.
Step 2: Drop or upload your file
Now, drag and drop your video or audio file or tap the Choose file option to import the file from your local device.
Step 3: Normalize audio
From the Covert video to dropdown, choose the video format you want to convert your file to. Then, click on the Start button to start normalizing your file.
Step 4: Download the converted file
Once the conversion is completed, hit Download in front of the converted file to save it to your computer.
Method 2: Normalize Audio with Wondershare Filmora’s Auto Normalization
Yet another advanced audio normalization software is the Wondershare Filmora . Whether you are looking for basic editing tools or some advanced features, Filmora has it all. The powerful editor uses artificial intelligence editing that provides a smart way to improve your audio quality. The essence of this well-known software is the Auto Normalization feature that allows users to modify the volume of multiple recording clips to standard European audio programs at 23.0 LUFS – with just ONE CLICK.
And for the best part, the normalization process is pretty straightforward and lossless with Wondershare Filmora. Below is a quick step-by-step guide to using this intuitive audio enhancer tool.
Step 1: Download and install the Wondershare Filmora
To get started, download, and install the Wondershare Filmora on your PC. Then launch the program to enter the main interface.
Step 2: Import your audio/video file
From the main menu, go to Import media, then click on Import media files and select to upload your files in the media box. Once uploaded, drag and drop the media clips onto the timeline.
Step 3: Open the audio editing panel
Next, right-click on the audio or video clip on the timeline and then tap Adjust audio, or you can simply double-click it to enter the audio editing panel.
Step 4: Enable auto audio normalization
On the audio editing panel, scroll down and enable the Auto normalization feature. Wondershare Filmora will analyze and normalize the audio file automatically.
Step 5: Export the normalized file
After the normalization process is completed, preview your video or audio to check the auto normalization. If you are not satisfied with the output, hit Reset and try again. Finally, tap on the Export option, give your file a name, and again hit Export to save the high-quality output.
Method 3: Normalize Audio with Audacity
Audacity is a popular audio editor that works wonders for professional music producers. This free, open-source platform has taken audio editing to newer levels with a wide range of advanced features; there is a spectrogram view mode for visualizing and selecting frequencies. In addition, there is extensive support for various plug-ins.
Besides audio normalization, the creative platform can record, mix, add filters, and equalize multiple soundtracks. Moreover, when normalizing with Audacity, you don’t have to worry about losing audio quality, thanks to its 16-bit, 24-bit, and 32-bit support.
To take advantage of this excellent audio normalizer, just follow these quick steps and set your audio tone.
Step 1: Open Audacity on your computer
First, download the Audacity software on your computer, and then open the program.
Step 2: Import your audio files
Go to the File tab on the top menu bar and tap on Open. Then select audio files you want to normalize to import, or simply drag and drop the files on the main screen.
Step 3: Customize audio normalization settings
Now, select the added audio clip and go to Effect on the top menu bar. From the dropdown, choose Normalize and type your desired volume level into the dB.
Step 4: Normalize audio
After editing the normalization settings, click the OK button to start normalizing.
Step 5: Save the audio file
Once finished, select Export under the File tab, and choose how you want to save the file.
FAQs about Normalizing Audio
Here we sorted out some frequently asked questions about audio normalization, which can help you learn more about audio normalization.
1. What dB should I normalize audio to?
Well, that entirely depends on your audio use, and there is no exact number for normalizing an audio clip. However, for safety, the trick is to stay from the maximum volume level of 0 dB. For overall mix levels, most video editors recommend normalizing audio between -10 dB to -20 dB. Likewise, in the case of a dialogue clip, the recommended audio levels are -12 dB to -15 dB. Still some other suggestions are
- Music: -18 dB to -22 dB
- Soundeffects: -10 dB to -20 dB
2. What is the difference between audio normalization and compression?
Audio normalization only and purely changes the volume of a sound by applying a constant amount of gain with a goal to make the loudest peak reach 0 Db. And while normalizing also matches multiple audios to the same volume, it still does not affect the sound dynamics, unlike compression.
On the flip side, audio compression chops off the audio peaks in your recording to get a fuller, louder sound without reaching the clipping limit. In compression, you are changing a proportion of the audio over time in varying amounts.
3. Will the audio normalization process affect the sound quality?
Fortunately, no. Audio normalization, when appropriately done with the help of efficient audio editors, never affects the audio quality. When normalizing an audio clip, the digital bit having the highest level below 0 dB is identified, and all the other bits of the audio are amplified to the same level. This translates to no change in the relative difference between every bit, while the noise level also does not change. So, yes, the only thing affected is the output level and not the quality of the track.
Summing up
Audio normalization is an emerging trend as a good idea to manage high-quality audio levels. This feature can indeed benefit the final steps of mastering music production. However, you need to be careful when deciding where and when to normalize audio or avoid it for better results.
So, are you ready to level up your audio game? The above-mentioned audio editing tools are top-notch normalizers that will do the work for you. Also, don’t forget to try Wondershare Filmora’s distinctive auto normalization feature to produce studio-quality audio.
Richard Bennett
Richard Bennett is a writer and a lover of all things video.
Follow @Richard Bennett
“Hear & Save: Discovering the Best Audio Devices for Effortless Voice Recording”
Top 10 Audio Recording Software to Capture Your Voice Easily

Shanoon Cox
Mar 27, 2024• Proven solutions
Whether professional or for amateur purposes, the audio recording software programs are very important. These programs allow manipulating the audio so that it matches the need for a specific project.
The best audio recording software has a variety of tools embedded to polish the audio recorded, in which this article we are going to review the best of them for you.
What is Audio Recording Software?
As the name suggests, the audio recording software is used to record audio using a unique technology. This allows the users to capture their own or the voice they want and transfer it wherever they want. The software also adds effects to the voice and makes it professional to use wherever the user wants to.
What Does a Sound Recorder Use for?
There are several uses of audio recording software program. Some are listed as under:
- In the music field, this software is of great use. It can be used for multitrack recording. The mixing of the sound is then done using the same or different tools.
- The audio recorded can be edited with ease. This includes enhancing and adding effects to it with perfection.
- With microphone use, the recording software can be integrated to make sure that the voice of the user is also recorded if required.
- Some audio recording software programs also come with screen recording, and therefore, these foster multitasking.
List of Top 10 Audio Recording Software Programs
The audio recording software for PC that would make your life easy is mentioned as under.
1.Wondershare DemoCreator
This is by far the best and the most used software program when it comes to audio recording. It is highly reliable and comes with a GUI. The user interface is easy to understand, and so are the functionalities.
With the best and the most advanced controls recording audio has never been this easy. It also acts as Mac audio recording software, and therefore it is highly recommended for all platforms. The frequent updates make this program even easier to use.
Features
- The interface of the program is very easy to use and stress-free.
- The high definition audio can be recorded with ease.
- The program supports 50+ formats to import audio, video, and other files to the system.
- There are highly advanced options for professional audio recording.
- The program can record endless video and audio as far as there is space on your disk.
Pros
- It is one of the programs that support professional audio editing.
- The program is very easy to use as it has a graphical interface.
Cons
- The program is flash software-based, which can slow down the system.
- It does not offer highly advanced audio editing at all.
Supported Platforms
The program can be used with both Windows and Mac.
Go ahead to download and have a try now!
2.WavePad
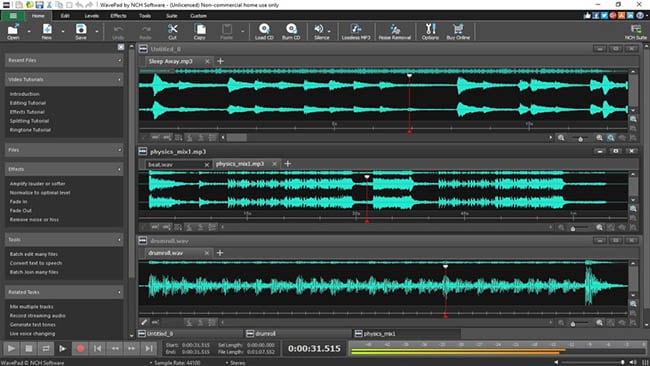
It is one of the best and most used programs to make sure that the audio is recorded with perfection. This program is compatible with most of the audio formats, and therefore it is highly recommended. The overall rating of the program is high as it is used by professionals and, therefore, highly rated as well.
Features
- It has several audio enhancing capabilities, which include amplification and effect addition.
- The audio can be edited, trimmed, and cropped with this program.
- The professional-quality sound recording is used by this program to enhance the capabilities.
Pros
- The best part of this program is its quality of end product that is very high.
- It is a wave editor that gives the users more control over the end product.
Cons
- The mp3 editor of this program does not offer top quality work.
- The program cannot work with multiple files efficiently.
Supported Platforms
It can be installed over Mac, Windows, Android, and iOS.
3.Ocenaudio

As a cross-platform program, this one has a lot to offer. The interface is a bit technical, but overall the use of the program is easy once the hands-on is done. The program is also highly intuitive and allows the users to overcome the day to day audio recording and editing tasks.
Features
- The Ocen Framework is also integrated with this platform to enhance its capabilities.
- The program also records screen if required by the users.
- It is one of the programs that have been rated on other high-end platforms.
Pros
- The program uses auto trim and voice recording controls.
- The sound spectral analysis of the program is highly advanced.
Cons
- The program cannot directly load the file from a CD.
- The program cannot be opened in multiple screens, so the work rate is slow.
Supported Platforms
It is compatible with Mac, Windows, and Linux.
4.Adobe Audition

It can be rightfully regarded as one of the best and the most advanced programs. Backed by years of Adobe experience, it is a program that will get the user a step forward. It is highly recommended to all those users that are looking for a professional level of audio recording.
Features
- It includes multitrack, wave editing, and audio restoration tools to give the best results.
- The essential sound panel has been integrated with the program to get the best oomph effect to the audio.
- The music clips can be integrated within the audio recording to make it sound professional.
Pros
- The platform can be used to create awesome podcasts.
- The audio break can be repaired with perfection.
Cons
- It is expensive, so all the users cannot afford it at all.
- The interface is high tech in nature and requires time to learn.
Supported Platforms
It is supported by Windows and Mac.
5.Audacity

It is free software that is used to record audio professionally. This high-performance program makes sure that the audio which is recorded is also shared with different platforms. The built-in panel is upgraded, and therefore it is highly advance.
Features
- It is ad-free and therefore provides hassle-free work.
- The audio editing and recording have never been as easy as it is with audacity.
- Multitrack editing is also possible with this program.
Pros
- The VST plugin support is provided by the program.
- It is a portable program that can be used for pitch correction.
Cons
- The noise reduction tool of this program needs an upgrade.
- The record to tape feature is currently unavailable.
Supported Platforms
It is supported by Mac, Linux, Windows, and BSD.
6.Wavosaur

It is one of the free programs that can be regarded as better than many paid ones. It is all because the qualities of the program are matchless. The processing of files is done with WAV and Mp3 files filter, which makes the process very much easier.
Features
- The program has multiple document interfaces for multiple file handling.
- The editing features such as cut, copy, paste, and edit can be performed in a single window.
- The waveform representation of the program is accurate and highly advanced.
Pros
- The program offers bit depth convert, pitch shift, and DC offset removal.
- The VST effects can be added to the entire batch of sound files.
Cons
- The audio routing and the multichannel support of the program are not efficient.
- The software sampler extraction is a bit slow when it comes to this program.
Supported Platforms
The program can only be installed on Windows.
7.MixPad
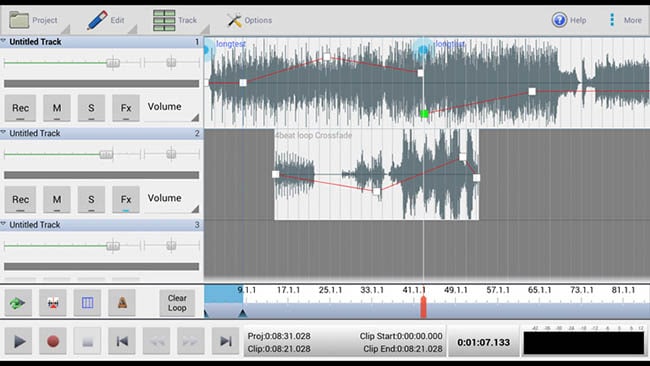
The audio processing and mixing have been made very easy with this platform. The program has an interface that is sleek in design and allows the processing of the audio info with care. The program also supports cloud storage, which means that the entire user’s hard work remains safe and secures all the time.
Features
- The program can mix the unlimited number of tracks all at the same time.
- Depending upon the requirement, the multiple or a single track can be processed at the same time.
- The program supports almost every sound format, so any type of sound can be imported with perfection.
Pros
- The audio effects such as EQ, compression, and reverb can be added with perfection.
- The latency rate is very low, and the program also offers ASIO support for accurate processing.
Cons
- The program only offers the export of the sound that is up to 32 bits.
- The sample rates of up to 96 kHz are only supported, which is less than most of the other mixers.
Supported Platforms
The program can be installed on Mac, Windows, Android, iPad, and Kindle Fire.
8.Sound Forge

If a user wants to completely control the audio editing process, then this software is for them. It is highly advanced and makes sure that the work that is done is highly précised. From Red Book CD creation to sound design and mixing, this program provides the users with complete control and authority over the process.
Features
- The multichannel WAV recording and processing is now possible with the new version of the program.
- The VST plugin support is provided by this program with perfection.
- The VST effects can be chained in a virtual rack.
Pros
- The simple digitization and restoration of the audio have been made simple by this program.
- The one-click solutions allow the users to process the audio tracks easily.
Cons
- The program only offers 32 bits of power, which is very low.
- The multiple VST GUI is not supported by this program.
Supported Platforms
The Sound Forge can be installed on Mac and Windows.
9.Spek

The best part of the software is that it is free and allows the users to overcome the problems which the other audio recorders present. The interface is easy to learn, and therefore the overall usage is easy. The lossless quality is something for which the software is known for. It also supports the FFMPEG library.
Features
- The signal processing is ultra-fast as it uses several threads to process audio.
- The drag and drop support of the program is highly efficient, and the program supports common audio formats.
- The program can be accessed in 19 different languages.
Pros
- The spectral density rulers allow the auto fitting of time.
- The spectral density range of the program is also adjustable.
Cons
- The codec names are, and the audio signal parameters cannot be seen.
- The program is licensed under GPLv3, which is now obsolete.
Supported Platforms
The program is compatible with Windows, Linux, and Mac.
10.Audio Highjack

The program, as the name suggests, makes it possible for the users to completely delve deep into the process of audio editing. The interface, as well as the controls, is very easy to understand and use. For novice users, this program is highly recommended as it makes audio editing a fun-filled activity.
Features
- It provides detailed statistics and min, the max value per channel.
- The processed audio can be listened in real-time to get an idea about the end product.
- The waveform generator and frequency impulse train are embedded within the program.
Pros
- The lame encoder support has been embedded within the recorder to export mp3 files.
- The editor’s look is skin able, which can be changed as per the user choice.
Cons
- The processing options are less as compared to the other recorders.
- The audio files cannot be exported as text, so the program cannot be used with PSpice.
Supported Platforms
The program is only available for Mac.
A Roundup of the Best Audio Recording Software Programs
| No. | Tools | Rating | Supported Formats | Price | Processing Power |
|---|---|---|---|---|---|
| 1 | DemoCreator | 4.5 | .mp3, .m4a, .wav, .wma, .ogg, .flac, .aif, .aiff | $29.99 | 64-bit |
| 2 | WavePad | 4.4 | vox, gsm, WMA, real audio, au, aif, FLAC, and Ogg | $69.95 | 64-bit |
| 3 | Ocenaudio | 4.0 | vox, gsm, WMA, wav, .wma, .ogg, and .flac | Free | 32-bit |
| 4 | Adobe Audition | 4.5 | AIF, AIFF, AIFC | $74.99 | 64-bit |
| 5 | Audacity | 3.9 | mp3, wav, AIFF, au, and ogg | Free | 32-bit |
| 6 | Wavosaur | 3.5 | VST plugins, ASIO driver, multichannel wav files, real-time effect processing. | Free | 32-bit |
| 7 | MixPad | 3.2 | wav, mp3, vox, and gsm | $129 | 32-bit |
| 8 | Sound Forge | 4.0 | SWF, RealMedia 9, WMA, AVI , AIFF, AIF, and SND | Free | 32-bit |
| 9 | Spek | 4.4 | vox, gsm, WMA, Wav, WMA, real audio, au, aif, FLAC, and Ogg | Free | 64-bit |
| 10 | Audio Highjack | 4.2 | .mp3, .m4a, .wav, .wma, aif, FLAC, and Ogg | Free | 64-bit |
Conclusion
With the overall specs and ratings by the users, the Wondershare DemoCreator is the best software that should be used for audio recording.
The program is highly compatible with major operating systems, and therefore it is highly recommended. The overall mechanism is easy, and the program also supports multiple formats.
It is highly technical and is constantly upgraded to make sure that it remains in line with modern technologies. It is a one-stop-shop for all the audio recording needs of the users and therefore highly viable.
With this program, the audio that has been worked on can be shared on most popular social media platforms like YouTube and Facebook.
Shanoon Cox
Shanoon Cox is a writer and a lover of all things video.
Follow @Shanoon Cox
Shanoon Cox
Mar 27, 2024• Proven solutions
Whether professional or for amateur purposes, the audio recording software programs are very important. These programs allow manipulating the audio so that it matches the need for a specific project.
The best audio recording software has a variety of tools embedded to polish the audio recorded, in which this article we are going to review the best of them for you.
What is Audio Recording Software?
As the name suggests, the audio recording software is used to record audio using a unique technology. This allows the users to capture their own or the voice they want and transfer it wherever they want. The software also adds effects to the voice and makes it professional to use wherever the user wants to.
What Does a Sound Recorder Use for?
There are several uses of audio recording software program. Some are listed as under:
- In the music field, this software is of great use. It can be used for multitrack recording. The mixing of the sound is then done using the same or different tools.
- The audio recorded can be edited with ease. This includes enhancing and adding effects to it with perfection.
- With microphone use, the recording software can be integrated to make sure that the voice of the user is also recorded if required.
- Some audio recording software programs also come with screen recording, and therefore, these foster multitasking.
List of Top 10 Audio Recording Software Programs
The audio recording software for PC that would make your life easy is mentioned as under.
1.Wondershare DemoCreator
This is by far the best and the most used software program when it comes to audio recording. It is highly reliable and comes with a GUI. The user interface is easy to understand, and so are the functionalities.
With the best and the most advanced controls recording audio has never been this easy. It also acts as Mac audio recording software, and therefore it is highly recommended for all platforms. The frequent updates make this program even easier to use.
Features
- The interface of the program is very easy to use and stress-free.
- The high definition audio can be recorded with ease.
- The program supports 50+ formats to import audio, video, and other files to the system.
- There are highly advanced options for professional audio recording.
- The program can record endless video and audio as far as there is space on your disk.
Pros
- It is one of the programs that support professional audio editing.
- The program is very easy to use as it has a graphical interface.
Cons
- The program is flash software-based, which can slow down the system.
- It does not offer highly advanced audio editing at all.
Supported Platforms
The program can be used with both Windows and Mac.
Go ahead to download and have a try now!
2.WavePad
It is one of the best and most used programs to make sure that the audio is recorded with perfection. This program is compatible with most of the audio formats, and therefore it is highly recommended. The overall rating of the program is high as it is used by professionals and, therefore, highly rated as well.
Features
- It has several audio enhancing capabilities, which include amplification and effect addition.
- The audio can be edited, trimmed, and cropped with this program.
- The professional-quality sound recording is used by this program to enhance the capabilities.
Pros
- The best part of this program is its quality of end product that is very high.
- It is a wave editor that gives the users more control over the end product.
Cons
- The mp3 editor of this program does not offer top quality work.
- The program cannot work with multiple files efficiently.
Supported Platforms
It can be installed over Mac, Windows, Android, and iOS.
3.Ocenaudio
As a cross-platform program, this one has a lot to offer. The interface is a bit technical, but overall the use of the program is easy once the hands-on is done. The program is also highly intuitive and allows the users to overcome the day to day audio recording and editing tasks.
Features
- The Ocen Framework is also integrated with this platform to enhance its capabilities.
- The program also records screen if required by the users.
- It is one of the programs that have been rated on other high-end platforms.
Pros
- The program uses auto trim and voice recording controls.
- The sound spectral analysis of the program is highly advanced.
Cons
- The program cannot directly load the file from a CD.
- The program cannot be opened in multiple screens, so the work rate is slow.
Supported Platforms
It is compatible with Mac, Windows, and Linux.
4.Adobe Audition
It can be rightfully regarded as one of the best and the most advanced programs. Backed by years of Adobe experience, it is a program that will get the user a step forward. It is highly recommended to all those users that are looking for a professional level of audio recording.
Features
- It includes multitrack, wave editing, and audio restoration tools to give the best results.
- The essential sound panel has been integrated with the program to get the best oomph effect to the audio.
- The music clips can be integrated within the audio recording to make it sound professional.
Pros
- The platform can be used to create awesome podcasts.
- The audio break can be repaired with perfection.
Cons
- It is expensive, so all the users cannot afford it at all.
- The interface is high tech in nature and requires time to learn.
Supported Platforms
It is supported by Windows and Mac.
5.Audacity
It is free software that is used to record audio professionally. This high-performance program makes sure that the audio which is recorded is also shared with different platforms. The built-in panel is upgraded, and therefore it is highly advance.
Features
- It is ad-free and therefore provides hassle-free work.
- The audio editing and recording have never been as easy as it is with audacity.
- Multitrack editing is also possible with this program.
Pros
- The VST plugin support is provided by the program.
- It is a portable program that can be used for pitch correction.
Cons
- The noise reduction tool of this program needs an upgrade.
- The record to tape feature is currently unavailable.
Supported Platforms
It is supported by Mac, Linux, Windows, and BSD.
6.Wavosaur
It is one of the free programs that can be regarded as better than many paid ones. It is all because the qualities of the program are matchless. The processing of files is done with WAV and Mp3 files filter, which makes the process very much easier.
Features
- The program has multiple document interfaces for multiple file handling.
- The editing features such as cut, copy, paste, and edit can be performed in a single window.
- The waveform representation of the program is accurate and highly advanced.
Pros
- The program offers bit depth convert, pitch shift, and DC offset removal.
- The VST effects can be added to the entire batch of sound files.
Cons
- The audio routing and the multichannel support of the program are not efficient.
- The software sampler extraction is a bit slow when it comes to this program.
Supported Platforms
The program can only be installed on Windows.
7.MixPad
The audio processing and mixing have been made very easy with this platform. The program has an interface that is sleek in design and allows the processing of the audio info with care. The program also supports cloud storage, which means that the entire user’s hard work remains safe and secures all the time.
Features
- The program can mix the unlimited number of tracks all at the same time.
- Depending upon the requirement, the multiple or a single track can be processed at the same time.
- The program supports almost every sound format, so any type of sound can be imported with perfection.
Pros
- The audio effects such as EQ, compression, and reverb can be added with perfection.
- The latency rate is very low, and the program also offers ASIO support for accurate processing.
Cons
- The program only offers the export of the sound that is up to 32 bits.
- The sample rates of up to 96 kHz are only supported, which is less than most of the other mixers.
Supported Platforms
The program can be installed on Mac, Windows, Android, iPad, and Kindle Fire.
8.Sound Forge
If a user wants to completely control the audio editing process, then this software is for them. It is highly advanced and makes sure that the work that is done is highly précised. From Red Book CD creation to sound design and mixing, this program provides the users with complete control and authority over the process.
Features
- The multichannel WAV recording and processing is now possible with the new version of the program.
- The VST plugin support is provided by this program with perfection.
- The VST effects can be chained in a virtual rack.
Pros
- The simple digitization and restoration of the audio have been made simple by this program.
- The one-click solutions allow the users to process the audio tracks easily.
Cons
- The program only offers 32 bits of power, which is very low.
- The multiple VST GUI is not supported by this program.
Supported Platforms
The Sound Forge can be installed on Mac and Windows.
9.Spek
The best part of the software is that it is free and allows the users to overcome the problems which the other audio recorders present. The interface is easy to learn, and therefore the overall usage is easy. The lossless quality is something for which the software is known for. It also supports the FFMPEG library.
Features
- The signal processing is ultra-fast as it uses several threads to process audio.
- The drag and drop support of the program is highly efficient, and the program supports common audio formats.
- The program can be accessed in 19 different languages.
Pros
- The spectral density rulers allow the auto fitting of time.
- The spectral density range of the program is also adjustable.
Cons
- The codec names are, and the audio signal parameters cannot be seen.
- The program is licensed under GPLv3, which is now obsolete.
Supported Platforms
The program is compatible with Windows, Linux, and Mac.
10.Audio Highjack
The program, as the name suggests, makes it possible for the users to completely delve deep into the process of audio editing. The interface, as well as the controls, is very easy to understand and use. For novice users, this program is highly recommended as it makes audio editing a fun-filled activity.
Features
- It provides detailed statistics and min, the max value per channel.
- The processed audio can be listened in real-time to get an idea about the end product.
- The waveform generator and frequency impulse train are embedded within the program.
Pros
- The lame encoder support has been embedded within the recorder to export mp3 files.
- The editor’s look is skin able, which can be changed as per the user choice.
Cons
- The processing options are less as compared to the other recorders.
- The audio files cannot be exported as text, so the program cannot be used with PSpice.
Supported Platforms
The program is only available for Mac.
A Roundup of the Best Audio Recording Software Programs
| No. | Tools | Rating | Supported Formats | Price | Processing Power |
|---|---|---|---|---|---|
| 1 | DemoCreator | 4.5 | .mp3, .m4a, .wav, .wma, .ogg, .flac, .aif, .aiff | $29.99 | 64-bit |
| 2 | WavePad | 4.4 | vox, gsm, WMA, real audio, au, aif, FLAC, and Ogg | $69.95 | 64-bit |
| 3 | Ocenaudio | 4.0 | vox, gsm, WMA, wav, .wma, .ogg, and .flac | Free | 32-bit |
| 4 | Adobe Audition | 4.5 | AIF, AIFF, AIFC | $74.99 | 64-bit |
| 5 | Audacity | 3.9 | mp3, wav, AIFF, au, and ogg | Free | 32-bit |
| 6 | Wavosaur | 3.5 | VST plugins, ASIO driver, multichannel wav files, real-time effect processing. | Free | 32-bit |
| 7 | MixPad | 3.2 | wav, mp3, vox, and gsm | $129 | 32-bit |
| 8 | Sound Forge | 4.0 | SWF, RealMedia 9, WMA, AVI , AIFF, AIF, and SND | Free | 32-bit |
| 9 | Spek | 4.4 | vox, gsm, WMA, Wav, WMA, real audio, au, aif, FLAC, and Ogg | Free | 64-bit |
| 10 | Audio Highjack | 4.2 | .mp3, .m4a, .wav, .wma, aif, FLAC, and Ogg | Free | 64-bit |
Conclusion
With the overall specs and ratings by the users, the Wondershare DemoCreator is the best software that should be used for audio recording.
The program is highly compatible with major operating systems, and therefore it is highly recommended. The overall mechanism is easy, and the program also supports multiple formats.
It is highly technical and is constantly upgraded to make sure that it remains in line with modern technologies. It is a one-stop-shop for all the audio recording needs of the users and therefore highly viable.
With this program, the audio that has been worked on can be shared on most popular social media platforms like YouTube and Facebook.
Shanoon Cox
Shanoon Cox is a writer and a lover of all things video.
Follow @Shanoon Cox
The Ultimate Guide to Adding Auto-Tuned Magic in Audacity
You might be surprised to learn that audacity’s many default audio effects do not include an autotune feature if you have ever had to correct a song’s pitch or tuning. Not to worry!. GSnap is a free plugin that lets you use autotune (not to be confused with Auto-Tune) in audacity. On Windows, Mac OS X, and Linux computers, you can autotune and adjust the pitch of recorded files using GSnap.
This article will guide you to download the audacity autotune plugin to your computer and install it. Then you will be able to adjust the pitch of your sounds easily and tune them automatically without any hassle. This is a free download that can be installed in audacity to help you fine-tune your live vocal performance. During vocal pitch correction, it allows audacity to expand its functionality.
How Does Auto-tune Works?
Negative feedback from listeners is a common occurrence for singers. They need to satisfy their audience by giving them their most perfect production numbers. Nevertheless, there are instances when they need the aid of a device to conceal their mistakes or avoid making them. So they lip-sync and autotune their prerecorded songs.
Singers and music producers are not the only ones to use autotune. The most common users are ordinary people who have made music creation a part of their lives. Then how does autotuning operate?
The pitch is raised to the nearest correct tone when a person sings with the key off (out-of-tune). Moreover, the distortion can mask the out-of-tune parts (especially the highest and lowest pitches) in the overall performance.
How To Add Autotune To Audacity Using GSnap?
The autotune effect in audacity is enabled by the GSnap plugin (from GVST). This might be useful for correcting your pitch or creating a robotic voice. You can download it for free and install it on your computer.
You need to follow the steps to get a free autotune for audacity. Be sure to follow every step to avoid any issues.
Step 1
Find GVST - GSnap by searching Google. You can find information about GVST on the official website.

Step 2
The downloads section can be found at the top of the page. When you click it, you will be taken to the Downloads page.

Step 3
Find GSnap from the list of downloads and click on it. A new page will open to find a GSnap download link. Once you click on it, a zip file will be downloaded to your pc. Keep in mind that this download will only work for windows. For mac and Linux, there will be a separate download link.
Step 4
Open the downloaded zip file and extract all files in it.
Step 5
There will be two files present in the folder once you have extracted them. Copy the .dll file to the Audacity plugin directory. Find the Audacity folder in the Program Files folder on your computer. Paste your copied file into the plugins subfolder. Your plugins will be added.
If you are using macOS, then open the Applications folder, right-click audacity’s icon, and choose “Show Package Contents.” Next, open the folders “Contents” and “Extensions.”

Step 6
In some cases, you may be asked for the administrator’s permission. All you need to do is click on the “Continue Anyway” button if a dialogue box appears and wait for any undergoing process to complete.
Step 7
Now run the audacity program, and if it is already running, you may need to restart it to recognize the autotune audacity plugin.
Step 8
Try recording a new sound in audacity, or you can also open an existing one from your system.
Step 9
Choose the Add / Remove plugins option from the Effects menu in the menu bar. You can enable GSnap by scrolling down and clicking on Enable. Click OK to continue.

Step 10
GSnap will appear as an effective option under the “Effect” tab in audacity with the new update. Clicking on it will open a window that allows you to tune your audio file automatically.
GSnap has several options and knobs that can be used individually to autotune audio files. Get more information on GSnap’s online manual or by experimenting with the options.
Final Verdict
There is no doubt that autotune feature is a necessity of sound producers these days. Although it isn’t present in audacity, which is the most widely used tool for audio editing but using GSnap, you can get auto tune for audacity now. It is free to download, and in this article, we showed you how you could easily add it to audacity in just a few simple steps.
For Win 7 or later (64-bit)
For macOS 10.12 or later
Step 2
The downloads section can be found at the top of the page. When you click it, you will be taken to the Downloads page.
Step 3
Find GSnap from the list of downloads and click on it. A new page will open to find a GSnap download link. Once you click on it, a zip file will be downloaded to your pc. Keep in mind that this download will only work for windows. For mac and Linux, there will be a separate download link.
Step 4
Open the downloaded zip file and extract all files in it.
Step 5
There will be two files present in the folder once you have extracted them. Copy the .dll file to the Audacity plugin directory. Find the Audacity folder in the Program Files folder on your computer. Paste your copied file into the plugins subfolder. Your plugins will be added.
If you are using macOS, then open the Applications folder, right-click audacity’s icon, and choose “Show Package Contents.” Next, open the folders “Contents” and “Extensions.”
Step 6
In some cases, you may be asked for the administrator’s permission. All you need to do is click on the “Continue Anyway” button if a dialogue box appears and wait for any undergoing process to complete.
Step 7
Now run the audacity program, and if it is already running, you may need to restart it to recognize the autotune audacity plugin.
Step 8
Try recording a new sound in audacity, or you can also open an existing one from your system.
Step 9
Choose the Add / Remove plugins option from the Effects menu in the menu bar. You can enable GSnap by scrolling down and clicking on Enable. Click OK to continue.
Step 10
GSnap will appear as an effective option under the “Effect” tab in audacity with the new update. Clicking on it will open a window that allows you to tune your audio file automatically.
GSnap has several options and knobs that can be used individually to autotune audio files. Get more information on GSnap’s online manual or by experimenting with the options.
Final Verdict
There is no doubt that autotune feature is a necessity of sound producers these days. Although it isn’t present in audacity, which is the most widely used tool for audio editing but using GSnap, you can get auto tune for audacity now. It is free to download, and in this article, we showed you how you could easily add it to audacity in just a few simple steps.
For Win 7 or later (64-bit)
For macOS 10.12 or later
Also read:
- Updated Voice Transformation Hacks The Top 7 FREE Applications to Consider
- Discover the Finest Deck-Free Podcast Tools for iPhone and Tablets
- Updated Discovering the Leading Mac Audio Mixers - A Complete Assessment
- New Perfect Pitches Made Simple Installing and Utilizing Autotune with Audacity for 2024
- New In 2024, Enhance Your IGTV Content with Tunes
- Updated How To Remove Vocals In Adobe Audition Unveiling The 6 Easy Steps for 2024
- Updated Victory Vibrations Locating Dynamic Cheer Noises
- The 10 Best MP3 to Text File Transcription Aids at Zero Cost - Accommodating with ExpressSlide Pro Integration
- In 2024, Achieving Clarity in Soundscapes Innovative Techniques for Minimizing Audio Distractions, Online/Offline
- The Modern Guide to Implementing Decay in Sound Tracks for 2024
- Rapping Rhythms A Starters Manual for Selecting Beat Drops and Beats
- Updated Silent Stream Sculptors Crafting Audience-Free Video Formats (MP4, MKV, AVI, MOV, WMV) for 2024
- Updated Procuring Immersive Dragon Roar Soundscape for 2024
- New In 2024, How to Design an Awesome Podcast Cover Art An Ultimate Guide
- Updated Cutting-Edge 11 Mobile Audio Tools for Home Studios for 2024
- New 2024 Approved The Leading Voice Alteration and Production Software for Aspiring Sopranos & Tenors
- Updated The Leading Free Platforms for Professional Vocal Enhancement Techniques for 2024
- New In 2024, Converting Audio Clips A Podcast to MP3 Guide with Three Key Steps
- 2024 Approved Best Voice Over Generators
- An Experts Manual on Extracting Sound Without Background Noise Using Audacity
- New The Complete Tutorial on Augmenting Android Video Projects with Essential Audioscapes
- 2024 Approved Unlocking Profound Sound A Guide to Deepening Your Vocal Presence via Filmora
- New Mastering Sound Design with Linux A Deep Dive Into Top Audio Tools
- In 2024, Melody and Mics The 10 Most User-Friendly Voice Capture Tools in Technology
- Updated In 2024, Silent Clip Creation Techniques for Deleting Audio From MP4, MKV, AVI, MOV, and WMV Video Files
- 2024 Approved Discover the Leading 10 Android Apps for Efficient and Clear Voice Capture
- The Technicians Guide to Transforming Distorted Audio Into High-Quality Video Content
- Updated 2024 Approved Simplifying Vocal Alterations The Audacity Technique
- Updated Achieving Clarity in Soundscapes Innovative Techniques for Minimizing Audio Distractions, Online/Offline
- Expert Strategies for Oscillating Between Silence and Sounds in OBS Broadcasting
- Revolutionizing Your Sound IOSs Leading Audio Editing Applications for 2024
- Finding Authentic Clap Sound Implementations for Projects for 2024
- New The Ultimate Step-by-Step Process for Transforming Videos Through Dubbing Using Filmora for 2024
- New Identifying Repositories of Flatulence-Related Auditory Experiences for Creative Use
- Updated 2024 Approved How to Use Autotune in Audacity with Plugins for Free?
- New Melodies to Move You Discovering the Emotional Playlists
- Updated Mastering Sound with These Top 10 Audio Editors Compatible with Windows and Mac
- New In 2024, Blending Audio Sources for Professional Video Production
- Updated Audacity Mastery Modifying Vocal Characteristics to Suit Your Style
- Updated In 2024, No-Cost Video Trimming 10 Best Free Online Tools
- 6 Proven Ways to Unlock Tecno Phantom V Flip Phone When You Forget the Password
- Updated 2024 Approved The Ultimate List Top 10 Free Game Download Sites for PC and Android Devices
- 5 Ways Change Your Home Address in Google/Apple Map on Apple iPhone 15/iPad | Dr.fone
- New 2024 Approved How to Create Loop Videos with Filmora
- Updated Freeze the Action How to Turn Videos Into Photos Using 10 Top Converters for 2024
- New The Ultimate Guide to Video Speed Changer Software for Windows and Mac for 2024
- How to Unlock iPhone 11 Pro With an Apple Watch & What to Do if It Doesnt Work | Dr.fone
- A Comprehensive Guide to iCloud Unlock From iPhone SE (2022) Online
- Recover Apple iPhone 12 mini Data From iTunes Backup | Dr.fone
- Pokemon Go Error 12 Failed to Detect Location On Vivo X Fold 2? | Dr.fone
- How To Upgrade or Downgrade Apple iPhone 12 Pro Max? | Dr.fone
- How to Unlock Apple ID Activation Lock On iPhone 11 Pro?
- Title: In 2024, Precision Audio Leveling in Three Simple Steps
- Author: David
- Created at : 2024-05-20 05:45:51
- Updated at : 2024-05-21 05:45:51
- Link: https://sound-tweaking.techidaily.com/in-2024-precision-audio-leveling-in-three-simple-steps/
- License: This work is licensed under CC BY-NC-SA 4.0.
