
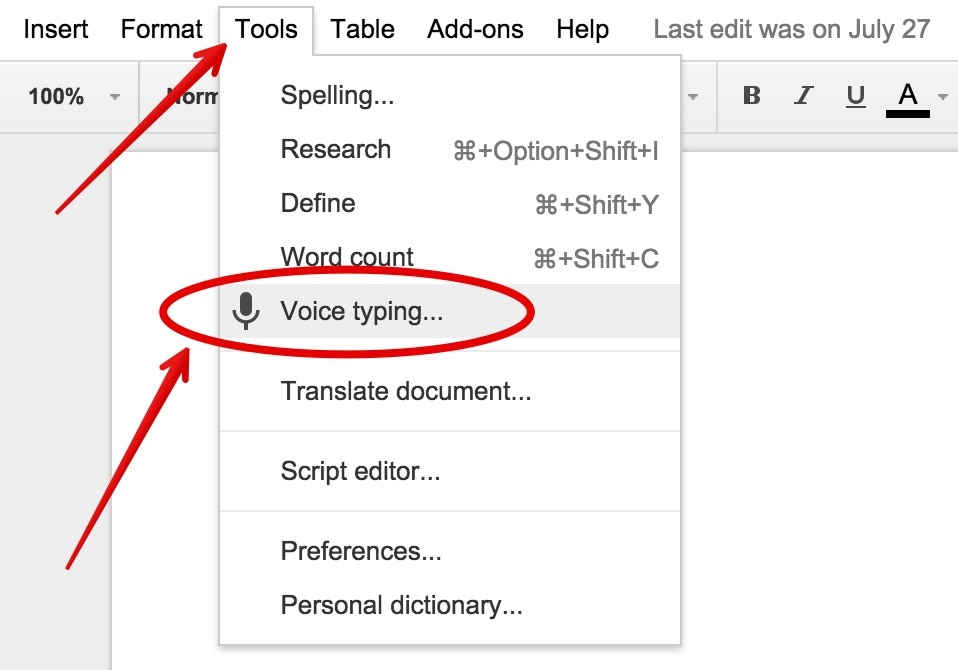
:max_bytes(150000):strip_icc():format(webp)/GettyImages-753288077-5bb0f9b2cff47e00261aa8fc.jpg)
In 2024, Comprehensive Guide to Vimeo Videos Exploring Aspect Ratios and Their Impact
Comprehensive Guide to Vimeo Videos: Exploring Aspect Ratios and Their Impact
Video customization does not come automatically. There is something extraordinary you need to look around. One platform that most people are aware of is YouTube that offers video sharing services. But the world is not so small. There exists a new genre picking up pace with personalized effect. The talk is about Vimeo, the latest trending video streaming site, with a vast viewer base after YouTube.

It is a beautiful platform for those professional videographers, filmmakers, event organizers, graphic designers, or those who want to expand their business and gain a viewer base. While creating videos for the platform, there are some basic requirements such as Vimeo Aspect RatioorVimeo Thumbnail Dimensions. If all these terms look unknown to you, and you are eager to discover more with Vimeo Ratio, you have landed the right place. Here, you will get all the recipe ingredients required to prepare for a professional-looking, customized video through Vimeo.
In this article
04 How big of a File can upload to Vimeo
Part 1: What is Vimeo?
Vimeo is a video streaming and hosting services provider online platform that equips a user with a powerful video customization feature. This feature distinguishes it from other video streaming sites. Vimeo reflects the vision of its founder filmmakers, who furnish advanced video customization features for Audio and Video content. Vimeo renders services from “Freemium” the free users to that of Advance business partners.

Basic features it enabled in itself are:
- Users can customize and promote their videos
- HD audio and video quality
- Freemium account for free usage
- Supports 8K Video resolution
- The pricing plan ranges from $7 to $75
- Specific sites promotion option
- Customized screen end view
- Multiple options such as color, size, or different types of buttons
- For the same URL video replacement option
- Featuring Team collaboration
- Live Streaming
In addition, additional features and services get added up with each account up-gradation.
Part 2: Vimeo Video Requirement
If you are also interested in being a part of Vimeo’s community and geared up to share the video, you must be aware of Vimeo Video requirements and Vimeo dimensions. So that you can upload the video with ease on the site without facing any issue. Let’s look at some of the critical video ratios and other requirements.

- Frame Rate:
Keep the Video Frame Rate constant. Some common frame rates are: 60, 59.94, 50, 30, 29.97, 25, 24, and 23.98. While compressing, keep the frame rate below 60.
- Codecs:
Codecs represent video encoded format. Some of the most recommended codecs are , (), Apple ProRes (HQ) 422
- Color
Most of the color display is acceptable. But the recommended ones are:
- Color Matrix Coefficients/Primaries- [BT.709 (Rec.709), BT.2020, whereas Rec.2020 HLG for Dolby Vision]
- Bit Depth- 10 or more than 10 for better quality.
- Characteristics of Color Transfer- Multiple ranges for SDR. But HLG or PQ (SMPTE 2084) for HDR
- Bit Rate- Video file size, visual quality control by data rate/Bit-rate. Go with Variable Bit Rate. That might range in different parameters, or you can choose from 2 to 50 MBPS. Where for SD (2 to 5), 720P (5 to 10), 1080p (10 to 20), 2k (20 to 30), 4k (30 to 60), 8k (50 to 80).
- Scan Type- Progressive playback is advisable before uploading de-interlace the video.
- Resolution/Aspect Ratio
Though all shapes and sizes are available, the most preferable Vimeo Video Aspect Ratio and Proportions are:
| Format | Aspect Ratio | Resolution |
|---|---|---|
| HD (720P) | 16:9 | 1280X720 |
| HD (1080P) | 16:9 | 1920X1080 |
| SD | 16:9 | 640X360 |
| SD | 4:3 | 640X480 |
| 2K | 16:9 | 2560X1440 |
| UHD (4K) | 16:9 | 3840X2160 |
| UHD (DCI 4K) | 17:9 | 4096X2160 |
| Stereoscopic 360 4K | 2:1 | 4096X2048 |
| Monoscopic 3604K | 2:1 | 4096X2048 |
| UHD 8K | 17:9 | 8192X4320 |
Here, a question that might arise. OK, these are the requirements by Vimeo Video Ratio. But, how to set the Vimeo dimensions? For this purpose, one valuable suggestion is the Wondershare Filmora Video Editing tool.
Wondershare Filmora is a friendly and effective interface if looking to adjust the Vimeo Video size ratio or pre-setting the Vimeo Aspect Ratio to make it as per the norms of Vimeo. Then we can go with the efficient, quick, and easy-to-use way to edit the Vimeo Aspect ratio.
Versatile Video Editor - Wondershare Filmora
An easy yet powerful editor
Numerous effects to choose from
Detailed tutorials provided by the official channel
Steps are simple: land the home page of Wondershare Filmora, upload your video project, and select the desired video Ratiounder project settings.
Part 3: Size Limit of Vimeo File
Are you ready to create an exciting video and about to upload that into your Vimeo account? Then, there is a precious suggestion to you. Wait for a while, as some restrictions come under Vimeo dimensions uploading. And you must be aware of that. Let’s first understand about Size Limit of the Vimeo File. In terms of duration, there is no limit, but for file size following criteria is used:
As per Vimeo, the user can upload a file of any size. For instance, it can upload videos ranging from the most minor 30 seconds to a whopping 3-hour duration epics. The maximum limit is 25GB per video.
Part 4: How big of a File can upload to Vimeo
The following important question comes out, how big a file can you upload to Vimeo? Let’s scrap out this information for you:
- Basic account- 5GB total
- Vimeo Plus- Up to 250 GB in a year
- Vimeo Pro- 1TB in a Year
- Vimeo Business- 5 TB in total
- Vimeo Premium – 7 TB in total
So, by checking the above criteria, it becomes easy for you to create and upload your video as per the mentioned guidelines. So, let you be ready with your sizzling video following Vimeo ratio and size criteria.
Part 5: Vimeo Weekly Upload Limit
Now, it is crucial to understand. What could be the weekly upload limit to your Vimeo account? As accordingly, you will plan for the appropriate tab. Here are the details:
- Free Account- 500 MB/week
- Vimeo Plus Account- 5GB/week
- Vimeo Pro Account- 20GB/week
- Vimeo Business Account- No Weekly Limit
- Vimeo Premium Account- Unlimited Live Streaming
It looks like Vimeo has divided its size criteria into different frames, usage, daily basis, weekly basis, yearly basis, and maximum limit. So, if you, as a potential user, have all this valuable information to grow your business, hobby, or any peculiar interest, it will become a bonanza to your efforts. As exemplary efforts always show the way to success. I hope that till now, all your queries, concerns such as Vimeo Thumbnail dimensions, Vimeo Video Size ratio, duration, size limit gets filled up. So, without delay, rock on in the video world of Vimeo and let the world know your potential right away.
Conclusion:
Vimeo Video Size Ratio and other requirements to upload your video to the Vimeo site are covered here. Indeed, these will be going to be the milestone to start or progress your business with Vimeo. Vimeo is trending nowadays, especially among the users who prefer a customized look to their video and a solution to grow their business with proper after support. So, doing little pre-work in terms of Vimeo Video Dimensions will pave the way to start your journey. In addition, while adjusting Vimeo Aspect Ratio, Wondershare Filmora will act as the right approach with appropriate tools to change the Vimeo Aspect Ratio and other important editing options. All the best!
04 How big of a File can upload to Vimeo
Part 1: What is Vimeo?
Vimeo is a video streaming and hosting services provider online platform that equips a user with a powerful video customization feature. This feature distinguishes it from other video streaming sites. Vimeo reflects the vision of its founder filmmakers, who furnish advanced video customization features for Audio and Video content. Vimeo renders services from “Freemium” the free users to that of Advance business partners.
Basic features it enabled in itself are:
- Users can customize and promote their videos
- HD audio and video quality
- Freemium account for free usage
- Supports 8K Video resolution
- The pricing plan ranges from $7 to $75
- Specific sites promotion option
- Customized screen end view
- Multiple options such as color, size, or different types of buttons
- For the same URL video replacement option
- Featuring Team collaboration
- Live Streaming
In addition, additional features and services get added up with each account up-gradation.
Part 2: Vimeo Video Requirement
If you are also interested in being a part of Vimeo’s community and geared up to share the video, you must be aware of Vimeo Video requirements and Vimeo dimensions. So that you can upload the video with ease on the site without facing any issue. Let’s look at some of the critical video ratios and other requirements.
- Frame Rate:
Keep the Video Frame Rate constant. Some common frame rates are: 60, 59.94, 50, 30, 29.97, 25, 24, and 23.98. While compressing, keep the frame rate below 60.
- Codecs:
Codecs represent video encoded format. Some of the most recommended codecs are , (), Apple ProRes (HQ) 422
- Color
Most of the color display is acceptable. But the recommended ones are:
- Color Matrix Coefficients/Primaries- [BT.709 (Rec.709), BT.2020, whereas Rec.2020 HLG for Dolby Vision]
- Bit Depth- 10 or more than 10 for better quality.
- Characteristics of Color Transfer- Multiple ranges for SDR. But HLG or PQ (SMPTE 2084) for HDR
- Bit Rate- Video file size, visual quality control by data rate/Bit-rate. Go with Variable Bit Rate. That might range in different parameters, or you can choose from 2 to 50 MBPS. Where for SD (2 to 5), 720P (5 to 10), 1080p (10 to 20), 2k (20 to 30), 4k (30 to 60), 8k (50 to 80).
- Scan Type- Progressive playback is advisable before uploading de-interlace the video.
- Resolution/Aspect Ratio
Though all shapes and sizes are available, the most preferable Vimeo Video Aspect Ratio and Proportions are:
| Format | Aspect Ratio | Resolution |
|---|---|---|
| HD (720P) | 16:9 | 1280X720 |
| HD (1080P) | 16:9 | 1920X1080 |
| SD | 16:9 | 640X360 |
| SD | 4:3 | 640X480 |
| 2K | 16:9 | 2560X1440 |
| UHD (4K) | 16:9 | 3840X2160 |
| UHD (DCI 4K) | 17:9 | 4096X2160 |
| Stereoscopic 360 4K | 2:1 | 4096X2048 |
| Monoscopic 3604K | 2:1 | 4096X2048 |
| UHD 8K | 17:9 | 8192X4320 |
Here, a question that might arise. OK, these are the requirements by Vimeo Video Ratio. But, how to set the Vimeo dimensions? For this purpose, one valuable suggestion is the Wondershare Filmora Video Editing tool.
Wondershare Filmora is a friendly and effective interface if looking to adjust the Vimeo Video size ratio or pre-setting the Vimeo Aspect Ratio to make it as per the norms of Vimeo. Then we can go with the efficient, quick, and easy-to-use way to edit the Vimeo Aspect ratio.
Versatile Video Editor - Wondershare Filmora
An easy yet powerful editor
Numerous effects to choose from
Detailed tutorials provided by the official channel
Steps are simple: land the home page of Wondershare Filmora, upload your video project, and select the desired video Ratiounder project settings.
Part 3: Size Limit of Vimeo File
Are you ready to create an exciting video and about to upload that into your Vimeo account? Then, there is a precious suggestion to you. Wait for a while, as some restrictions come under Vimeo dimensions uploading. And you must be aware of that. Let’s first understand about Size Limit of the Vimeo File. In terms of duration, there is no limit, but for file size following criteria is used:
As per Vimeo, the user can upload a file of any size. For instance, it can upload videos ranging from the most minor 30 seconds to a whopping 3-hour duration epics. The maximum limit is 25GB per video.
Part 4: How big of a File can upload to Vimeo
The following important question comes out, how big a file can you upload to Vimeo? Let’s scrap out this information for you:
- Basic account- 5GB total
- Vimeo Plus- Up to 250 GB in a year
- Vimeo Pro- 1TB in a Year
- Vimeo Business- 5 TB in total
- Vimeo Premium – 7 TB in total
So, by checking the above criteria, it becomes easy for you to create and upload your video as per the mentioned guidelines. So, let you be ready with your sizzling video following Vimeo ratio and size criteria.
Part 5: Vimeo Weekly Upload Limit
Now, it is crucial to understand. What could be the weekly upload limit to your Vimeo account? As accordingly, you will plan for the appropriate tab. Here are the details:
- Free Account- 500 MB/week
- Vimeo Plus Account- 5GB/week
- Vimeo Pro Account- 20GB/week
- Vimeo Business Account- No Weekly Limit
- Vimeo Premium Account- Unlimited Live Streaming
It looks like Vimeo has divided its size criteria into different frames, usage, daily basis, weekly basis, yearly basis, and maximum limit. So, if you, as a potential user, have all this valuable information to grow your business, hobby, or any peculiar interest, it will become a bonanza to your efforts. As exemplary efforts always show the way to success. I hope that till now, all your queries, concerns such as Vimeo Thumbnail dimensions, Vimeo Video Size ratio, duration, size limit gets filled up. So, without delay, rock on in the video world of Vimeo and let the world know your potential right away.
Conclusion:
Vimeo Video Size Ratio and other requirements to upload your video to the Vimeo site are covered here. Indeed, these will be going to be the milestone to start or progress your business with Vimeo. Vimeo is trending nowadays, especially among the users who prefer a customized look to their video and a solution to grow their business with proper after support. So, doing little pre-work in terms of Vimeo Video Dimensions will pave the way to start your journey. In addition, while adjusting Vimeo Aspect Ratio, Wondershare Filmora will act as the right approach with appropriate tools to change the Vimeo Aspect Ratio and other important editing options. All the best!
Online Learning Module: A Complete Overview
Video Podcasts: Everything You Need to Know

Benjamin Arango
Mar 27, 2024• Proven solutions
The journalists, influencers, celebrities, and a friend of yours, everyone has a podcast! Even though the podcast is there for a decade, it is becoming highly famous now. It all started in 2005 when Apple announced broadcasting podcasts. There were radios before podcasting, and still, they are there!

We are now talking about video podcasts in the best possible manner. Is it worth creating video when it is primarily for audio format? Yes, it is not that easy as it seems to be! There are many versions to create video podcasts. Turning on a video while making a podcast is quite smart as now you have the required video content to post on YouTube. But that would be painful if you can’t hold the audience’s attention for more than five minutes. Visually compelling contents seem to be very important, especially when hosting your podcast on a central social platform such as YouTube.
Stay tuned as we are going to unleash the required elements to make the best video podcasts!
- Part1: What is a Video Podcast?
- Part2: Video Podcast v/s Vlog: What’s the Difference?
- Part3: Pros and Cons of Video Podcasting
- Part4: How to create a Video Podcast?
What is a Video Podcast?
In simple words, a video podcast is generally a video format of audio podcasts. Overall, it is video content than mere audio content. Thus, they can’t listen to MP3 players. You must have a high-end digital media player, iTunes, and other video hosting platforms to listen to these kinds of podcasts. You can call it by a different name like vodcasting or videocasting as well. It is a version of podcasting despite other formats or versions of podcasts, including interview format, startup format, etc.
Video Podcast v/s Vlog: What’s the Difference?
There is a visual difference between a vlog and a video podcast. Even though you can share both the content formats on a robust platform like YouTube, a video podcast is still different from a vlog in many terms.
Type of Content
The very first Difference is the type of content posted on both platforms. Vlogging is a kind of informal content presentation, whereas a vodcast is presented most formally in different versions.
Style
The vloggers generally show their lifestyles in various forms while also spreading social messages in some of their videos. A vlog may or may not be informative to the audience. On the other hand, a video podcaster is obliged to present its audience with informative content. Whether in the version of a startup, interview, conversational, or a repurposed content, almost every video podcast is highly instructive.
Type of Versions
You can have a video podcast in different versions or formats, including Interviews, Startup Conversations, Laptop Lifestyles, First Launch Conversations, Solo/ Monologue, Co-Hosting, or Hosting Regular Show. On the other hand, vlogging comes in various versions or types, namely Lifestyle, Makeup, Gaming, Fitness, Unboxing, and Reviews. It is generally informally represented to showcase reality to the audience.
Pros and Cons of Video Podcasting
There are many such merits and demerits of video podcasts if you decide to do it on a large scale. As mentioned earlier, it won’t be that easy if you are not consistent and committed. It will also help if you consider the following advantages and disadvantages of video podcasting as follows.
Pros of Video Podcasts
Easy Accessibility
An easy reach and wide accessibility is the first significant advantage of hosting a podcast. Every second person nowadays is fond of listening to podcasts, whether in audio or video formats. A podcast is a whole pack of informational content that doesn’t need further FAQs and similar issues to mention separately. On the other hand, accessibility is also comprehensive as everyone is utilizing the platform like YouTube.
A video podcast is the better alternative if you don’t have the required setup and budget to promote your business operations.
Convenient
Podcasts or Video Podcasts are more convenient options, especially on YouTube. Despite getting high value, a video podcast can listen everywhere when you have YouTube. Due to convenience, they are pretty similar to listening to an audio podcast, which is also free of cost except for your internet charges. A YouTube-hosted video podcast doesn’t need a paid subscription.
Encourages productivity
The very idea of presenting a podcast is to offer authentic information formally. It doesn’t matter what format you choose to host the best video podcast; it contains reliable information and the elements to encourage productivity in viewers’ minds.
Cons of Video Podcasts
The challenging process of finding a relevant audience
It may be super tough to find the relevant audience in the beginning. You may have to advertise on YouTube to see the audience. Else, a strategic marketing policy for your channel to ensure consistency and retention of followers or audience.
Time Consuming
Making a video podcast is generally a time-consuming procedure, specifically when you are new to the technical aspects. Well, a person who is passionate about podcasting can even hire a video editor to fulfill the editing and similar tasks. But that won’t be beneficial in the long run. It’s essential to learn video podcasting and further video editing to cut costs on a long-term basis.
Distracting
You should not create a podcast if it is distracting the audience within the first five minutes. That’s the primary concern as creating visually appealing video podcasts is more than challenging, especially for a beginner. Due to the podcasting hype, many creators develop video podcasts that are not even useful and highly distracting for the audience.
How to create a Video Podcast?
Let’s review the step-by-step guide to create a video podcast, as mentioned below!
Step 1: Content Preparation

So yes, the content preparation is essential and foremost! Check the field and podcast format for which you can create the most awesome content. You must also address the target audience as your first step using various research tools, such as Facebook Groups, Twitter, Reddit, Quora, etc. You can also look at several types of podcast formats discussed above to get started.
Step 2: Recording

A recording is all about using the ideal equipment and setup. It also depends upon your selection of format. For instance, a video podcast in an interview may not need the other guest as in-person if they have a virtual presence. You can record with the on-screen recorder then. Remember to follow the basics of recording, such as facing the camera and remaining in the frame.
Step 3: Editing
Now, there’s a turn to edit the raw video. Editing can be in various forms and can be time-consuming if you are not doing it right. For this purpose, a good video editor is more than crucial. Generally, you are required to adjust the audio and pop in a little video effect with interactive video intros and outros. We want to recommend you the updated and easy to use video editor, namely the Wondershare Filmora X. It has a huge list of stunning video and audio effects with an inbuilt music library to craft your podcasts in the most professional way.


Step 4: Publish
Lastly, now that you have the edited video ready publish your video podcast on your blog or online media, like YouTube, etc.
Conclusion
So, this was all about the general as well as the professional aspect of video podcasts. We’ve tried our best to provide you with reliable info on everything, including the definition, advantages, disadvantages, and the ultimate procedure of creating the best video podcasts. Now, we want to mention that this whole thing is incomplete without an ideal video editor Wondershare Filmora X. This specific editor comes with new updates and the most straightforward user interface, even for the professionals.
Benjamin Arango
Benjamin Arango is a writer and a lover of all things video.
Follow @Benjamin Arango
Benjamin Arango
Mar 27, 2024• Proven solutions
The journalists, influencers, celebrities, and a friend of yours, everyone has a podcast! Even though the podcast is there for a decade, it is becoming highly famous now. It all started in 2005 when Apple announced broadcasting podcasts. There were radios before podcasting, and still, they are there!
We are now talking about video podcasts in the best possible manner. Is it worth creating video when it is primarily for audio format? Yes, it is not that easy as it seems to be! There are many versions to create video podcasts. Turning on a video while making a podcast is quite smart as now you have the required video content to post on YouTube. But that would be painful if you can’t hold the audience’s attention for more than five minutes. Visually compelling contents seem to be very important, especially when hosting your podcast on a central social platform such as YouTube.
Stay tuned as we are going to unleash the required elements to make the best video podcasts!
- Part1: What is a Video Podcast?
- Part2: Video Podcast v/s Vlog: What’s the Difference?
- Part3: Pros and Cons of Video Podcasting
- Part4: How to create a Video Podcast?
What is a Video Podcast?
In simple words, a video podcast is generally a video format of audio podcasts. Overall, it is video content than mere audio content. Thus, they can’t listen to MP3 players. You must have a high-end digital media player, iTunes, and other video hosting platforms to listen to these kinds of podcasts. You can call it by a different name like vodcasting or videocasting as well. It is a version of podcasting despite other formats or versions of podcasts, including interview format, startup format, etc.
Video Podcast v/s Vlog: What’s the Difference?
There is a visual difference between a vlog and a video podcast. Even though you can share both the content formats on a robust platform like YouTube, a video podcast is still different from a vlog in many terms.
Type of Content
The very first Difference is the type of content posted on both platforms. Vlogging is a kind of informal content presentation, whereas a vodcast is presented most formally in different versions.
Style
The vloggers generally show their lifestyles in various forms while also spreading social messages in some of their videos. A vlog may or may not be informative to the audience. On the other hand, a video podcaster is obliged to present its audience with informative content. Whether in the version of a startup, interview, conversational, or a repurposed content, almost every video podcast is highly instructive.
Type of Versions
You can have a video podcast in different versions or formats, including Interviews, Startup Conversations, Laptop Lifestyles, First Launch Conversations, Solo/ Monologue, Co-Hosting, or Hosting Regular Show. On the other hand, vlogging comes in various versions or types, namely Lifestyle, Makeup, Gaming, Fitness, Unboxing, and Reviews. It is generally informally represented to showcase reality to the audience.
Pros and Cons of Video Podcasting
There are many such merits and demerits of video podcasts if you decide to do it on a large scale. As mentioned earlier, it won’t be that easy if you are not consistent and committed. It will also help if you consider the following advantages and disadvantages of video podcasting as follows.
Pros of Video Podcasts
Easy Accessibility
An easy reach and wide accessibility is the first significant advantage of hosting a podcast. Every second person nowadays is fond of listening to podcasts, whether in audio or video formats. A podcast is a whole pack of informational content that doesn’t need further FAQs and similar issues to mention separately. On the other hand, accessibility is also comprehensive as everyone is utilizing the platform like YouTube.
A video podcast is the better alternative if you don’t have the required setup and budget to promote your business operations.
Convenient
Podcasts or Video Podcasts are more convenient options, especially on YouTube. Despite getting high value, a video podcast can listen everywhere when you have YouTube. Due to convenience, they are pretty similar to listening to an audio podcast, which is also free of cost except for your internet charges. A YouTube-hosted video podcast doesn’t need a paid subscription.
Encourages productivity
The very idea of presenting a podcast is to offer authentic information formally. It doesn’t matter what format you choose to host the best video podcast; it contains reliable information and the elements to encourage productivity in viewers’ minds.
Cons of Video Podcasts
The challenging process of finding a relevant audience
It may be super tough to find the relevant audience in the beginning. You may have to advertise on YouTube to see the audience. Else, a strategic marketing policy for your channel to ensure consistency and retention of followers or audience.
Time Consuming
Making a video podcast is generally a time-consuming procedure, specifically when you are new to the technical aspects. Well, a person who is passionate about podcasting can even hire a video editor to fulfill the editing and similar tasks. But that won’t be beneficial in the long run. It’s essential to learn video podcasting and further video editing to cut costs on a long-term basis.
Distracting
You should not create a podcast if it is distracting the audience within the first five minutes. That’s the primary concern as creating visually appealing video podcasts is more than challenging, especially for a beginner. Due to the podcasting hype, many creators develop video podcasts that are not even useful and highly distracting for the audience.
How to create a Video Podcast?
Let’s review the step-by-step guide to create a video podcast, as mentioned below!
Step 1: Content Preparation
So yes, the content preparation is essential and foremost! Check the field and podcast format for which you can create the most awesome content. You must also address the target audience as your first step using various research tools, such as Facebook Groups, Twitter, Reddit, Quora, etc. You can also look at several types of podcast formats discussed above to get started.
Step 2: Recording
A recording is all about using the ideal equipment and setup. It also depends upon your selection of format. For instance, a video podcast in an interview may not need the other guest as in-person if they have a virtual presence. You can record with the on-screen recorder then. Remember to follow the basics of recording, such as facing the camera and remaining in the frame.
Step 3: Editing
Now, there’s a turn to edit the raw video. Editing can be in various forms and can be time-consuming if you are not doing it right. For this purpose, a good video editor is more than crucial. Generally, you are required to adjust the audio and pop in a little video effect with interactive video intros and outros. We want to recommend you the updated and easy to use video editor, namely the Wondershare Filmora X. It has a huge list of stunning video and audio effects with an inbuilt music library to craft your podcasts in the most professional way.
Step 4: Publish
Lastly, now that you have the edited video ready publish your video podcast on your blog or online media, like YouTube, etc.
Conclusion
So, this was all about the general as well as the professional aspect of video podcasts. We’ve tried our best to provide you with reliable info on everything, including the definition, advantages, disadvantages, and the ultimate procedure of creating the best video podcasts. Now, we want to mention that this whole thing is incomplete without an ideal video editor Wondershare Filmora X. This specific editor comes with new updates and the most straightforward user interface, even for the professionals.
Benjamin Arango
Benjamin Arango is a writer and a lover of all things video.
Follow @Benjamin Arango
Premier Lyric Decoding Applications: The Ultimate Guide
An MP3 to text converter allows you to change mp3 files to text files. This program assists in the transcription of interviews, lectures, sermons, conferences, and even music. Mp3 to text converters are everywhere on the internet today. They provide the most convenient method for converting mp3 to text. Companies, individuals, conference organizers, and agents benefit from such technologies. Modern mp3 to text online converters with superior hi-tech features and capabilities have emerged.
If you’re searching for free software to convert audio to text, think about how well it works and how accurate the converted text is. In other words, choose a tool that can quickly produce accurate and editable transcriptions. Many converters on the internet may provide these functions, but which one should you pick? Today, we’ll show you the finest MP3 to text converters that are completely free or premium.
- 14 Best MP3 to Text Converter Online
- VEED.IO
- Flixier
- Happyscribe
- Go Transcribe
- Rev
- Transcribe
- Vocalmatic
- Getwelder
- Amberscript
- 360 Converter
- Virtual Speech
- Sonix
- Audext
- Bear File Converter
Why You Should Use MP3 to Text Converter?
Any audio can be converted to text using an MP3 to text converter. It’s an excellent approach to transcribe conferences or presentations accurately. Transcribing audio takes a long time, as we all know. Depending on the size of your MP3 files, an MP3 to text converter can correctly auto-transcribe them into text in minutes. This means you can begin correcting and polishing your transcriptions immediately, thus, cutting down on time spent on the task!
7 Best MP3 To Text Converter for Windows/Mac
1. Filmora
Although Wondershare Filmora Video Editor is well recognized for its broader video editing operations, it also has a large library of other features, such as mp3 to text conversion, that you can utilize to make your projects handy. It’s a Freemium program, like most other products we’ve discussed. However, the advantage here is that you can get mp3 to text software and all of Filmora’s other tools and features, providing you more bang for your money.
Platform: Windows/Mac
Price:$4.99/Month
Features
- Mp3 to text conversion
- Support upload audio files
Pros
- Very easy to use
- Simple interface that requires few clicks
- Pre-built text templates
2.Office 365/Word
Microsoft Word provides various useful built-in features for transcribing audio files. Word can instantly transcribe straight from your audio files, eliminating the need to place a speaker up to your PC microphone and play it. Of course, you’ll need an Office 365 or Office license for this to operate (though there are various hacks for getting Office to work for free, at least temporarily). Sign in to Office 365 on your browser and create a new Word document to transcribe.

Platform: Windows
**Price:**Free
Features
- Directly record in Word.
- Voice instructions may be uploaded as an audio file.
Pros
- It allows you to capture audio from your device’s microphone, as well as recognize and transcribe noises from the speakers in real-time.
Cons
- It is compatible with Windows devices only.
3. Google Docs
Google Docs has become an indispensable tool for most content creators., especially if you’re already using Google services. It allows you to write with your voice and access over 100 view commands for altering and formatting your documents in any manner you like. Making bullet points, altering the text style, and shifting the pointer to other document places are all examples. Consider Google Docs or Google Slides with Google’s Voice Typing tool for Google products like Gmail and Google Drive and require an in-built, powerful, but free dictation tool.
Platform: Windows/Mac
**Price:**Free
Features
- Voice typing and commands
- Transcribe in real-time
Pros
- Compatible with any device
- Very accurate
- It’s quick, particularly for real-time typing, since no prepared audio files are required
Cons
- It can only function in real-time, not with previously recorded data
4. Speech to Text converter
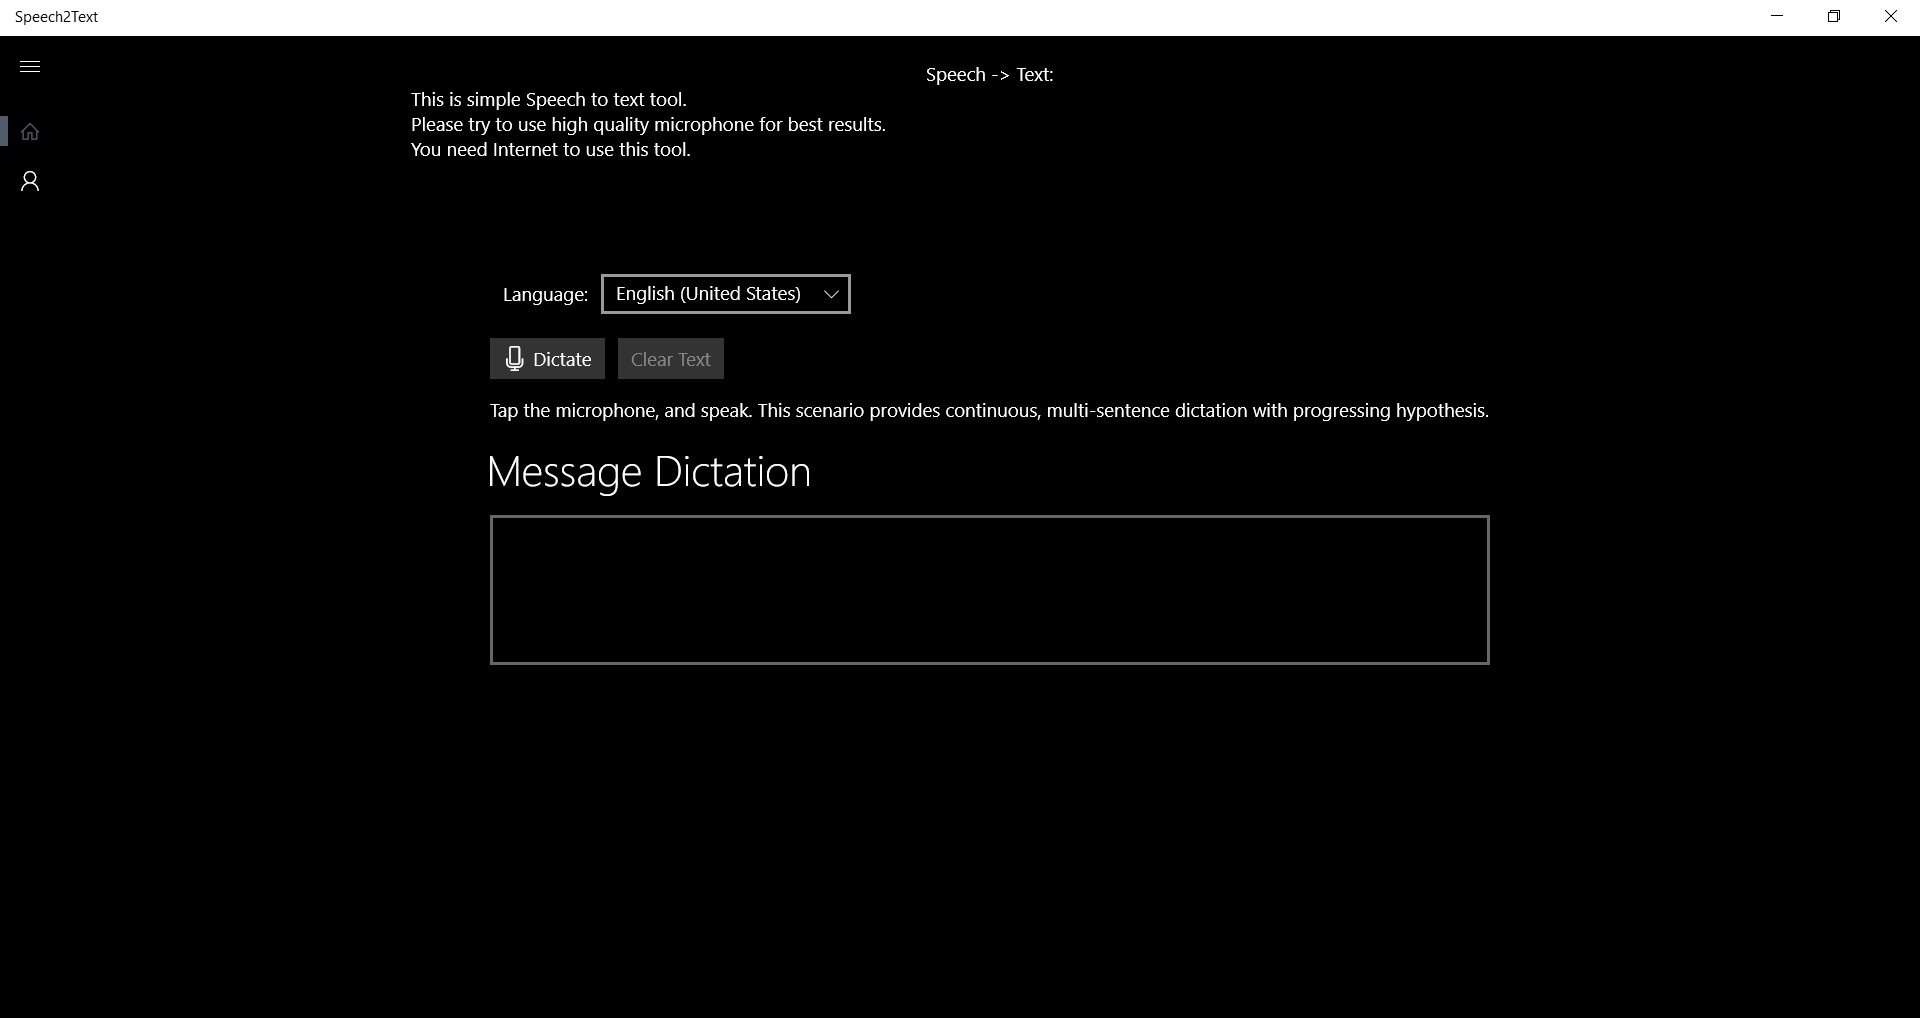
Any voice can be converted into plain text with the speech-to-text converter tool. The default language is English US. It also works with the languages that are installed on your Windows 10 computer. This tool is straightforward and uncluttered. Instead of typing your email, narrative, lesson, or chat, you can talk, and this program will convert it to text. You may copy and paste this content anywhere you like. It’s a Universal Windows Platform (UWP) software, which means it’ll run on any Windows 10 device, including phones, PCs, tablets, and Xboxes.
Platform: Windows
**Price:**Free
Features
- Voice commands
- Text editor
- Will support the language that you use in your PC
Pros
- It is highly efficient due to the usage of keyboard controls
- It gives simple keyboard shortcuts for navigation
Cons
- It needs an internet connection
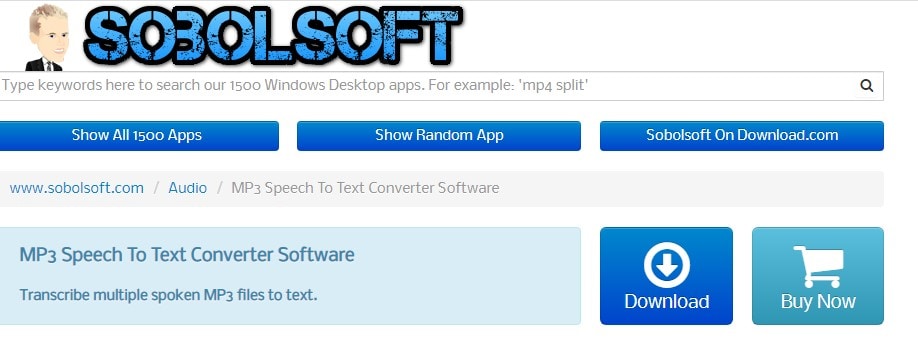
5. Sobolsoft
Sobolsoft’s MP3 Voice to Text Converter software is one of the most incredible solutions on the market if you’re seeking a trustworthy mp3 to text program that you can use on your PC. The program is simple; just choose the audio files you want to transcribe and press the Start Converting button. All of the text generated by the program will be presented in the Results box, where you may modify, copy, or save it as a text file. This program, however, does not handle video files, so you won’t be able to use it to transcribe videos stored in MP4, AVI, MOV, or any other common video file type. You may sample Sobolsoft’s MP3 Speech to Text Converter for free before deciding if you want to buy a license to use the program without limitations.
Platform: Windows
Price:$19.99 per month
Features
- Powerful speech to text conversion
- Transcribe in real time
Pros
- In terms of production and understandable alternatives, there are no time constraints.
- You can separate the timeframes and convert numerous files.
Cons
- This software doesn’t provide support for video files.
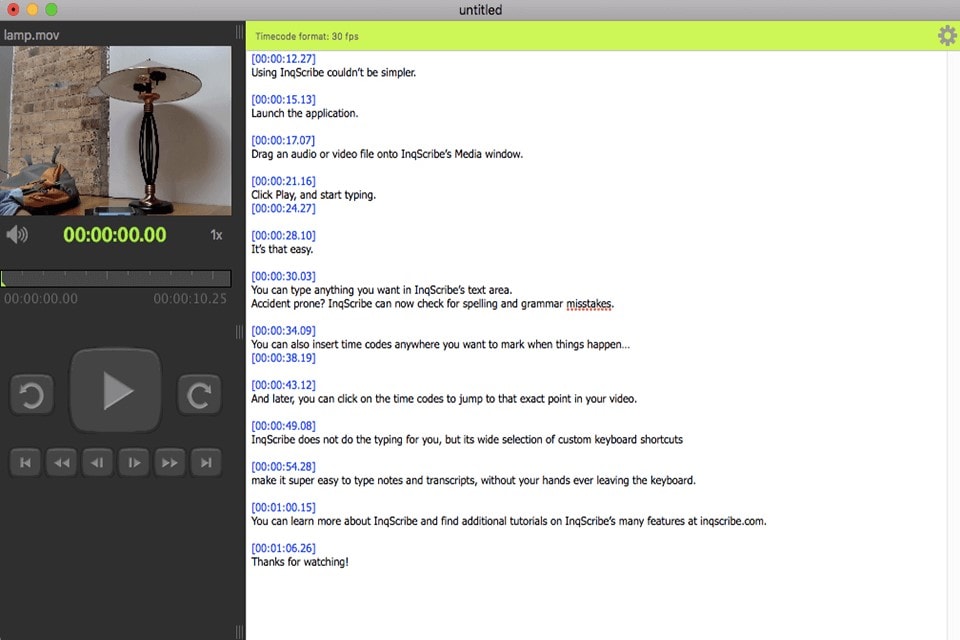
6. InqScribe
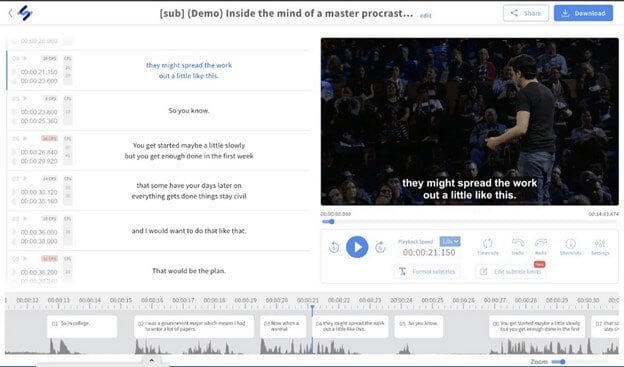
Even though InqScribe does not produce text automatically, it is still one of the best tools for creating subtitles for films and audio transcripts on Windows and Mac computers. The program supports a wide range of languages, allowing you to transcribe several languages in the same document. Simply drag and drop a video or audio file into the media window of the app and begin composing your transcript. InqScribe also allows you to include timecodes wherever in the text, making it ideal for creating subtitle files that you can simply add to videos you post online.
**Platform:**Windows/Mac
Price:$99 for an individual license
Features
- The program lets you export the process and add subtitles to your projects before exporting them as video files using Final Cut Pro or Adobe Premiere Pro.
Pros
- It can convert movie subtitles
- Feature-rich
Cons
- Installation is required
- It doesn’t allow recording directly into the software
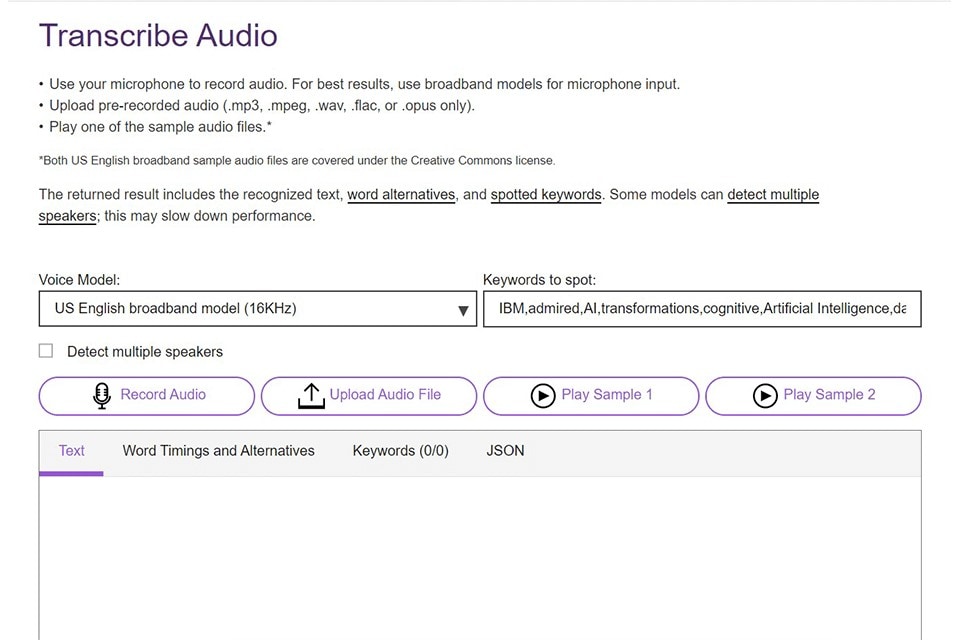
7. Watson STT
Arabic, English, Brazilian, German, Portuguese, Spanish, French, Japanese, Korean, and Mandarin are just a few of the languages available. The IBMWatson STT is ideal for anybody who works with one of these languages. This is one of the greatest free audio to text converters out there.
This transcription program enables you to convert audio to text in real time or upload previously recorded files. It boasts of advanced language models, audio frequency settings, and transcription output capabilities.
You can easily organize and prepare your transcripts with features like numeric redaction, speaker labels, smart formatting, word timestamps, confidence, keyword detection, and alternatives.
**Platform:**Windows/Mac
**Price:**Free
Features
- Smart formatting
- Speaker labels
- Keyword spotting
- Word timestamps
- Numeric redaction
Pros
- Utilizes unstructured data
- Enhances the user experience
- Allows you to upload prerecorded audio
Cons
- Limited options in a free version
15 Best mp3 to text converter Online
2. VEED.IO
Veed.io is much more than just an MP3 to text converter. With this powerful tool, you may make any kind of audio or video. It lets you add sound effects to Instagram stories and YouTube intros, among other things. To transcribe the voice from your MP3 to a text file, get Veed’s free, fast, and simple online transcription tool. It works with WAVs, M4As, OGGs, and even video files and MP3.

**Price:**free and paid ($12/mo)
Features
- Fast cloud servers
- It can read and transcribe a variety of languages, including English, French, Chinese, Spanish, and others.
Pros
- Simple interface
Cons
- The free version is not accurate
3. Flixier
Flixier is a cloud-based, collaborative video editing application that operates on any computer browser, significantly speeding up your video production process. Flixier is a robust video editor that runs entirely inside the browser. This means you can keep editing on several devices, including Chromebooks, without sacrificing performance. Flixier is also simple for collaborative video editings, such as when working with a cameraperson or an outside editor.
**Price:**free and paid ($10/user/mo)
Features
- Speech to text converter
Pros
- It is a collaborative tool that allows you to use other apps.
Cons
- It takes to transcribe a file.
- The free version has fewer features.
4. Happyscribe
Happy Scribe is a reliable voice-to-text converter that can also transcribe MPA, MPE, MPEG, M4A, WMA, MP4, and MOV files for 120 Euros per hour of conversion. It has been recommended by the BBC, Forbes, Spotify, and other reputable organizations. When your account’s credits go below a certain level, the solution automatically recharges your account.
Price:$2.11 per minute
Features
- Fast and reliable speech to text converter
- Real-time transcription
Pros
- No credit expirations.
- It can transcribe Zoom meetings.
Cons
- Since AI is used for transcription, the text might not be as accurate as expected.
5. Go Transcribe
Go transcribe is a popular service that uses artificial intelligence. The app is compatible with any device and supports 17 different languages. Within the same sector, it also offers Team Management solutions. Go Transcribe offers a pay-per-minute service at 22 cents (USD). It also offers a monthly membership plan that starts at 48 USD a month for 4 hours. They also provide free audio and video translation services for testing reasons.

Price:$48 for 4 hours a month
Features
- Mp3 to text converter
- Audio and video translation
Pros
- Has a lot of useful features
- Simple interface for novices
Cons
- Text is accurate at times
6. Rev
Rev , one of the greatest and most reputable transcription services, does not use Artificial Intelligence (AI) technology and instead relies on people to do all of the conversions. It assures that the transcribed audio is accurate up to 99 %.

Price:$1.25 per minute
Features
- AI-based mp3 and speech to text converter
Pros
- It offers a rough draft (generated by the AI) with up to 80% accuracy at a comparatively lower cost.
- It can add English and foreign captions to your videos.
Cons
- Rev is a bit more expensive than other service providers in the same industry.
7. Transcribe
Transcribe , a widely used and acknowledged program is a must-have for journalists, lawyers, students, and anybody else who could use such software. It is one of the most popular web tools since it is fast, simple, and flexible to the demands of users. It offers a one-week free trial and then charges $20 per year for a single subscription with an additional $6 per hour of automated audio to text conversion. Alternatively, you can pay 20 USD per year to use the editor without automated transcriptions.
Price:$20/year + $6/hour
Features
- Integrated editor
- Voice typing
- Automatic text expander
Pros
- Simple interface
- Great features and shortcuts
Cons
- It is slow sometimes, depending on the size of the audio file.
8.Vocalmatic
Vocalmatic is the most convenient MP3 to text internet portal, complete with a professional transcribing service for journalists, podcasts, marketing, and sales. It converts text to MP3, WMA, and WAV formats. Its voice-to-text AI turns audio and video data into text in minutes and is rapid, efficient, and simple to use. It can transcribe your material into over 110 languages, making it as global as possible while being understandable to everybody. The online editing mode with playback controls is a highly unique feature. This text editor has Word and text export options.
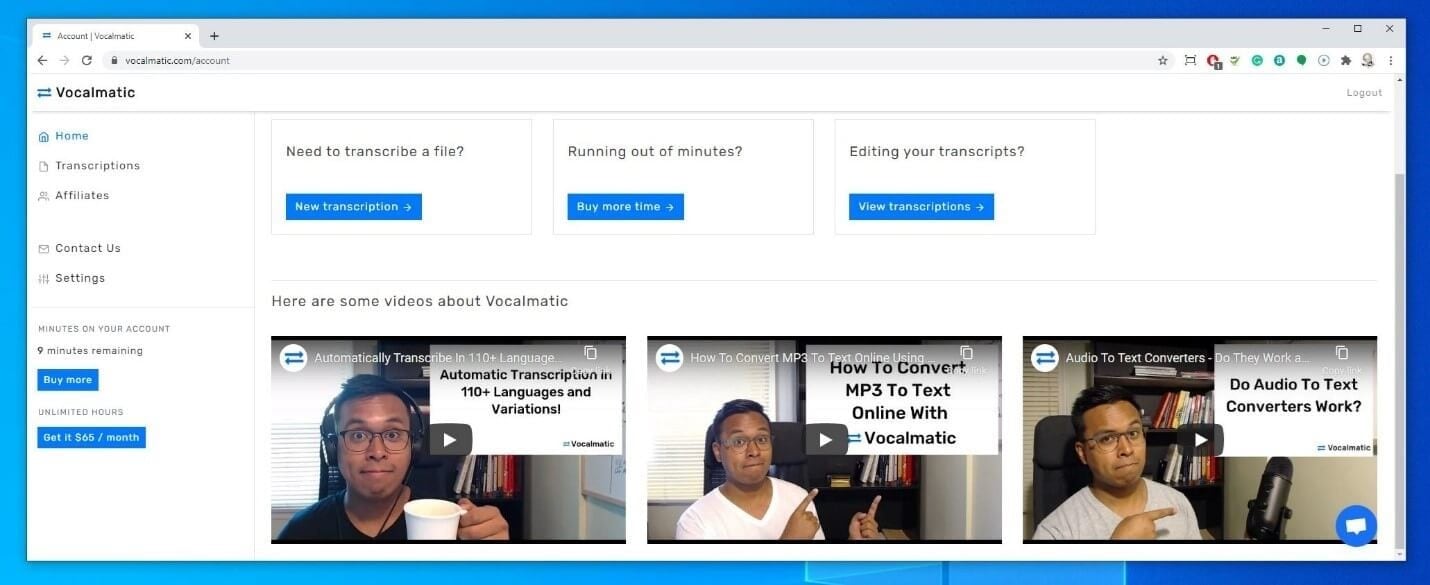
Price:$10/hour
Features
- Mp3 to text converter
- Text editor
Pros
- Supports several languages.
Cons
- The interface is not as easy to use.
9. Getwelder
Getwelder mp3 to text converter is best for those who have already begun a podcast using Zoom or Skype and want to improve the quality of their studio.
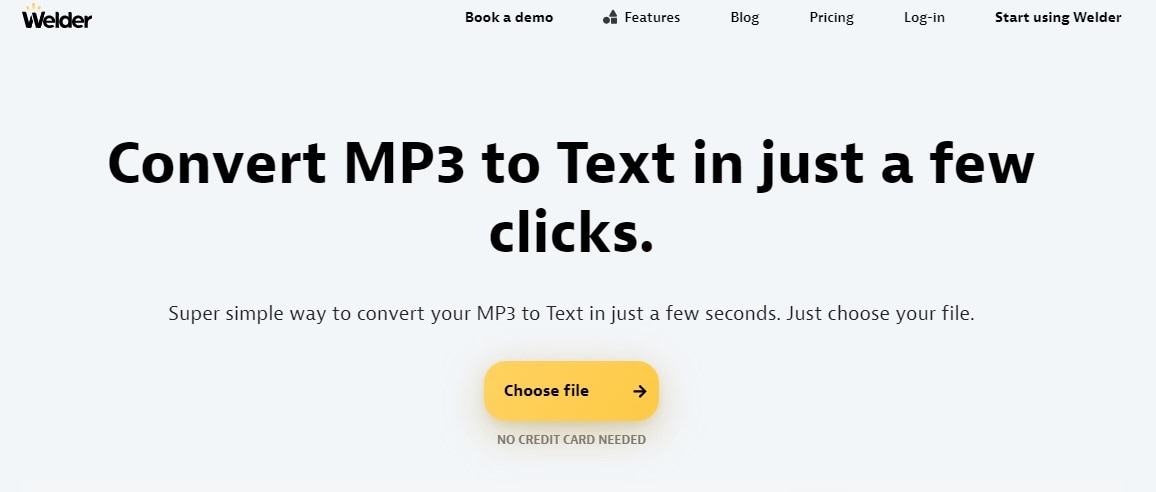
**Platform:**Android
Price:$20/month
Features
- It offers the finest user interface and user experience, making it the simplest to use.
- Amazing sound and video quality with up to 4K video and 48Khz audio.
Pros
- It provides separate audio and video tracks for appropriate editing.
- They now provide podcast transcripts that can be used right away for reusing material. Guests may quickly find out how to utilize it.
Cons
- Pricing is a little high for beginners and enthusiasts, at $20 per month.
- The video file is very big (it will quickly eat up your hard disk).
10. Amberscript
AmberScript is an online service that accepts MP3 audio recordings and converts them to text. It uses ASR (Automatic Speech Recognition) technology to significantly speed up the process. Moreover, the app gives a free trial transcription that lasts up to 30 minutes. Following that, you must acquire their premium membership to continue converting.
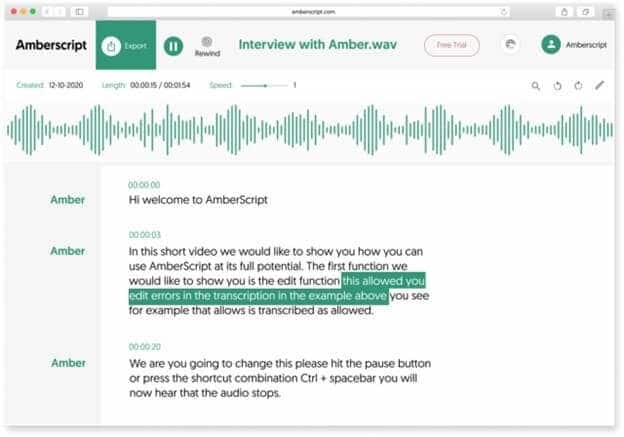
**Platform:**Android
Price:$8/hour
Features
- Text editor
- Multiple speakers distinction
- Mobile app available
Pros
- It provides a simple way to upload the source files.
- Artificial Intelligence (AI) is used for transcribing.
Cons
- Only the costliest membership gives 99 percent accuracy since people review the transcriptions.
11. 360 Converter
360 Converter is one of the most basic MP3 to text converters available. It features the most intuitive user interface with easy selection formats. It handles not only local files but also cloud and internet data. It can transcribe mp3 files in over 12 languages and save them as plain text, Microsoft Word documents, or PDF files. It has automated transcription software that accurately translates audio and video data to text, making it a must-have for transcribing tasks.
**Platform:**Android
**Price:**free
Features
- Video to text
- Speech to text
Pros
- Has a free version that fives accurate results
Cons
- File limit of 20MB foe guests and 50MB for members who have signed up
12. Virtual Speech
This internet application converts your voice into text and sends it to you through email, where you can download it. For audio files under 60 seconds, this program is free to use. We charge a nominal price for each minute of extra audio over this. When you submit an audio file, the price is plainly indicated.
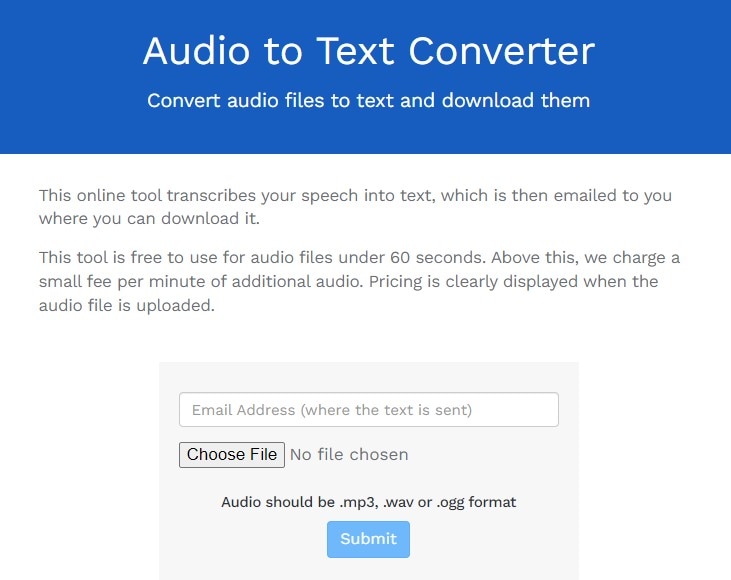
**Platform:**Android/iPhone
**Price:**free
Features
- Audio to text converter
- Download text file
Pros
- The free version gives you up to 10 files per month
Cons
- It lacks a text editor
13. Sonix
Sonix is a legitimate and no-nonsense online converter that is available in three membership tiers and offers 30 minutes of free transcribing as a trial without asking for any credit card information. The online tool ensures maximum conversion accuracy and even provides attractive savings if you purchase their Enterprise package.
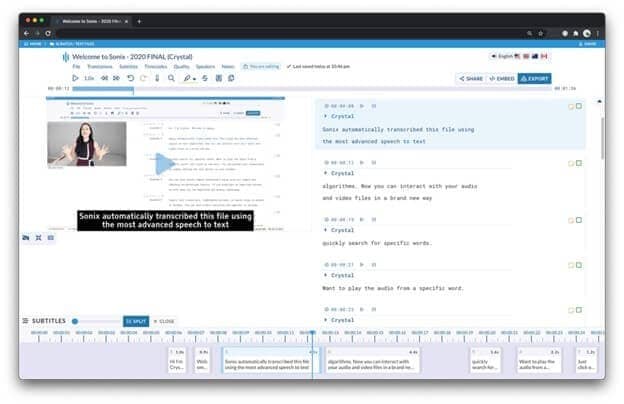
**Platform:**iPhone
Price:$10/hour
Features
- 35+ languages
- Text editor
- Word-by-word timestamps
- Speaker labelling
Pros
- Many prestigious companies, like Stanford University, CNBC, Harvard University, ESPN, and others, promote Sonix.
- The corporate membership provides users with enhanced training.
Cons
- Even using the trial transcription requires registration.
14. Audext
Audext is a fantastic online application that can automatically transcribe your audio files, which is both rapid and inexpensive. It only costs $12 per hour of transcribing, or $5 if you sign up for their subscription plan.
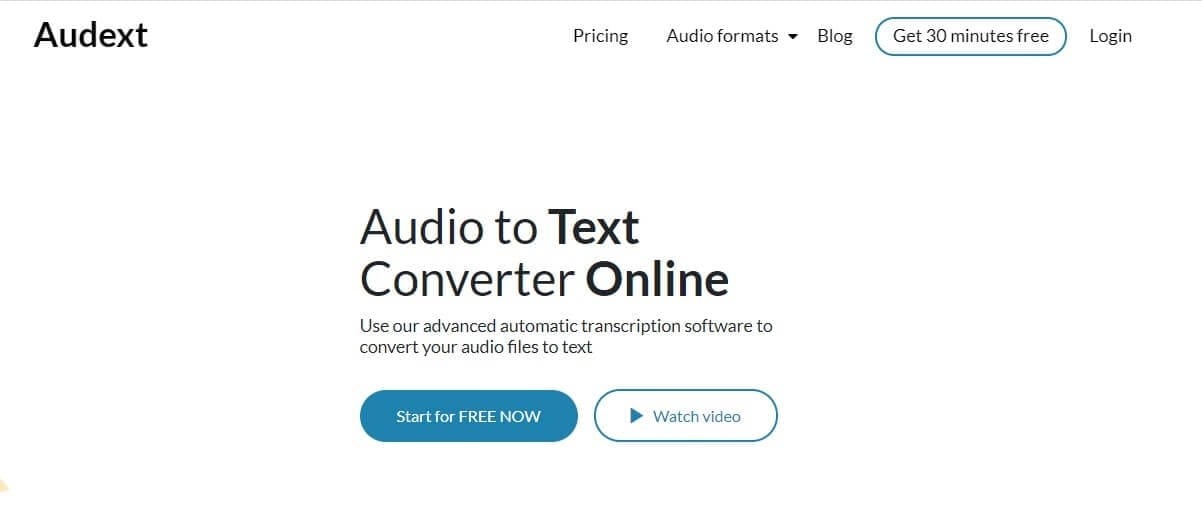
**Platform:**iPhone
Price:$12/hour
Features
- Built-in text editor
- Auto-save progress
- Recognition of voices despite background noise
- Speaker identification
- Various audio formats support
Pros
- Audext is simple to use and helps the process go smoothly from beginning to end.
Cons
- It needs a lot of computation power.
15. Bear File Converter
Bear File Converter is a good solution for quick audio-to-text conversion for short notes. Based on the Baidu recognition engine, it can convert clean audio with minimal interfering sounds properly. However, the internet program does not convert MP3 music files to text accurately. Furthermore, the internet program only records for three minutes.
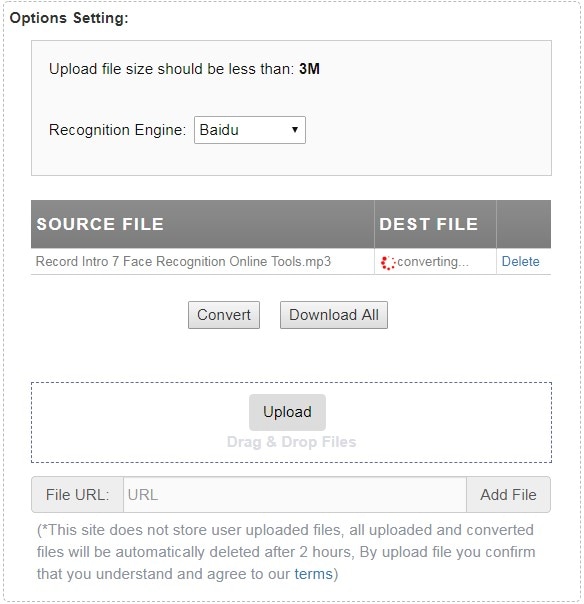
**Platform:**Windows/Mac
**Price:**Free with a premium version ($29.95 per user)
Features
- Mp3 to text conversion
- AI-based speech to text conversion
- Online text editor
Pros
- For transcribing, it uses Artificial Intelligence (AI).
- It provides a simple way to upload the source files.
Cons
- The online tool has a file size limit of 3 minutes.
- It is not very accurate on mp3 files.
How to Convert MP3 to Text with Filmora
The Speech to Text effect makes it seem like someone’s words are transformed into text on your screen! Consider making several text tracks and beginning the next one a little later than the previous if you want to create a pause in the phrase.
Step1 – Add file and select speech to text feature
You can do this in four ways.
A. Select the audio asset on the timeline, then go to Tools > Audio > Speech-to-Text in the top menu bar.
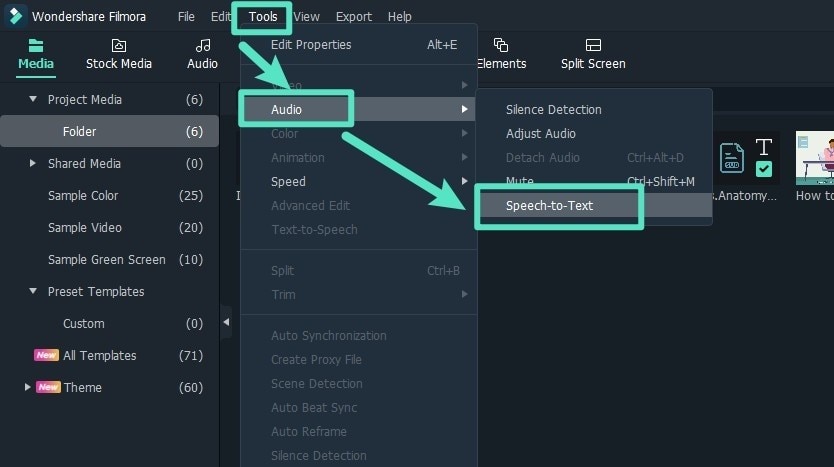
B. In the Media resource box, right-click the video/audio with the audio track and choose Speech-to-Text.
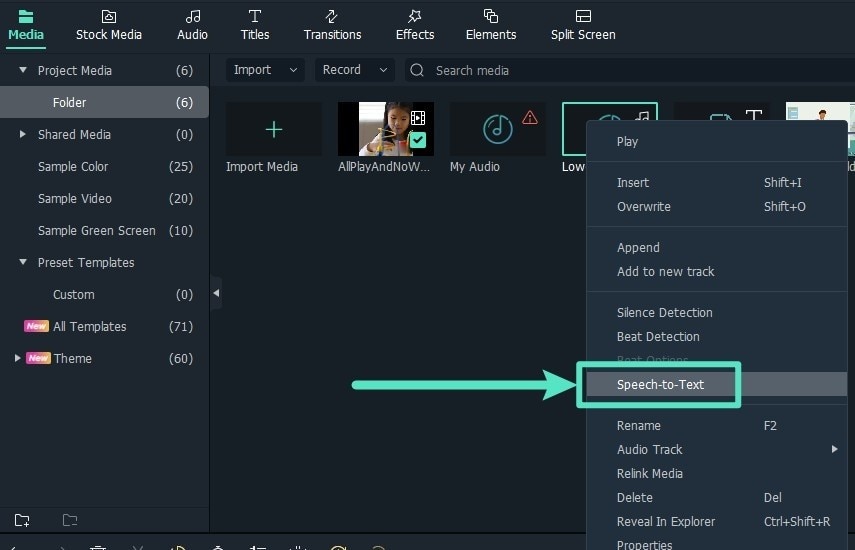
C. Once you’ve selected an audio asset, click the speech-to-text tool icon in the toolbar; if there is no compatible file type on the timeline, it will not appear.
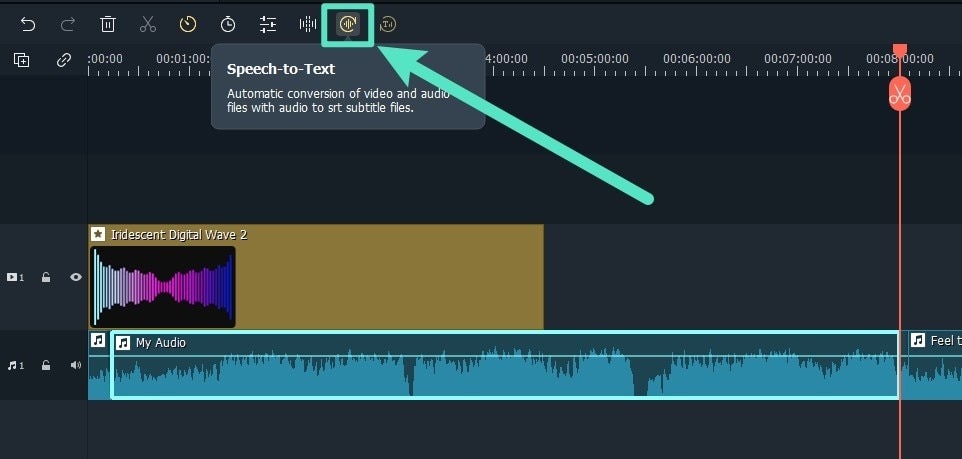
D. Right-click on the audio asset in the timeline and pick Speech-to-Text from the context menu that appears.
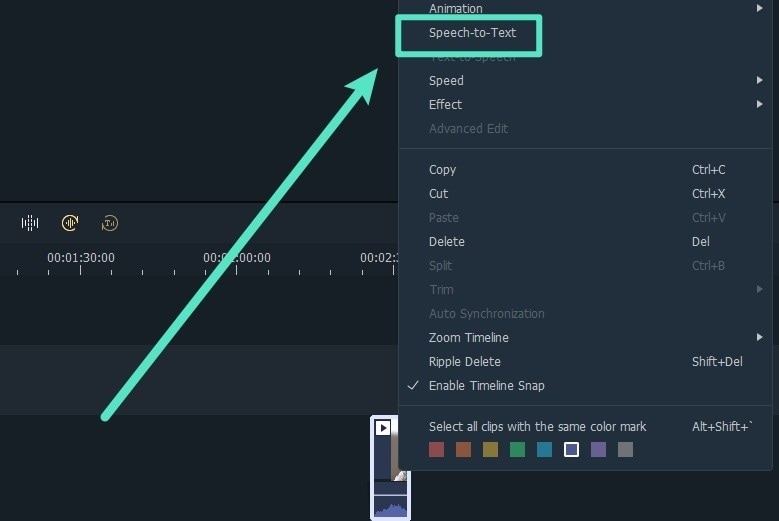
Step2- Parameter Settings
Select the language of the audio files to be transcribed and the files to be converted in the STT parameter setting bar and tick the automatically match to the timeline option.
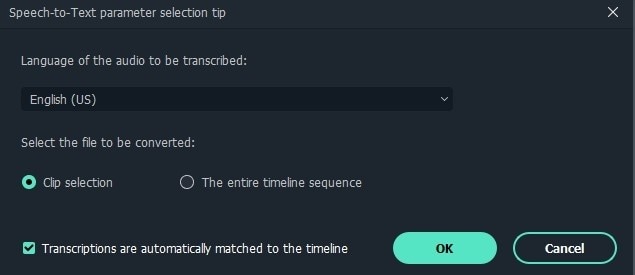
You must pick the language of the clip transcription in the language option.
Step3– The list of tasks
- The progress of the file’s transcoding and transcription will be shown in the task list.
- The list is ordered from the first imported file to the last, with the latter at the very top of the list. It allows for up-and-down swiveling.
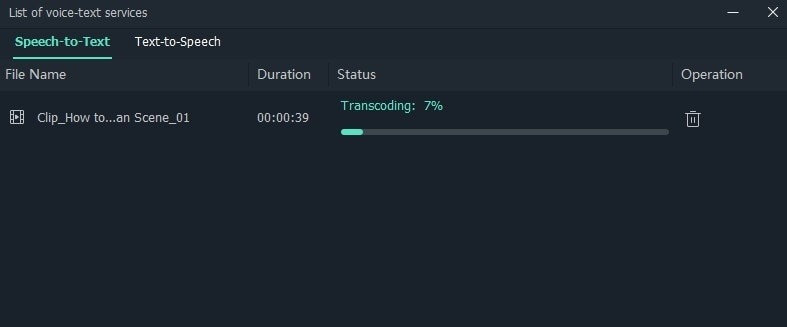
Step4– Generate and export files
SRT format will be used to display the created file.

Notice and Tips When Converting MP3 to Text
Keeping it Confidential
Online services present yet another potentially serious issue: privacy. Your audio file is stored on someone else’s server since you have to submit it to the service.
Your audio might be revealed to the public if that service is ever hacked or someone working there is not honest. In some circumstances, this may not be an issue, but in others, it might be a major one. In certain sectors, it might result in legal issues and large penalties. Many online voice to text services aren’t an option if you operate in a profession with tight privacy rules, such as healthcare.
Audio-to-text PC software is Better
While there are certain drawbacks to computer-assisted transcribing, it is not without merit. It’s a cheap method to convert your audio, and it can “learn” from its errors and improve over time thanks to the newest machine learning technologies. Simple audio material, taking notes, and other tasks with a low degree of complexity are best handled by software or web-based solutions. Even so, you’ll have to proofread everything and make a significant number of mistakes.
It’s also beneficial in cases when accuracy is less crucial than having the material translated to text, such as contact center monitoring. If the material is only being read internally, perfection may be less essential than speed and cost.
Bottom Line
Do you wish to convert an MP3 file to a text file and transcribe a speech? You may utilize the online auto transcribing tool provided by Filmora! It’s quick and simple to operate. Say goodbye to hours of manually transcribing audio transcriptions and welcome to automated transcriptions that just take a few clicks. There is no software to download; everything is done online.
Simply upload your audio recording, then choose the Auto Transcribe option. You may make minor changes to the transcription if necessary. WAV, M4A, and other common audio formats are all supported by Filmora’s speech-to-text service.
- VEED.IO
- Flixier
- Happyscribe
- Go Transcribe
- Rev
- Transcribe
- Vocalmatic
- Getwelder
- Amberscript
- 360 Converter
- Virtual Speech
- Sonix
- Audext
- Bear File Converter
- How to Convert MP3 to Text with Filmora
- Notice and Tips When Converting MP3 to Text
Why You Should Use MP3 to Text Converter?
Any audio can be converted to text using an MP3 to text converter. It’s an excellent approach to transcribe conferences or presentations accurately. Transcribing audio takes a long time, as we all know. Depending on the size of your MP3 files, an MP3 to text converter can correctly auto-transcribe them into text in minutes. This means you can begin correcting and polishing your transcriptions immediately, thus, cutting down on time spent on the task!
7 Best MP3 To Text Converter for Windows/Mac
1. Filmora
Although Wondershare Filmora Video Editor is well recognized for its broader video editing operations, it also has a large library of other features, such as mp3 to text conversion, that you can utilize to make your projects handy. It’s a Freemium program, like most other products we’ve discussed. However, the advantage here is that you can get mp3 to text software and all of Filmora’s other tools and features, providing you more bang for your money.
Platform: Windows/Mac
Price:$4.99/Month
Features
- Mp3 to text conversion
- Support upload audio files
Pros
- Very easy to use
- Simple interface that requires few clicks
- Pre-built text templates
2.Office 365/Word
Microsoft Word provides various useful built-in features for transcribing audio files. Word can instantly transcribe straight from your audio files, eliminating the need to place a speaker up to your PC microphone and play it. Of course, you’ll need an Office 365 or Office license for this to operate (though there are various hacks for getting Office to work for free, at least temporarily). Sign in to Office 365 on your browser and create a new Word document to transcribe.
Platform: Windows
**Price:**Free
Features
- Directly record in Word.
- Voice instructions may be uploaded as an audio file.
Pros
- It allows you to capture audio from your device’s microphone, as well as recognize and transcribe noises from the speakers in real-time.
Cons
- It is compatible with Windows devices only.
3. Google Docs
Google Docs has become an indispensable tool for most content creators., especially if you’re already using Google services. It allows you to write with your voice and access over 100 view commands for altering and formatting your documents in any manner you like. Making bullet points, altering the text style, and shifting the pointer to other document places are all examples. Consider Google Docs or Google Slides with Google’s Voice Typing tool for Google products like Gmail and Google Drive and require an in-built, powerful, but free dictation tool.
Platform: Windows/Mac
**Price:**Free
Features
- Voice typing and commands
- Transcribe in real-time
Pros
- Compatible with any device
- Very accurate
- It’s quick, particularly for real-time typing, since no prepared audio files are required
Cons
- It can only function in real-time, not with previously recorded data
4. Speech to Text converter
Any voice can be converted into plain text with the speech-to-text converter tool. The default language is English US. It also works with the languages that are installed on your Windows 10 computer. This tool is straightforward and uncluttered. Instead of typing your email, narrative, lesson, or chat, you can talk, and this program will convert it to text. You may copy and paste this content anywhere you like. It’s a Universal Windows Platform (UWP) software, which means it’ll run on any Windows 10 device, including phones, PCs, tablets, and Xboxes.
Platform: Windows
**Price:**Free
Features
- Voice commands
- Text editor
- Will support the language that you use in your PC
Pros
- It is highly efficient due to the usage of keyboard controls
- It gives simple keyboard shortcuts for navigation
Cons
- It needs an internet connection
5. Sobolsoft
Sobolsoft’s MP3 Voice to Text Converter software is one of the most incredible solutions on the market if you’re seeking a trustworthy mp3 to text program that you can use on your PC. The program is simple; just choose the audio files you want to transcribe and press the Start Converting button. All of the text generated by the program will be presented in the Results box, where you may modify, copy, or save it as a text file. This program, however, does not handle video files, so you won’t be able to use it to transcribe videos stored in MP4, AVI, MOV, or any other common video file type. You may sample Sobolsoft’s MP3 Speech to Text Converter for free before deciding if you want to buy a license to use the program without limitations.
Platform: Windows
Price:$19.99 per month
Features
- Powerful speech to text conversion
- Transcribe in real time
Pros
- In terms of production and understandable alternatives, there are no time constraints.
- You can separate the timeframes and convert numerous files.
Cons
- This software doesn’t provide support for video files.
6. InqScribe
Even though InqScribe does not produce text automatically, it is still one of the best tools for creating subtitles for films and audio transcripts on Windows and Mac computers. The program supports a wide range of languages, allowing you to transcribe several languages in the same document. Simply drag and drop a video or audio file into the media window of the app and begin composing your transcript. InqScribe also allows you to include timecodes wherever in the text, making it ideal for creating subtitle files that you can simply add to videos you post online.
**Platform:**Windows/Mac
Price:$99 for an individual license
Features
- The program lets you export the process and add subtitles to your projects before exporting them as video files using Final Cut Pro or Adobe Premiere Pro.
Pros
- It can convert movie subtitles
- Feature-rich
Cons
- Installation is required
- It doesn’t allow recording directly into the software
7. Watson STT
Arabic, English, Brazilian, German, Portuguese, Spanish, French, Japanese, Korean, and Mandarin are just a few of the languages available. The IBMWatson STT is ideal for anybody who works with one of these languages. This is one of the greatest free audio to text converters out there.
This transcription program enables you to convert audio to text in real time or upload previously recorded files. It boasts of advanced language models, audio frequency settings, and transcription output capabilities.
You can easily organize and prepare your transcripts with features like numeric redaction, speaker labels, smart formatting, word timestamps, confidence, keyword detection, and alternatives.
**Platform:**Windows/Mac
**Price:**Free
Features
- Smart formatting
- Speaker labels
- Keyword spotting
- Word timestamps
- Numeric redaction
Pros
- Utilizes unstructured data
- Enhances the user experience
- Allows you to upload prerecorded audio
Cons
- Limited options in a free version
15 Best mp3 to text converter Online
2. VEED.IO
Veed.io is much more than just an MP3 to text converter. With this powerful tool, you may make any kind of audio or video. It lets you add sound effects to Instagram stories and YouTube intros, among other things. To transcribe the voice from your MP3 to a text file, get Veed’s free, fast, and simple online transcription tool. It works with WAVs, M4As, OGGs, and even video files and MP3.
**Price:**free and paid ($12/mo)
Features
- Fast cloud servers
- It can read and transcribe a variety of languages, including English, French, Chinese, Spanish, and others.
Pros
- Simple interface
Cons
- The free version is not accurate
3. Flixier
Flixier is a cloud-based, collaborative video editing application that operates on any computer browser, significantly speeding up your video production process. Flixier is a robust video editor that runs entirely inside the browser. This means you can keep editing on several devices, including Chromebooks, without sacrificing performance. Flixier is also simple for collaborative video editings, such as when working with a cameraperson or an outside editor.
**Price:**free and paid ($10/user/mo)
Features
- Speech to text converter
Pros
- It is a collaborative tool that allows you to use other apps.
Cons
- It takes to transcribe a file.
- The free version has fewer features.
4. Happyscribe
Happy Scribe is a reliable voice-to-text converter that can also transcribe MPA, MPE, MPEG, M4A, WMA, MP4, and MOV files for 120 Euros per hour of conversion. It has been recommended by the BBC, Forbes, Spotify, and other reputable organizations. When your account’s credits go below a certain level, the solution automatically recharges your account.
Price:$2.11 per minute
Features
- Fast and reliable speech to text converter
- Real-time transcription
Pros
- No credit expirations.
- It can transcribe Zoom meetings.
Cons
- Since AI is used for transcription, the text might not be as accurate as expected.
5. Go Transcribe
Go transcribe is a popular service that uses artificial intelligence. The app is compatible with any device and supports 17 different languages. Within the same sector, it also offers Team Management solutions. Go Transcribe offers a pay-per-minute service at 22 cents (USD). It also offers a monthly membership plan that starts at 48 USD a month for 4 hours. They also provide free audio and video translation services for testing reasons.
Price:$48 for 4 hours a month
Features
- Mp3 to text converter
- Audio and video translation
Pros
- Has a lot of useful features
- Simple interface for novices
Cons
- Text is accurate at times
6. Rev
Rev , one of the greatest and most reputable transcription services, does not use Artificial Intelligence (AI) technology and instead relies on people to do all of the conversions. It assures that the transcribed audio is accurate up to 99 %.
Price:$1.25 per minute
Features
- AI-based mp3 and speech to text converter
Pros
- It offers a rough draft (generated by the AI) with up to 80% accuracy at a comparatively lower cost.
- It can add English and foreign captions to your videos.
Cons
- Rev is a bit more expensive than other service providers in the same industry.
7. Transcribe
Transcribe , a widely used and acknowledged program is a must-have for journalists, lawyers, students, and anybody else who could use such software. It is one of the most popular web tools since it is fast, simple, and flexible to the demands of users. It offers a one-week free trial and then charges $20 per year for a single subscription with an additional $6 per hour of automated audio to text conversion. Alternatively, you can pay 20 USD per year to use the editor without automated transcriptions.
Price:$20/year + $6/hour
Features
- Integrated editor
- Voice typing
- Automatic text expander
Pros
- Simple interface
- Great features and shortcuts
Cons
- It is slow sometimes, depending on the size of the audio file.
8.Vocalmatic
Vocalmatic is the most convenient MP3 to text internet portal, complete with a professional transcribing service for journalists, podcasts, marketing, and sales. It converts text to MP3, WMA, and WAV formats. Its voice-to-text AI turns audio and video data into text in minutes and is rapid, efficient, and simple to use. It can transcribe your material into over 110 languages, making it as global as possible while being understandable to everybody. The online editing mode with playback controls is a highly unique feature. This text editor has Word and text export options.
Price:$10/hour
Features
- Mp3 to text converter
- Text editor
Pros
- Supports several languages.
Cons
- The interface is not as easy to use.
9. Getwelder
Getwelder mp3 to text converter is best for those who have already begun a podcast using Zoom or Skype and want to improve the quality of their studio.
**Platform:**Android
Price:$20/month
Features
- It offers the finest user interface and user experience, making it the simplest to use.
- Amazing sound and video quality with up to 4K video and 48Khz audio.
Pros
- It provides separate audio and video tracks for appropriate editing.
- They now provide podcast transcripts that can be used right away for reusing material. Guests may quickly find out how to utilize it.
Cons
- Pricing is a little high for beginners and enthusiasts, at $20 per month.
- The video file is very big (it will quickly eat up your hard disk).
10. Amberscript
AmberScript is an online service that accepts MP3 audio recordings and converts them to text. It uses ASR (Automatic Speech Recognition) technology to significantly speed up the process. Moreover, the app gives a free trial transcription that lasts up to 30 minutes. Following that, you must acquire their premium membership to continue converting.
**Platform:**Android
Price:$8/hour
Features
- Text editor
- Multiple speakers distinction
- Mobile app available
Pros
- It provides a simple way to upload the source files.
- Artificial Intelligence (AI) is used for transcribing.
Cons
- Only the costliest membership gives 99 percent accuracy since people review the transcriptions.
11. 360 Converter
360 Converter is one of the most basic MP3 to text converters available. It features the most intuitive user interface with easy selection formats. It handles not only local files but also cloud and internet data. It can transcribe mp3 files in over 12 languages and save them as plain text, Microsoft Word documents, or PDF files. It has automated transcription software that accurately translates audio and video data to text, making it a must-have for transcribing tasks.
**Platform:**Android
**Price:**free
Features
- Video to text
- Speech to text
Pros
- Has a free version that fives accurate results
Cons
- File limit of 20MB foe guests and 50MB for members who have signed up
12. Virtual Speech
This internet application converts your voice into text and sends it to you through email, where you can download it. For audio files under 60 seconds, this program is free to use. We charge a nominal price for each minute of extra audio over this. When you submit an audio file, the price is plainly indicated.
**Platform:**Android/iPhone
**Price:**free
Features
- Audio to text converter
- Download text file
Pros
- The free version gives you up to 10 files per month
Cons
- It lacks a text editor
13. Sonix
Sonix is a legitimate and no-nonsense online converter that is available in three membership tiers and offers 30 minutes of free transcribing as a trial without asking for any credit card information. The online tool ensures maximum conversion accuracy and even provides attractive savings if you purchase their Enterprise package.
**Platform:**iPhone
Price:$10/hour
Features
- 35+ languages
- Text editor
- Word-by-word timestamps
- Speaker labelling
Pros
- Many prestigious companies, like Stanford University, CNBC, Harvard University, ESPN, and others, promote Sonix.
- The corporate membership provides users with enhanced training.
Cons
- Even using the trial transcription requires registration.
14. Audext
Audext is a fantastic online application that can automatically transcribe your audio files, which is both rapid and inexpensive. It only costs $12 per hour of transcribing, or $5 if you sign up for their subscription plan.
**Platform:**iPhone
Price:$12/hour
Features
- Built-in text editor
- Auto-save progress
- Recognition of voices despite background noise
- Speaker identification
- Various audio formats support
Pros
- Audext is simple to use and helps the process go smoothly from beginning to end.
Cons
- It needs a lot of computation power.
15. Bear File Converter
Bear File Converter is a good solution for quick audio-to-text conversion for short notes. Based on the Baidu recognition engine, it can convert clean audio with minimal interfering sounds properly. However, the internet program does not convert MP3 music files to text accurately. Furthermore, the internet program only records for three minutes.
**Platform:**Windows/Mac
**Price:**Free with a premium version ($29.95 per user)
Features
- Mp3 to text conversion
- AI-based speech to text conversion
- Online text editor
Pros
- For transcribing, it uses Artificial Intelligence (AI).
- It provides a simple way to upload the source files.
Cons
- The online tool has a file size limit of 3 minutes.
- It is not very accurate on mp3 files.
How to Convert MP3 to Text with Filmora
The Speech to Text effect makes it seem like someone’s words are transformed into text on your screen! Consider making several text tracks and beginning the next one a little later than the previous if you want to create a pause in the phrase.
Step1 – Add file and select speech to text feature
You can do this in four ways.
A. Select the audio asset on the timeline, then go to Tools > Audio > Speech-to-Text in the top menu bar.
B. In the Media resource box, right-click the video/audio with the audio track and choose Speech-to-Text.
C. Once you’ve selected an audio asset, click the speech-to-text tool icon in the toolbar; if there is no compatible file type on the timeline, it will not appear.
D. Right-click on the audio asset in the timeline and pick Speech-to-Text from the context menu that appears.
Step2- Parameter Settings
Select the language of the audio files to be transcribed and the files to be converted in the STT parameter setting bar and tick the automatically match to the timeline option.
You must pick the language of the clip transcription in the language option.
Step3– The list of tasks
- The progress of the file’s transcoding and transcription will be shown in the task list.
- The list is ordered from the first imported file to the last, with the latter at the very top of the list. It allows for up-and-down swiveling.
Step4– Generate and export files
SRT format will be used to display the created file.
Notice and Tips When Converting MP3 to Text
Keeping it Confidential
Online services present yet another potentially serious issue: privacy. Your audio file is stored on someone else’s server since you have to submit it to the service.
Your audio might be revealed to the public if that service is ever hacked or someone working there is not honest. In some circumstances, this may not be an issue, but in others, it might be a major one. In certain sectors, it might result in legal issues and large penalties. Many online voice to text services aren’t an option if you operate in a profession with tight privacy rules, such as healthcare.
Audio-to-text PC software is Better
While there are certain drawbacks to computer-assisted transcribing, it is not without merit. It’s a cheap method to convert your audio, and it can “learn” from its errors and improve over time thanks to the newest machine learning technologies. Simple audio material, taking notes, and other tasks with a low degree of complexity are best handled by software or web-based solutions. Even so, you’ll have to proofread everything and make a significant number of mistakes.
It’s also beneficial in cases when accuracy is less crucial than having the material translated to text, such as contact center monitoring. If the material is only being read internally, perfection may be less essential than speed and cost.
Bottom Line
Do you wish to convert an MP3 file to a text file and transcribe a speech? You may utilize the online auto transcribing tool provided by Filmora! It’s quick and simple to operate. Say goodbye to hours of manually transcribing audio transcriptions and welcome to automated transcriptions that just take a few clicks. There is no software to download; everything is done online.
Simply upload your audio recording, then choose the Auto Transcribe option. You may make minor changes to the transcription if necessary. WAV, M4A, and other common audio formats are all supported by Filmora’s speech-to-text service.
Also read:
- In 2024, Voice Creation Simplified A Selection of 9 Free Tools for Textual to Auditory Conversion
- New In-Depth Guide to iPhone for Excellent Quality Audio Capture
- Updated 2024 Approved Master the Art of Costless Sound Transformation and Advanced Audio Editing in Filmora Videos
- Updated Unveiling the Ultimate Frequency Tuner Configurations for 2024
- Updated Audacitys Role in Professional Computer Audio Capture - New Developments for 2024
- New 2024 Approved Remove Wind Noise From Video Remove Online, PC, iPhone, Android
- Essential Mobile Audio Cutting Software The Ultimate List for iPhones and Tablets
- Unveiling the Most Cutting-Edge Speech Modification Technologies for 2024
- New In 2024, Reduced Clarity of Audio Outputs in the Latest Adobe Rush Release
- New 2024 Approved Embedding Musical Composition Into Visual Media Projects
- New 2024 Approved Complete Insight Into the Wave Editor Vital Elements, Expert Opinions, and Instructional Videos
- New How to Remove Audio From MKV for 2024
- Updated 2024 Approved Step-By-Step Guide for Aspiring Filmmakers Incorporating Audio with iMovie
- Updated In 2024, Best Anime Voice Changers Desktop and Mobile
- 2024 Approved Navigating the Best FREE Browser-Based DAW Platforms for Enhanced Audio Creation - 2023 Edition
- Updated Top 8 Best DAW Software for Mac (Fully Review)
- 2024 Approved Essential Techniques Optimizing Voxacell Voice Transformation Use on Discord Platform
- Updated 2024 Approved How to Remove Vocals From Any Song Top 8 Song Lyrics Removers
- In 2024, The Best 8 Speech Transcription Services Suitable for All Major OS Including Cloud Computing
- 2024 Approved Pure Soundscapes A Comprehensive Manual on Sound Editing in Adobe Audition
- New In 2024, Disable iOS Automatic Sound Adjustment on Phone
- Updated 2024 Approved Exploring Cricket Auditory Signatures
- New In 2024, Top 10 Podcasting Audio to Text Transcription Software
- New In 2024, Instant Volume Amplification Solutions for Windows Users - Discover the Top 10
- New In 2024, The Ultimate Guide to Quieting Down Films and Videos
- New Enhancing Film Quality with Simplified Audio Layer Control in Premiere Pro 2023
- New 2024 Approved Vocal Variations with Siri The Ultimate Method to Change Siris Speaking Voice
- Rapid Remedies for Clearing Up Crippling Static in Soundtracks Instantly for 2024
- How To Transfer WhatsApp From iPhone 14 Pro to other iPhone 13 Pro devices? | Dr.fone
- In 2024, How to Mirror Your Oppo F25 Pro 5G Screen to PC with Chromecast | Dr.fone
- In 2024, Easiest Guide How to Clone Vivo S17e Phone? | Dr.fone
- 3 Solutions to Hard Reset Poco C51 Phone Using PC | Dr.fone
- The way to recover deleted contacts on Nokia C12 Pro without backup.
- In 2024, How To Fix OEM Unlock Missing on Vivo X100?
- 5 Ways to Reset Xiaomi Redmi 12 5G Without Volume Buttons | Dr.fone
- In 2024, Unlock Your Xiaomi Redmi Note 12 Pro 4Gs Potential The Top 20 Lock Screen Apps You Need to Try
- Unleash Creative Freedom Best Public Domain Video Resources for 2024
- In 2024, Top Apps and Online Tools To Track Nokia C12 Plus Phone With/Without IMEI Number
- 8 Quick Fixes Unfortunately, Snapchat has Stopped on Realme C67 4G | Dr.fone
- In 2024, How to Transfer Data from Vivo Y200 to Other Android Devices? | Dr.fone
- Updated WhatsApp Status Creator Best Apps to Try
- New 2024 Approved Converting Like a Pro The Experts Guide to Wav Converter
- In 2024, The Ultimate Guide How to Bypass Swipe Screen to Unlock on Xiaomi Redmi Note 12 5G Device
- Apply These Techniques to Improve How to Detect Fake GPS Location On Apple iPhone 15 Plus | Dr.fone
- New Extract Audio without Compromise Video to MP3 Conversion Tips
- 11 Best Location Changers for Vivo Y02T | Dr.fone
- Android Safe Mode - How to Turn off Safe Mode on Nokia XR21? | Dr.fone
- Updated WhatsApp Video Status Creator Tools Free and Paid Reviews for 2024
- What to Do if Google Play Services Keeps Stopping on Infinix Smart 7 HD | Dr.fone
- Top IMEI Unlokers for Your Nokia C210 Phone
- Super Easy Ways To Deal with Xiaomi Redmi Note 13 Pro 5G Unresponsive Screen | Dr.fone
- In 2024, 10 Free Location Spoofers to Fake GPS Location on your Meizu 21 | Dr.fone
- How to Unlock Vivo V27e Pattern Lock if Forgotten? 6 Ways
- New 2024 Approved Gaming Intro Design Top Picks for Windows and Mac Computers
- 6 Ways to Change Spotify Location On Your Realme Narzo N53 | Dr.fone
- Updated Spooky Halloween with the Best 15+ Halloween Countdown Video Clips
- Title: In 2024, Comprehensive Guide to Vimeo Videos Exploring Aspect Ratios and Their Impact
- Author: David
- Created at : 2024-05-20 05:45:28
- Updated at : 2024-05-21 05:45:28
- Link: https://sound-tweaking.techidaily.com/in-2024-comprehensive-guide-to-vimeo-videos-exploring-aspect-ratios-and-their-impact/
- License: This work is licensed under CC BY-NC-SA 4.0.
