
In 2024, Comparative Analysis of MAGIX Samplitude with Other Audio Workstations

“Comparative Analysis of MAGIX Samplitude with Other Audio Workstations”
These days, the importance of having a good Digital Audio Workstation (DAW) in your music production arsenal cannot be understated. With the ever-expanding demand for better-quality music, the competition in the DAW market is fierce. However, there is one excellent DAW standing out from the music production market - MAGIX Samplitude.
Samplitude is a music production software, first released in 1992 by the German company MAGIX. This DAW is available for 32/64-bit Windows 10/11 and has a wide range of features that make it suitable for both beginner and experienced music producers. When you search for an appropriate DAW for your music production, you possibly have seen this music production software many times. And you may wonder: is MAGIX Sampltitude really that good?
In this MAGIX Samplitude review, we will discuss its numerous features. By the end, you’ll have a good idea of whether or not this music software is worth your time and money.
Part 1. What Is MAGIX Samplitude?
MAGIX Samplitude is a digital audio workstation that lets you create, edit, and produce professional-quality audio recordings. Since its release, the software has evolved into the most popular DAW among music producers and audio engineers. We will show you its history which demonstrates its fast development in recent 30 years below.
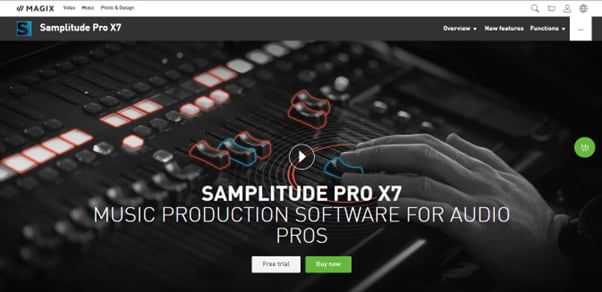
History of Samplitude’s Development
The first version of Samplitude was created for the Amiga platform, and since then, it has become a staple in the music production industry. Today, Samplitude is used by some of the world’s top producers for creating and editing unique musical sounds.
Here’s a quick history timeline of MAGIX Samplitude:
- 1992: MAGIX Samplitude is released.
- 1995: Samplitude released version for Microsoft Windows 3.1
- 1998: Samplitude 2496 version is released with a new interface and improved workflow and supports 24-bit recording with sample rates of up to 96 kHz.
- 2002: Samplitude Professional is released, aimed at professional producers and engineers.
- 2005: Samplitude version 8.0 was released.
- 2006: Samplitude 9.0 was presented with a de-esser, advanced dual CPU support, and VSTi manager.
- 2011: Samplitude Pro X with 64-bit system requirement. Since its release, the Pro X version has been further upgraded into Pro X2, Pro X3, Pro X4, Pro X5, Pro X6, and Pro X7.
The Difference Between Samplitude Pro X’s Three Versions
As presented above, the newest version of Samplitude is Pro X which offers three popular versions for purchase, each with its own unique set of specifications and features:
- Samplitude Pro X: This DAW version includes 47 virtual instruments and the main features.
- Samplitude Pro X Suite: This version comes with all the Samplitude Pro X7 features, a copy of the audio editor Sound Forge Pro 11 audio editor, a 70 GB soundset for independent instruments, and five additional VSTs.
- Samplitude Pro X365: A subscription-based version that includes all the Samplified Pro X7 features, a Spectra Layers Pro 5, and a visual, audio editor spectral analysis.
Part 2. MAGIX Samplitude Review
As we have mentioned in the beginning, MAGIX Samplitude is a perfect and great choice for both beginner and advanced users. Then what features make it?
Below we’ve provided a quick review of MAGIX Samplitude to give you a better idea of the software.
Price
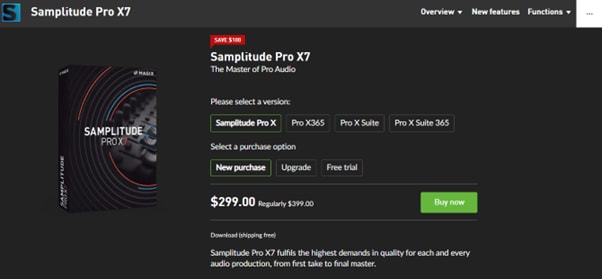
MAGIX Samplitude is available for purchase from the MAGIX website. The Pro X7 version costs $299.00 as a one-time purchase, the Pro X365 costs $14.99/month, and the Suite edition costs $419.00.
Features
- The Core Feature Set: MAGIX Samplitude Pro X7 features include up to 384kHz 32-bit recording, advanced MIDI editing, 999 tracks, virtual instrument support, ultra-low-latency recording, non-destructive audio editing, and 256 physical inputs.
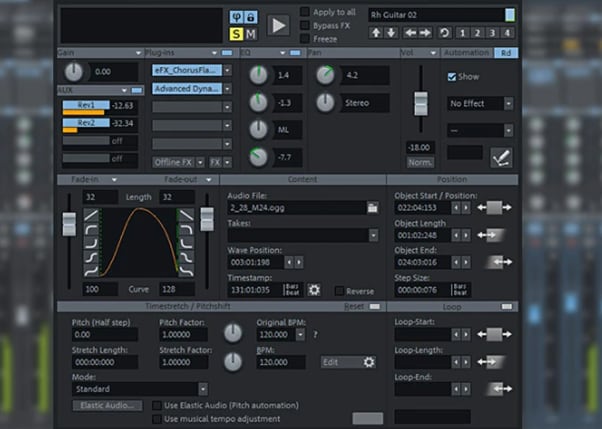
- The Object Editor: The Object Editor provides control over your plug-ins and can assign EQ and time/pitch settings to your clips to make the automation process easier. You can also easily cut and record your audio recordings.
- Amplitude Bundles Melodyne 4 Essential: Samplitude Pro X7 supports Melodyne 4 Essential with ARA technology that helps with pitch correction on a single track without sending it out and back in again.
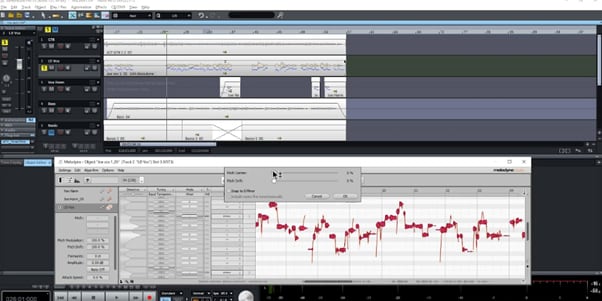
- Virtual Instruments: The software comes with 47 virtual instruments (both classic and modern), spurring musicians on to new ideas for creating ethereal musical sounds.
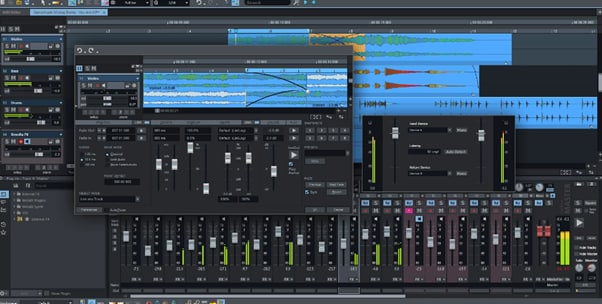
- The Mixer View: Samplitude offers a mixer view that appears in a separate window, making it easy to access the built-in parametric EQ and plug-ins.
- Vocal Recording Correction: The software offers the Vocal Tune 2 feature to quickly correct your voice recordings. Additionally, you can adjust your audio recordings in detail using the pitch curves and practical waveform display.
- A Faster Workflow With ARA2 Support: The new ARA2-compatible plug-ins allow you to edit audio files faster and more efficiently. You can create seamless clip borders, perform multiple tasks at the same time on different tracks, and work with the interface more intuitively.
Minimum System Requirements
To run MAGIX Samplitude smoothly, your computer must meet the following minimum system requirements:
- Windows: 8 or 10.
- Processor: Intel Dual-core processor with 1.5 GHz.
- RAM: 2 GB for 32-bit and 4 GB for 64-bit.
- Storage Space: 2 GB of free hard disk space.
- Sound Card: Must be compatible with ASIO.
- Graphic Card: Onboard, minimum 1280 x 768 resolution.
Review on the Third-Party Website
Samplitude has been well-received by critics on the platforms like PCMag, Softexia, and Top Ten Reviews, with many praising its ease of use, powerful features, and great sound quality.
However, the software has not received any ratings or scores on the G2, a well-known software review platform. This means the users have yet to review MAGIX Samplitude Pro X7 on this platform.
Part 3. Video - MAGIX Samplitude Pro X7, Testing the Features
To help you better understand the features of MAGIX Samplitude Pro X7, we prepared a video which tests the functions. You can watch it to better make the decision whether Samplitude Pro X7 worths your time and money.
https://www.youtube.com/watch?v=CxzjnWRvfrk
Conclusion
MAGIX Samplitude is advanced audio software with almost every element you can think of when it comes to editing music. All in all, the software has an impressive scope and can prove to be a versatile tool if you are a multi-instrument musician looking to produce your own music in various styles.
In this article, we’ve provided an in-depth review of MAGIX Samplitude Pro X7 to help you understand the program in detail. We discussed what the software is, its history, and the difference between its latest three versions.
Additionally, we explored the pricing plan of MAGIX Samplitude Pro X and its various features. We hope you found this review helpful in deciding whether or not to purchase this software.
Free Download For Win 7 or later(64-bit)
Free Download For macOS 10.14 or later
Free Download For macOS 10.14 or later
Reducing Noise With Audacity: Working Through The Details
Noise reduction is a global issue, and it is not going anywhere any soon. In such times, being a creator can be tough, as audiences prefer noise-free content. The presence of unnecessary noises diminishes the identity of content and its creator. To eliminate such sounds from your videos, developers launched noise reducers. Audacity removal noise is among those leading noise reducers with proficient features.
The key concept of this article is to remove background noise from audio in Audacity. Readers will find a detailed knowledge of reducing background noise Audacity. In addition, users will learn why removing noise is necessary and ways to avoid it. Moreover, we will discuss a valid and versatile alternative to it.
AI Vocal Remover A cross-platform for facilitating your video editing process by offering valuable benefits!
Free Download Free Download Learn More

Part 1: Why Is It Necessary to Get Rid of Background Noise in Videos and Audios?
You might wonder, if no one can avoid background noises, why remove them? However, there are many reasons why removing them is significant. Along with achieving high-quality videos, they have many advantages. This section of the Audacity noise cancellation article will discuss the reasons below:
1. Effective Communication
If you’re a creator, professional, or marketer, audience communication is important. Digital platforms have eased this through videos and online streamlining platforms. You bring clarity to your speech for effective communication via noise reduction. A video without distractions hooks the viewers to the screen, and they focus better.
2. Reflects Professionalism
Creators with international reach and vast audiences never compromise on audio quality. They post videos with zero background noises and audio enhancement effects. This is because such videos convey a professional brand or creator’s image. No one likes a video with distracting traffic noises, wind noises, and others.
3. High Production Value
Video without background noises builds a premium and consistent brand image. They convey a message that the brand cares for its audience’s preferences. In addition, the production of such videos speaks for itself. The stakeholders also invest in such brands that care for brand image.
4. Consistent Storytelling
With background noises out of the image, the storyline stays consistent. There are no unnecessary distractions that keep the audience off your videos. Those who create learning tutorials and explainer videos can benefit from this.
5. Audience Accessibility
When creating content, you should keep your horizons vast and diverse. There are people who cannot listen properly and use hearing aids. The removal of background noises makes content accessible for those with disabilities. In addition, some people prefer to watch movies and videos without captions. Background noises will force them to stick to subtitles, which can be a turn-off.
Part 2: How to Remove Background Noise Using Audacity? A Step-by-Step Guide
Audacity is an editing tool for enhancing audio with its advanced functionalities. This is a professional-grade tool that can cut, trim, copy, and mix audio. In addition, you can record audio through a microphone and other sources. With the Audacity denoise feature , you can remove unwanted noises from your videos. It assists in removing background noises, echoes, and other forms of noise through it.
Steps to Remove Background Noises in Audacity
In this section, you can learn to employ Audacity’s noise remover function. Read the following guide to Audacity filter background noise here:
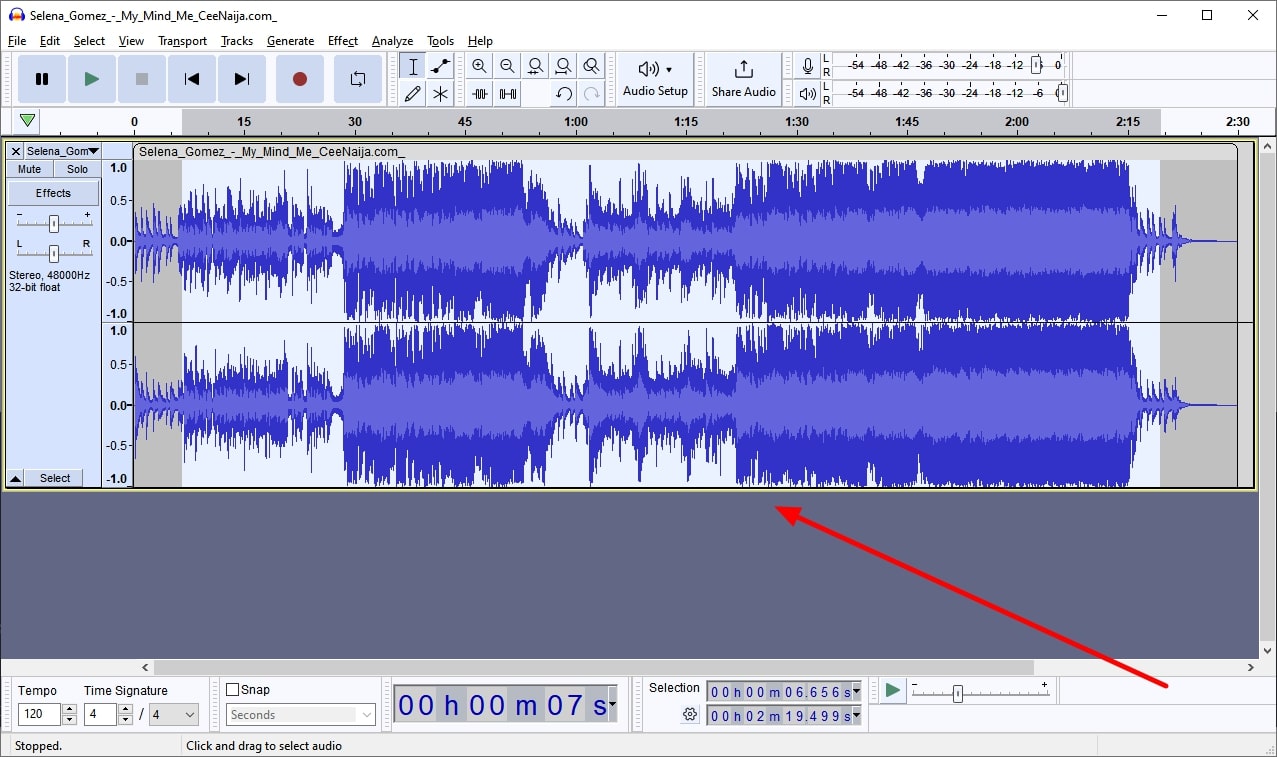
Step 1
Once you import and bring media into Audacity’s timeline, select it.
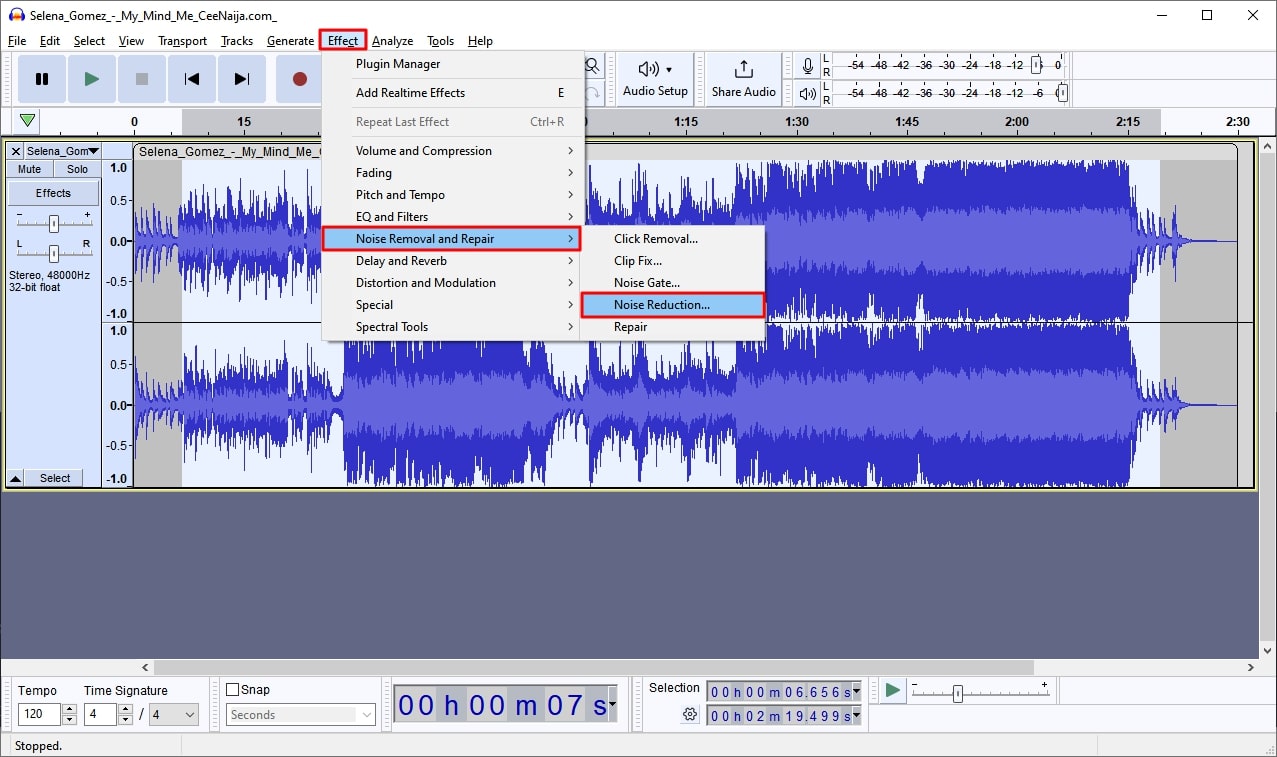
Step 2
Further, navigate towards the upper toolbar and locate the “Effect” tab. From the Effects dropdown menu, continue to “Noise Removal and Repair” and select the “Noise Reduction” option.
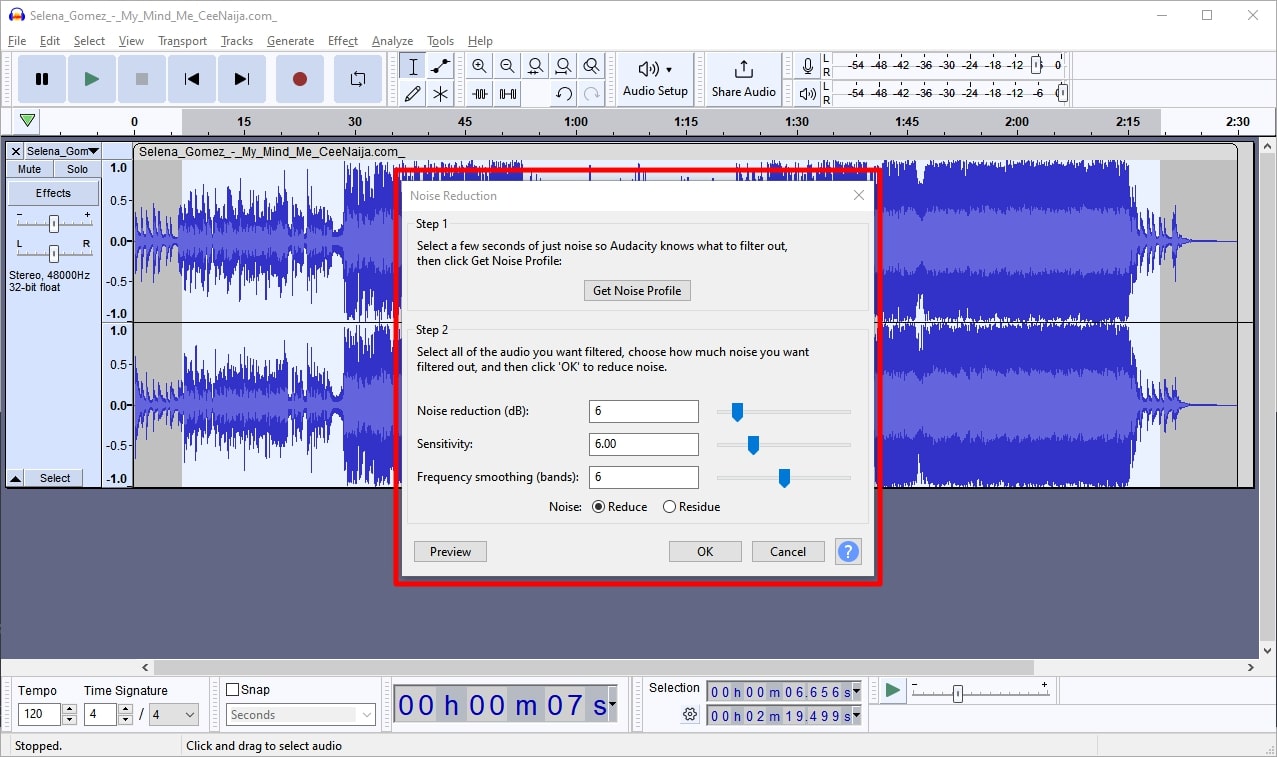
Step 3
A “Noise Reduction” window will appear on the screen. From there, click the “Get Noise Profile,” adjust the slider value, and press “OK.”
Step 4
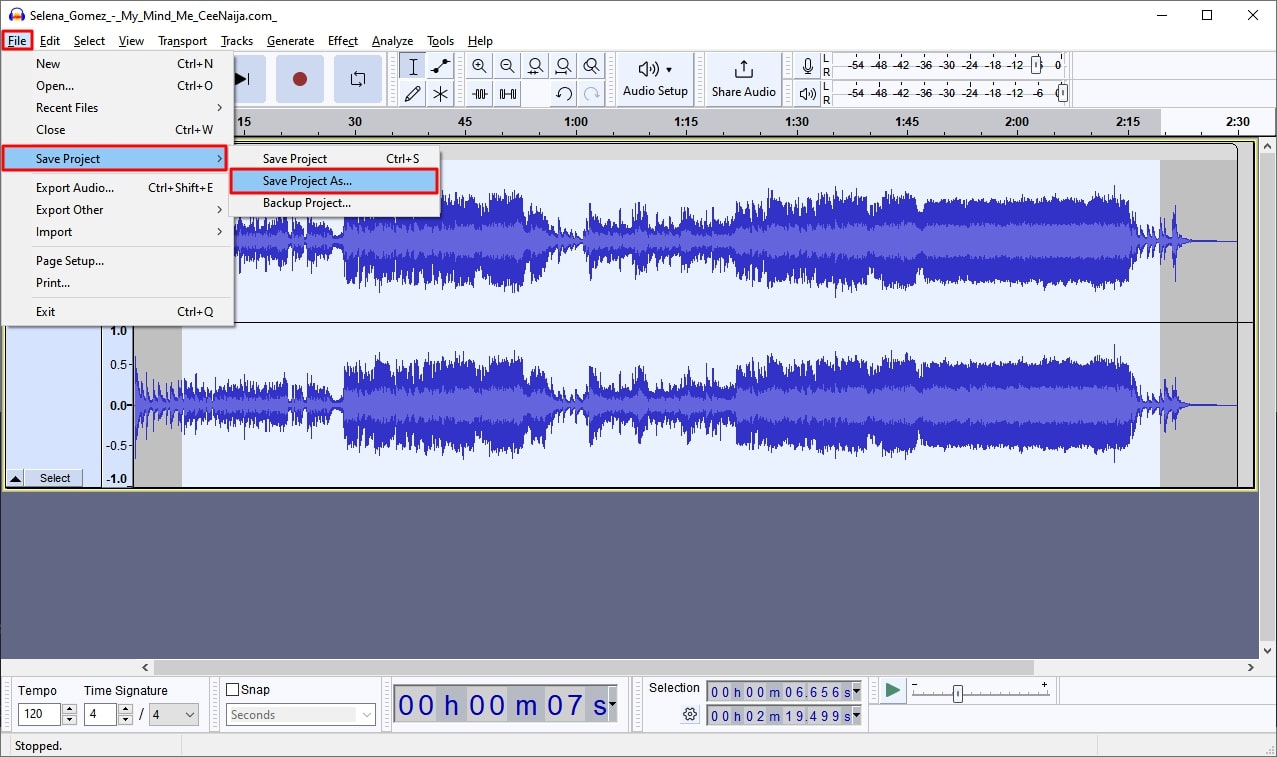
Afterwards, Audacity will store the noise reduction settings, and you can access it. Then, go to the “File” tab and click “Save Project” to save it on your device.
Part 3: Ways to Prevent Background Noise While Recording Audios or Videos
Editors like Audacity background noise removers help in achieving content perfection. In addition to these tools, creators can take some steps prior to recording. These will help them avoid maximum noise distractions before editing. It will also help the tool in generating efficient results and maximum productivity. This section will elaborate on the ways of preventing background noises:
1. Selecting a Quiet Environment
Before creating videos, ensure that there is minimum sound in the surroundings. Don’t shoot in areas with heavy traffic or heavy machine sounds. Choose peaceful places that can add to your video’s audio as well as visual quality.
2. Setting a Qualitied Microphone
When it comes to recording, quality equipment plays a crucial role in its quality. Make sure that the microphone is of a reliable company. In addition, position the microphone closer to your lips for clear audio. This will help in capturing high-quality audio signals and reduce background noise.
3. Acoustic Set-Up
If you want to record professional-grade videos, you can also build an artificial environment. Users can achieve such an environment via soundproofing the recording room. This will make audio free of outside distractions and reverbs echo.
4. Disable Noisy or Electrical Machinery
Another way of reducing sound is to minimize the presence of noisy tech in the surroundings. This includes turning off any electrical equipment near the recorder. Machinery like refrigerators, fans, and air conditioners. This is because sometimes the human ear cannot detect a sound, but microphones can.
5. Track and Maintain Audio Levels
This is a post-editing technique that involves the use of statistics to maintain audio. Many editing or recording tools feature audio levels. This will help in monitoring any high or low frequencies in videos. Later, they can manage noise by observing the audio levels.
Bonus Part: Make Audio Editing Easy with Best-in-Class Audio Management Functionality - Wondershare Filmora
No doubt, the Audacity denoise feature is available for use, but it is difficult to access. Someone with primary editing skills cannot operate this software. Hence, we recommend Wondershare Filmora for denoising audio and elevating content. You can employ two of its features to remove background noises. With its Audio Denoise feature, you can decrease various types of noise.
It can assist in audio enhancement and denoising wind noise, echoes, and hums. With its AI Vocal Remover feature, you can separate vocals from background noise. Both these features use AI technology to improve audio accuracy. Hence, it is your perfect replacement for Audacity background noise.
Prominent Audio Editing Features of Wondershare Filmora
Along with denoise and vocal remover, this Audacity denoise alternative has more. With its AI audio editing features, users can uplift other aspects of their audio. In this section, we’ll discuss some exclusive audio editing features of Filmora:
- AI Audio Stretch: When it comes to aligning audio with video duration, you can employ audio stretch. This feature uses drag and adjusts techniques to match audio and video. You can apply stunning audio effects or music without worrying about duration.
- Silence Detection: With its silence detection AI, you don’t need to worry about silent pauses. It can analyze and eliminate the seconds without any speech duration. This will remove unnecessary minutes or seconds from your videos.
- Audio Ducking: Lowering the audio levels of one track while increasing the other is complex. However, this feature eases the process for you without any technicalities. It can auto-detect when someone is speaking and lowers the music levels.
- Audio Visualizer: Adding audio effects to music videos enhances their visuals. With Filmora’s audio visualizer, you can do this as well. You can find diverse audio effects with a range of colors and styles. They align with the beat of your audio and uplift the visuals.
Free Download For Win 7 or later(64-bit)
Free Download For macOS 10.14 or later
Conclusion
In conclusion, let’s review everything we have discussed in the article. Users have unlocked the knowledge of Audacity remove noise feature. In addition, the tool mentioned the significance and ways of noise reduction. We recommend Wondershare Filmora as an alternative solution to Audacity denoise. It has other audio editing features that can enhance your video and audio quality.
Free Download Free Download Learn More

Part 1: Why Is It Necessary to Get Rid of Background Noise in Videos and Audios?
You might wonder, if no one can avoid background noises, why remove them? However, there are many reasons why removing them is significant. Along with achieving high-quality videos, they have many advantages. This section of the Audacity noise cancellation article will discuss the reasons below:
1. Effective Communication
If you’re a creator, professional, or marketer, audience communication is important. Digital platforms have eased this through videos and online streamlining platforms. You bring clarity to your speech for effective communication via noise reduction. A video without distractions hooks the viewers to the screen, and they focus better.
2. Reflects Professionalism
Creators with international reach and vast audiences never compromise on audio quality. They post videos with zero background noises and audio enhancement effects. This is because such videos convey a professional brand or creator’s image. No one likes a video with distracting traffic noises, wind noises, and others.
3. High Production Value
Video without background noises builds a premium and consistent brand image. They convey a message that the brand cares for its audience’s preferences. In addition, the production of such videos speaks for itself. The stakeholders also invest in such brands that care for brand image.
4. Consistent Storytelling
With background noises out of the image, the storyline stays consistent. There are no unnecessary distractions that keep the audience off your videos. Those who create learning tutorials and explainer videos can benefit from this.
5. Audience Accessibility
When creating content, you should keep your horizons vast and diverse. There are people who cannot listen properly and use hearing aids. The removal of background noises makes content accessible for those with disabilities. In addition, some people prefer to watch movies and videos without captions. Background noises will force them to stick to subtitles, which can be a turn-off.
Part 2: How to Remove Background Noise Using Audacity? A Step-by-Step Guide
Audacity is an editing tool for enhancing audio with its advanced functionalities. This is a professional-grade tool that can cut, trim, copy, and mix audio. In addition, you can record audio through a microphone and other sources. With the Audacity denoise feature , you can remove unwanted noises from your videos. It assists in removing background noises, echoes, and other forms of noise through it.
Steps to Remove Background Noises in Audacity
In this section, you can learn to employ Audacity’s noise remover function. Read the following guide to Audacity filter background noise here:
Step 1
Once you import and bring media into Audacity’s timeline, select it.

Step 2
Further, navigate towards the upper toolbar and locate the “Effect” tab. From the Effects dropdown menu, continue to “Noise Removal and Repair” and select the “Noise Reduction” option.

Step 3
A “Noise Reduction” window will appear on the screen. From there, click the “Get Noise Profile,” adjust the slider value, and press “OK.”

Step 4
Afterwards, Audacity will store the noise reduction settings, and you can access it. Then, go to the “File” tab and click “Save Project” to save it on your device.

Part 3: Ways to Prevent Background Noise While Recording Audios or Videos
Editors like Audacity background noise removers help in achieving content perfection. In addition to these tools, creators can take some steps prior to recording. These will help them avoid maximum noise distractions before editing. It will also help the tool in generating efficient results and maximum productivity. This section will elaborate on the ways of preventing background noises:
1. Selecting a Quiet Environment
Before creating videos, ensure that there is minimum sound in the surroundings. Don’t shoot in areas with heavy traffic or heavy machine sounds. Choose peaceful places that can add to your video’s audio as well as visual quality.
2. Setting a Qualitied Microphone
When it comes to recording, quality equipment plays a crucial role in its quality. Make sure that the microphone is of a reliable company. In addition, position the microphone closer to your lips for clear audio. This will help in capturing high-quality audio signals and reduce background noise.
3. Acoustic Set-Up
If you want to record professional-grade videos, you can also build an artificial environment. Users can achieve such an environment via soundproofing the recording room. This will make audio free of outside distractions and reverbs echo.
4. Disable Noisy or Electrical Machinery
Another way of reducing sound is to minimize the presence of noisy tech in the surroundings. This includes turning off any electrical equipment near the recorder. Machinery like refrigerators, fans, and air conditioners. This is because sometimes the human ear cannot detect a sound, but microphones can.
5. Track and Maintain Audio Levels
This is a post-editing technique that involves the use of statistics to maintain audio. Many editing or recording tools feature audio levels. This will help in monitoring any high or low frequencies in videos. Later, they can manage noise by observing the audio levels.
Bonus Part: Make Audio Editing Easy with Best-in-Class Audio Management Functionality - Wondershare Filmora
No doubt, the Audacity denoise feature is available for use, but it is difficult to access. Someone with primary editing skills cannot operate this software. Hence, we recommend Wondershare Filmora for denoising audio and elevating content. You can employ two of its features to remove background noises. With its Audio Denoise feature, you can decrease various types of noise.
It can assist in audio enhancement and denoising wind noise, echoes, and hums. With its AI Vocal Remover feature, you can separate vocals from background noise. Both these features use AI technology to improve audio accuracy. Hence, it is your perfect replacement for Audacity background noise.
Prominent Audio Editing Features of Wondershare Filmora
Along with denoise and vocal remover, this Audacity denoise alternative has more. With its AI audio editing features, users can uplift other aspects of their audio. In this section, we’ll discuss some exclusive audio editing features of Filmora:
- AI Audio Stretch: When it comes to aligning audio with video duration, you can employ audio stretch. This feature uses drag and adjusts techniques to match audio and video. You can apply stunning audio effects or music without worrying about duration.
- Silence Detection: With its silence detection AI, you don’t need to worry about silent pauses. It can analyze and eliminate the seconds without any speech duration. This will remove unnecessary minutes or seconds from your videos.
- Audio Ducking: Lowering the audio levels of one track while increasing the other is complex. However, this feature eases the process for you without any technicalities. It can auto-detect when someone is speaking and lowers the music levels.
- Audio Visualizer: Adding audio effects to music videos enhances their visuals. With Filmora’s audio visualizer, you can do this as well. You can find diverse audio effects with a range of colors and styles. They align with the beat of your audio and uplift the visuals.
Free Download For Win 7 or later(64-bit)
Free Download For macOS 10.14 or later
Conclusion
In conclusion, let’s review everything we have discussed in the article. Users have unlocked the knowledge of Audacity remove noise feature. In addition, the tool mentioned the significance and ways of noise reduction. We recommend Wondershare Filmora as an alternative solution to Audacity denoise. It has other audio editing features that can enhance your video and audio quality.
“Breaking Down MP4s: Removing Sound Tracks and Silence”
While editing an MP4 (MPEG/MPG) clip, we may want to remove audio from the MP4 file completely instead of muting the audio and getting only the video stream as an output.
Sometimes we may want to remove audio from the original file and add a new sound tracker.
To help finish this task, Wondershare Filmora is the right choice. With it, you can either delete all audio tracks completely from MP4 to get the video with no audio in it at all. Or remove an extra audio track and only keep the one you like.
The following article will introduce a simple way of removing audio from video in whatever situation.
MP4 Audio Remover - Wondershare Filmora
Why Choose Wondershare Filmora
- Completely remove the audio from video to keep video-only stream;
- Or mute the audio of the video;
- Easily trim/crop/rotate video files on the timeline;
- Add effect/subtitle/watermark to enrich your video;
- Save and play your video on different devices, burn to DVD or upload online;
- Supported OS: Windows & Mac (above 10.11).
For Win 7 or later (64-bit)
For macOS 10.12 or later
Step 1: Import your MP4 file
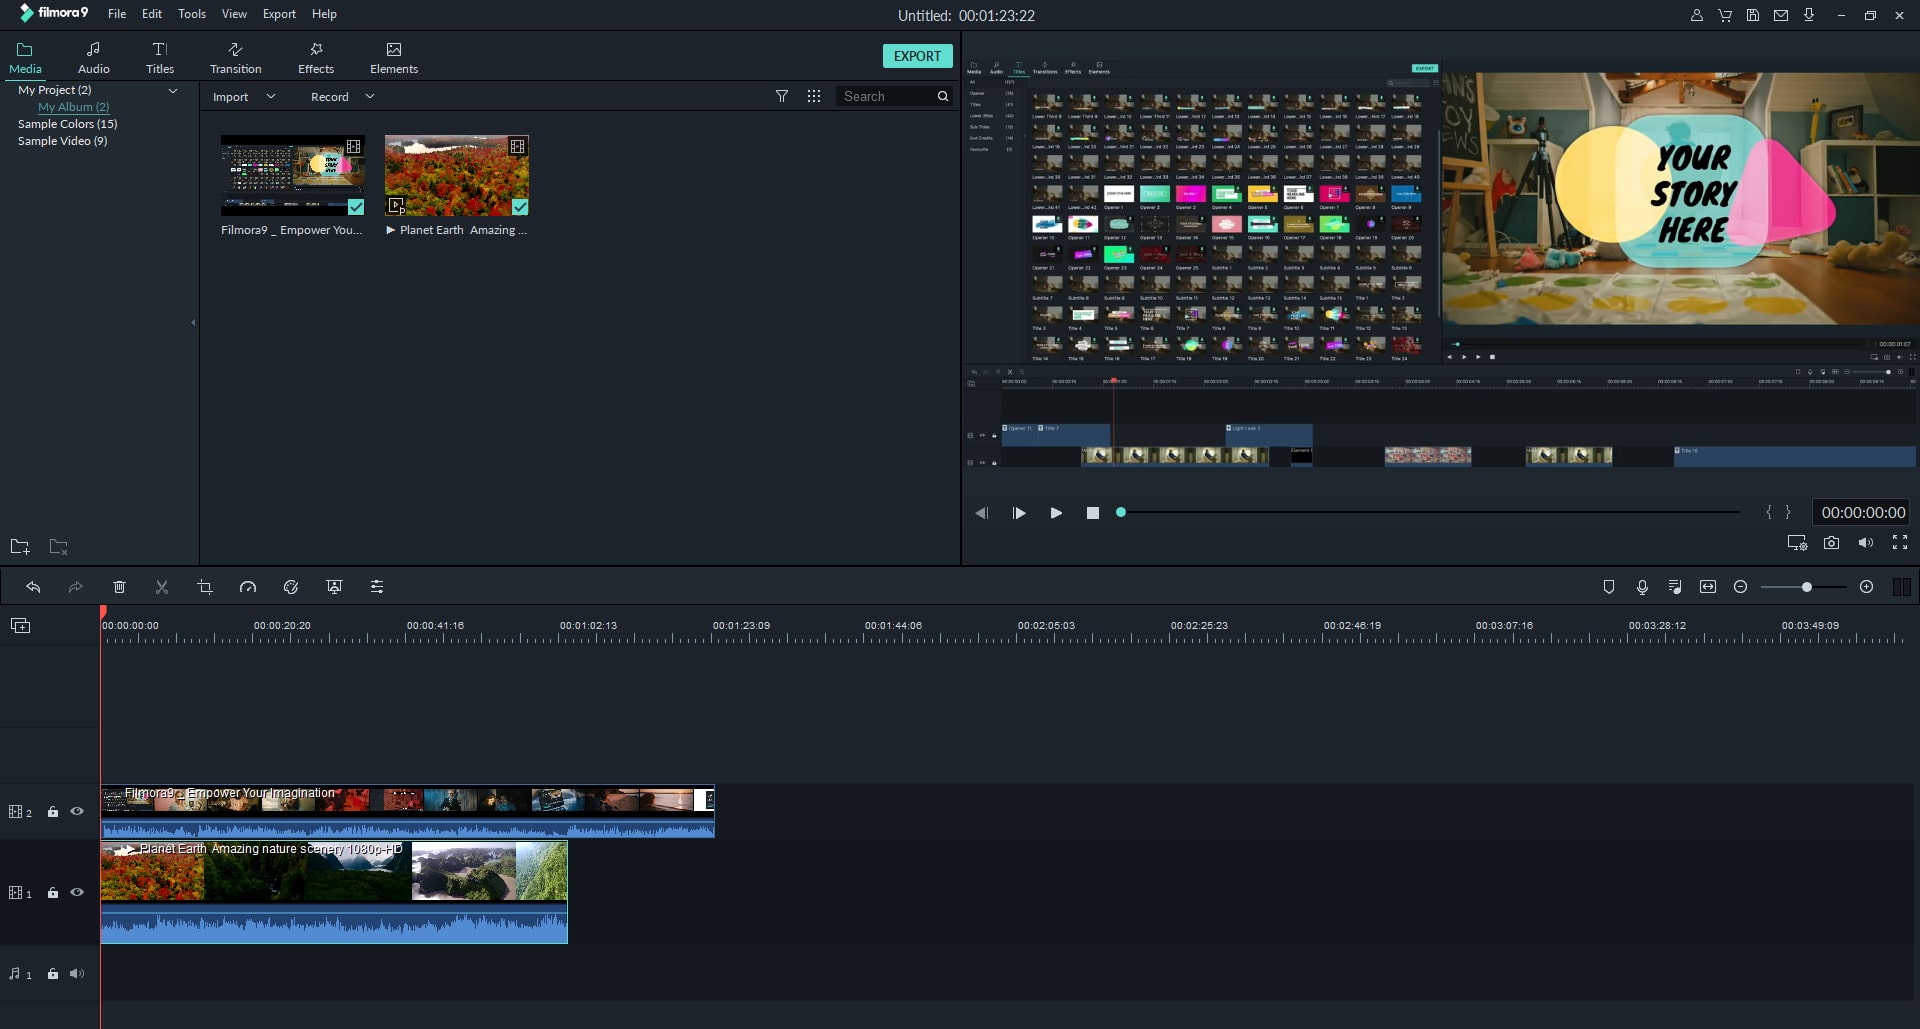
Free download the audio track remover- Video Editor, install, and run it. Then the following interface will pop up. Click the “Import” button to add the video file you want to remove audio tracks.
Step 2: Remove audio from the file
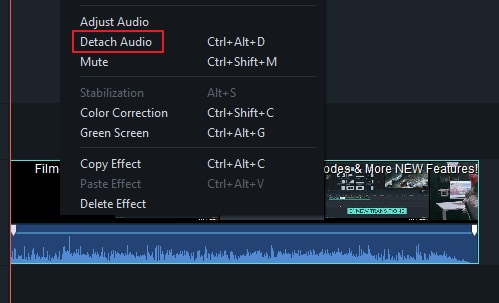
Drag-n-drop the mp4 file to the timeline, right-click and choose “Detach Audio” to detach the audio tracks from the original mp4 file. Then the separated audio track will appear in the Audio Timeline. You can right-click the audio and choose “Delete” to remove audio from mp4.
Note: if you want to add the new sound tracker, import the sound recordings you want to the media library and drag them to the audio timeline.
Step 3: Save the edited video
After that, hit “Export” to select the desired output way. You can set the output video format the same as the original one or set the output video format to any other video formats. Then click the “Export” button to export the video. What’s more, you can save the edited file to iPhone, iPad PSP, etc., or directly upload it to YouTube for sharing with friends.

Bonus: Mute a Video with Filmora Video Editor with 1-click
Sometimes, you might wish to mute a video clip for many reasons, then the Filmora Video Editor, as the best MP4 Audio Extractor or Editor will help you do it with 1 simple click.
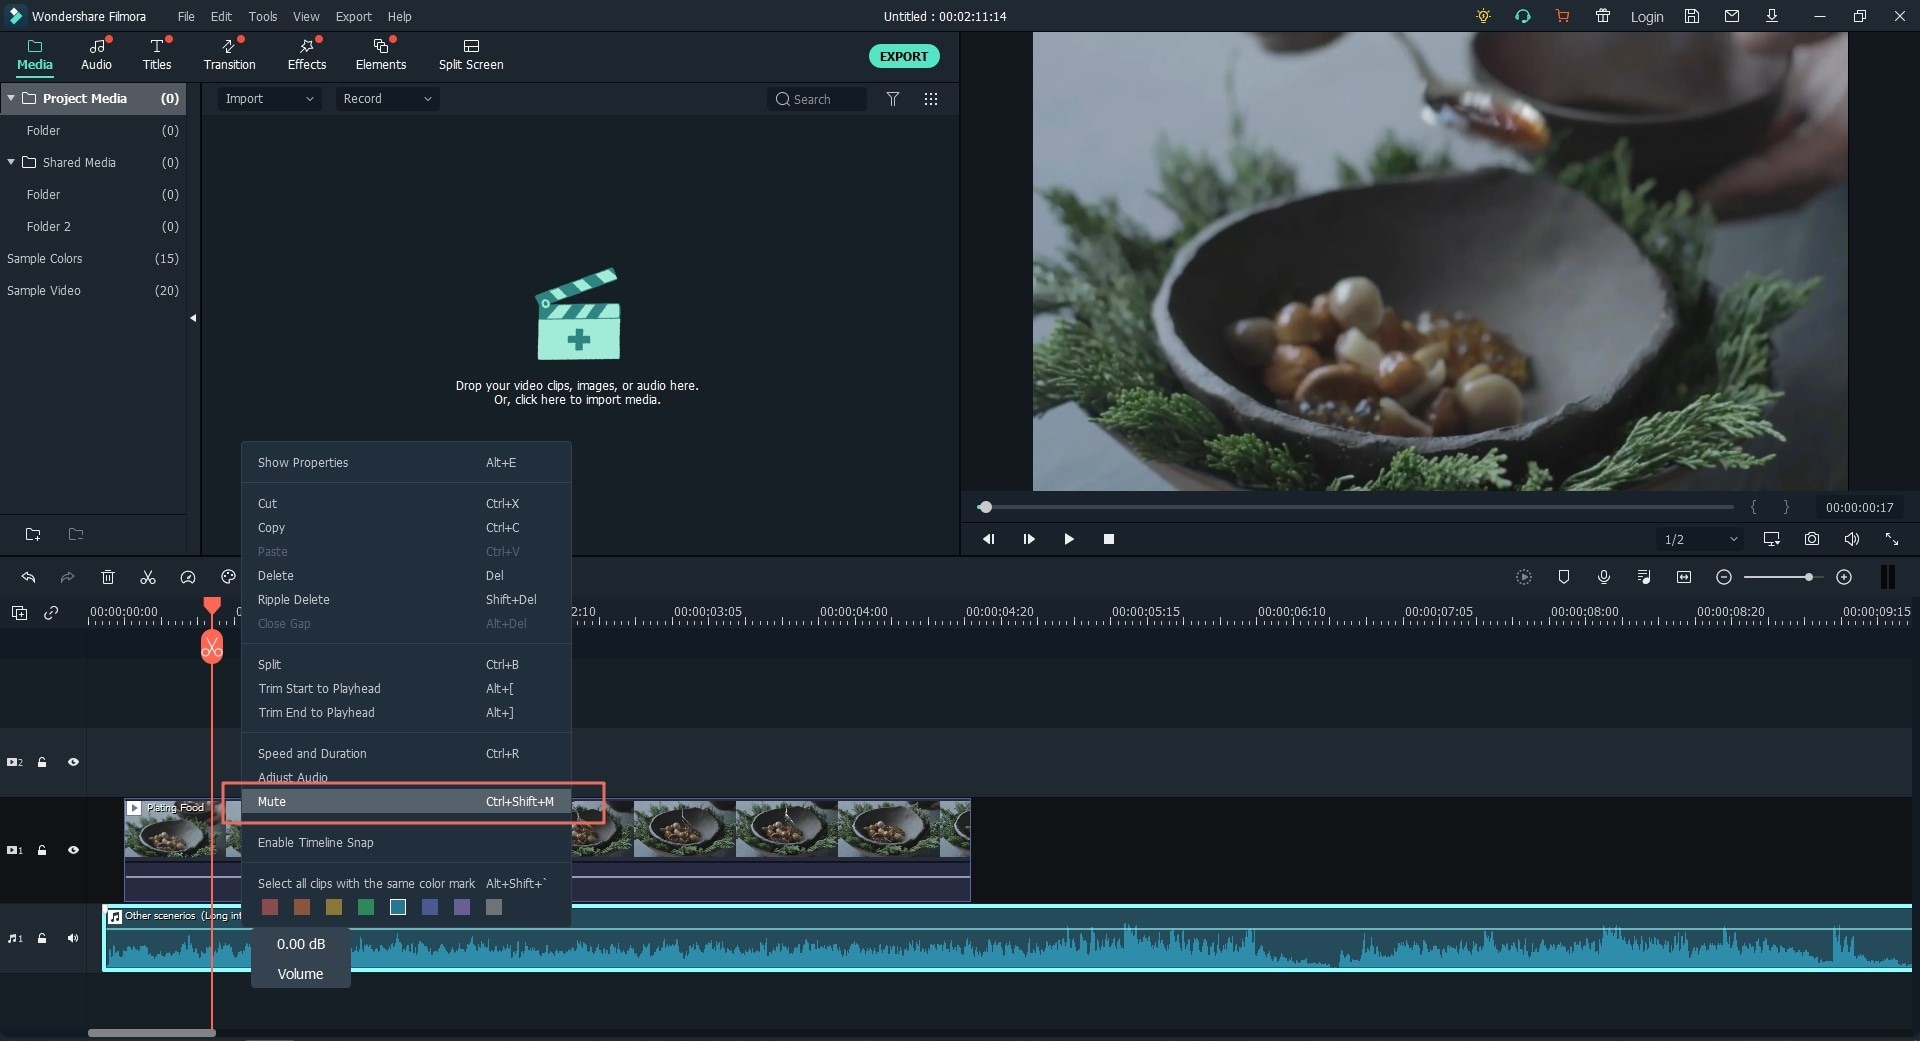
To reach it, you only need to drag and drop your targeted MP4 video into the timeline, and then, right-click on it and choose “Mute“ option. Then, click “Export” to export and save the edited videos.
Conclusion
Now, it’s your turn to have a try. Above are the steps to remove audio from video. Leave a comment to let us know if you have any questions.
Versatile Video Editor - Wondershare Filmora
An easy yet powerful editor
Numerous effects to choose from
Detailed tutorials provided by the official channel
For Win 7 or later (64-bit)
For macOS 10.12 or later
Step 1: Import your MP4 file
Free download the audio track remover- Video Editor, install, and run it. Then the following interface will pop up. Click the “Import” button to add the video file you want to remove audio tracks.

Step 2: Remove audio from the file
Drag-n-drop the mp4 file to the timeline, right-click and choose “Detach Audio” to detach the audio tracks from the original mp4 file. Then the separated audio track will appear in the Audio Timeline. You can right-click the audio and choose “Delete” to remove audio from mp4.
Note: if you want to add the new sound tracker, import the sound recordings you want to the media library and drag them to the audio timeline.

Step 3: Save the edited video
After that, hit “Export” to select the desired output way. You can set the output video format the same as the original one or set the output video format to any other video formats. Then click the “Export” button to export the video. What’s more, you can save the edited file to iPhone, iPad PSP, etc., or directly upload it to YouTube for sharing with friends.

Bonus: Mute a Video with Filmora Video Editor with 1-click
Sometimes, you might wish to mute a video clip for many reasons, then the Filmora Video Editor, as the best MP4 Audio Extractor or Editor will help you do it with 1 simple click.
To reach it, you only need to drag and drop your targeted MP4 video into the timeline, and then, right-click on it and choose “Mute“ option. Then, click “Export” to export and save the edited videos.

Conclusion
Now, it’s your turn to have a try. Above are the steps to remove audio from video. Leave a comment to let us know if you have any questions.
Versatile Video Editor - Wondershare Filmora
An easy yet powerful editor
Numerous effects to choose from
Detailed tutorials provided by the official channel
For Win 7 or later (64-bit)
For macOS 10.12 or later
Step 1: Import your MP4 file
Free download the audio track remover- Video Editor, install, and run it. Then the following interface will pop up. Click the “Import” button to add the video file you want to remove audio tracks.

Step 2: Remove audio from the file
Drag-n-drop the mp4 file to the timeline, right-click and choose “Detach Audio” to detach the audio tracks from the original mp4 file. Then the separated audio track will appear in the Audio Timeline. You can right-click the audio and choose “Delete” to remove audio from mp4.
Note: if you want to add the new sound tracker, import the sound recordings you want to the media library and drag them to the audio timeline.

Step 3: Save the edited video
After that, hit “Export” to select the desired output way. You can set the output video format the same as the original one or set the output video format to any other video formats. Then click the “Export” button to export the video. What’s more, you can save the edited file to iPhone, iPad PSP, etc., or directly upload it to YouTube for sharing with friends.

Bonus: Mute a Video with Filmora Video Editor with 1-click
Sometimes, you might wish to mute a video clip for many reasons, then the Filmora Video Editor, as the best MP4 Audio Extractor or Editor will help you do it with 1 simple click.
To reach it, you only need to drag and drop your targeted MP4 video into the timeline, and then, right-click on it and choose “Mute“ option. Then, click “Export” to export and save the edited videos.

Conclusion
Now, it’s your turn to have a try. Above are the steps to remove audio from video. Leave a comment to let us know if you have any questions.
Versatile Video Editor - Wondershare Filmora
An easy yet powerful editor
Numerous effects to choose from
Detailed tutorials provided by the official channel
For Win 7 or later (64-bit)
For macOS 10.12 or later
Step 1: Import your MP4 file
Free download the audio track remover- Video Editor, install, and run it. Then the following interface will pop up. Click the “Import” button to add the video file you want to remove audio tracks.

Step 2: Remove audio from the file
Drag-n-drop the mp4 file to the timeline, right-click and choose “Detach Audio” to detach the audio tracks from the original mp4 file. Then the separated audio track will appear in the Audio Timeline. You can right-click the audio and choose “Delete” to remove audio from mp4.
Note: if you want to add the new sound tracker, import the sound recordings you want to the media library and drag them to the audio timeline.

Step 3: Save the edited video
After that, hit “Export” to select the desired output way. You can set the output video format the same as the original one or set the output video format to any other video formats. Then click the “Export” button to export the video. What’s more, you can save the edited file to iPhone, iPad PSP, etc., or directly upload it to YouTube for sharing with friends.

Bonus: Mute a Video with Filmora Video Editor with 1-click
Sometimes, you might wish to mute a video clip for many reasons, then the Filmora Video Editor, as the best MP4 Audio Extractor or Editor will help you do it with 1 simple click.
To reach it, you only need to drag and drop your targeted MP4 video into the timeline, and then, right-click on it and choose “Mute“ option. Then, click “Export” to export and save the edited videos.

Conclusion
Now, it’s your turn to have a try. Above are the steps to remove audio from video. Leave a comment to let us know if you have any questions.
Versatile Video Editor - Wondershare Filmora
An easy yet powerful editor
Numerous effects to choose from
Detailed tutorials provided by the official channel
Also read:
- [New] Prime Practices for Streaming Live Cricket Events
- [New] Rendering Reality Realistic 3D Text Effects for 2024
- 3uTools Virtual Location Not Working On Vivo Y200? Fix Now | Dr.fone
- Beyond the Screen: The Value of Game Possessions
- Bluetooth Woes Solved: Making Sure Your Paired Gadgets Connect Properly on Windows 11
- In 2024, 6 Proven Ways to Unlock Xiaomi Redmi Note 13 Pro+ 5G Phone When You Forget the Password
- New DuoSync Advanced Auditory Coordination Toolkit for Premiere Pro Professionals for 2024
- The way to get back lost data from ROG Phone 7
- Updated 2024 Approved Explore Our Top 8 Selection of Aural Designs for Cutting-Edge Video Sound Integration
- Updated 2024 Approved Unveiling 10 Innovative Audio Processing Platforms for Scalable Performance
- Updated Best MPA to MP3 Converter Convert MPA Audio Files to MP3 for Free for 2024
- Updated How to Add Music to Final Cut Pro?
- Updated How To Replace the Audio Track in a Video Step by Step for 2024
- Updated In 2024, How to Fade Music and Audio in iMovie on Mac?
- Updated In 2024, Ultimate Audio Cleaner for Videos Windows & Mac Edition
- Updated Leading Voice Modification Tools at Zero Cost An In-Depth Filmora Video Voice Editing Handbook
- Virtual Wellness at Your Fingertips with Top 5 Bot Apps
- Title: In 2024, Comparative Analysis of MAGIX Samplitude with Other Audio Workstations
- Author: David
- Created at : 2024-09-29 06:30:45
- Updated at : 2024-10-05 22:31:09
- Link: https://sound-tweaking.techidaily.com/in-2024-comparative-analysis-of-magix-samplitude-with-other-audio-workstations/
- License: This work is licensed under CC BY-NC-SA 4.0.